Tag: lxc

  • Proxmox LXC container docker not working

    Proxmox LXC container docker not working

    On a Proxmox server, LXC container failed to run docker. When I start a docker container, I get the following errors.

    root@erpdo:~# docker run hello-world
    Unable to find image 'hello-world:latest' locally
    latest: Pulling from library/hello-world
    2db29710123e: Pull complete 
    Digest: sha256:2498fce14358aa50ead0cc6c19990fc6ff866ce72aeb5546e1d59caac3d0d60f
    Status: Downloaded newer image for hello-world:latest
    docker: Error response from daemon: failed to create shim: OCI runtime create failed: container_linux.go:380: starting container process caused: process_linux.go:545: container init caused: rootfs_linux.go:76: mounting "proc" to rootfs at "/proc" caused: mount through procfd: permission denied: unknown.
    root@erpdo:~#
    

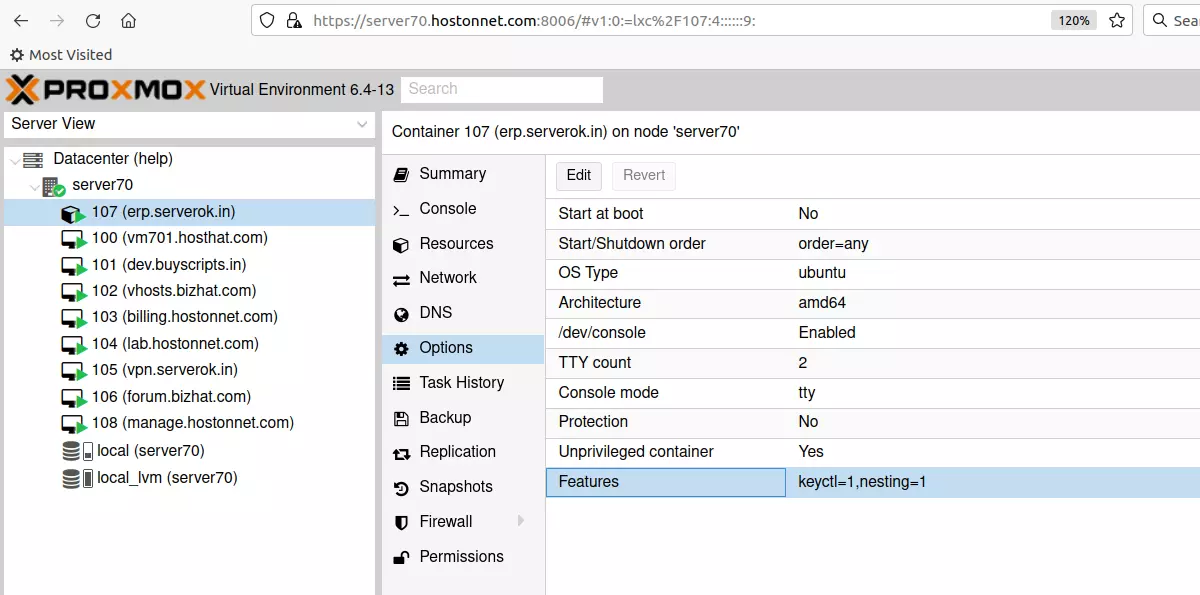
    To fix the error, in proxmox, click on the container, then go to Options.

    proxmox container options

    Proxmox > Container Name > Options > Features
    

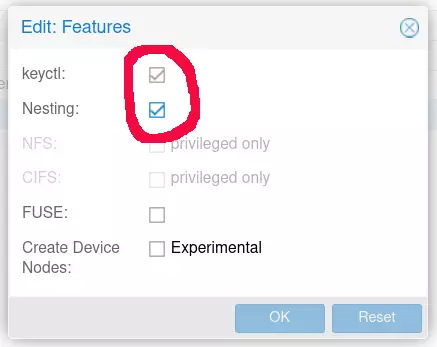
    Click on Features, then click edit. You will see a popup like

    proxmox edit container features

    On this screen, enable the following 2 options

    keyctl
    Nesting
    

    Stop and start the container. After this, the docker container will work inside the LXC container in proxmox server.

  • Static IP for CentOS LXC container

    Static IP for CentOS LXC container

    LXC containers get dynamic IP from DHCP. When you stop and start a container, its IP gets changed. If you hosting some web application on this container, you need to point the application to new IP. To avoid this, you can configure static IP on the container.

    LXC containers get IP in the range 10.0.3.2-255. To make CentOS container IP static, edit file

    vi /etc/sysconfig/network-scripts/ifcfg-eth0 
    

    Find

    BOOTPROTO=dhcp
    

    Replace with

    BOOTPROTO=STATIC
    

    Add below

    IPADDR=10.0.3.2
    GATEWAY=10.0.3.1
    DNS1=1.1.1.1
    DNS1=8.8.8.8
    

    10.0.3.2 = replace with any unused IP in the range your LXC container assign using DHCP.

    Create a static route file

    vi /etc/sysconfig/network-scripts/route-eth0
    

    Add

    10.0.3.1 dev eth0
    default via 10.0.3.1 dev eth0
    

    After restarting the LXC container, you will have a fixed IP.

    reboot
    
  • Where LXC Container files are stored?

    Where LXC Container files are stored?

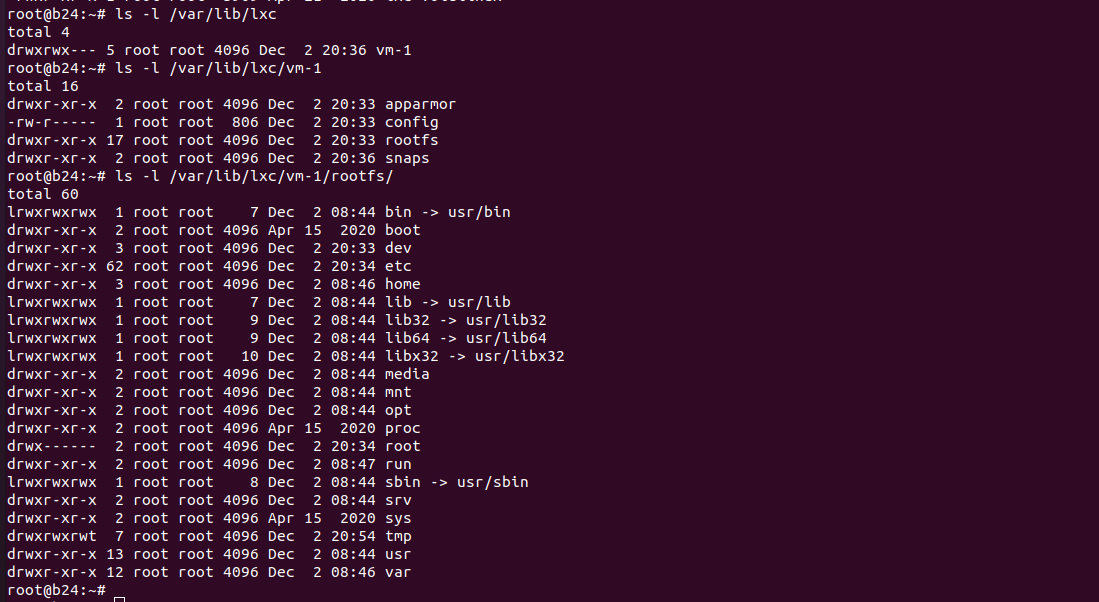
    LXC containers are stored in folder /var/lib/lxc

    lxd directory

    Each container have a folder, which contains

    /var/lib/lxc/VM_NAME_HERE/config = configuration file
    /var/lib/lxc/VM_NAME_HERE/rootfs = file system used by lxc container.
    

    LXC container OS templates are stored in

    /usr/share/lxc/templates
    

    See LXC

  • LXC container networking not working

    LXC container networking not working

    On a Debian server, I installed lxc, but when I create a container, it is missing IP address. When I did “lxc-attack VM_NAME”, and checked the network interface with “ip link” command, i can only see the loopback interface “lo”.

    On Host machine, when I checked network interfaces, lxcbr0 was missing. To fix this, edit file

    vi /etc/default/lxc 
    

    Find

    USE_LXC_BRIDGE="false"
    

    Replace with

    USE_LXC_BRIDGE="true"
    

    Now restart lxc-net service

    systemctl restart lxc-net
    

    At this point, you will see the network interface “lxcbr0”.

    root@b24:~# brctl show
    bridge name	bridge id		STP enabled	interfaces
    br-52702762660a		8000.024201845e4b	no		
    docker0		8000.0242ee9122d8	no		
    lxcbr0		8000.00163e000000	no		vethDED0EK
    lxdbr0		8000.00163e7d81a2	no		
    root@b24:~#
    

    Next edit file

    vi /etc/lxc/default.conf
    

    I had the following content in this file

    root@b24:/etc/lxc# cat default.conf
    lxc.net.0.type = empty
    lxc.apparmor.profile = generated
    lxc.apparmor.allow_nesting = 1
    root@b24:/etc/lxc#

    Find

    lxc.net.0.type = empty
    

    Replace with

    lxc.net.0.type = veth
    lxc.net.0.link = lxcbr0
    lxc.net.0.flags = up
    

    After this is done, newly created LXC containers get IP addresses.

    root@b24:~# lxc-ls -f
    NAME STATE   AUTOSTART GROUPS IPV4       IPV6 UNPRIVILEGED 
    vm-1 RUNNING 0         -      10.0.3.128 -    false        
    root@b24:~# 
    

    See LXC

  • lxc error Unable to fetch GPG key from keyserver

    lxc error Unable to fetch GPG key from keyserver

    When i create an lxc container on the Ubuntu server, I get an error

    root@instance-20210627-0830:~# lxc-create -t download -n ok
    Setting up the GPG keyring
    ERROR: Unable to fetch GPG key from keyserver
    lxc-create: ok: lxccontainer.c: create_run_template: 1616 Failed to create container from template
    lxc-create: ok: tools/lxc_create.c: main: 319 Failed to create container ok
    root@instance-20210627-0830:~#
    

    To fix this, you can run

    export DOWNLOAD_KEYSERVER="keyserver.ubuntu.com"
    

    To make it permanent, add it to .bashrc

    vi ~/.bashrc
    

    At the end of the file, add

    export DOWNLOAD_KEYSERVER="keyserver.ubuntu.com"
    

    Method 2

    You can specify DOWNLOAD_KEYSERVER environment variable for the command with

    DOWNLOAD_KEYSERVER="keyserver.ubuntu.com" lxc-create -t download -n mycontainer -- -d ubuntu -r focal -a amd64
    

    Method 3

    Use –keyserver command line argument

    lxc-create -t download -n mycontainer -- -d ubuntu -r focal -a amd64 --keyserver hkp://keyserver.ubuntu.com
    

    See lxc

  • Copy a file from host into LXD container

    To copy file from host machine to LXD container run

    lxc file push FILE_NAME CONTAINER_NAME/FOLDER/

    Example

    lxc file push ant-media-server-enterprise-2.2.1-20201029_2042.zip centos8/root/
    lxc file copy

    To copy a file from the host machine to an lxd container, run

    lxc file push FILE_NAME CONTAINER_NAME/path/to/folder/
    copy file to lxd container

    To copy a file from LXD container to the local machine, run

    lxc file pull first-vm/root/2.txt .

    If you need to copy a folder and files inside, you can use option –recursive

    See LXD

  • LXD container snapshot and restore

    lxc allow you to take snapshot, restore snapshot of a container.

    Here we create a snapshot, then delete the /etc folder from the container. Now the container is useless. Restore the container from snapshot to get it work again.

    root@UNUSED:~# lxc snapshot my-vm-2 my-vm-2-snap1
    root@UNUSED:~# lxc exec my-vm-2 -- rm -rf /etc
    root@UNUSED:~# lxc exec my-vm-2 -- bash
    I have no name!@my-vm-2:~# ls -l / | grep etc
    I have no name!@my-vm-2:~# exit
    root@UNUSED:~# lxc restore my-vm-2 my-vm-2-snap1
    root@UNUSED:~# lxc exec my-vm-2 -- bash
    root@my-vm-2:~# ls -l / | grep etc
    drwxr-xr-x  89 root   root    4096 Aug 27 07:06 etc
    root@my-vm-2:~# exit
    root@UNUSED:~#
    
  • Create lxc container with lxc-create

    lxc-create is used to create lxc container. To create a container, run

    lxc-create -t download -n CONTAINER_NAME_HERE
    

    This will list all available containers. You can select the OS you want to use.

    To specify OS, you can use the following examples

    lxc-create -t download -n mycontainer-1 -- -d ubuntu -r focal -a amd64
    lxc-create -t download -n mycontainer-2 -- -d debian -r buster -a amd64
    

    To list all containers, run

    lxc-ls -f
    

    To start a container, run

    lxc-start NAME
    

    To connect to a container, use the command

    lxc-attach NAME
    

    Example

    root@b24:~# lxc-attach boby2
    root@boby2:~# cat /etc/*issue
    Debian GNU/Linux 10 \n \l
    
    root@boby2:~# 
    

    To delete a container, run

    lxc-destroy NAME
    

    See lxc