Tag: docker

  • Create Python Flask Docker Container

    Create Python Flask Docker Container

    Create a folder and change to the folder

    mkdir python-flask
    cd python-flask
    

    Create file

    vi Dockerfile
    

    Add following content

    FROM python:2.7-slim
    
    WORKDIR /app
    COPY . /app
    
    RUN pip install -r requirements.txt
    
    EXPOSE 8080
    
    CMD ["python", "app.py"]
    

    Create file requirements.txt, add “Flask” to it.

    echo "Flask" > requirments.txt
    

    Now lets create our Python Flask Application

    vi app.py
    

    Add following content

    from flask import Flask
    import os
    import socket
    
    app = Flask(__name__)
    
    @app.route("/")
    def hello():
    	return  "

    Ok, World

    " if __name__ == "__main__": app.run(host="0.0.0.0", port=8080)

    To test Flask application locally, install Flask using pip

    sudo pip install Flask
    

    Now run the application using

    python app.py
    

    Now you will be able to see web application at

    http://localhost:8080
    

    Press CTRL+C to stop the application.

    To build Docker image, run

    docker build -t python-flask-app .
    

    -t specify tag.

    If all worked properly, you will see

    You can see the container image listed

    docker images
    

    Now your docker image is ready. To build a container using this image, run

    docker container run -d --name my-flask-app -p 8080:8080 python-flask-app
    

    You can access your python application running inside docker container on URL

    http://localhost:8080
    

    To stop the application, run

    docker stop my-flask-app
    

    To start it, run

    docker start my-flask-app
    
  • Docker container start on boot

    Docker container start on boot

    To set a docker container to start on system reboot, run

    docker update --restart=unless-stopped CONTAINER_ID
    

    Replace CONTAINER_ID with actual ID of your container.

    You can specify

    --restart=unless-stopped
    

    On creating docker container, for example

    docker run -d -p 80:80 --restart=unless-stopped nginx
    
  • Docker Nginx Proxy

    Docker Nginx Proxy allow you to run multiple docker containers on same server behind nginx proxy. This is done using

    https://github.com/jwilder/nginx-proxy

    To do this, you need a server with port 80 and 443 unused.

    To setup nginx proxy, run following

    cd /root/
    git clone https://github.com/evertramos/docker-compose-letsencrypt-nginx-proxy-companion.git
    cd docker-compose-letsencrypt-nginx-proxy-companion
    cp .env.sample .env
    ./start.sh
    

    This will start nginx proxy. You can modify .env file if you want.

    Starting a Docker Web App Behind Proxy

    To start a web app, all you need is to start docker container on same network as nginx proxy. By default it is “webproxy”.

    Here is an example command to start a web server.

    docker run -d 
        -e VIRTUAL_HOST=test.serverok.in \
        -e LETSENCRYPT_HOST=test.serverok.in \
        -e [email protected] \
        --network=webproxy \
        --name my_app \
        httpd:alpine
    

    This will start a test web server. You need to point the domain specified to this servers IP, then only nginx proxy can get LetsEncrypt SSL installed.

    Replace test.serverok.in with your actual domain.

    If you don’t want LetsEncrypt SSL installed, you can remove following 2 options

        -e LETSENCRYPT_HOST=test.serverok.in \
        -e [email protected] \
    
  • Deploy Docker Image using Elastic Beanstalk

    Deploy Docker Image using Elastic Beanstalk

    First create a file docker-eb-run.json with following content

    {
        "AWSEBDockerrunVersion": "1",
        "Image": {
            "Name": "bitnami/tomcat"
        },
        "Ports": [
            { "ContainerPort": "8080" }
        ]
    }
    

    here i used docker container bitnami/tomcat, you can use any container.

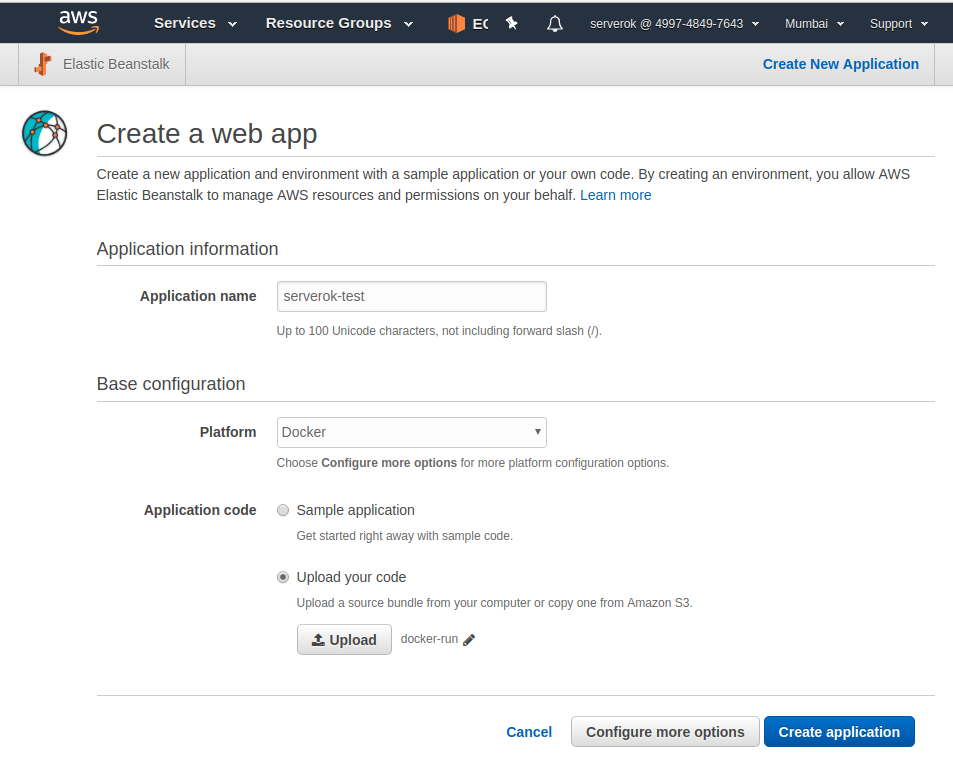
    Login to AWS Console, go to AWS Elastic Beanstalk page. Click Get Started.

    On next page, it ask for

    Application Name  = put anything you like here
    Platform = Docker
    

    For Application code, select Upload your code, click upload button and select “docker-eb-run.json” file you created.

    Click “Create application” button. AWS will start deploying your docker container in Elastic Beanstalk, it will take a few minutes to complete.

    Once deployment is completed, you get URL like

    http://serveroktest-env.ap7uahtfyh.ap-south-1.elasticbeanstalk.com
    

    aws

  • Installing Docker on Ubuntu 16.04

    To install docker on Ubuntu 16.04, run

    wget -qO- https://get.docker.com/ | sh
    

    To run docker commands as your user, run

    usermod -aG docker your-user
    

    Docker

  • Docker Delete all images

    Before you can delete a docker image, you need to delete any container that is based on this image. So see how to delete all docker containers, see

    Delete all docker containers

    To list all available docker images, run

    docker images
    

    To just display image ID only, run with -q option

    docker images -q
    

    Now lets pass the result to docker rmi command using xargs

    docker images -q | xargs docker rmi
    

    This will delete all images. You can also use

    docker rmi $(docker images -q)
    

    See docker

  • Red Hat acquires CoreOS for $250 mililon

    CoreOS is a container-optimized Linux operating system to be used under docker/Kubernetes.

    On January 30, 2018, Red Hat, Inc. announced that it is acquiring CoreOS for $250 million.

    Founded in 2013, CoreOS was created with a goal of building and delivering infrastructure for organizations of all sizes that mirrored that of large-scale software companies, automatically updating and patching servers and helping to solve pain points like downtime, security and resilience. Since its early work to popularize lightweight Linux operating systems optimized for containers, CoreOS has become well-regarded as a leader behind award-winning technologies that are enabling the broad adoption of scalable and resilient containerized applications.

    CoreOS is the creator of CoreOS Tectonic, an enterprise-ready Kubernetes platform that provides automated operations, enables portability across private and public cloud providers, and is based on open source software. It also offers CoreOS Quay, an enterprise-ready container registry. CoreOS is also well-known for helping to drive many of the open source innovations that are at the heart of containerized applications, including Kubernetes, where it is a leading contributor; Container Linux, a lightweight Linux distribution created and maintained by CoreOS that automates software updates and is streamlined for running containers; etcd, the distributed data store for Kubernetes; and rkt, an application container engine, donated to the Cloud Native Computing Foundation (CNCF), that helped drive the current Open Container Initiative (OCI) standard.

    https://coreos.com/blog/coreos-agrees-to-join-red-hat/

    docker

  • Running MySQL inside docker

    On a Cpanel Server with an old version of PHP, one of the applications requires MySQL 5.6 to work. Since the PHP version is no longer supported, updating MySQL using WHM will upgrade PHP to one of the supported versions, which may break existing sites. So I decided to install MySQL inside docker.

    First, create a folder for MySQL docker to store data.

    mkdir /home/mysql-docker-data

    Now run

    docker run --name serverok-mysql --restart=unless-stopped -v /home/mysql-docker-data:/var/lib/mysql -p 3307:3306 -e MYSQL_ROOT_PASSWORD=KqAtPd3BpyKjQ -d mysql:5.6

    For MairaDB 10.1, run

    docker run --name serverok-mysql --restart=unless-stopped -v /home/mysql-docker-data:/var/lib/mysql -p 3307:3306 -e MYSQL_ROOT_PASSWORD=KqAtPd3BpyKjQ -d mariadb:10.5

    Here I used “KqAtPd3BpyKjQ” as the password, replace it with your password.

    -p 3307:3306 -> tell docker to map port 3306 inside the docker container to port 3307 on host machine.

    This will pull the MySQL docker image and start it.

    Once it finished downloading, you can check if it is running with the command

    root@rapidswitch [~]# docker ps
    CONTAINER ID        IMAGE               COMMAND                  CREATED             STATUS              PORTS                    NAMES
    24c86d5ce381        mysql:5.6           "docker-entrypoint..."   8 minutes ago       Up 8 minutes        0.0.0.0:3307->3306/tcp   serverok-mysql
    root@rapidswitch [~]# 

    To connect to MySQL use

    mysql -h 127.0.0.1 --port 3307 -u root -pKqAtPd3BpyKjQ

    Auto Start on Boot

    To start the container on boot, you can run

    docker update --restart=unless-stopped serverok-mysql

    Or use /etc/rc.local, this may not work with newer versions of Ubuntu/Debian

    docker start serverok-mysql
  • docker

    If you need to try docker on web without installing on your computer, use https://labs.play-with-docker.com

    Docker Install

    Docker Basics

    Docker Delete Conatiner/Image

    Run Application in Docker Container

    Creating Docker Images

    Docker Tools

    Using Docker

    To install docker, run

    wget -qO- https://get.docker.com/ | sh

    Install docker compose

    curl -L "https://github.com/docker/compose/releases/download/1.23.1/docker-compose-$(uname -s)-$(uname -m)" -o /usr/local/bin/docker-compose
    chmod 755 /usr/local/bin/docker-compose

    Check docker is working

    root@forum:~# docker run hello-world
    Unable to find image 'hello-world:latest' locally
    latest: Pulling from library/hello-world
    ca4f61b1923c: Pull complete 
    Digest: sha256:66ef312bbac49c39a89aa9bcc3cb4f3c9e7de3788c944158df3ee0176d32b751
    Status: Downloaded newer image for hello-world:latest
    
    Hello from Docker!
    This message shows that your installation appears to be working correctly.
    
    To generate this message, Docker took the following steps:
     1. The Docker client contacted the Docker daemon.
     2. The Docker daemon pulled the "hello-world" image from the Docker Hub.
        (amd64)
     3. The Docker daemon created a new container from that image which runs the
        executable that produces the output you are currently reading.
     4. The Docker daemon streamed that output to the Docker client, which sent it
        to your terminal.
    
    To try something more ambitious, you can run an Ubuntu container with:
     $ docker run -it ubuntu bash
    
    Share images, automate workflows, and more with a free Docker ID:
     https://cloud.docker.com/
    
    For more examples and ideas, visit:
     https://docs.docker.com/engine/userguide/
    
    root@forum:~# 

    To list all running docker containers

    root@rapidswitch [~]# docker ps
    CONTAINER ID        IMAGE               COMMAND             CREATED             STATUS              PORTS               NAMES
    root@rapidswitch [~]#