Tag: kubernetes

  • Google Kubernetes Engine Node Pools

    In Google Kubernetes Engine, Nodes are Google Complete Engine (Virtual Machiens). Pods run inside Nodes. A Kubernetes cluster can contain multiple node pools. A node pool contain multiple nodes of same instance type.

    To create a Node Pool in Google Kubernetes Engine, run

    gcloud container node-pools create POOL_NAME \
      --cluster=CLUSER_NAME \
      --machine-type=e2-standard-2 \
      --num-nodes=1 \
      --zone=ZONE_NAME
    

    To delete a node pool, run

    gcloud container node-pools delete POOL_NAME --cluster CLUSER_NAME --zone ZONE_NAME
    

    To resize a node pool, run

    gcloud container clusters resize CLUSER_NAME --node-pool POOL_NAME \
        --num-nodes 3 --zone ZONE_NAME
    

    See Google Kubernetes Engine

  • Kubernetes scale a deployment

    To scale a deploymenet in Kubernetes using kubectl, run

    kubectl scale deployment DEPLOYMENT_NAME --replicas=2
    

    Example

    kubectl scale deployment my-frontend --replicas=2
    

    See Kubernetes

  • Google Kubernetes Engine get credentials

    Before you can run kubectl commands on Google Kubernetes Engine, you need to get credentials, this is done with command

    gcloud container clusters get-credentials CLUSER_NAME_HERE --zone ZONE_HERE
    

    To use gcloud commands, you need to login to google cloud first using command

    gcloud auth login
    

    See Google Kubernetes Engine

  • Install Minikube in Ubuntu

    Minikube is an easy-to-use Kubernetes that run on one machine. It is used for testing purposes.

    https://github.com/kubernetes/minikube
    Install Minikube with docker driver on Ubuntu

    To install minikube, run

    wget https://storage.googleapis.com/minikube/releases/latest/minikube-linux-amd64
    sudo mv minikube-linux-amd64 /usr/local/bin/minikube
    sudo chmod 755 /usr/local/bin/minikube
    

    Before you can start minikube, you need to install VirtualBox, this can be done with the command

    sudo apt install virtualbox
    

    To start minikube, run

    minikube start
    

    To stop

    minikube stop
    

    To connect to minikube node

    minikube ssh
    

    See minikube logs

    minikube logs
    

    Delete minikube

    minikube delete
    

    Mount a file system

    minikube mount $(pwd):/var/www/html/
    

    See Kubernetes

  • Deploy MySQL Server in Kubernetes using Helm

    To install MySQL server in Kubernetes, run

    helm install stable/mysql
    

    Once install is completed, you will get something like

    NOTES:
    MySQL can be accessed via port 3306 on the following DNS name from within your cluster:
    incendiary-monkey-mysql.default.svc.cluster.local
    
    To get your root password run:
    
        MYSQL_ROOT_PASSWORD=$(kubectl get secret --namespace default incendiary-monkey-mysql -o jsonpath="{.data.mysql-root-password}" | base64 --decode; echo)
    
    To connect to your database:
    
    1. Run an Ubuntu pod that you can use as a client:
    
        kubectl run -i --tty ubuntu --image=ubuntu:16.04 --restart=Never -- bash -il
    
    2. Install the mysql client:
    
        $ apt-get update && apt-get install mysql-client -y
    
    3. Connect using the mysql cli, then provide your password:
        $ mysql -h incendiary-monkey-mysql -p
    
    To connect to your database directly from outside the K8s cluster:
        MYSQL_HOST=127.0.0.1
        MYSQL_PORT=3306
    
        # Execute the following command to route the connection:
        kubectl port-forward svc/incendiary-monkey-mysql 3306
    
        mysql -h ${MYSQL_HOST} -P${MYSQL_PORT} -u root -p${MYSQL_ROOT_PASSWORD}
    

    To connect to this MySQL, you need to create a temporary Ubuntu server in Kubernetes as MySQL is only available inside the cluster.

    To create a server, run

    kubectl run -i --tty ubuntu --image=ubuntu:18.04 --restart=Never -- bash -il
    

    Install MySQL client inside this server with

    apt update
    apt install mariadb-client -y
    

    To connect to MySQL, use the command provided after install, in my case

    mysql -h incendiary-monkey-mysql -u root -p
    

    You can get password by running

    kubectl get secret --namespace default incendiary-monkey-mysql -o jsonpath="{.data.mysql-root-password}" | base64 --decode; echo
    

    You can list packages installed using helm with

    boby@sok-01:~$ helm list
    NAME             	REVISION	UPDATED                 	STATUS  	CHART       	APP VERSION	NAMESPACE
    incendiary-monkey	1       	Tue Feb 26 22:24:13 2019	DEPLOYED	mysql-0.15.0	5.7.14     	default  
    boby@sok-01:~$ 
    

    To delete, run

    boby@sok-01:~$ helm delete incendiary-monkey
    release "incendiary-monkey" deleted
    boby@sok-01:~$ 
    
  • Install WordPress in Kubernetes

    To install WordPress in Kubernetes, you need to install helm package manager.

    Now run

    helm install stable/wordpress
    

    After the helm chart is run, you will get commands to get login for WordPress admin area.

    Here is services it create

    boby@sok-01:~$ kubectl get service
    NAME                             TYPE           CLUSTER-IP      EXTERNAL-IP    PORT(S)                      AGE
    kubernetes                       ClusterIP      10.39.240.1              443/TCP                      34m
    whopping-labradoodle-mariadb     ClusterIP      10.39.248.140            3306/TCP                     2m
    whopping-labradoodle-wordpress   LoadBalancer   10.39.253.160   35.193.33.14   80:32054/TCP,443:30939/TCP   2m
    boby@sok-01:~$
    

    List of all pods

    boby@sok-01:~$ kubectl get pod
    NAME                                             READY   STATUS      RESTARTS   AGE
    ubuntu                                           0/1     Completed   0          21m
    whopping-labradoodle-mariadb-0                   1/1     Running     0          3m
    whopping-labradoodle-wordpress-8bddb5fdf-2l24d   1/1     Running     0          3m
    boby@sok-01:~$ 
    

    Deployments

    boby@sok-01:~$ kubectl get deployment
    NAME                             DESIRED   CURRENT   UP-TO-DATE   AVAILABLE   AGE
    whopping-labradoodle-wordpress   1         1         1            1           4m
    boby@sok-01:~$ 
    

    To scale the deployment, run

    boby@sok-01:~$ kubectl scale deployment/whopping-labradoodle-wordpress --replicas=2
    deployment.extensions/whopping-labradoodle-wordpress scaled
    boby@sok-01:~$ 
    

    See Helm Kubernetes Package Manager, Kubernetes

  • Helm Kubernetes Package Manager

    Helm is Package Manager for Kubernetes. Helm packages are called “Charts”. Charts allow you to deploy various software on Kubernetes cluster.

    https://helm.sh/

    To install helm, run

    curl https://raw.githubusercontent.com/kubernetes/helm/master/scripts/get > get_helm.sh
    bash get_helm.sh
    

    If you are on Ubuntu, you can install from snap

    snap install helm --classic
    

    To update helm repos, run

    helm repo update
    

    To deploy MySQL chart to Kubernetes, run

    helm install stable/mysql
    

    Install WordPress in Kubernetes
    Deploy MySQL Server in Kubernetes using Helm

    See Kubernetes

  • Google Kubernetes Engine

    To list all Kubernetes clusters, run

    gcloud container clusters list
    

    To create a Kubernetes cluster, run

    gcloud container clusters create CLUSTER_NAME
    

    Get credential for kubectl

    gcloud container clusters get-credentials CLUSTER_NAME
    

    List all nodes (GCP instances)

    kubectl get nodes
    
  • Create Kubernetes cluser using gcloud

    Create Kubernetes cluser using gcloud

    Login to gcloud with

    gcloud auth login
    

    Set default region

    gcloud config set compute/zone us-central1-a
    

    To create a cluser, run

    gcloud container clusters create CLUSTER-NAME
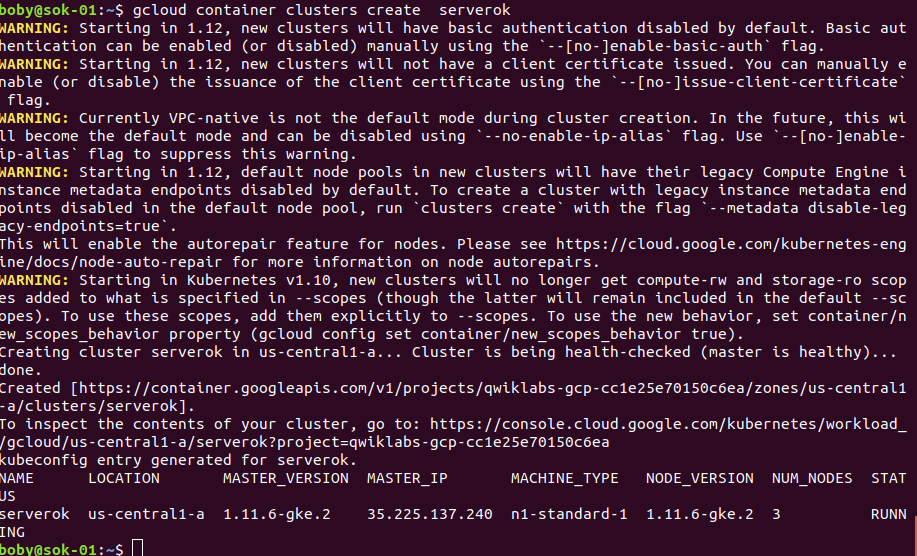
    

    To create a cluster with 2 nodes, run

    gcloud container clusters create CLUSTER-NAME --num-nodes 2
    

    To specify compute engine type during cluster creation, run

    gcloud container clusters create CLUSTER-NAME --num-nodes 2 --machine-type n1-standard-2
    

    You can also specify scopes, this allow you to give the cluster permission to access other google cloud resources. For example to allow cluster access Cloud Source Repositories and Google Container Registry. run

    gcloud container clusters create CLUSTER-NAME --num-nodes 2 --machine-type n1-standard-2 --scopes "https://www.googleapis.com/auth/projecthosting,cloud-platform"
    

    To list your container, run

    gcloud container clusters list
    

    gcloud clusters

    Before you can use cluser, you need to get authentication credentials with command

    gcloud container clusters get-credentials CLUSTER-NAME
    

    To interact with Kubernetes, you need kubectl, on Ubuntu, yu can install it with

    sudo snap install kubectl --classic
    

    To deploy a container, run

    kubectl run hello-server --image=gcr.io/google-samples/hello-app:1.0 --port 8080
    

    This will deploy google provided hello-app container to the cluser.

    To make the application available to public, create a loadbalancer service.

    kubectl expose deployment hello-server --type="LoadBalancer"
    

    Now find IP of the LoadBalacner service with command

    kubectl get services
    

    From the result, we found EXTERNAL-IP for LoadBalancer is 35.232.226.216. To access the application, go to url


    http://35.232.226.216:8080

    See Kubernetes

  • Kubeapps

    Kubeapps allows you to run bitnami applications in Kubernetes cluster.

  • Installing kubernetes master on Ubuntu 16.04

    To install master on Ubuntu 16.04, lets start by installing docker.

    apt-get update
    apt-get install -y docker.io
    

    Now install kubeadm

    apt-get update && apt-get install -y apt-transport-https
    curl -s https://packages.cloud.google.com/apt/doc/apt-key.gpg | apt-key add -
    cat </etc/apt/sources.list.d/kubernetes.list
    deb http://apt.kubernetes.io/ kubernetes-xenial main
    EOF
    apt-get update
    apt-get install -y kubelet kubeadm kubectl
    

    You can create kubernetes master by running kubeadmin init command.

    root@doc1:~# kubeadm init
    [kubeadm] WARNING: kubeadm is in beta, please do not use it for production clusters.
    [init] Using Kubernetes version: v1.8.5
    [init] Using Authorization modes: [Node RBAC]
    [preflight] Running pre-flight checks
    [kubeadm] WARNING: starting in 1.8, tokens expire after 24 hours by default (if you require a non-expiring token use --token-ttl 0)
    [certificates] Generated ca certificate and key.
    [certificates] Generated apiserver certificate and key.
    [certificates] apiserver serving cert is signed for DNS names [doc1.elitetechs.com kubernetes kubernetes.default kubernetes.default.svc kubernetes.default.svc.cluster.local] and IPs [10.96.0.1 45.32.210.20]
    [certificates] Generated apiserver-kubelet-client certificate and key.
    [certificates] Generated sa key and public key.
    [certificates] Generated front-proxy-ca certificate and key.
    [certificates] Generated front-proxy-client certificate and key.
    [certificates] Valid certificates and keys now exist in "/etc/kubernetes/pki"
    [kubeconfig] Wrote KubeConfig file to disk: "admin.conf"
    [kubeconfig] Wrote KubeConfig file to disk: "kubelet.conf"
    [kubeconfig] Wrote KubeConfig file to disk: "controller-manager.conf"
    [kubeconfig] Wrote KubeConfig file to disk: "scheduler.conf"
    [controlplane] Wrote Static Pod manifest for component kube-apiserver to "/etc/kubernetes/manifests/kube-apiserver.yaml"
    [controlplane] Wrote Static Pod manifest for component kube-controller-manager to "/etc/kubernetes/manifests/kube-controller-manager.yaml"
    [controlplane] Wrote Static Pod manifest for component kube-scheduler to "/etc/kubernetes/manifests/kube-scheduler.yaml"
    [etcd] Wrote Static Pod manifest for a local etcd instance to "/etc/kubernetes/manifests/etcd.yaml"
    [init] Waiting for the kubelet to boot up the control plane as Static Pods from directory "/etc/kubernetes/manifests"
    [init] This often takes around a minute; or longer if the control plane images have to be pulled.
    [apiclient] All control plane components are healthy after 48.004158 seconds
    [uploadconfig] Storing the configuration used in ConfigMap "kubeadm-config" in the "kube-system" Namespace
    [markmaster] Will mark node doc1.elitetechs.com as master by adding a label and a taint
    [markmaster] Master doc1.elitetechs.com tainted and labelled with key/value: node-role.kubernetes.io/master=""
    [bootstraptoken] Using token: cfeeef.e7a85b6b4a55936c
    [bootstraptoken] Configured RBAC rules to allow Node Bootstrap tokens to post CSRs in order for nodes to get long term certificate credentials
    [bootstraptoken] Configured RBAC rules to allow the csrapprover controller automatically approve CSRs from a Node Bootstrap Token
    [bootstraptoken] Configured RBAC rules to allow certificate rotation for all node client certificates in the cluster
    [bootstraptoken] Creating the "cluster-info" ConfigMap in the "kube-public" namespace
    [addons] Applied essential addon: kube-dns
    [addons] Applied essential addon: kube-proxy
    
    Your Kubernetes master has initialized successfully!
    
    To start using your cluster, you need to run (as a regular user):
    
      mkdir -p $HOME/.kube
      sudo cp -i /etc/kubernetes/admin.conf $HOME/.kube/config
      sudo chown $(id -u):$(id -g) $HOME/.kube/config
    
    You should now deploy a pod network to the cluster.
    Run "kubectl apply -f [podnetwork].yaml" with one of the options listed at:
      http://kubernetes.io/docs/admin/addons/
    
    You can now join any number of machines by running the following on each node
    as root:
    
      kubeadm join --token cfeeef.e7a85b6b4a55936c 45.32.210.20:6443 --discovery-token-ca-cert-hash sha256:68540be50b8436e5d08c097ec9328b61398d8dd5a9a7449a1e55520b88d423f3
    
    root@doc1:~#