Tag: mysql

  • How to Recover MySQL Table Structure from .frm File

    How to Recover MySQL Table Structure from .frm File

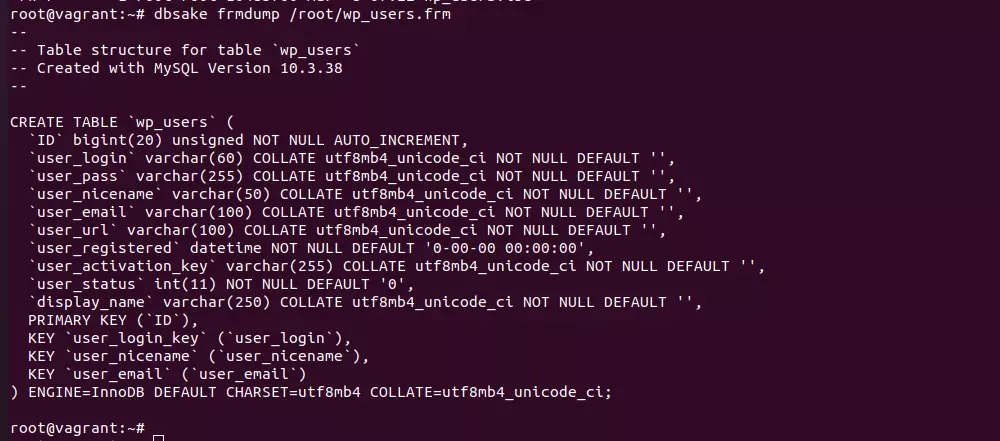
    To recover MySQL table structure from .frm file, you can use dbsake. You can find dbsake documentation at http://dbsake.readthedocs.org/en/latest/.

    To install dbsake, run

    curl -s http://get.dbsake.net > dbsake
    chmod u+x dbsake
    mv dbsake /usr/local/bin/

    To find the structure of a table from the .frm file, run

    dbsake frmdump /path/to/table_name.frm
    recover table structure with dbsake

    Back to MySQL

  • How to change MySQL Datadir in Cpanel Server

    How to change MySQL Datadir in Cpanel Server

    If the disk partition that stores MySQL data directory runs out of disk space, you may need to consider moving the MySQL data directory to another partition. Before you do the MySQL data directory change, make sure you take a backup of all your databases using mysqldump.

    mysqldump --events --routines --triggers --all-databases | gzip -9 > "$(date +%F-%H%m%S)"-mysql-backup.sql.gz
    

    First, disable MySQL monitoring, so MySQL won’t auto start while we do the data directory migration

    whmapi1 configureservice service=mysql enabled=1 monitored=0
    

    Stop the MySQL server

    systemctl stop mysqld
    

    In this case, we have free disk space in /home partition so we will move the MySQL data directory to this partition. Create a directory to store MySQL data, and copy the MySQL files to it.

    mkdir /home/mysql-data
    rsync -avzP /var/lib/mysql/ /home/mysql-data/
    chown -R mysql:mysql /home/mysql-data/
    

    Rename /var/lib/mysql directory, create an empty directory for MySQL socket

    mv /var/lib/mysql /var/lib/mysql-backup
    mkdir /var/lib/mysql/
    chown mysql:mysql /var/lib/mysql/
    

    Update my.cnf file

    vi /etc/my.cnf
    

    Add

    socket=/var/lib/mysql/mysql.sock
    datadir=/home/mysql-data/
    

    MariaDB 10.1 or newer does not allow MySQL data in /home directory. To make datadir work from /home, edit file

    vi /etc/systemd/system/mariadb.service.d/override.conf
    

    Add

    [Service]
    ProtectHome=false
    ProtectSystem=off
    

    Since we edit systemd file, we need to reload

    systemctl daemon-reload
    

    Start MySQL

    systemctl start mysqld
    

    At this point, MySQL will work from the new data directory. Verify sites are working properly.

    If all is good, enable cpanel service monitoring for MySQL

    whmapi1 configureservice service=mysql enabled=1 monitored=1
    

    If you are using CloudLinux CageFS, sites won’t work. You need to run these 2 commands to get MySQL working for websites.

    cagefsctl --disable-all
    cagefsctl --enable-all
    

    Remove old MySQL datadir

    We have renamed original MySQL data directory as /var/lib/mysql-backup, you can take a backup of this directory and delete it to free up disk space.

    Back to MySQL

  • Free MySQL Database Hosting

    Free MySQL Database Hosting

    Looking for a free MySQL hosting solution? In this blog post, I will list some of the MySQL hosting providers that offer free and paid MySQL hosting. These MySQL hosting is useful for smaller database work loads. If you have lot of data, you may need local MySQL server or a MySQL server to your web application server.

    Filess

    Filess.io is a free MySQL hosting provider that offers a 100% free plan that allows you to host one MySQL database with up to 100MB of storage space. You can also upgrade to a paid plan if you need more storage space or features.

    It is a good option for people who need a free MySQL hosting solution. It is easy to set up and use.

    https://filess.io

    Free MySQL Hosting

    FreeMySQLHosting.net is a free MySQL hosting provider that offers a generous amount of storage space and bandwidth on their free plan. They also offer a variety of features, including backups, replication, and security.

    One of the main benefits of using FreeMySQLHosting.net is that they offer a free plan with unlimited MySQL databases. This means that you can create as many databases as you need, without having to worry about storage space or bandwidth limits. They also offer a generous amount of storage space and bandwidth on their free plan, so you can easily host small to medium-sized websites or applications.

    Another benefit of using FreeMySQLHosting.net is that they offer a variety of features, including backups, replication, and security. This means that your data is safe and secure, even if something happens to their servers. They also offer 24/7 customer support, so you can always get help if you need it.

    https://www.freemysqlhosting.net/

    Back to MySQL

  • How to Migrate MySQL Users to Another Server

    How to Migrate MySQL Users to Another Server

    I wanted to Migrate MySQL from one server to another. Usually, I could just copy over the MySQL data directory (/var/lib/mysql) to the new server, this will copy over MySQL users and data. On this server, the MySQL data file (ibdata1) was too large, 200 GB approx. If I do a mysqldump, the SQL file was only 10 GB, so I decided not to copy over the data directory to the new server.

    I did a MySQL dump of all databases with the command

    mysqldump --events --routines --triggers --all-databases > all-dbs.sql
    

    Copy the file all-dbs.sql to the new server and tried to restore with the command

    mysql < all-dbs.sql
    

    It failed because MySQL on old and new servers are different, recent MySQL versions have users table changed to view.

    So I backed up individual MySQL databases using MySQL backup all databases, copied over to the new server, and restore the databases. When restoring databases, I get an error saying the database does not exist, I created the databases and restored the SQL files.

    Now we have all databases and data on new server. We need to create all users with correct permissions. To do this, on source server, run

    pt-show-grants
    

    pt-show-grants is part of Percona Toolkit. You can install Percona Toolkit on Ubuntu/Debian with the command

    apt install percona-toolkit
    

    If you have password for root user, you can use

    pt-show-grants --host localhost --user root --ask-pass
    

    The command will show the SQL commands used to create the users with the correct permission. Copy it and run it on new server MySQL command prompt. This will create all users on new server with proper permissions.

    Copy a specific user to new server

    To view commands to create a specific user, you can run the command

    show grants for 'USER_HERE'@'HOST_HERE';
    

    Example

    show grants for 'root'@'localhost';
    

    Copy all MySQL users to the new server

    If you don't have Percona Toolkit installed, you can use the following command

    mysql -u root --silent --skip-column-names -A -e"SELECT CONCAT('SHOW GRANTS FOR ''',user,'''@''',host,''';') FROM mysql.user WHERE user<>''" | mysql -u root --skip-column-names -A
    

    It will generate SQL commands to create users, copy and run it on new server to create MySQL users.

    Here is a bash script to do the same

    mysql --silent --skip-column-names --execute "select concat('\'',User,'\'@\'',Host,'\'') as User from mysql.user" | sort | \
    while read u
     do echo "-- $u"; mysql --silent --skip-column-names --execute "show grants for $u" | sed 's/$/;/'
    done
    

    Back to MySQL
  • How to disable MySQL X Protocol (mysqlx_port)

    How to disable MySQL X Protocol (mysqlx_port)

    After installing MySQL 8 and checking listening ports with “netstat -lntp”, you will see MySQL is listening on ports 3306 and 33060.

    root@mysql:~# netstat -lntp | grep mysql
    tcp        0      0 127.0.0.1:3306          0.0.0.0:*               LISTEN      13643/mysqld        
    tcp        0      0 127.0.0.1:33060         0.0.0.0:*               LISTEN      13643/mysqld        
    root@mysql:~# 

    Port 3306 is used by traditional MySQL protocol (MySQL Classic Protocol). MySQL X Protocol uses port 33060.

    What is MySQL X Protocol?

    MySQL X Protocol is a network protocol that allows communication between MySQL Server and client applications using a modern, asynchronous, and high-performance approach.

    One of the key advantages of MySQL X Protocol is its ability to handle large datasets efficiently, making it ideal for applications that require high-speed data transfer.

    It also supports new features in MySQL 5.7 and later versions, such as document store, which allows users to store and retrieve JSON documents directly in the database.

    How to disable MySQL X Protocol?

    To disable MySQL X protocol, edit MySQL configuration file.

    On Ubuntu/Debian

    vi /etc/mysql/mysql.conf.d/mysqld.cnf

    Find, [mysqld] section, and under it, add

    mysqlx=off

    Restart MySQL service

    systemctl restart mysqld

    How to change MySQL X Protocol port?

    To change the MySQL X Protocol port, change the following variables in your MySQL configuration file and restart MySQL server.

    mysqlx-port=33060
    mysqlx-bind-address=127.0.0.1

    MySQL X Protocol related variables

    To see MySQL 8 related variables, use the SQL command

    show variables like 'mysqlx%';

    Example

    mysql> show variables like 'mysqlx%';
    +---------------------------------------------+----------------------------------------+
    | Variable_name                               | Value                                  |
    +---------------------------------------------+----------------------------------------+
    | mysqlx_bind_address                         | 127.0.0.1                              |
    | mysqlx_compression_algorithms               | DEFLATE_STREAM,LZ4_MESSAGE,ZSTD_STREAM |
    | mysqlx_connect_timeout                      | 30                                     |
    | mysqlx_deflate_default_compression_level    | 3                                      |
    | mysqlx_deflate_max_client_compression_level | 5                                      |
    | mysqlx_document_id_unique_prefix            | 0                                      |
    | mysqlx_enable_hello_notice                  | ON                                     |
    | mysqlx_idle_worker_thread_timeout           | 60                                     |
    | mysqlx_interactive_timeout                  | 28800                                  |
    | mysqlx_lz4_default_compression_level        | 2                                      |
    | mysqlx_lz4_max_client_compression_level     | 8                                      |
    | mysqlx_max_allowed_packet                   | 67108864                               |
    | mysqlx_max_connections                      | 100                                    |
    | mysqlx_min_worker_threads                   | 2                                      |
    | mysqlx_port                                 | 33060                                  |
    | mysqlx_port_open_timeout                    | 0                                      |
    | mysqlx_read_timeout                         | 30                                     |
    | mysqlx_socket                               | /var/run/mysqld/mysqlx.sock            |
    | mysqlx_ssl_ca                               |                                        |
    | mysqlx_ssl_capath                           |                                        |
    | mysqlx_ssl_cert                             |                                        |
    | mysqlx_ssl_cipher                           |                                        |
    | mysqlx_ssl_crl                              |                                        |
    | mysqlx_ssl_crlpath                          |                                        |
    | mysqlx_ssl_key                              |                                        |
    | mysqlx_wait_timeout                         | 28800                                  |
    | mysqlx_write_timeout                        | 60                                     |
    | mysqlx_zstd_default_compression_level       | 3                                      |
    | mysqlx_zstd_max_client_compression_level    | 11                                     |
    +---------------------------------------------+----------------------------------------+
    29 rows in set (0.01 sec)
    
    mysql>

    Back to MySQL

  • Limit disk used by MySQL binary log files

    Limit disk used by MySQL binary log files

    You can use following config to keep 7 days bin log

    [mysqld]
    log_bin = /var/log/mysql/mysql-bin.log
    binlog_format = ROW
    expire_logs_days = 4
    max_binlog_size = 100M

    After modifying the configuration file, you will need to restart the MySQL server to apply the changes:

    systemctl restart mysql

    You can also manually delete old binary log files to free up disk space:

    PURGE BINARY LOGS BEFORE '2024-02-01 00:00:00';

    Replace ‘2024-02-01 00:00:00’ with the date before which you want to delete the binary log files.

    On a server, the disk was almost full. On checking most of the disk space is used in “/var/lib/mysql” folder, which had many MySQL binary logs.

    In the MySQL command prompt, run the command to see all MySQL binary logs

    SHOW BINARY LOGS;

    On checking MySQL configuration, I had the line

    max_binlog_size   = 100M

    This limited the binlog file size to 100 MB, when the file size reached 100 MB, the file get rotated.

    How long logs are kept is determined by the value of binlog_expire_logs_seconds. The default value for this variable was 2592000, which is approx 30 days.

    To make the MySQL bin log expire after 48 hours, add the following to the MySQL configuration file under the [mysqld] directive.

    [mysqld]
    binlog_expire_logs_seconds=86400

    Restart the MySQL server with

    systemctl restart mysql

    On RHEL based servers

    systemctl restart mysqld

    After restarting I checked the disk space used by folder “/var/lib/mysql”, it changed to 13 GB, which is much lower than the initial MySQL disk usage.

    Disable MySQL binlog

    In my.cnf, add

    [mysqld]
    skip-log-bin

    Restart the MySQL server

    Back to MySQL

  • How to Install MySQL 5.7 on Ubuntu 22.04

    How to Install MySQL 5.7 on Ubuntu 22.04

    MySQL 5.7 is not supported on Ubuntu 22.04, but you can download MySQL 5.7 for Ubuntu 18.04 and install it on Ubuntu 20.04 or Ubuntu 22.04

    First, install libtinfo5, this is available for download from https://launchpad.net/ubuntu/bionic/amd64/libtinfo5/6.1-1ubuntu1.18.04

    cd ~/
    wget http://launchpadlibrarian.net/371711898/libtinfo5_6.1-1ubuntu1.18.04_amd64.deb
    dpkg -i libtinfo5_6.1-1ubuntu1.18.04_amd64.deb

    The files are moved from the Offical MySQL site

    https://dev.mysql.com/downloads/mysql/5.7.html

    So we will download it from a mirror site. If the mirror is down, you can search with the .deb file name to find another mirror.

    mkdir ~/mysql57
    cd ~/mysql57
    wget https://mirror.csclub.uwaterloo.ca/mysql/Downloads/MySQL-5.7/libmysqlclient-dev_5.7.38-1ubuntu18.04_amd64.deb
    wget https://mirror.csclub.uwaterloo.ca/mysql/Downloads/MySQL-5.7/libmysqlclient20_5.7.38-1ubuntu18.04_amd64.deb
    wget https://mirror.csclub.uwaterloo.ca/mysql/Downloads/MySQL-5.7/libmysqld-dev_5.7.38-1ubuntu18.04_amd64.deb
    wget https://mirror.csclub.uwaterloo.ca/mysql/Downloads/MySQL-5.7/mysql-client_5.7.38-1ubuntu18.04_amd64.deb
    wget https://mirror.csclub.uwaterloo.ca/mysql/Downloads/MySQL-5.7/mysql-common_5.7.38-1ubuntu18.04_amd64.deb
    wget https://mirror.csclub.uwaterloo.ca/mysql/Downloads/MySQL-5.7/mysql-community-client_5.7.38-1ubuntu18.04_amd64.deb
    wget https://mirror.csclub.uwaterloo.ca/mysql/Downloads/MySQL-5.7/mysql-community-server_5.7.38-1ubuntu18.04_amd64.deb
    wget https://mirror.csclub.uwaterloo.ca/mysql/Downloads/MySQL-5.7/mysql-community-source_5.7.38-1ubuntu18.04_amd64.deb
    wget https://mirror.csclub.uwaterloo.ca/mysql/Downloads/MySQL-5.7/mysql-community-test_5.7.38-1ubuntu18.04_amd64.deb
    wget https://mirror.csclub.uwaterloo.ca/mysql/Downloads/MySQL-5.7/mysql-server_5.7.38-1ubuntu18.04_amd64.deb
    wget https://mirror.csclub.uwaterloo.ca/mysql/Downloads/MySQL-5.7/mysql-testsuite_5.7.38-1ubuntu18.04_amd64.deb
    dpkg -i *.deb
    apt install -f

    To start MySQL on boot, run

    systemctl enable mysql

    To start MySQL, run

    systemctl start mysql

    Back to MySQL Installation

  • How to create MySQL data directory with mysql_install_db

    How to create MySQL data directory with mysql_install_db

    On a Debian 7 server, the MySQL database got corrupted, which caused the MySQL database to keep crashing. I was able to take a backup of the database following InnoDB Recovery instructions at

    https://dev.mysql.com/doc/refman/5.6/en/forcing-innodb-recovery.html

    Once I have the Database backup taken, I took a backup of the MySQL data directory /var/lib/mysql and removed it.

    To recreate the MySQL data directory, I run the mysql_install_db command, but it failed with the error message “FATAL ERROR: Could not find my-default.cnf”

    root@srv01 ~ # mysql_install_db --defaults-file=/etc/mysql/my.cnf --user=mysql --datadir=/var/lib/mysql
    FATAL ERROR: Could not find my-default.cnf
    
    If you compiled from source, you need to run 'make install' to
    copy the software into the correct location ready for operation.
    
    If you are using a binary release, you must either be at the top
    level of the extracted archive, or pass the --basedir option
    pointing to that location.
    
    root@srv01 ~ # 
    

    It is fixed by copying /etc/mysql/my.cnf to /usr/share/mysql/my-default.cnf

    cp /etc/mysql/my.cnf /usr/share/mysql/my-default.cnf
    

    Back to MySQL

  • How to Upgrade MySQL/MariaDB in WHM cPanel Server

    How to Upgrade MySQL/MariaDB in WHM cPanel Server

    cPanel server supports MySQL and MariaDB. In most cases MySQL and MariaDB are compatible, you will be fine with either of them.

    Find current MySQL version

    Before you upgrade, find out what version of MySQL or MariaDB you are using with the command

    mysql --version
    

    Check MySQL version

    In this server, we have MariaDB 10.3.37.

    You can note down the rpm files, so you know the exact RPMs names in case you need to revert back.

    rpm -qa | egrep -i "(mysql|mariadb)" | grep -v php | grep -v alt
    

    Backup MySQL database

    Before upgrading MySQL take a backup of the MySQL folder.

    Disable Monitoring for MySQL/MariaDB so it won’t auto start

    whmapi1 configureservice service=mysql enabled=1 monitored=0
    

    Stop MySQL

    /scripts/restartsrv_mysql --stop
    

    Take a copy of MySQL data directory

    mkdir -p ~/mysql-backup
    cp -r /var/lib/mysql/ ~/mysql-backup/
    

    If you use a non-default MySQL data directory location, you may need to change the path /var/lib/mysql.

    You can find the MySQL data directory with the command

    root@server20 [~]# mysql -e "show variables like 'datadir';"
    +---------------+-----------------+
    | Variable_name | Value           |
    +---------------+-----------------+
    | datadir       | /var/lib/mysql/ |
    +---------------+-----------------+
    root@server20 [~]# 
    

    Start MySQL

    /scripts/restartsrv_mysql
    

    Enable Monitoring

    whmapi1 configureservice service=mysql enabled=1 monitored=1
    

    Upgrade MySQL/MariaDB using WHM

    Login to WHM as user root. Go to

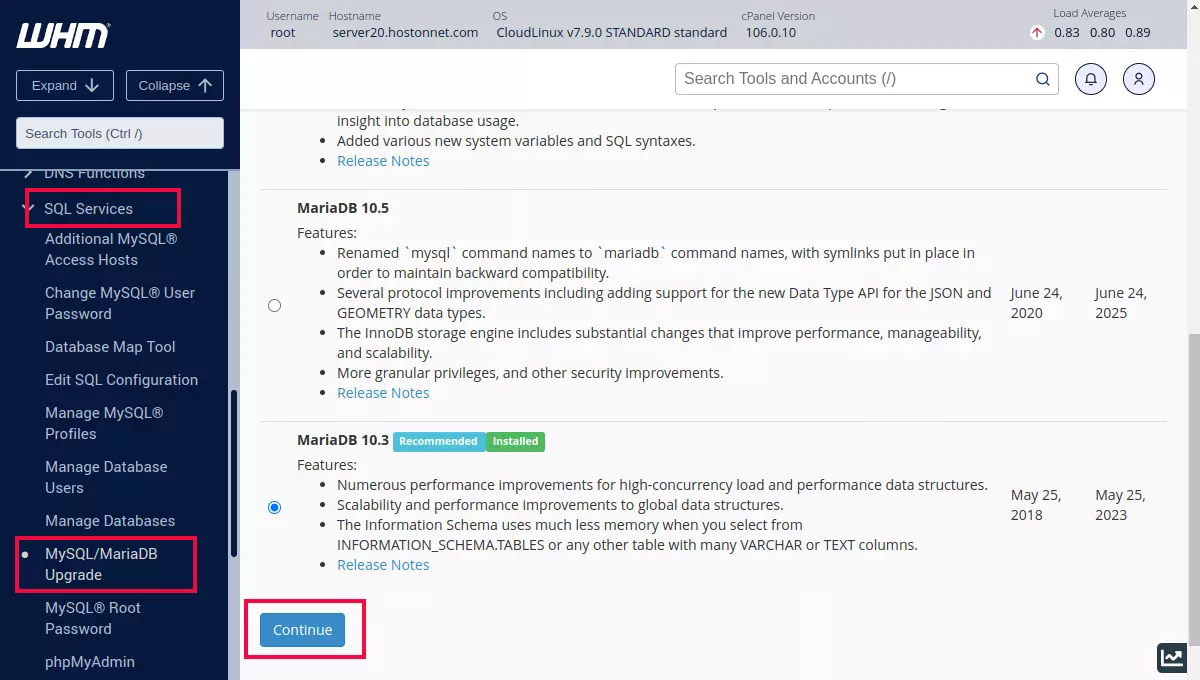
    WHM > SQL Services > MySQL/MariaDB Upgrade
    

    You can also use the search box in WHM, and search for “MariaDB upgrade”.

    WHM MySQL/MaraDB upgrade

    On this page, select the MySQL or MariaDB version you need. Then click on the “Continue” button.

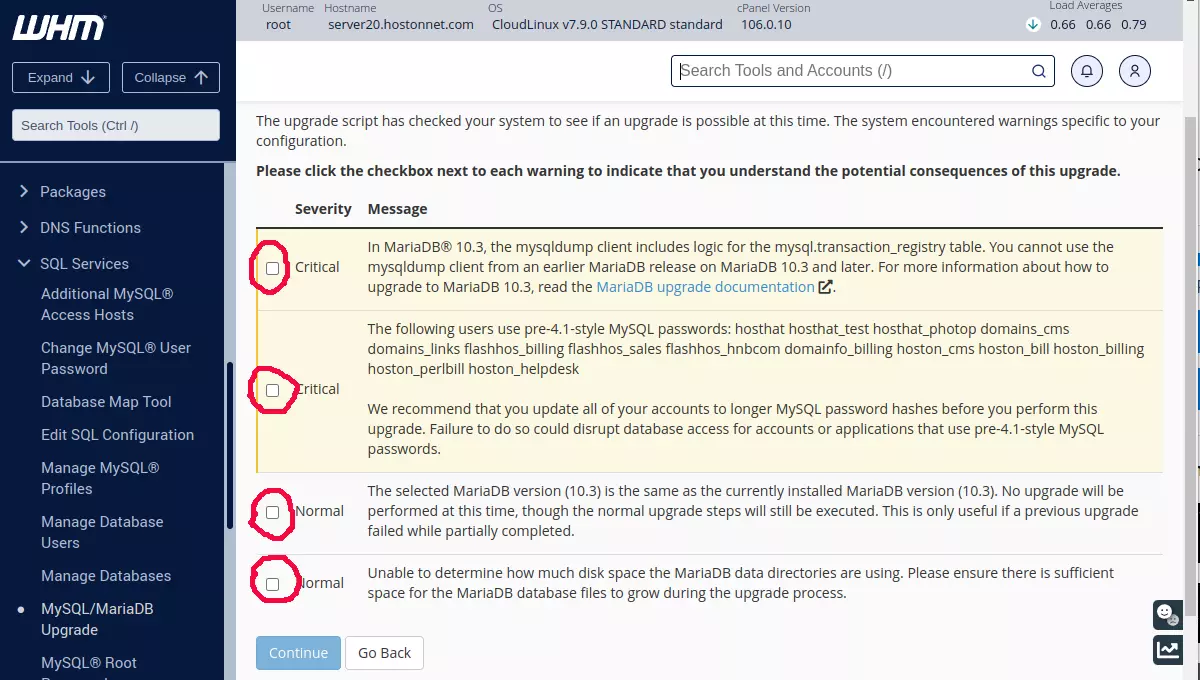
    MariaDB upgrade warning

    It will show some warnings related to MySQL/MariaDB changes. You need to check all check boxes, then click on the “Continue” button.

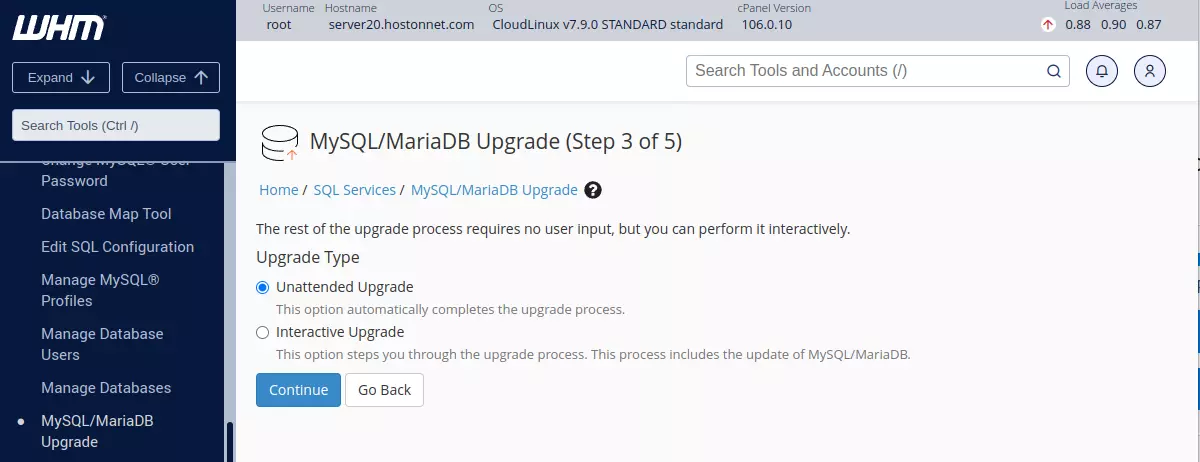
    MariaDB upgrade method

    On this page, you get 2 options “Unattended Upgrade” and “Interactive Upgrade”. You can select any of it and click the “Continue” button to do the upgrade.

    Back to cPanel Server

  • How to fix InnoDB: ERROR: the age of the last checkpoint

    How to fix InnoDB: ERROR: the age of the last checkpoint

    On a MySQL server, the error log keeps getting the following error message

    221024 17:50:03  InnoDB: ERROR: the age of the last checkpoint is X,
    InnoDB: which exceeds the log group capacity 9433498.
    InnoDB: If you are using big BLOB or TEXT rows, you must set the
    InnoDB: combined size of log files at least 10 times bigger than the
    InnoDB: largest such row.
    

    The error is because you are trying to insert more data into InnoDB and the InnoDB log is getting full before the data can be written into the data file. You need to set the value of innodb_log_file_size value at least ten times bigger than max_allowed_packet.

    To fix the error, edit your MySQL configuration file

    On Debian/Ubuntu with MairaDB

    vi /etc/mysql/mariadb.conf.d/50-server.cnf
    

    Under [mysqld] section, add

    innodb_buffer_pool_size=3G
    innodb_log_file_size=1G
    innodb_log_buffer_size=32M
    

    To select a proper size for these MySQL variables for your system, use MySQL tuner.

    wget https://raw.githubusercontent.com/major/MySQLTuner-perl/master/mysqltuner.pl
    perl mysqltuner.pl
    

    It will suggest you recommended values of innodb_buffer_pool_size and innodb_log_file_size.

    Disable fast MySQL shutdown.

    mysql -u root -p -e "SET GLOBAL innodb_fast_shutdown = 0;"
    

    This will flush all changes done on MySQL from log file to data file so we can safely remove MySQL InnoDB log files. We need to remove existing log files before MySQL can create log files with different size.

    Stop MySQL server.

    systemctl stop mysql

    Move log files out

    mkdir ~/mysql-old-log
    mv /var/lib/mysql/ib_logfile* ~/mysql-old-log
    

    Start MySQL service with

    systemctl start mysql
    

    This will recreate MySQL log files (ib_logfile0 and ib_logfile1) with the new size.

    See MySQL

  • MySQL 8 Your password does not satisfy the current policy requirements

    MySQL 8 Your password does not satisfy the current policy requirements

    When transferring a website from one Cpanel server to another server running MySQL 8, I got the following error message

    Cpanel::Exception::Database::Error/(XID u99as8) The system received an error from the “MySQL” database “mysql”: 
    1819 (Your password does not satisfy the current policy requirements)
    

    The error is due to validate_password component.

    https://dev.mysql.com/doc/mysql-secure-deployment-guide/8.0/en/secure-deployment-password-validation.html

    Method 1

    Edit mysql configuration file, add following under [mysqld] section.

    validate_password.policy=0
    

    Policy 0 is LOW, default value is 1, that is MEDIUM.

    Restart MySQL

    systemctl restart mysqld
    

    Method 2: Disable Password Validation Component

    To check if MySQL Password Validation Component is enabled, run the command

    mysql -sse "SELECT * FROM mysql.component"
    

    If you have Password Validation Component enabled, you will see

    [root@server2 ~]# mysql -sse "SELECT * FROM mysql.component"
    1	1	file://component_validate_password
    [root@server2 ~]#
    

    To disable the component, run

    mysql -sse "UNINSTALL COMPONENT 'file://component_validate_password';"
    

    Back to MySQL 8

  • Change MySQL root password in Webuzo

    Change MySQL root password in Webuzo

    Webuzo stores MySQL root password in file

    /var/webuzo/my.conf
    

    If you changed MySQL/MariaDB root password outside of Webuzo, you need to update this file.

    You may also need to modify the file

    /root/.my.cnf
    

    This is only for command line access.

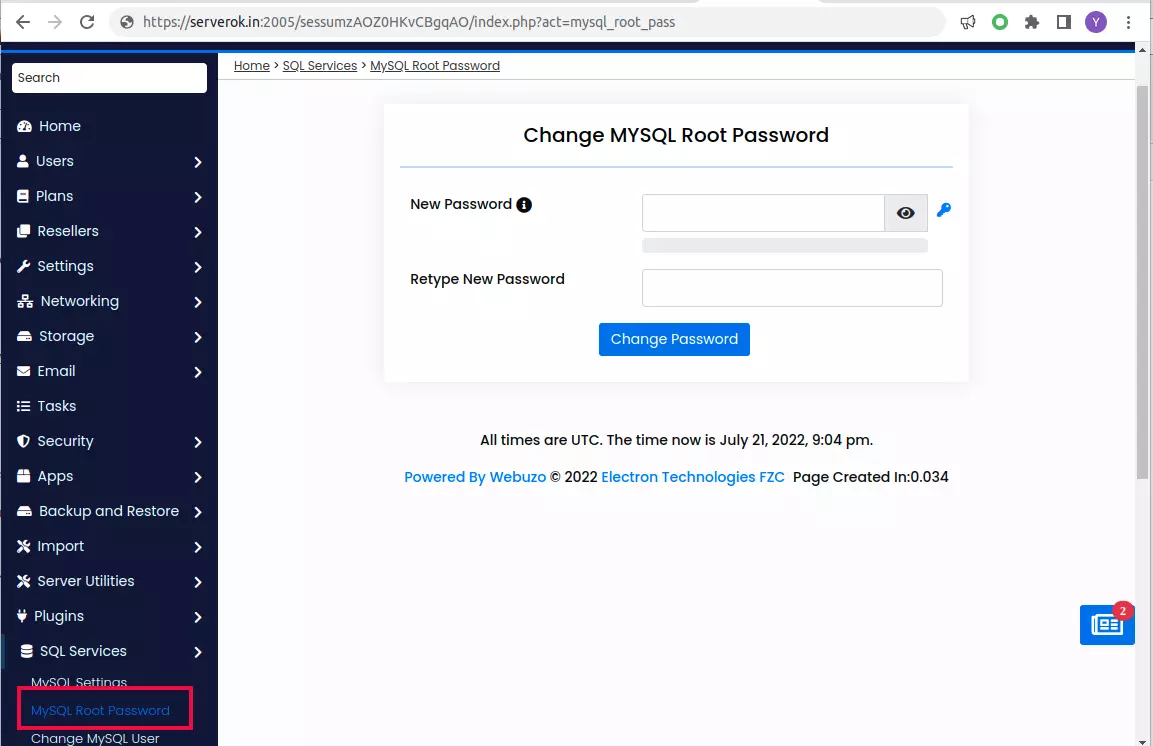
    To change the MySQL root password on Webuzo, login to the Webuzo control panel at

    https://your-server-ip:2005/
    

    Go to

    SQL Services > MYSQL Root Password
    

    Change MySQL root password in Webuzo

    Back to Webuzo