Tag: netplan

  • Configure VPS IP address in OneProvider Server

    Configure VPS IP address in OneProvider Server

    If you are running virtualization software like Proxmox, KVM, or VMWare ESXi on the OneProvider server, you need to order an additional IP address. On one provider IP operates in 2 modes, you need to set IP to virtualization mode to configure the IP address inside a VPS.

    Go to Server Details > Manage > IP Manager

    Default settings for IP address is “Host Route”, change it to “Virtualization” under Routing Type.
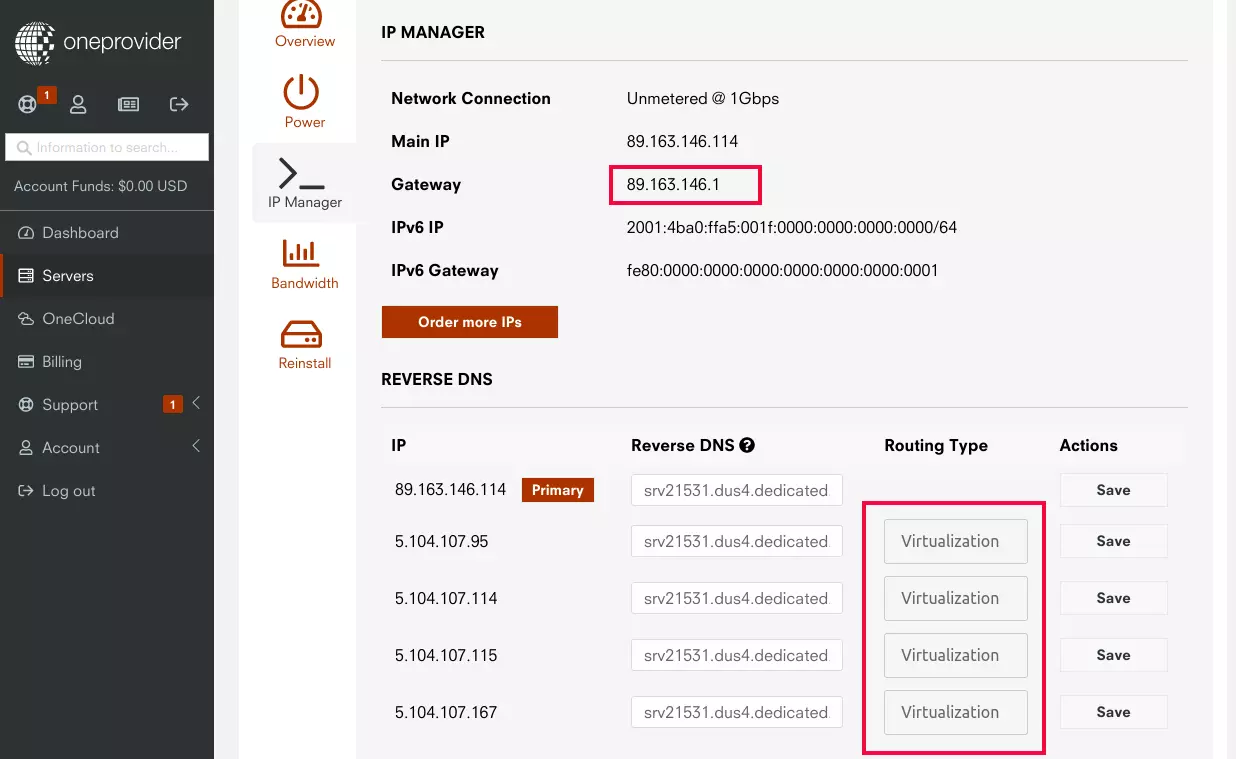
    oneprovider ip manager

    On this page, you can also get the Gateway IP address. All virtual machines should use the same Gateway IP as main server.

    For a virtual machine, I used following netplan config

    root@vm3:~# cat /etc/netplan/00-installer-config.yaml 
    # This is the network config written by 'subiquity'
    network:
      ethernets:
        enp1s0:
          dhcp4: false
          addresses:
          - 5.104.107.115/32
          nameservers:
           addresses:
           - 1.1.1.1
           - 8.8.8.8
          routes:
          - on-link: true
            to: 0.0.0.0/0
            via: 89.163.146.1
      version: 2
    root@vm3:~# 
    

    Here 5.104.107.115 is the IP address of the Virtual Machine. 89.163.146.1 is the gateway.

    After editing file /etc/netplan/00-installer-config.yaml, you can apply the changes with command

    netplan apply
    
  • Configure KVM Bridge Network using netplan

    Configure KVM Bridge Network using netplan

    On Ubuntu 20.04 server we have the following network configuration

    root@mail:~# ip a
    1: lo: <LOOPBACK,UP,LOWER_UP> mtu 65536 qdisc noqueue state UNKNOWN group default qlen 1000
        link/loopback 00:00:00:00:00:00 brd 00:00:00:00:00:00
        inet 127.0.0.1/8 scope host lo
           valid_lft forever preferred_lft forever
        inet6 ::1/128 scope host 
           valid_lft forever preferred_lft forever
    2: enp2s0: <BROADCAST,MULTICAST,UP,LOWER_UP> mtu 1500 qdisc fq_codel state UP group default qlen 1000
        link/ether d8:cb:8a:e3:c7:c9 brd ff:ff:ff:ff:ff:ff
        inet 37.157.249.137/32 scope global enp2s0
           valid_lft forever preferred_lft forever
        inet6 fe80::dacb:8aff:fee3:c7c9/64 scope link 
           valid_lft forever preferred_lft forever
    root@mail:~# 

    “netplan get all” command show following

    netplan get all

    netplan config file has the following

    root@mail:~# cat /etc/netplan/01-netcfg.yaml 
    # This file describes the network interfaces available on your system
    # For more information, see netplan(5).
    network:
      version: 2
      renderer: networkd
      ethernets:
        enp2s0:
          addresses: [ 37.157.249.137/32 ]
          nameservers:
              search: [ venus.dedi.server-hosting.expert ]
              addresses:
                  - "8.8.8.8"
                  - "1.1.1.1"
          routes:
          - to: 0.0.0.0/0
            via: 37.157.249.129
            on-link: true
    
    root@mail:~# 

    Before you can use bridge in netplan, you need to install bridge-utils

    apt-get install bridge-utils

    To configure bridge networking, modify the file as follows

    network:
        version: 2
        renderer: networkd
        ethernets:
            enp2s0:
                dhcp4: no
                dhcp6: no
        bridges:
            br0:
                dhcp4: no
                dhcp6: no
                interfaces: [enp2s0]
                addresses: [ 37.157.249.137/32 ]
                nameservers:
                    addresses:
                        - "8.8.8.8"
                        - "1.1.1.1"
                routes:
                -   to: 0.0.0.0/0
                    via: 37.157.249.129
                    on-link: true
    

    To check if there is any error in netplan configuration, run

    netplan generate

    To test the configuration, run

    netplan try

    Here is an example https://gist.github.com/serverok/712b85432d188f16c9d32e44455b419a

    Back to netplan

  • Ubuntu Server 20.04 set static IP with netplan

    First check if you have file

    /etc/cloud/cloud.cfg.d/subiquity-disable-cloudinit-networking.cfg

    If the file exists, make sure, you have the following content in it.

    root@ubuntu:~# cat /etc/cloud/cloud.cfg.d/subiquity-disable-cloudinit-networking.cfg
    network: {config: disabled}
    root@ubuntu:~# 

    Edit

    vi /etc/netplan/00-installer-config.yaml

    Replace all content with

    network:
        version: 2
        ethernets:
            eth0:
                addresses: [192.168.1.100/24]
                routes:
                    - to: default
                      via: 192.168.1.1
                nameservers:
                    addresses: [1.1.1.1, 8.8.8.8]

    In the above cause 192.168.1.100 is your static IP address. 192.168.1.1 is the gateway. eth0 is the network interface name.

    Older versions of netpan used gateway4 instead of routes.

                gateway4: 192.168.1.1

    Now try the changes with

    netplan try

    If all is good, you can make changes permanent with

    netplan apply

    See IP