Category: Apache

  • Apache Increase FD limit

    Apache Increase FD limit

    On CentOS 7 sevrer running apache, when try to install plugin in WordPress admin area, i get error

    Installazione fallita: Il download non è andato a buon fine. cURL error 35: Process open FD table is full
    

    This is due to Apache File Descriptor Limits.

    To see current Limits, use following PHP script

    FD Soft Limit: " . exec('ulimit -Sn');
    echo "
    FD Hard Limit: " . exec('ulimit -Hn');

    To see system wide limits, use following commands

    sysctl fs.file-nr
    sysctl fs.file-max
    

    Normally this will be high value. You need to increse limit for user running Apache. On CentOS 7, the username is “apache”. To increase limit for this user, edit

    vi /etc/security/limits.conf
    

    Add following lines

    apache soft nofile 10240
    apache hard nofile 900000
    

    To verify, we need to login as user Apache, and verify limits, for this, lets enable SSH or bash terminal for user apache. By default no SSH login allowed for this user.

    chsh --shell /bin/bash apache
    

    Now change to user, verify the limits

    su - apache
    ulimit -Hn
    ulimit -Sn
    

    Exit back to root, disable shell for user apache with command.

    chsh --shell /sbin/nologin apache
    

    We need to edit service file for Apache. Default service file look like following.

    [root@centos-s-1vcpu-1gb-blr1-01 ~]# cat /usr/lib/systemd/system/httpd.service
    [Unit]
    Description=The Apache HTTP Server
    After=network.target remote-fs.target nss-lookup.target
    Documentation=man:httpd(8)
    Documentation=man:apachectl(8)
    
    [Service]
    Type=notify
    EnvironmentFile=/etc/sysconfig/httpd
    ExecStart=/usr/sbin/httpd $OPTIONS -DFOREGROUND
    ExecReload=/usr/sbin/httpd $OPTIONS -k graceful
    ExecStop=/bin/kill -WINCH ${MAINPID}
    # We want systemd to give httpd some time to finish gracefully, but still want
    # it to kill httpd after TimeoutStopSec if something went wrong during the
    # graceful stop. Normally, Systemd sends SIGTERM signal right after the
    # ExecStop, which would kill httpd. We are sending useless SIGCONT here to give
    # httpd time to finish.
    KillSignal=SIGCONT
    PrivateTmp=true
    
    [Install]
    WantedBy=multi-user.target
    [root@centos-s-1vcpu-1gb-blr1-01 ~]# 
    

    Find

    [Service]
    

    Add below

    LimitNOFILE=65535
    LimitNPROC=65535
    

    Method 2

    create file

    mkdir -p /etc/systemd/system/httpd.service.d/
    vi /etc/systemd/system/httpd.service.d/limits.conf
    

    Add

    [Service]
    LimitNOFILE=65535
    LimitNPROC=65535
    

    Reload service file with

    systemctl daemon-reload
    

    Restart Apache

    systemctl restart httpd
    

    See Apache

  • gunicorn behind Apache web server

    gunicorn is a python application server used to run python applications in production. This is normally run behind web servers like nginx or apache.

    To configre gunicorn behind apache, enable following apache modules.

    a2enmod proxy proxy_ajp proxy_http rewrite deflate headers proxy_balancer proxy_connect proxy_html xml2enc
    

    Restart apache web server

    systemctl restart apache2
    

    For web site running pythin application, add a virtual host like following.

    
        ServerName DOMAIN_NAME
        ServerAdmin [email protected]
        DocumentRoot "/home/flaskapp/myapp"
    
        ErrorLog ${APACHE_LOG_DIR}/flaskapp-error.log
        CustomLog ${APACHE_LOG_DIR}/flaskapp-access.log combined
    
        ProxyPass / http://127.0.0.1:5000/
        ProxyPassReverse / "http://127.0.0.1:5000/"
    
        
            Order allow,deny
            Allow from all
            Options Indexes FollowSymLinks MultiViews
            Satisfy Any


  • Apache Invalid command AuthGroupFile

    On Plesk server, i get following error on error_log for a site

    [Tue Apr 23 08:50:32.336220 2019] [core:alert] [pid 30457:tid 140337888573184] [client 86.243.163.203:44805] /var/www/html/.htaccess: Invalid command 'AuthGroupFile', perhaps misspelled or defined by a module not included in the server configuration
    

    This is because authz_groupfile apache module was not loaded. To load this, run

    a2enmod authz_groupfile
    service apache2 restart
    

    To verify the module is loaded, run

    root@root1313:~#  apachectl -M | grep auth
     auth_basic_module (shared)
     auth_digest_module (shared)
     authn_core_module (shared)
     authn_file_module (shared)
     authz_core_module (shared)
     authz_groupfile_module (shared)
     authz_host_module (shared)
     authz_user_module (shared)
    root@root1313:~# 
    
  • Apache Limit access to a url

    I want to limit access to admin login url of a web application to specified IP address.

    The web site had admin login in following URL

    https://domain.com/login

    To limit IP address, i edited Apache VirtualHost configuration for this web site, added

    
        Order deny,allow
        Deny from all
        Allow from 103.35.199.82
        Allow from 51.38.246.115


    Restart apache

    systemctl restart httpd
    

    Or

    systemctl restart apache2
    

    Now only IP listed on the Allow from directive are allowed to access the /login URL.

    NOTE: this won’t work in .htaccess file. You need to add it in Apache VirtualHost.

  • Ubuntu Apache Setup for WordPress

    Ubuntu Apache Setup for WordPress

    On a Fresh Ubuntu 18.04 server, run following commands to setup Apache, PHP and MySQL needed for WordPress installation.

    You can go to each file and manually run the commands if you want to see what commands are executed.

    wget https://raw.githubusercontent.com/serverok/server-setup/master/ubuntu/1-basic-tools.sh
    wget https://raw.githubusercontent.com/serverok/server-setup/master/ubuntu/2-apache-php-mysql.sh
    wget https://raw.githubusercontent.com/serverok/server-setup/master/install/update-php-ini.sh
    bash ./1-basic-tools.sh
    bash ./2-apache-php-mysql.sh
    bash ./update-php-ini.sh
    

    At this stage, you have LAMP server setup and ready to go.

    To get your domain work with Apache, first you need to point your domain to server IP. This can be done by editing DNS records with your domain registrar or DNS provider.

    In commands below, replace

    DOMAIN.COM = replace with your actual domain name
    USERNAME = you can use any username you wnat, first 8 chars of domain name for example

    Create SFTP User

    useradd -m --shell /bin/bash --home /home/DOMAIN.COM USERNAME
    usermod -aG sudo USERNAME
    

    Set a password for the user. This will be used to login to SFTP

    passwd USERNAME
    

    You will be asked to enter password 2 times.

    Configure Apache

    First lets make Apache run as the user, this will make WordPress upgrade easier.

    sed -i "s/www-data/USERNAME/g" /etc/apache2/envvars
    chown -R USERNAME:USERNAME /var/lib/php/
    

    Create Apache VirtualHost entry

    vi /etc/apache2/sites-available/DOMAIN.COM.conf
    

    Add

    
        ServerName DOMAIN.COM
        ServerAlias www.DOMAIN.COM
        ServerAdmin [email protected]
        DocumentRoot /home/DOMAIN.COM/html
        
            Options All
            AllowOverride All
            Require all granted
            Order allow,deny
            allow from all


    To activate the web site, run

    a2ensite DOMAIN.COM
    

    Create document root and set permission

    mkdir -p /home/DOMAIN.COM/html
    chown -R USERNAME:USERNAME /home/DOMAIN.COM/
    chmod -R 755 /home/DOMAIN.COM/html/
    

    Restart Apache

    systemctl restart apache2
    

    Create MySQL Database

    Login to mysql, on ubuntu, as user root, run

    mysql
    

    Now you will be in MySQL command promt, run following 2 commands to create a Database and User.

    create database DB_NAME;
    grant all on DB_NAME.* to 'DB_USER'@'localhost' identified by 'MYSQL_PASSWORD';
    

    Replace MYSQL_PASSWORD with your own MySQL password. DB_NAME with name of database you need. DB_USER with username for the db.

    You will need these when installing WordPress.

    Installing LetsEncrypt

    First install letsEncrypt with

    wget https://raw.githubusercontent.com/serverok/server-setup/master/install/letsencrypt.sh
    bash ./letsencrypt.sh
    

    To get SSL for your domain, run

    certbot --authenticator webroot --webroot-path /home/DOMAIN.COM/html/ --installer apache --email [email protected] -d DOMAIN.COM -d www.DOMAIN.COM
    

    Replace [email protected] with your actual email address.

    Installing WordPress

    You can now SFTP/SSH into the server. Upload WordPress into html folder. Make sure you use the newly created USER to do this, if you do it as user root, you will get permission error. Visit the web site, you wil get WordPress install wizzard. Just fill the form to do the install. You will need to enter MySQL login details you created before.

    Install WordPress using SSH

    First login with SSH user you created with command

    ssh USER@SERVER_IP_ADDR
    

    You will be asked to enter password. Enter password you created before.

    Download wordpress

    wget https://wordpress.org/latest.tar.gz
    

    Extract wordpress files with

    tar xvf latest.tar.gz
    

    This will create a folder “wordpress” with the files.

    To make the site live, we need to replace folder html with this new wordpress folder

    mv html html-old
    mv wordpress html
    

    Now you can go to the site, you will see wordpress install screen.

    See WordPress

  • Cpanel ReverseProxy Traffic to Docker Container

    Cpanel ReverseProxy Traffic to Docker Container

    On a cpanel server, i need to run a web application using docker container.

    Application running side docker container listening on port 8000 on localhost.

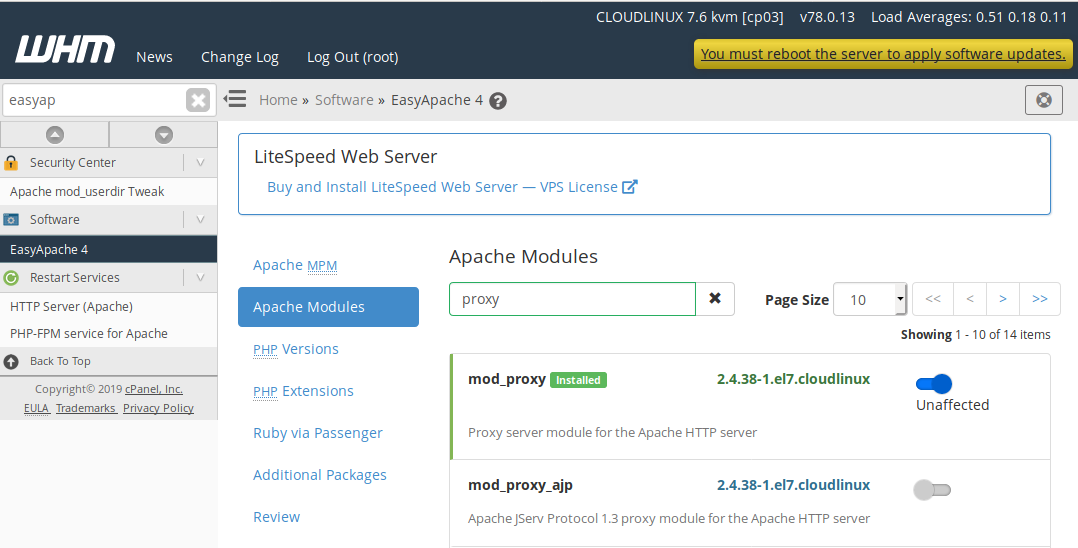
    For a web site to serve traffic from this docker container, we can use Apache mod_proxy, this is enabled by default on cpanel servers.

    https://httpd.apache.org/docs/2.4/howto/reverse_proxy.html

    You can verify it at

    WHM > EasyApache 4 > Currently Installed Packages > Customize > Apache Modules
    

    Apache mod_proxy

    For the site, you need to create reverse proxy, create a folder.

    NOTE: Replace CPANEL_USER and DOMAIN with your actual cpanel user name and domain name. You can find/verify this path by looking virtual host entry for your domain name in /etc/apache2/conf/httpd.conf file. By default this “Include” line will be commented. Once you put a file and rebuildhttpdconf, this line get uncommented.

    mkdir -p /etc/apache2/conf.d/userdata/std/2_4/CPANEL_USER/DOMAIN/
    

    Now create a file

    vi /etc/apache2/conf.d/userdata/std/2_4/CPANEL_USER/DOMAIN/docker.conf
    

    Add following.

    ProxyPass "/"  "http://localhost:8000/"
    ProxyPassReverse "/"  "http://localhost:8000/"
    

    Now rebuild Apache config.

    /scripts/rebuildhttpdconf
    

    Now if you check Apache config file (/etc/apache2/conf/httpd.conf), you will see included in Apache virtual host entry.

    Restart Apache

    service httpd restart
    

    Now if you visit the site, you will see the web application running on http://localhost:8000/

    See Reverse proxy, Cpanel Server, Apache

  • Disable PHP on a folder

    A web site had vlunerability, all allowed hacker to upload backdoor script to “uploads” folder used by the script.

    As a quick fix, i disabled PHP execution from “uploads” folder. Doing this for any site is a good dea when if your site is not vlunerable at the moment.

    Method 1

    To disable PHP execution, create a file with name .htaccess

    vi .htaccess
    

    Add

    php_flag engine off
    

    Method 2

    In .htacess, add

    RewriteRule ^.*\.php$ - [F,L]
    

    Only Allow specifc PHP files

    Only index.php is allowed. Any other PHP script will result in 403 error.

    
    Order Allow,Deny
    Deny from all
    
    
    Order Allow,Deny
    Allow from all


    See htaccess

  • Apache Benchmark

    ab is a tool for benchmarking web servers. It is designed to give you an impression of how your web server installation performs. This especially shows you how many requests per second your web server is capable of serving.

    http://httpd.apache.org/docs/2.4/programs/ab.html

    To benchmark a web site, use ab command provided by Apache.

    ab -c 200 -n 15000 http://site-to-benchmark-here.com/

    This will start 15000 requests to the server specified. 200 requests at a time.

  • Limit Access Using htaccess

    To limit access to a folder using .htaccess, create .htacess file with following content.

    order deny,allow
    deny from all
    allow from YOUR_IP_HERE
    

    YOUR_IP_HERE = Replace it with your actual IP.

    You can white list IP range by entering CIDR notation for the IP range.

    Here is .htacess i use on one of my web sites admin folder.

    order deny,allow
    deny from all
    allow from 137.97.0.0/16
    allow from 116.68.64.0/18
    

    If your server is behind a reverse proxy server, you may need to use

    Order Deny,Allow
    deny from all
    SetEnvIf X-Forwarded-For "103.35.199.82" OkAccess
    SetEnvIf X-Forwarded-For "92.184.105.169" OkAccess
    Allow from env=OkAccess
    
  • Show X-Forwarded-For IP in Apache

    When apache is running behind the proxy server it shows the IP of the proxy server as visitor IP. To fix this, you need to enable Apache module remoteip.

    https://httpd.apache.org/docs/2.4/mod/mod_remoteip.html

    On Ubuntu/Debian, this can be enabled with the command

    a2enmod remoteip
    

    Now create file

    vi /etc/apache2/conf-available/remoteip.conf
    

    Add

    RemoteIPHeader X-Forwarded-For
    RemoteIPTrustedProxy IP_OF_YOUR_PROXY_SERVER_HERE
    

    IP_OF_YOUR_PROXY_SERVER_HERE = repace with your proxy server. This can be any proxy server like haproxy, nginx, etc.. If you have more than one proxy server, use IPs separated by space.

    If your proxy IP is internal, use RemoteIPInternalProxy instead of RemoteIPTrustedProxy. On a server running varnish, RMOTE_ADDR shows 127.0.0.1 (varnish IP). To fix this, I used following

    RemoteIPHeader CF-Connecting-IP
    RemoteIPInternalProxy 127.0.0.1
    

    CF-Connecting-IP is because the site was behind cloudflare. Use X-Forwarded-For instead of CF-Connecting-IP if not using cloudflare.

    Enable config with

    a2enconf remoteip
    

    To get Apache Logs to show real Visitor IP, replace %h with %a in LogFormat.

    On Ubuntu

    vi /etc/apache2/apache2.conf
    

    Find

    LogFormat "%h %l %u %t \"%r\" %>s %O \"%{Referer}i\" \"%{User-Agent}i\"" combined
    

    Replace with

    LogFormat "%a %l %u %t \"%r\" %>s %O \"%{Referer}i\" \"%{User-Agent}i\"" combined
    

    Restart Apache with

    systemctl restart apache2
    

    Now apache/php will show proper visitor IP instead of proxy server IP.

  • Apache Disable PHP for a web site

    To disable PHP for a web site edit VirtualHost entry of the web site and add

    php_flag engine off
    

    Restart Apache

    systemctl restart apache2
    

    Method 2

    Add following code in VirtualHost entry

    
        SetHandler none


    Restart Apache.

    Method 3

    Add following code to Apache VirtualHost entry

    
        php_admin_flag engine Off


    Then restart the Apache web server. Change folder /var/www/html to your DocumentRoot directory.

    Apache

  • Run .html files as PHP in Apache

    On Ubuntu, to execute .htm files as PHP, create file

    vi /etc/apache2/conf-enabled/php-html.conf
    

    Add following content

    
        SetHandler application/x-httpd-php


    This is similar code from your PHP configuration. In this case, it is from /etc/apache2/mods-available/php5.6.conf

    If you want it only for a specific website, edit VirtualHost entry for the website and add

    
            SetHandler application/x-httpd-php


    Example

    
        ServerName serverok.in
        ServerAlias www.serverok.in
        DocumentRoot /home/www/serverok.in/html
        CustomLog ${APACHE_LOG_DIR}/serverok.in.log combined
        
            Options All
            AllowOverride All
            Require all granted
            Order allow,deny
            allow from all
        
        
                SetHandler application/x-httpd-php


    Now restart apache

    service apache2 restart
    

    Apache | PHP