Category: AlmaLinux

  • Install ffmpeg on AlmaLinux 8

    Install ffmpeg on AlmaLinux 8

    First, enable epel repo

    dnf install epel-release

    Enable rpmfusion repo

    dnf install https://download1.rpmfusion.org/free/el/rpmfusion-free-release-8.noarch.rpm
    dnf install https://download1.rpmfusion.org/nonfree/el/rpmfusion-nonfree-release-8.noarch.rpm

    Install ffmpeg with

    dnf install ffmpeg

    Verify ffmpeg is working

    [root@nc-ph-0997-24 ~]# ffmpeg -version
    ffmpeg version 4.2.10 Copyright (c) 2000-2024 the FFmpeg developers
    built with gcc 8 (GCC)
    configuration: --prefix=/usr --bindir=/usr/bin --datadir=/usr/share/ffmpeg --docdir=/usr/share/doc/ffmpeg --incdir=/usr/include/ffmpeg --libdir=/usr/lib64 --mandir=/usr/share/man --arch=x86_64 --optflags='-O2 -g -pipe -Wall -Werror=format-security -Wp,-D_FORTIFY_SOURCE=2 -Wp,-D_GLIBCXX_ASSERTIONS -fexceptions -fstack-protector-strong -grecord-gcc-switches -specs=/usr/lib/rpm/redhat/redhat-hardened-cc1 -specs=/usr/lib/rpm/redhat/redhat-annobin-cc1 -m64 -mtune=generic -fasynchronous-unwind-tables -fstack-clash-protection -fcf-protection' --extra-ldflags='-Wl,-z,relro -Wl,-z,now -specs=/usr/lib/rpm/redhat/redhat-hardened-ld ' --extra-cflags=' ' --enable-libopencore-amrnb --enable-libopencore-amrwb --enable-libvo-amrwbenc --enable-version3 --enable-bzlib --disable-crystalhd --enable-fontconfig --enable-frei0r --enable-gcrypt --enable-gnutls --enable-ladspa --enable-libaom --enable-libdav1d --enable-libass --enable-libbluray --enable-libcdio --enable-libdrm --enable-libjack --enable-libfreetype --enable-libfribidi --enable-libgsm --enable-libmp3lame --enable-nvenc --enable-openal --enable-opencl --enable-opengl --enable-libopenjpeg --enable-libopus --enable-libpulse --enable-librsvg --enable-libsrt --enable-libsoxr --enable-libspeex --enable-libssh --enable-libtheora --enable-libvorbis --enable-libv4l2 --enable-libvidstab --enable-libvmaf --enable-version3 --enable-vapoursynth --enable-libvpx --enable-libx264 --enable-libx265 --enable-libxvid --enable-libzimg --enable-libzvbi --enable-avfilter --enable-avresample --enable-libmodplug --enable-postproc --enable-pthreads --disable-static --enable-shared --enable-gpl --disable-debug --disable-stripping --shlibdir=/usr/lib64 --enable-libmfx --enable-runtime-cpudetect
    libavutil      56. 31.100 / 56. 31.100
    libavcodec     58. 54.100 / 58. 54.100
    libavformat    58. 29.100 / 58. 29.100
    libavdevice    58.  8.100 / 58.  8.100
    libavfilter     7. 57.100 /  7. 57.100
    libavresample   4.  0.  0 /  4.  0.  0
    libswscale      5.  5.100 /  5.  5.100
    libswresample   3.  5.100 /  3.  5.100
    libpostproc    55.  5.100 / 55.  5.100
    [root@nc-ph-0997-24 ~]# 

    Back to ffmpeg

  • How to Migrate CentOS 7 to AlmaLinux 8

    How to Migrate CentOS 7 to AlmaLinux 8

    Upgrade CentOS 7 to latest version with

    yum update -y
    

    Reboot the server

    reboot
    

    Install elevate repo rpm file

    yum install -y http://repo.almalinux.org/elevate/elevate-release-latest-el$(rpm --eval %rhel).noarch.rpm
    

    Install leapp

    yum install -y leapp-upgrade leapp-data-almalinux
    

    Run pre upgrade check

    leapp preupgrade
    

    After the preupgrade script run, it will generate a log file /var/log/leapp/leapp-report.txt, you need to fix any problems reported in this file.

    On CentOS 7, you need to run these 2 commands as they will cause upgrade blocking.

    rmmod pata_acpi
    leapp answer --section remove_pam_pkcs11_module_check.confirm=True
    

    Run the upgrade

    leapp upgrade
    

    During the upgrade, server will reboot itself. This process can take a while to finish. Don’t interrupt the process or you will end up with non working server.

    Once the upgrade process is finished, reboot the server.

    reboot
    
  • How to configure IPv6 on OVH AlmaLinux 8 server

    How to configure IPv6 on OVH AlmaLinux 8 server

    First, find the network interface used by the server with ip a command.

    [root@15-204-47-122 ~]# ip a
    1: lo:  mtu 65536 qdisc noqueue state UNKNOWN group default qlen 1000
        link/loopback 00:00:00:00:00:00 brd 00:00:00:00:00:00
        inet 127.0.0.1/8 scope host lo
           valid_lft forever preferred_lft forever
        inet6 ::1/128 scope host 
           valid_lft forever preferred_lft forever
    2: eno1:  mtu 1500 qdisc mq state UP group default qlen 1000
        link/ether a8:a1:59:c0:de:80 brd ff:ff:ff:ff:ff:ff
        altname enp3s0f0
        inet 15.204.47.122/24 brd 15.204.47.255 scope global eno1
           valid_lft forever preferred_lft forever
        inet6 fe80::aaa1:59ff:fec0:de80/64 scope link 
           valid_lft forever preferred_lft forever
    3: enp3s0f1:  mtu 1500 qdisc noop state DOWN group default qlen 1000
        link/ether a8:a1:59:c0:de:81 brd ff:ff:ff:ff:ff:ff
    4: enp0s20f0u8u3c2:  mtu 1500 qdisc noop state DOWN group default qlen 1000
        link/ether 5a:58:d0:03:8e:b3 brd ff:ff:ff:ff:ff:ff
    [root@15-204-47-122 ~]# 
    

    The interface eno1 has the public IPv4 address of the server associated, so it is the public interface used by the server.

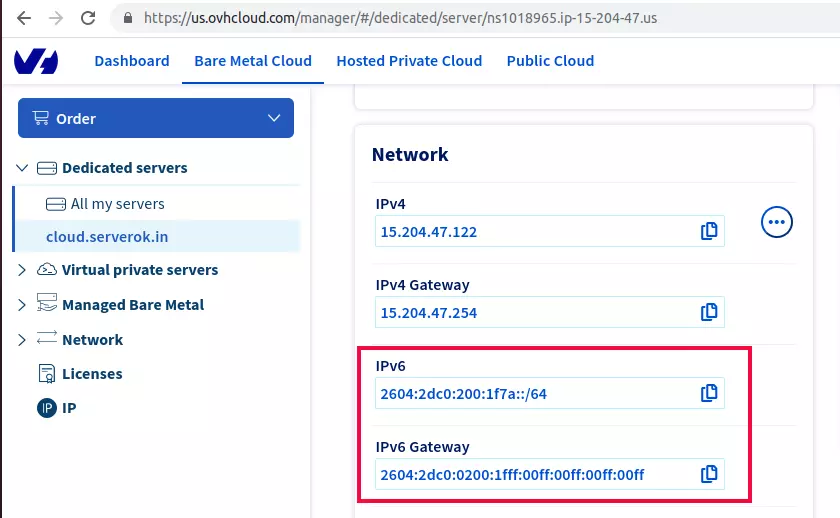
    Find the IPv6 IP address and gateway, This you can find in the OVH Manager server details page.

    OVH Server manager network details IPv6

    Edit ifcfg file for the network interface

    vi /etc/sysconfig/network-scripts/ifcfg-eno1 
    

    At the end of the configuration, add

    IPV6INIT=yes
    IPV6_AUTOCONF=no
    IPV6_FAILURE_FATAL=no
    IPV6ADDR=2604:2dc0:200:1f7a::/64
    

    2604:2dc0:200:1f7a::/64 – is the IPv6 IP address found in OVH Manager.

    Here is the full configuration

    BOOTPROTO=static
    DEVICE=eno1
    HWADDR=a8:a1:59:c0:de:80
    IPADDR=15.204.47.122
    NETMASK=255.255.255.0
    GATEWAY=15.204.47.254
    ONBOOT=yes
    TYPE=Ethernet
    USERCTL=no
    IPV6INIT=yes
    IPV6_AUTOCONF=no
    IPV6_FAILURE_FATAL=no
    IPV6ADDR=2604:2dc0:200:1f7a::/64
    

    Create route file

    vi /etc/sysconfig/network-scripts/route6-eno1 
    

    Add

    2604:2dc0:0200:1fff:00ff:00ff:00ff:00ff dev eno1
    default via 2604:2dc0:0200:1fff:00ff:00ff:00ff:00ff
    

    Here ‘2604:2dc0:0200:1fff:00ff:00ff:00ff:00ff” is gateway address you get from OVH Manager server network page. eno1 is your public network interface name.

    After reboot, the IPv6 network will work on the server.

    Back to IP

  • How to install docker on AlmaLinux 8

    How to install docker on AlmaLinux 8

    To install docker on AlmaLinux, run the following commands

    Install yum-utils

    dnf install -y yum-utils

    Add docker repository

    yum-config-manager --add-repo https://download.docker.com/linux/centos/docker-ce.repo

    Install Docker CE with

    dnf install docker-ce

    Enable docker

    systemctl enable docker

    Start Docker

    systemctl start docker

    To verify if docker is working properly, run

    docker run hello-world
    

    Example

    [root@cloud ~]# docker run hello-world
    Unable to find image 'hello-world:latest' locally
    latest: Pulling from library/hello-world
    2db29710123e: Pull complete 
    Digest: sha256:94ebc7edf3401f299cd3376a1669bc0a49aef92d6d2669005f9bc5ef028dc333
    Status: Downloaded newer image for hello-world:latest
    
    Hello from Docker!
    This message shows that your installation appears to be working correctly.
    
    To generate this message, Docker took the following steps:
     1. The Docker client contacted the Docker daemon.
     2. The Docker daemon pulled the "hello-world" image from the Docker Hub.
        (amd64)
     3. The Docker daemon created a new container from that image which runs the
        executable that produces the output you are currently reading.
     4. The Docker daemon streamed that output to the Docker client, which sent it
        to your terminal.
    
    To try something more ambitious, you can run an Ubuntu container with:
     $ docker run -it ubuntu bash
    
    Share images, automate workflows, and more with a free Docker ID:
     https://hub.docker.com/
    
    For more examples and ideas, visit:
     https://docs.docker.com/get-started/
    
    [root@cloud ~]# 

    See docker

  • Install PHP 5.6 on AlmaLinux 8

    Install PHP 5.6 on AlmaLinux 8

    To install PHP 5.6 on AlmaLinux 8, first enable the epel repository.

    dnf install -y epel-release

    install remi repository with the command

    dnf install http://rpms.remirepo.net/enterprise/remi-release-8.rpm

    Now you can install PHP 5.6 with

    dnf install php56

    You can execute PHP with the command

    php56

    If you want PHP 5.6 to work with the command “php”, then edit

    vi ~/.bashrc

    At end of the file, add

    source /opt/remi/php56/enable

    Log off and login to the server or run command

    source /opt/remi/php56/enable

    Or you can create a symlink

    ln -s /opt/remi/php56/root/usr/bin/php /usr/bin/php

    If you need PHP work with Apache, run install Apache with

    dnf install httpd

    Install php-fpm with

    dnf install php56-php-fpm

    Enable and restart Apache

    systemctl enable php56-php-fpm
    systemctl enable httpd
    systemctl restart httpd
    systemctl restart php56-php-fpm

    php-fpm pool config file available at

    /etc/opt/remi/php56/php-fpm.d/www.conf