nf_conntrack: table full, dropping packet
MariaDB Change Open Files Limit
Elasticsearch
Category: Linux
-
nf_conntrack: table full, dropping packet
On a CentOS server, i get following error in /var/log/messages
Jan 17 03:40:02 ss1 kernel: nf_conntrack: table full, dropping packet
Jan 17 03:40:03 ss1 kernel: nf_conntrack: table full, dropping packet
Jan 17 03:40:03 ss1 kernel: nf_conntrack: table full, dropping packet
Jan 17 03:40:03 ss1 kernel: nf_conntrack: table full, dropping packet
Jan 17 03:40:03 ss1 kernel: nf_conntrack: table full, dropping packet
Jan 17 03:40:03 ss1 kernel: nf_conntrack: table full, dropping packetThis is because the server is getting too much connections. This can be due to a busy server or DDoS attack.
if you traffic is legit, you can increase maximum connection tracking.
To see current value, run
cat /proc/sys/net/netfilter/nf_conntrack_max
To set value, run
echo 64000 > /proc/sys/net/netfilter/nf_conntrack_max
Change 64000 with your desired value.
You can also use sysctl, for example
sysctl -a | grep nf_conntrack_max
To set value, run
sysctl -w net.netfilter.nf_conntrack_max=120000
To make it permanent, edit
vi /etc/sysctl.conf
Add
net.netfilter.nf_conntrack_max=120000
Now run
sysctl -p
See sysctl
-
lsof
To see all Open files
lsof
To see all network activity
lsof -i
See the connections on port 80
lsof -i :80
To see all files opened by a process
lsof -p PID
To see all files opened by a process and refresh it every 5 seconds, run
lsof -p PID_HERE -r 5
See Linux Commands
-
Install PHP 7.2 on CentOS from yum
First you need to install Remi repository
Enable epel repo with
yum install epel-release -y
On CentOS 7
rpm -ivh https://rpms.remirepo.net/enterprise/remi-release-7.rpm
On CentOS 6
rpm -ivh https://rpms.remirepo.net/enterprise/remi-release-6.rpm
Enable PHP 7.2
yum install yum-utils
yum-config-manager --enable remi-php72
To install PHP, run
yum install -y php php-bcmath php-cli php-common php-devel php-gd \
    php-imap php-intl php-json php-ldap php-lz4 php-mbstring php-mysqlnd \
    php-soap php-intl php-opcache php-xml php-pdo
Downgrading PHP version
if you ever want to change PHP version, lets say PHP 7.0, do the following. Remove current PHP
rpm -qa | grep php | xargs yum remove -y
Disable PHP 7.2 repo.
yum-config-manager --disable remi-php72
Enable PHP 7.0 repo
yum-config-manager --enable remi-php70
Now install PHP as above.
PHp Binary
PHP cli will be installed in /usr/bin/php72, you can create a symlink if you want.
PHP-FPM
To install php-fpm module, run
yum install php72-php-fpm -y
To start php-fpm, run
systemctl start php72-php-fpm
-
haproxy
To install haproxy on Ubuntu, run
apt install haproxyHaproxy config file is located at
/etc/haproxy/haproxy.cfgEnable HTTP_X_FORWARDED_FOR in Haproxy
Show X-Forwarded-For IP in Apache
Haproxy Site With SSL
Enable SSL in Haproxy Docker Container -
chrome
- Install Google Chrome on CentOS 7 64 bit
- Install Google Chrome in Ubuntu
- Enable Native Notification in Google Chrome
- Disable Native Notification on Google Chrome Ubuntu
- How to remove the Google Chrome Reading List
- How to Convert a Website (Trello) into Desktop (Chrome) Application
Good Plugins
Some of the special URLs/settings pages
chrome://settings/content
chrome://plugins
chrome://net-internals/#events
chrome://net-internals/#dns
Configure Socks Proxy with google chrome
google-chrome --user-data-dir=/mnt/data/chrome-profile/sok-vpn --class=sok-vpn --proxy-server="socks5://127.0.0.1:7373" --proxy-bypass-list="<local>,127.0.0.1,*.test" --host-resolver-rules="MAP * ~NOTFOUND , EXCLUDE 127.0.0.1" -
Install Google Chrome on CentOS 7 64 bit
To install Google Chrome on CentOS 7 (Chrome won’t work on CentOS 6 as it is using older version of libraries required for Chrome).
First create repo file
vi /etc/yum.repos.d/google-chrome.repo
Add following content
[google-chrome]
name=google-chrome
baseurl=http://dl.google.com/linux/chrome/rpm/stable/x86_64
enabled=1
gpgcheck=1
gpgkey=https://dl-ssl.google.com/linux/linux_signing_key.pub
Now you can install google chrome with command
yum -y install google-chrome-stable
See CentOS
-
screen
screen allows you to run commands in the remote server even after you disconnect.
disconnect from a session
Press
CTRL + A, then press CTRIL +D in quick succession.
You can also close the terminal, the screen session will continue in the background.
screen -ls List all available screen sessions screen -r Reconnect to a disconnected screen session screen -S work start a named session screen -r ID / screen -r “name” reattach specific session screen -d -r detach and reattach screen -RR reattach if possible, otherwise create Ctrl-a d detach Ctrl-a c create a new window Ctrl-a n / Ctrl-a p next / previous window Ctrl-a “ list windows Ctrl-a A rename current window Ctrl-a | vertical split Ctrl-a Tab move focus between regions Run a script inside screen
screen -dmS sessionName ./script.sh -
OVH VPS Configure failover IP in Ubuntu
On Ubuntu
Default config look like
root@zecurecode:~# cat /etc/network/interfaces
# This file describes the network interfaces available on your system
# and how to activate them. For more information, see interfaces(5).

# The loopback network interface
auto lo
iface lo inet loopback

# Source interfaces
# Please check /etc/network/interfaces.d before changing this file
# as interfaces may have been defined in /etc/network/interfaces.d
# See LP: #1262951
source /etc/network/interfaces.d/*.cfg

root@zecurecode:~#
/etc/network/interfaces.d/50-cloud-init.cfg is used to auto configure network interface with dhcp.
root@zecurecode:~# cat /etc/network/interfaces.d/50-cloud-init.cfg
# This file is generated from information provided by
# the datasource.  Changes to it will not persist across an instance.
# To disable cloud-init's network configuration capabilities, write a file
# /etc/cloud/cloud.cfg.d/99-disable-network-config.cfg with the following:
# network: {config: disabled}
auto lo
iface lo inet loopback

auto ens3
iface ens3 inet dhcp
root@zecurecode:~#
First find the gateway used by the VPS.
root@zecurecode:~# route -n
Kernel IP routing table
Destination     Gateway         Genmask         Flags Metric Ref    Use Iface
0.0.0.0         51.254.32.1     0.0.0.0         UG    0      0        0 ens3
51.254.32.1     0.0.0.0         255.255.255.255 UH    0      0        0 ens3
root@zecurecode:~#
We found the gateway IP 51.254.32.1
The VPS had main IP of the server is 51.254.35.58 and secondary IPS 94.23.153.137, 178.32.52.159, 178.32.49.157
Here is the modified /etc/network/interfaces
root@zecurecode:~# cat /etc/network/interfaces
# This file describes the network interfaces available on your system
# and how to activate them. For more information, see interfaces(5).

# The loopback network interface
auto lo
iface lo inet loopback

# Source interfaces
# Please check /etc/network/interfaces.d before changing this file
# as interfaces may have been defined in /etc/network/interfaces.d
# See LP: #1262951
#source /etc/network/interfaces.d/*.cfg

auto ens3
iface ens3 inet static
    address 51.254.35.58
    netmask 255.255.255.255
    broadcast 51.254.35.58
    post-up route add 51.254.32.1 dev ens3
    post-up route add default gw 51.254.32.1
    post-down route del default gw 51.254.32.1
    post-down route del 51.254.32.1 dev ens3

auto ens3:1
iface ens3:1 inet static
    address 94.23.153.137
    netmask 255.255.255.255
    broadcast 94.23.153.137

auto ens3:2
iface ens3:2 inet static
    address 178.32.52.159
    netmask 255.255.255.255
    broadcast 178.32.52.159

auto ens3:3
iface ens3:3 inet static
    address 178.32.49.157
    netmask 255.255.255.255
    broadcast 178.32.49.157


root@zecurecode:~#
Here is a PHP script to create OVH failover IP config for Ubuntu/Debian.
https://gist.github.com/serverok/991f7ccd1be36cbc579e8d55caf39715
-
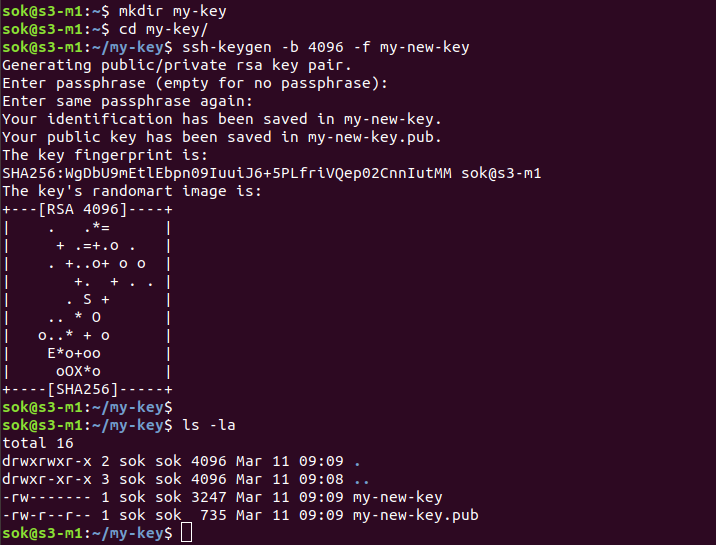
ssh-keygen
To generate SSH key, run
ssh-keygen -t ed25519If you need RSA key, run
ssh-keygen -b 4096To create an SSH key in the current folder, run
ssh-keygen -b 4096 -N "" -f NAME_OF_KEYThis will create 2 files in the current directory. The “-N” option is for keyphrase. With -N “”, it won’t ask you for kayphrase.
-
Change SSH Key Passphrase
To change SSH key passphrase, run
ssh-keygen -p -f ~/.ssh/id_rsa
Example
root@ok:~/.ssh# ssh-keygen -p -f ~/.ssh/id_rsa
Enter new passphrase (empty for no passphrase):
Enter same passphrase again:
Your identification has been saved with the new passphrase.
root@ok:~/.ssh#
See ssh-keygen