virt-manager is a GUI tool used to manage KVM virtial machines. To install virt-manager on Ubuntu, run
apt install virt-managervirt-manager is a GUI tool used to manage KVM virtial machines. To install virt-manager on Ubuntu, run
apt install virt-manager
Free version of VMware ESXi don’t provide option to clone virtual machine. If you want to clone a VM, you need to purchase expensive vSphere license.
There is a work around for this, you need to clone disk of an existing Virtual machine using vmkfstools.
To make clone of a VM disk, SSH into your VMWare ESXi server as user root. Then create clone of disk with
vmkfstools -i "source.vmdk" "destination.vmdk"
For new VM, i created a directory. Path to datastore directory may be differnt on your server, you can find it using “df -h” command and checking the file system.
mkdir /vmfs/volumes/disk2/ubuntu-clone/
Shutdown the Virtual Machine you want to clone the disk from. Run
[root@ns3048991:~] vmkfstools -i "/vmfs/volumes/disk2/Ubuntu/Ubuntu.vmdk" "/vmfs/volumes/disk2/ubuntu-clone/ubuntu-clone.vmdk"
Destination disk format: VMFS zeroedthick
Cloning disk '/vmfs/volumes/disk2/Ubuntu/Ubuntu.vmdk'...
Clone: 100% done.
[root@ns3048991:~]
In screenshot below, i first tried to clone with out creating destination folder. That resulted in error. After creating destination folder, vmkfstools command worked.

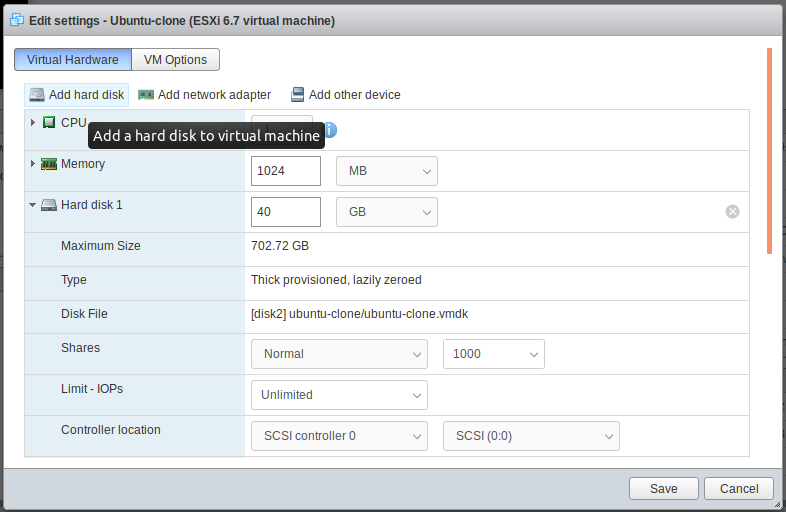
Login to VMware ESXi web interface. Create a new VM. On the step where you select hardware, delete the existing Disk. Add a new disk, browse and select the newly created clone disk. In this case – “/vmfs/volumes/disk2/ubuntu-clone/ubuntu-clone.vmdk”

Once the VM creation is finished, you will be able to start the new VM. You can create a VM, then use it as the template for creating new virtual machines.
See VMWare
To list all VM on a KVM server, run
virsh listExample
root@s3-m12:~# virsh list
 Id    Name                           State
----------------------------------------------------
 6     foo                            running

root@s3-m12:~#
To view all Virtual machines including stopped VM’s, use –all option.
root@mail:~# virsh list --all
 Id   Name       State
---------------------------
 1    iredmail   running
 -    win10      shut off

root@mail:~#
To see all network
root@server1:~# virsh net-list --all
 Name      State    Autostart   Persistent
--------------------------------------------
 Bridge0   active   yes         yes

root@server1:~#
See virsh
To see information about a KVM node, run
virsh nodeinfo
Example
root@s3-m12:~# virsh nodeinfo
CPU model:           x86_64
CPU(s):              8
CPU frequency:       1861 MHz
CPU socket(s):       1
Core(s) per socket:  4
Thread(s) per core:  2
NUMA cell(s):        1
Memory size:         16423092 KiB

root@s3-m12:~#
See virsh
virsh command is used to manage KVM vps. It is part of libvirt package.
To list KVM virtual machines, run
virsh listStart a VM
virsh start VM_IDTo shutdown a VM, run
virsh shutdown VM_IDTo delete a VM, run
virsh shutdown VM_IDvirsh --connect qemu+ssh://root@server70.hosthat.com/systemYou need SSH Key based authentication setup.
boby@fwhlin:~ $ virsh list --all
 Id    Name                           State
----------------------------------------------------
 -     vm1                            shut off

boby@fwhlin:~ $[root@server70 ~]# virsh list
Id Name State
----------------------------------------------------
1 vm10 running
3 vm12 running
5 vm15 running
7 vm17 running
12 vm16 running
[root@server70 ~]#virsh dominfo VM_NAMEexample
[root@server70 ~]# virsh dominfo vm18
Id:             10
Name:           vm18
UUID:           b6c3a3d8-d96a-c3fa-1fad-04aff28e476a
OS Type:        hvm
State:          running
CPU(s):         2
CPU time:       422.9s
Max memory:     524288 KiB
Used memory:    524288 KiB
Persistent:     yes
Autostart:      disable
Managed save:   no
Security model: none
Security DOI:   0

[root@server70 ~]#virsh dumpxml vm18 > vm18.xml
virsh shutdown vm18vi vm18.xmlFind
<memory unit='KiB'>524288</memor<memory unit='KiB'>524288</memory>
<currentMemory unit='KiB'>524288</currentMemory>
To change Memory to 1 GB, Replace it with
<memory unit='KiB'>1048576</memory>
<currentMemory unit='KiB'>1048576</currentMemory>
Load configuration
virsh define vm18.xml Example
[root@server70 ~]# virsh define vm18.xml
Domain vm18 defined from vm18.xml

[root@server70 ~]#
Start VM
virsh start vm18[root@server70 ~]# virsh start vm18
Domain vm18 started
[root@server70 ~]#See kvm
lxc allow you to take snapshot, restore snapshot of a container.
Here we create a snapshot, then delete the /etc folder from the container. Now the container is useless. Restore the container from snapshot to get it work again.
root@UNUSED:~# lxc snapshot my-vm-2 my-vm-2-snap1
root@UNUSED:~# lxc exec my-vm-2 -- rm -rf /etc
root@UNUSED:~# lxc exec my-vm-2 -- bash
I have no name!@my-vm-2:~# ls -l / | grep etc
I have no name!@my-vm-2:~# exit
root@UNUSED:~# lxc restore my-vm-2 my-vm-2-snap1
root@UNUSED:~# lxc exec my-vm-2 -- bash
root@my-vm-2:~# ls -l / | grep etc
drwxr-xr-x  89 root   root    4096 Aug 27 07:06 etc
root@my-vm-2:~# exit
root@UNUSED:~#
To list all snapshots of a container, run
lxc info container-nameTo delete a snapshot, run
lxc delete container-name/snapshot-nameContainer snapshots are stored in folder
/var/snap/lxd/common/lxd/storage-pools/default/containers-snapshots/To create LXD containers, run
lxc launch ubuntu:22.04 VM-NAME-HERE
lxc launch ubuntu:24.04 VM-NAME-HERE
lxc launch images:almalinux/8 VM-NAME-HERE
lxc launch images:almalinux/9 VM-NAME-HERE
lxc launch images:amazonlinux/2023 VM-NAME-HERE
lxc launch images:archlinux VM-NAME-HERE
lxc launch images:centos/9-Stream VM-NAME-HERE
lxc launch images:debian/11 VM-NAME-HERE
lxc launch images:debian/12 VM-NAME-HERE
lxc launch images:fedora/39 VM-NAME-HERE
lxc launch images:fedora/40 VM-NAME-HERE
lxc launch images:oracle/8 VM-NAME-HERE
lxc launch images:oracle/9 VM-NAME-HERE
LXD is a tool to manage LXC (Linux Containers). lxd allow you to create and manage lightweight Linux containers, it is like docker, but more like an actual virtual machine. LXD is more user-friendly than using LXC directly, has more features like clustering of servers.
On Ubuntu/Debian, run
apt install -y lxd lxd-clientBefore you start using lxd, run
lxd init --auto --storage-backend=dirOr
lxd initJust press enter for all questions. Defaults should work. lxd is a demon, only used one time during “lxd init”. After this, you will be using lxc command for everything.
Example
root@b24:~# lxd init
Would you like to use LXD clustering? (yes/no) [default=no]:
Do you want to configure a new storage pool? (yes/no) [default=yes]:
Name of the new storage pool [default=default]:
Name of the storage backend to use (dir, lvm, ceph, btrfs) [default=btrfs]:
Create a new BTRFS pool? (yes/no) [default=yes]:
Would you like to use an existing empty block device (e.g. a disk or partition)? (yes/no) [default=no]:
Size in GB of the new loop device (1GB minimum) [default=30GB]:
Would you like to connect to a MAAS server? (yes/no) [default=no]:
Would you like to create a new local network bridge? (yes/no) [default=yes]:
What should the new bridge be called? [default=lxdbr0]:
What IPv4 address should be used? (CIDR subnet notation, “auto” or “none”) [default=auto]:
What IPv6 address should be used? (CIDR subnet notation, “auto” or “none”) [default=auto]: none
Would you like the LXD server to be available over the network? (yes/no) [default=no]:
Would you like stale cached images to be updated automatically? (yes/no) [default=yes]
Would you like a YAML "lxd init" preseed to be printed? (yes/no) [default=no]:
root@b24:~#
When it ask for IPv6, I selected “none”, everything else is the default.
To create a container, run
lxc launch ubuntu:22.04 vm-1Create CentOS container
lxc launch images:centos/7 vm-2Create Debian 10 container
lxc launch images:debian/10 vm-3To list all containers, run
lxc ls
To stop a VM, run
lxc stop VM-NAMETo start VM,
lxc start VM-NAMETo see information about a container
lxc info VM-NAMEFolders
/var/snap/lxd/To see storage, run
lxc storage lsAll containers share the following disk image.
/var/snap/lxd/common/lxd/disks/default.img
/var/snap/lxd/common/lxd/storage-pools/default/containersLXC is Linux Container, allows you to run lightweight virtual servers on your computer.
It is better use LXD instead of LXC. LXD provides a much easier-to-use interface to LXC.
To install lxc, run
apt install -y lxc
To create a VM, use
lxc-create -t download -n first-vm
To list VM, use the command lxc-ls
root@UNUSED:~# lxc-ls
first-vm
root@UNUSED:~# lxc-ls -f
NAME     STATE   AUTOSTART GROUPS IPV4      IPV6 UNPRIVILEGED
first-vm RUNNING 0         -      10.0.3.26 -    false
root@UNUSED:~#
To start a VM, run
lxc-start VM_NAME
To login to a VM, run
lxc-attach VM_NAME
lxc config files
/etc/lxc/default.conf
/etc/lxc/lxc-usernet
/var/lib/lxc
lxc-create is used to create lxc container. To create a container, run
lxc-create -t download -n CONTAINER_NAME_HERE
This will list all available containers. You can select the OS you want to use.
To specify OS, you can use the following examples
lxc-create -t download -n mycontainer-1 -- -d ubuntu -r focal -a amd64
lxc-create -t download -n mycontainer-2 -- -d debian -r buster -a amd64
To list all containers, run
lxc-ls -f
To start a container, run
lxc-start NAME
To connect to a container, use the command
lxc-attach NAME
Example
root@b24:~# lxc-attach boby2
root@boby2:~# cat /etc/*issue
Debian GNU/Linux 10 \n \l

root@boby2:~#
To delete a container, run
lxc-destroy NAME
See lxc
To delete a partition in VMWare ESXI, you can use command
partedUtil
First find out all disks available on your server using command
ls /vmfs/devices/disks/
On my server, it show following
[root@ns3048991:~] ls /vmfs/devices/disks/
t10.ATA_____HGST_HUS726020ALA610____________________N4G3T44Y____________    vml.01000000004e34473354343459202020202020202020202020484753542048
t10.ATA_____HGST_HUS726020ALA610____________________N4G3T44Y____________:1  vml.01000000004e34473354343459202020202020202020202020484753542048:1
t10.ATA_____HGST_HUS726020ALA610____________________N4G3T44Y____________:2  vml.01000000004e34473354343459202020202020202020202020484753542048:2
t10.ATA_____HGST_HUS726020ALA610____________________N4G3T44Y____________:3  vml.01000000004e34473354343459202020202020202020202020484753542048:3
t10.ATA_____HGST_HUS726020ALA610____________________N4G3T44Y____________:5  vml.01000000004e34473354343459202020202020202020202020484753542048:5
t10.ATA_____HGST_HUS726020ALA610____________________N4G3T44Y____________:6  vml.01000000004e34473354343459202020202020202020202020484753542048:6
t10.ATA_____HGST_HUS726020ALA610____________________N4G3T44Y____________:7  vml.01000000004e34473354343459202020202020202020202020484753542048:7
t10.ATA_____HGST_HUS726020ALA610____________________N4G3T44Y____________:8  vml.01000000004e34473354343459202020202020202020202020484753542048:8
t10.ATA_____HGST_HUS726020ALA610____________________N4G3T44Y____________:9  vml.01000000004e34473354343459202020202020202020202020484753542048:9
t10.ATA_____HGST_HUS726020ALA610____________________N4G3TSMY____________    vml.01000000004e34473354534d59202020202020202020202020484753542048
t10.ATA_____HGST_HUS726020ALA610____________________N4G3TSMY____________:1  vml.01000000004e34473354534d59202020202020202020202020484753542048:1
[root@ns3048991:~]
I want to delete the partition
t10.ATA_____HGST_HUS726020ALA610____________________N4G3T44Y____________:3 vml.01000000004e34473354343459202020202020202020202020484753542048:3
To do this, i run
partedUtil delete "/vmfs/devices/disks/t10.ATA_____HGST_HUS726020ALA610____________________N4G3T44Y____________" 3
Here is help for partedUtil
[root@ns3048991:~] partedUtil Not enough arguments Usage: Get Partitions : getSet Partitions : set ["partNum startSector endSector type attr"]* Delete Partition : delete Resize Partition : resize Get Partitions : getptbl Set Partitions : setptbl