Tag: CentOS 8

  • How to find SSL Certificate fingerprint

    How to find SSL Certificate fingerprint

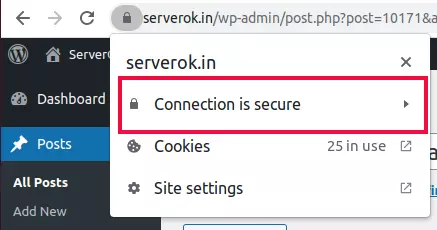
    To view the SSL certificate fingerprint, open the website in the google chrome browser. On the browser address bar, you will see the lock icon, click on it.

    Chrome SSL certificate details

    Click on “Connection is secure”

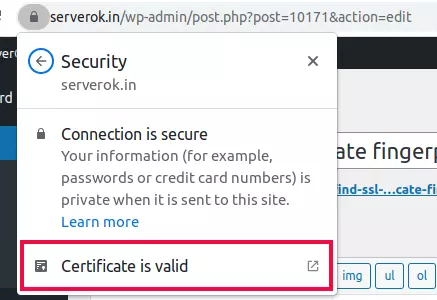
    google chrome valid SSL certficate

    Click on “Certificate is Valid”. You will see SSL Certificate details as shown below.

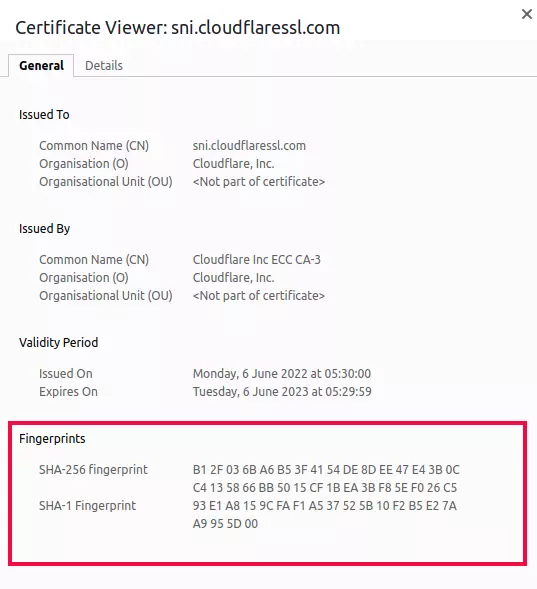
    SSL certificate fingerprint in chrome

    You will see SHA-256 and SHA-1 Fingerprint.

    To find the SSL certificate fingerprint using openssl command, run

    SHA-256

    openssl x509 -noout -fingerprint -sha256 -inform pem -in  SSL_CERT_FILE.CRT
    

    SHA-1

    openssl x509 -noout -fingerprint -sha1 -inform pem -in  SSL_CERT_FILE.CRT
    
  • CentOS 8 Error: Failed to download metadata for repo ‘appstream’

    CentOS 8 Error: Failed to download metadata for repo ‘appstream’

    When updating packages on CentOS 8 server, I got the following error

    [root@instance-20220409-2340 ~]# dnf update
    Failed loading plugin "osmsplugin": No module named 'librepo'
    CentOS Linux 8 - AppStream                                                                                                                                                  51  B/s |  38  B     00:00    
    Error: Failed to download metadata for repo 'appstream': Cannot prepare internal mirrorlist: No URLs in mirrorlist
    [root@instance-20220409-2340 ~]# 
    

    This is because CentOS 8 have reached its End of life.

    To fix the dnf error, you can change the repository baseurl to vault.centos.org

    sed -i -e "s|mirrorlist=|#mirrorlist=|g" /etc/yum.repos.d/CentOS-*
    sed -i -e "s|#baseurl=http://mirror.centos.org|baseurl=http://vault.centos.org|g" /etc/yum.repos.d/CentOS-*
    

    You may need to convert CentOS 8 to one of the supported Linux distributions.

    Convert CentOS 8 to CentOS 8 Stream

    To convert CentOS 8 to CentOS 8 Stream, run

    dnf --disablerepo '*' --enablerepo=extras swap centos-linux-repos centos-stream-repos
    dnf distro-sync
    

    Convert CentOS 8 to AlmaLinux 8

    AlmaLinux is RHEL 8 based (same as CentOS 8) Linux operating system. They provide easy way to convert CentOS 8 server to AlmaLinux.

    How to Migrate CentOS 8 to AlmaLinux

    Convert CentOS 8 to Rocky Linux 8

    Rocky Linux is an open-source enterprise operating system designed to be 100% bug-for-bug compatible with Red Hat Enterprise Linux.

    How to Convert CentOS 8 to Rocky Linux

    Convert CentOS 8 to Oracle Linux 8

    Oracle Linux 8 is free and open source, based on RHEL 8

    https://docs.oracle.com/en/learn/switch_centos8_linux8/index.html

    Convert CentOS 8 to RHEL 8

    RedHat provides Convert2RHEL script to convert CentOS 8 to RHEL 8. RHEL is now FREE for production up to 16 servers.

    https://www.redhat.com/en/technologies/linux-platforms/enterprise-linux/migration-process/convert2rhel-how-to-convert-from-centos-linux-to-red-hat-enterprise-linux

    See CentOS 8

  • Install Ant Media Server on CentOS 8

    To install Ant Media Server on CentOS 8, first install wget

    yum install wget -y
    

    Download installer script

    wget https://raw.githubusercontent.com/ant-media/Scripts/master/install_ant-media-server.sh
    

    Next you need to download binary zip file of Ant Media Server. For this install i used trail version

    ant-media-server-enterprise-2.2.1-20201029_2042.zip
    

    For community version, you can download from

    https://github.com/ant-media/Ant-Media-Server/releases
    

    Download it to same directory as “install_ant-media-server.sh”.

    Now run

    bash install_ant-media-server.sh -i ant-media-server-enterprise-2.2.1-20201029_2042.zip -r true
    

    Replace ant-media-server-enterprise-2.2.1-20201029_2042.zip with name of the ZIP file you downloaded.

    When i installed on 2021-01-19, it failed with following error.

    Created symlink /etc/systemd/system/multi-user.target.wants/antmedia.service → /usr/lib/systemd/system/antmedia.service.
    Redirecting to /bin/systemctl stop antmedia.service
    Redirecting to /bin/systemctl start antmedia.service
    Job for antmedia.service failed because the control process exited with error code.
    See "systemctl status antmedia.service" and "journalctl -xe" for details.
    There is a problem in installing the ant media server. Please send the log of this console to [email protected]
    

    To fix this, edit file

    vi /lib/systemd/system/antmedia.service
    

    Replace content of the file with

    [Unit]
    Description=AntMedia
    After=syslog.target network.target
    
    [Service]
    Type=simple
    Environment=JVM_MEMORY_OPTIONS=
    LimitNOFILE=65536
    Environment=ANTMEDIA_HOME=/usr/local/antmedia
    WorkingDirectory=/usr/local/antmedia
    RemainAfterExit=no
    Restart=on-failure
    RestartSec=5s
    TasksMax=36000
    User=antmedia
    Group=antmedia
    TimeoutStopSec=10
    SuccessExitStatus=143
    
    ExecStart=/usr/local/antmedia/start.sh
    
    
    [Install]
    WantedBy=multi-user.target
    

    Reload systemd deamon

    systemctl daemon-reload
    

    Now Ant Media Server will work. You can start using

    systemctl start antmedia
    

    Top stop Ant Media Server, use

    systemctl stop antmedia
    

    See Ant Media Server

  • Install Linux KVM on CentOS 8

    To install Linux KVM hypervisor on CentOS 8, run

    dnf install qemu-kvm
    

    Install libvirtd

    dnf install libvirt-daemon libvirt-daemon-kvm libvirt-client
    

    Enable libvirtd to start on boot

    systemctl enable libvirtd
    

    Start libvirtd

    systemctl start libvirtd
    

    To see status, run

    systemctl status libvirtd
    

    Install virt-install

    dnf install virt-install
    

    Now you have Linux KVM installed. You can use virt-install or Virt Manager to create virtual machine.

    See Linux KVM Virtualization

  • Install PHP 7.3 in CentOS 8

    CentOS 8 comes with PHP 7.2. To install PHP 7.3, you need to enable remi repo. You can download remi-release rpm file from

    http://rpms.remirepo.net

    Download and install remi-release rpm

    cd ; wget http://rpms.remirepo.net/enterprise/remi-release-8.rpm
    dnf install remi-release-8.rpm
    

    if you have older php version and don’t want to keep it, uninstall it with

    dnf remove php-gd php-xml php-mbstring php-common php php-odbc php-mysqlnd php-json php-process php-cli php-fpm php-intl php-bcmath php-soap php-pdo 
    

    Install PHP 7.3

    dnf install php73
    

    Set it as default PHP version

    update-alternatives --install /usr/bin/php php /usr/bin/php73 1
    

    Install PHP modules

    dnf install -y php73-php php73-php-gd php73-php-fpm php73-php-pdo php73-php-xml php73-php-json php73-php-imap php73-php-intl php73-php-json php73-php-soap php73-php-bcmath php73-php-xmlrpc php73-php-mysqlnd php73-php-mbstring php73-php-zip
    

    Install php-fpm package

    dnf install php73-php-fpm
    

    set php-fpm to start on boot

    systemctl enable php73-php-fpm
    

    Start php-fpm

    systemctl start php73-php-fpm
    

    Restart Apache

    systemctl restart httpd
    

    PHP 7.3 php.ini located at

    /etc/opt/remi/php73/php.ini
    

    Module directory for PHP 7.3 at

    /opt/remi/php73/root/usr/lib64/php/modules/
    

    Related Posts

    CentOS 8

    PHP

  • Creating CentOS 8 Virtual Machine with Vagrant

    Creating CentOS 8 Virtual Machine with Vagrant

    Create a directory for Vagrant project

    mkdir -p ~/vagrant/centos8
    cd ~/vagrant/centos8
    vagrant init generic/centos8
    

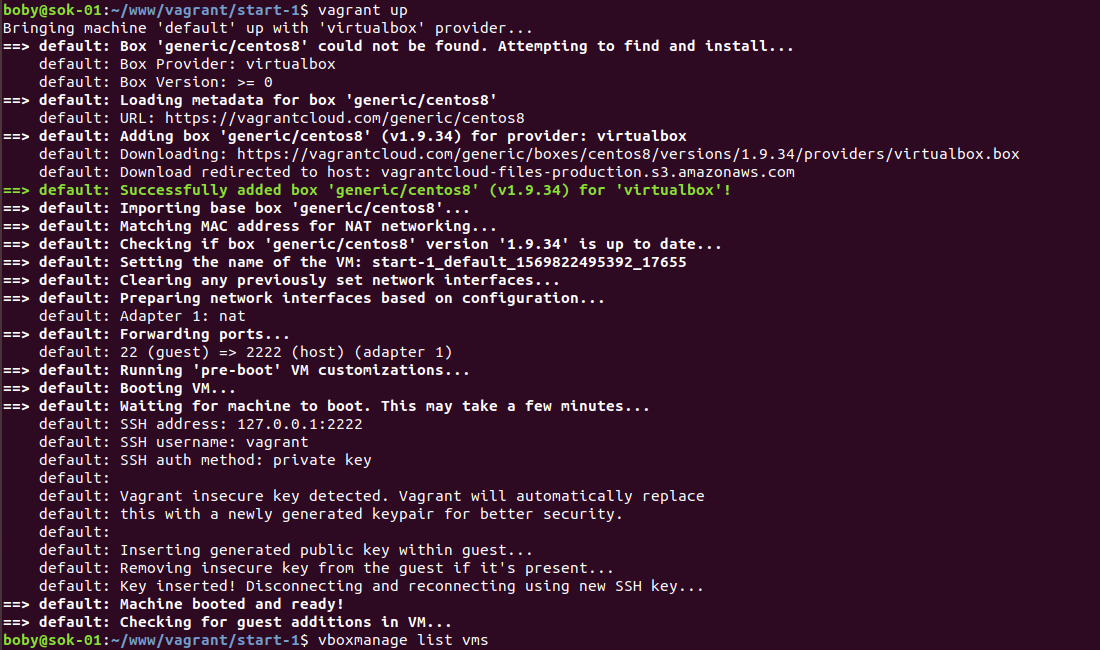
    This will create a file with name “Vagrantfile” on current folder. To start the CentOS 8 VM, run

    vagrant up
    

    CentOS 8  vagrant

    To SSH into CentOS 8 virtual machine

    vagrant ssh
    

    To stop a VM, run

    vagrant halt
    

    See Vagrant

  • CentOS 8 disable Activate the web console message

    When login to CentOS 8 using SSH, you get a message asking you to enable web console.

    Activate the web console with: systemctl enable --now cockpit.socket
    

    centos 8 cockpit

    You can uninstall cockpit with command

    yum remove cockpit*
    

    If you just need to disable the message, delete the file

    rm -f /etc/motd.d/cockpit
    

    This is actually a symlink to file /run/cockpit/motd

    See CentOS 8

  • Install CentOS 8 from Net boot ISO

    Install CentOS 8 from Net boot ISO

    CentOS 8 provide 2 type of ISO. One that ends with boot.iso, this is 534 MB. This only include essential files to get you started with installation. This installation method require internet connection as files needed to be downloaded from internet. Other ISO file is full install media, that is 6.6 GB in size. To install from boot.iso, download it from

    http://isoredirect.centos.org/centos/8/isos/x86_64/

    This page will list morrors near to you.
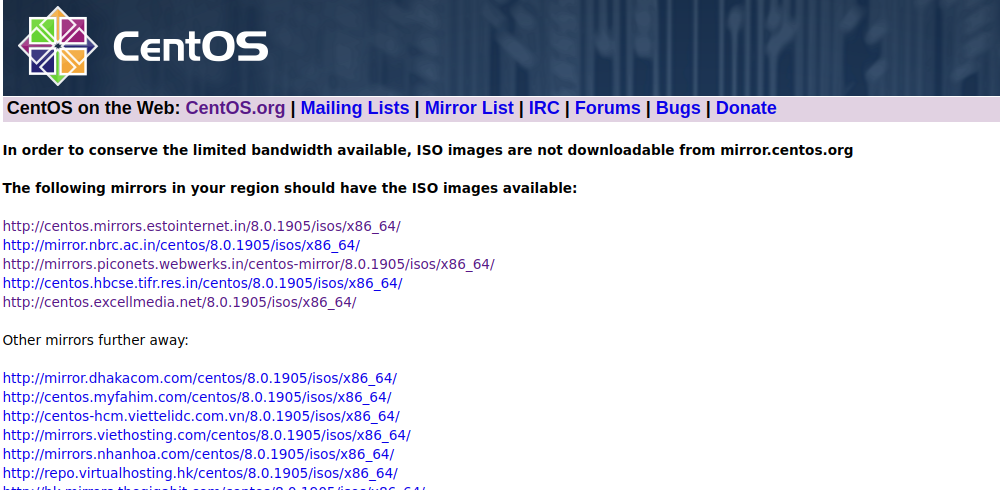
    CentOS download mirror

    Click on any of the morror from link, on next page, you will see ISO files. Download CentOS-8-x86_64-xxxx-boot.iso
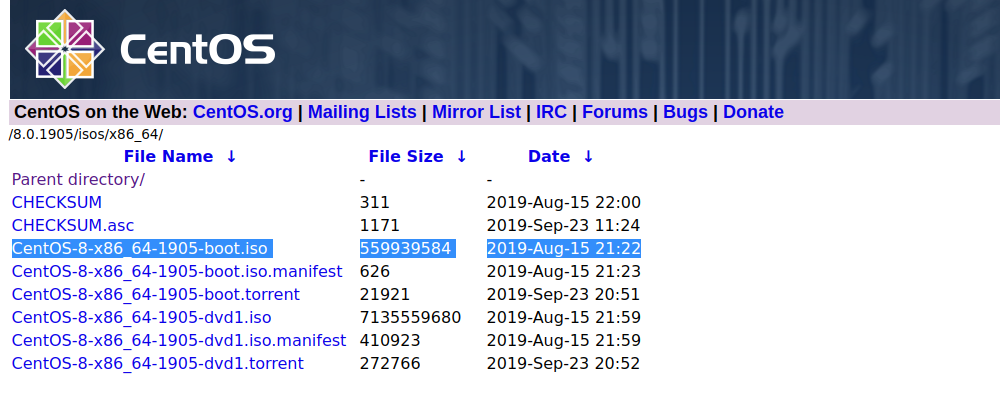
    CentOS 8 download ISO

    Write this ISO file into a USB drive or DVD, then boot your computer with it. You will see following screen.
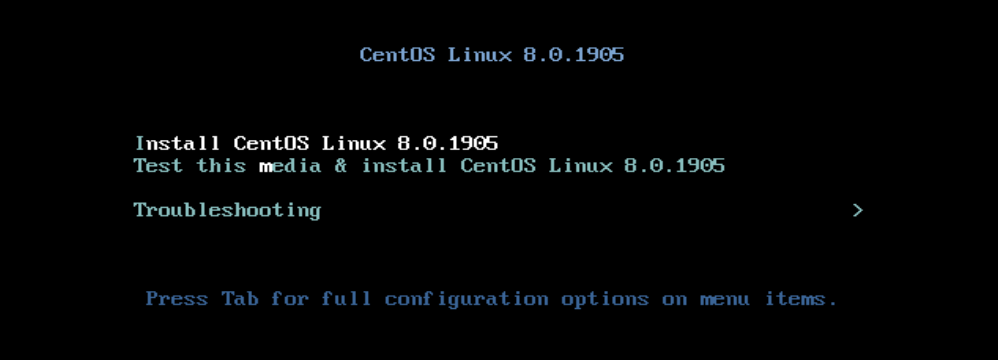
    CentOS 8 install

    Select first or second option. 2nd option test install media for any errors. If you use USB drive, you can just select option 1 as there is less chance of media corruption compared to DVD drives.
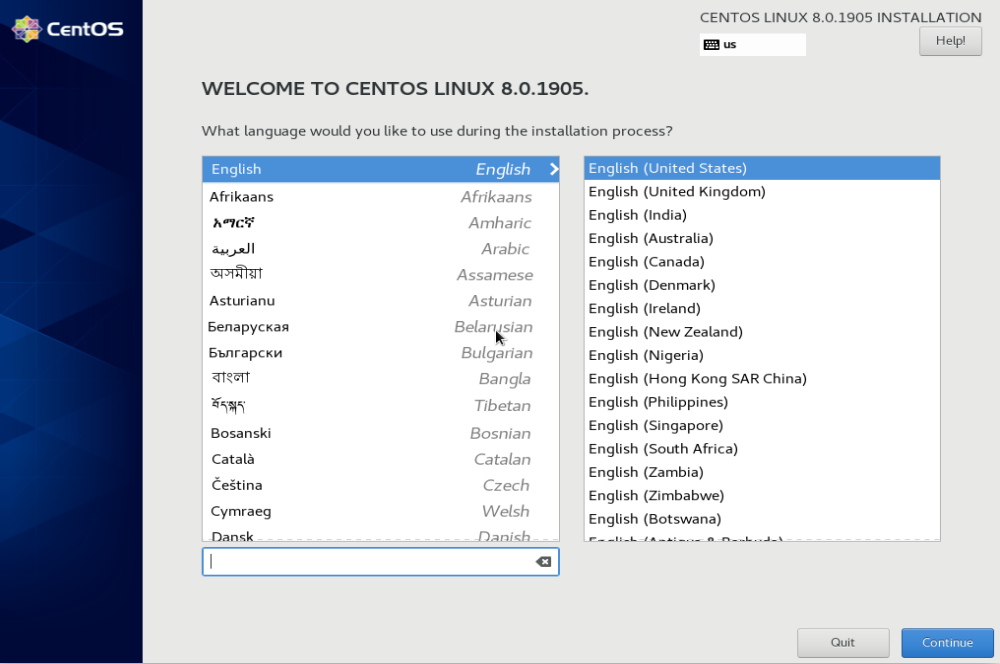
    centos 8 language

    Select language, click continue.

    CentOS 8 installation

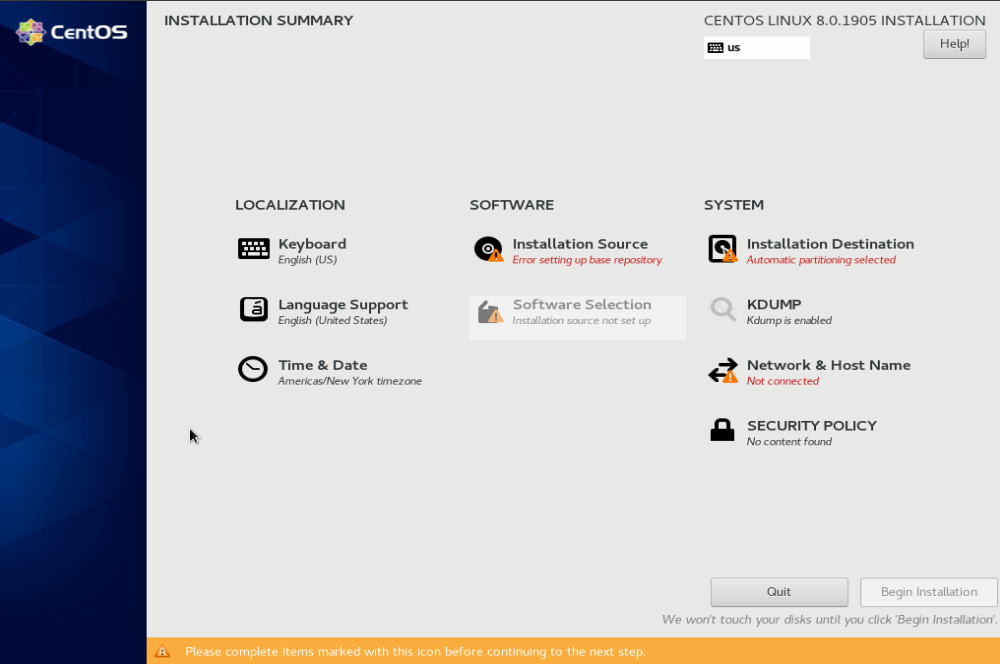
    On this screen, you need to make several choices.

    Installation Destination

    Select the hard disk where you need CentOS 8 installed.
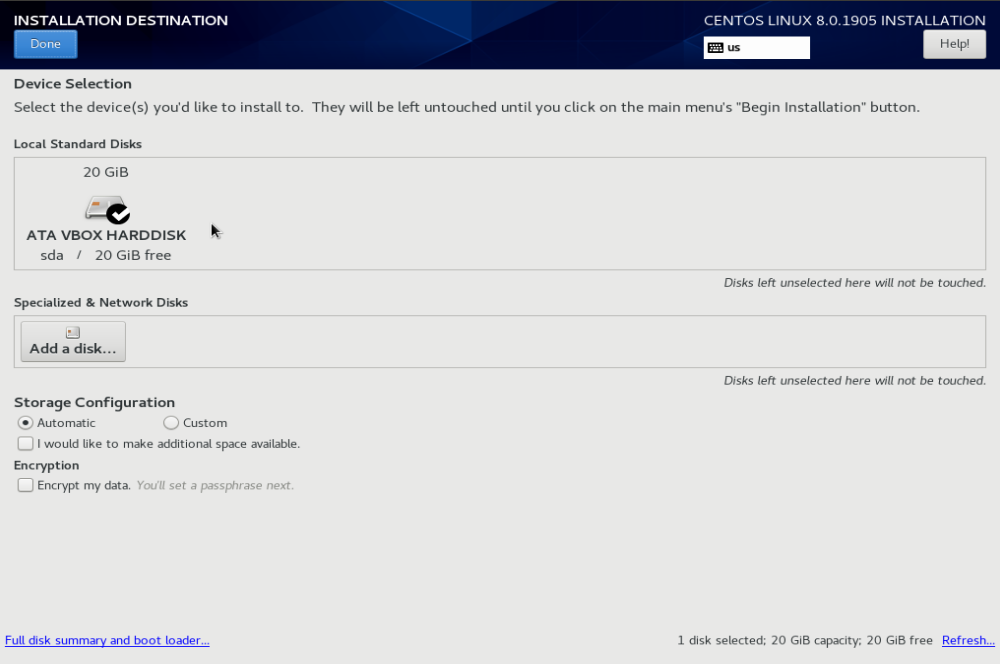
    CentOS 8 disk

    If you have an empty disk, all you need to do is click “Done”.

    If your disk have existing partitions, you may need to delete it before insalling CentOS 8. If you have any data on this hard disk, always take a backup before you installing new OS.

    Network & Host Name

    You need to configure your network. Most of the time all you need to do is click on ON/OFF toggle on right side of the network interface.
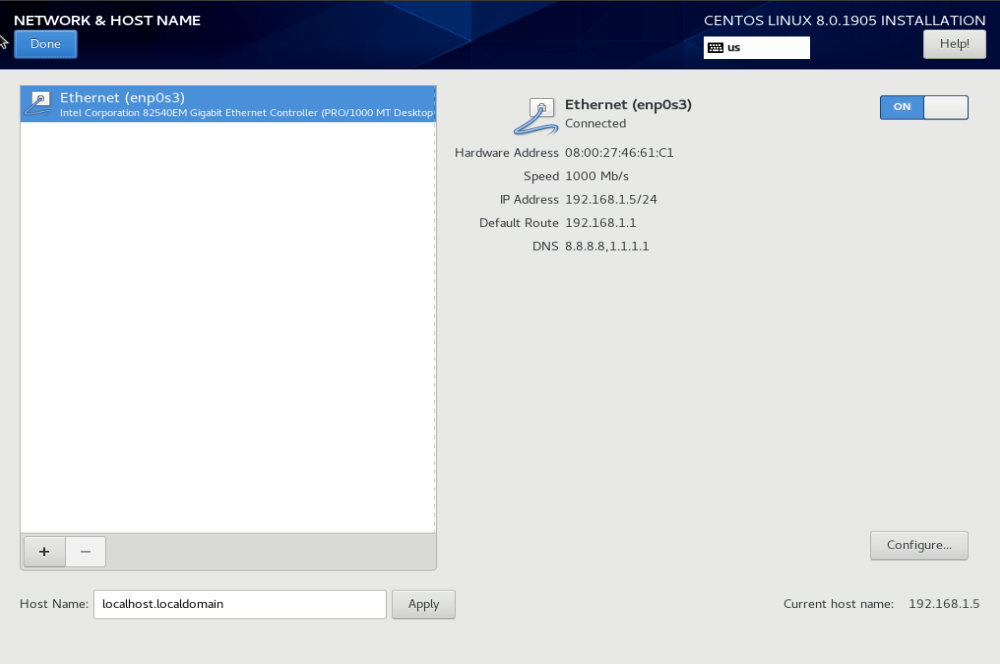
    CentOS 8 Network

    If you have DHCP on your network, you will see IP address assigned to your computer. If not, you need to manually configure networking. It is important as you will need internet to do CentOS 8 install using boot ISO file. Click Done to go back to previous screen.

    Installation Source

    On this page, you need to enter a CentOS mirror. You can use following URL

    http://mirror.centos.org/centos/8/BaseOS/x86_64/os/
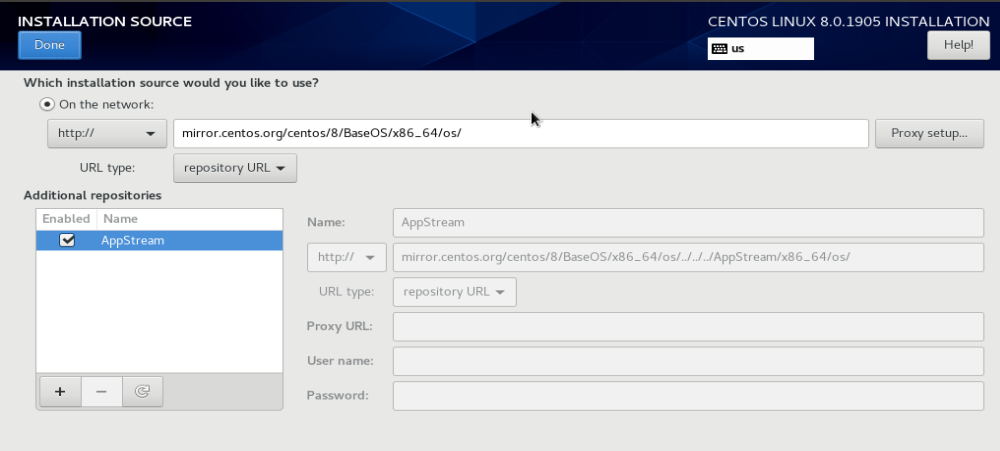
    

    CentOS 8 installation source

    It is better to use a CentOS mirror near to you. This will make file downloads faster. In my case, i used

    http://centos.mirrors.estointernet.in/8.0.1905/BaseOS/x86_64/os/
    

    There is option to select mirror near you on this screen. But for some reason, this option did not work for me.

    Software Slection

    On this screen, you need to select software to install.
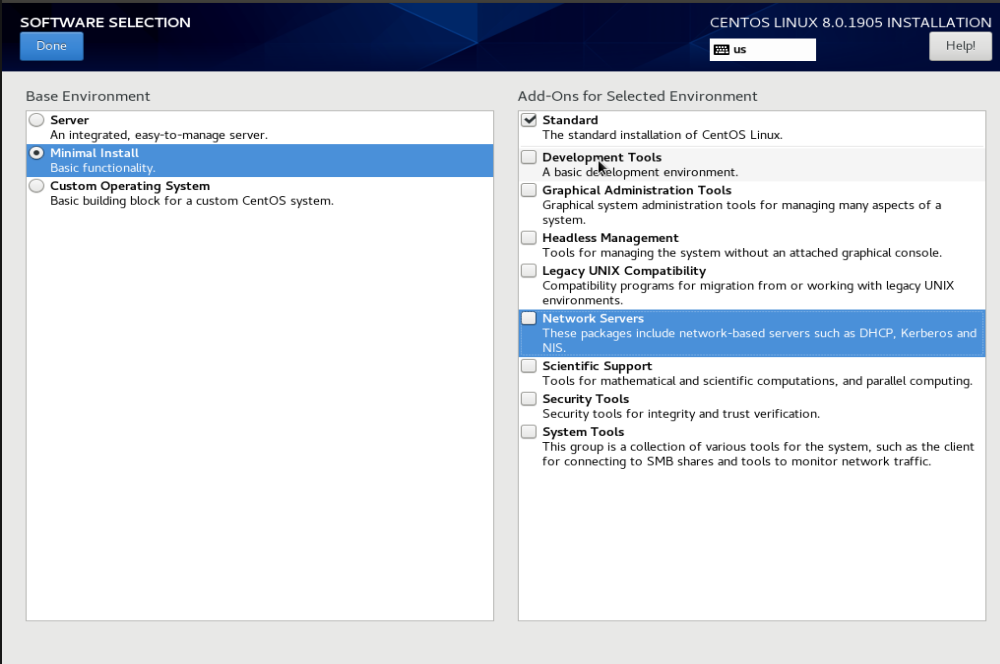
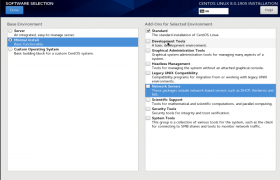
    CentOS 8 software selection

    You can select if you need to install GUI or just minimal CentOS install. I selected minimal install as everything else can be installed later as needed.

    Click “Done”, will take you to previous screen. Now you will see “Begin Installation” button enabled. Click on it to continue installation.

    On next screen, you get option to set password. Set password for user root. You can also create a new user if required.

    Installation take 15 to 30 minutes depending on your download speed. Once installation completed, you will be asked to reboot.

    CentOS 8 use Kernel 4.18

    [root@192 ~]# hostnamectl 
       Static hostname: localhost.localdomain
    Transient hostname: 192.168.1.5
             Icon name: computer-vm
               Chassis: vm
            Machine ID: 7ad955dffb89464a96918974be28795b
               Boot ID: 77cd4c012cbe4b6f9c33ab7dae5ecc33
        Virtualization: oracle
      Operating System: CentOS Linux 8 (Core)
           CPE OS Name: cpe:/o:centos:centos:8
                Kernel: Linux 4.18.0-80.7.1.el8_0.x86_64
          Architecture: x86-64
    [root@192 ~]# 
    

    You can use both yum and dnf for installing software.