Tag: letsencrypt

  • Certbot Remove a Domain Name from SSL Certficate

    Certbot Remove a Domain Name from SSL Certficate

    On a server, I have an SSL certificate with 2 domains (doaminA.com and domainB.com)

    root@Tombe:~# certbot certificates
    Saving debug log to /var/log/letsencrypt/letsencrypt.log
    
    - - - - - - - - - - - - - - - - - - - - - - - - - - - - - - - - - - - - - - - -
    Found the following certs:
      Certificate Name: doaminA.com
        Domains: doaminA.com www.doaminA.com domainB.com
        Expiry Date: 2022-08-18 11:06:35+00:00 (VALID: 6 days)
        Certificate Path: /etc/letsencrypt/live/doaminA.com/fullchain.pem
        Private Key Path: /etc/letsencrypt/live/doaminA.com/privkey.pem
    - - - - - - - - - - - - - - - - - - - - - - - - - - - - - - - - - - - - - - - -
    root@Tombe:~# 
    

    domainB.com no longer pointed to this server, so the SSL auto-renewal failed because certbot can’t verify the domain name domainB.com

    To fix the problem, run certbot without domainB.com

    certbot --cert-name domainA.com -d domainA.com -d www.doaminA.com
    

    This will remove domainB.com from the domainA.com SSL certificate.

    Example

    root@Tombe:~# certbot --cert-name domainA.com -d domainA.com
    Saving debug log to /var/log/letsencrypt/letsencrypt.log
    Plugins selected: Authenticator apache, Installer apache
    
    - - - - - - - - - - - - - - - - - - - - - - - - - - - - - - - - - - - - - - - -
    You are updating certificate domainA.com to include new domain(s):
    (None)
    
    You are also removing previously included domain(s):
    - domainB.com
    
    Did you intend to make this change?
    - - - - - - - - - - - - - - - - - - - - - - - - - - - - - - - - - - - - - - - -
    (U)pdate cert/(C)ancel: U
    Renewing an existing certificate
    

    See Letsencrypt

  • Lego – LetsEncrypt client

    Lego is a Let’s Encrypt client and ACME library written in Go.

    https://go-acme.github.io/lego

    Install Lego

    To install go to the release page, download the latest version.

    wget https://raw.githubusercontent.com/serverok/server-setup/master/install/lego.sh
    bash ./lego.sh

    Create SSL certificate

    To create an SSL certificate standalone (built-in webserver), run

    lego --accept-tos --http --email="EMAIL-ADDRESS" --key-type rsa2048 --domains="DOMAIN_NAME" --domains="www.DOMAIN_NAME" --path="/etc/lego" run

    If you need to verify using port 443, use “–tls” instead of “–http”

    Verify SSL using webroot (existing webserver)

    lego --accept-tos --http --http.webroot="/var/www/html/" --email="EMAIL-ADDRESS" --key-type rsa2048 --domains="DOMAIN_NAME" --domains="www.DOMAIN_NAME" --path="/etc/lego" run

    Issue Wildcard SSL using manual DNS verification

    lego --email "EMAIL-ADDRESS" --key-type rsa2048 --domains="DOMAIN_NAME" --domains="*.DOMAIN_NAME" --dns "manual" --path="/etc/lego" run

    Renew SSL certificate

    To renew the SSL certificate, use the same command as SSL creation with “run” replaced with

    renew --days 30

    –days 30 means SSL will be renewed if the expiry date is with 30 days. If you need to force renew SSL, use –days 90.

    Now run

    lego --http --http.webroot="/var/www/html/" --email="EMAIL-ADDRESS" --key-type rsa2048 --domains="DOMAIN_NAME" --domains="www.DOMAIN_NAME" --path="/etc/lego" renew --days 30

    You need to restart the webserver after running this command.

    Renew Hook

    If you need to execute a script after SSL renewal, you can add

    --renew-hook="./myscript.sh"

    Example

    lego --http --http.webroot="/var/www/html/" --email="EMAIL-ADDRESS" --key-type rsa2048 --domains="DOMAIN_NAME" --domains="www.DOMAIN_NAME" --path="/etc/lego" renew --days 30 --renew-hook="./myscript.sh"

    If you are using the standalone method, you need to stop the webserver before running the lego command.

    SSL certificates will be in the directory

    /etc/lego/certificates/

    Make it readable by the web server with the command

    chmod -R 755 /etc/lego/

    See letsencrypt

  • Install LetsEncrypt in CentOS 7

    certbot deprecated support for CentOS 7, so new version of certbot-auto script won’t work on CentOS 7.

    To install certbot (letsencrypt command line tool), run

    yum install -y epel-release 
    yum install -y python2-certbot.noarch
    

    To run it, use command

    /usr/bin/certbot-2
    

    See LetsEncrypt

  • Change Email address of LetsEncrypt SSL

    To change email address of LetsEncrypt SSL certficate account, run

    certbot update_account --email [email protected]
    

    See LetsEncrypt

  • Delete LetsEncrypt SSL certficate

    To list all available LetsEncrypt SSL certificates, run

    certbot certificates

    To delete a certificate, run

    certbot delete --cert-name NAME_OF_SSL_CERT

    You can find NAME_OF_SSL_CERT from the command “certbot certificates”.

    See LetsEncrypt

  • LetsEncrypt SSL On Nginx Password Protected site

    When you develop a web site, you will need it password protected so others won’t see or you don’t want google to index the web pages while you are working on it.

    To password protect a web site in nginx, see

    Nginx Password Protect a website

    If you password protect a web site and try to get LetsEncrypt SSL cerificate using webroot verification method, it will fail. We need to disable password protection for url domain/.well-known. To do this, find

    auth_basic "Members Only";
    auth_basic_user_file /etc/nginx/.htpasswd;
    

    Add below

    location ^~ /.well-known/acme-challenge/ {
        auth_basic "off";
    }
    

    Now restart nginx

    systemctl restart nginx
    

    See Letsencrypt

  • Install LetsEncrypt SSL on Bitnami

    NOTE: bitnami provides a tool to install SSL, it is better to use the tool to install SSL. You can see more info on page How to install LetsEncrypt SSL on Bitnami WordPress Server

    To install LetsEncrypt SSL on bitnami wordpress server, install letsencrypt with

    wget https://raw.githubusercontent.com/serverok/server-setup/master/install/letsencrypt.sh
    sh ./letsencrypt.sh
    

    Stop apache web server with

    /opt/bitnami/ctlscript.sh stop apache
    

    Now get SSL certificate using certbot

    certbot certonly --standalone -d YOUR-DOMAIN.EXT -d www.YOUR-DOMAIN.EXT
    

    Now you have SSL certficate, lets copy it to bitnami folder

    cat /etc/letsencrypt/live/YOUR-DOMAIN.EXT/privkey.pem >  /opt/bitnami/apache2/conf/server.key
    cat /etc/letsencrypt/live/YOUR-DOMAIN.EXT/cert.pem > /opt/bitnami/apache2/conf/server.crt
    cat /etc/letsencrypt/live/YOUR-DOMAIN.EXT/chain.pem >> /opt/bitnami/apache2/conf/server.crt
    

    Start the web server with

    /opt/bitnami/ctlscript.sh start apache
    

    Auto Renew LetsEncrypt

    Create file

    mkdir /usr/serverok
    vi /usr/serverok/ssl-renew
    

    Add following to the file. Replace YOUR-DOMAIN.EXT with your actual domain name.

    #!/bin/bash
    
    /opt/bitnami/ctlscript.sh stop apache
    /usr/bin/certbot renew
    cat /etc/letsencrypt/live/YOUR-DOMAIN.EXT/privkey.pem >  /opt/bitnami/apache2/conf/server.key
    cat /etc/letsencrypt/live/YOUR-DOMAIN.EXT/cert.pem > /opt/bitnami/apache2/conf/server.crt
    cat /etc/letsencrypt/live/YOUR-DOMAIN.EXT/chain.pem >> /opt/bitnami/apache2/conf/server.crt
    sleep 20
    /opt/bitnami/ctlscript.sh restart apache
    

    make the script executable

    chmod 755 /usr/serverok/ssl-renew
    

    Set a cronjob to execute it every month

    30 2 * * 1 /usr/serverok/ssl-renew >> /var/log/le-renew.log
    

    See bitnami

  • Install SSL Certificate in Virtualmin

    Install SSL Certificate in Virtualmin

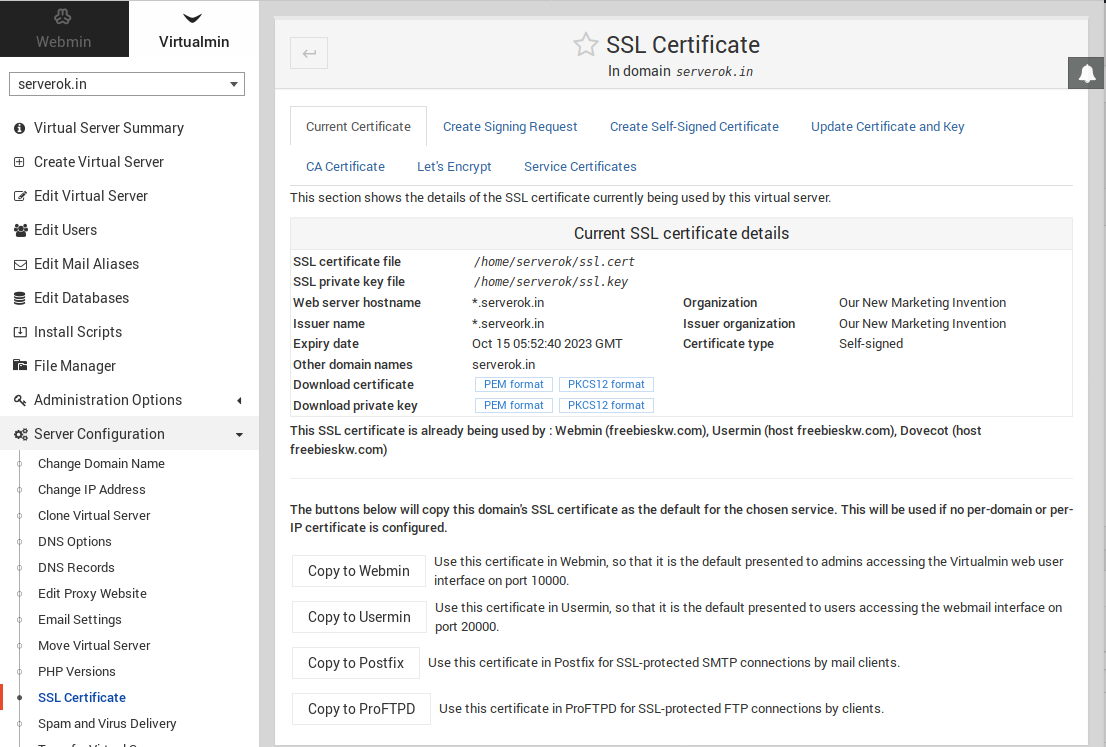
    To install SSL certificate in Virtualmin, select the domain from drop down list of Virtualmin.

    On left Menu, go to Server Configuration > SSL Certificate

    Virtualmin SSL Install

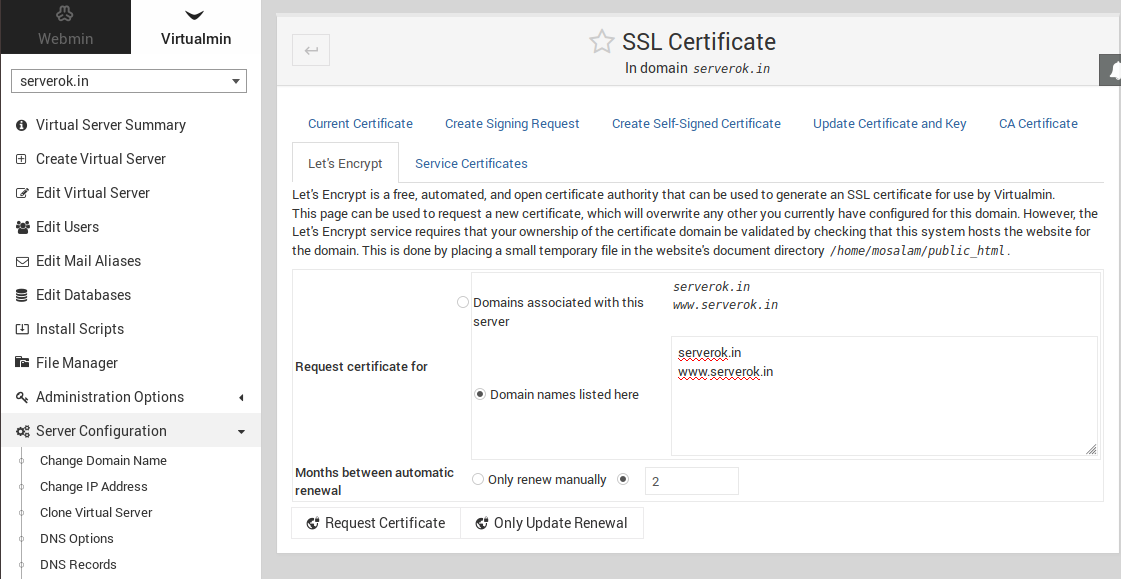
    If you want to install Free LetsEncypt SSL, click on “Let’s Encrypt” link on top. On next page

    Virtalmin Letsencrypt

    Click on “Request Certificate”.

  • Nginx Proxy SSL Verification

    When using Nginx as a reverse proxy, you may need to handle SSL verification requests. Passing this request to the backend server may not do any good as back-end servers usually only handle application requests.

    To handle SSL validation requests, use the following Nginx Configuration

    server {
        listen 80;
        server_name YOUR-DOMAIN.EXTN www.YOUR-DOMAIN.EXTN;
    
        location ^~ /.well-known/acme-challenge/ {
            allow all;
            autoindex on;
            root /var/www/html;
        }
    
        location / {
            proxy_set_header X-Real-IP  $remote_addr;
            proxy_set_header X-Forwarded-For $remote_addr;
            proxy_set_header Host $host;
            proxy_pass http://127.0.0.1:4200;
        }
    }

    Now restart Nginx

    service nginx restart

    You can get SSL with the following letsencrypt command

    certbot --authenticator webroot --webroot-path /var/www/html --installer nginx -d DOMAIN.EXTN -d www.DOMAIN.EXTN

    If you have a redirect to HTTPS in your Nginx server block, use something like

    server {
        listen 80;
        server_name YOUR-DOMAIN.EXTN www.YOUR-DOMAIN.EXTN;
    
        location ^~ /.well-known/acme-challenge/ {
            allow all;
            autoindex on;
            root /var/www/html;
        }
    
        location / {
            return 301 https://DOMAIN.EXTN$request_uri;
        }
    }

    See LetsEncrypt, Nginx

  • certbot certificates

    To list all letsencrypt SSL certificates, run

    certbot certificates
    

    Example

    root@ok:~# certbot certificates
    Saving debug log to /var/log/letsencrypt/letsencrypt.log
    Revocation status for /etc/letsencrypt/live/boby.hosthat.com/cert.pem is unknown
    
    -------------------------------------------------------------------------------
    Found the following certs:
      Certificate Name: boby.hosthat.com
        Domains: boby.hosthat.com
        Expiry Date: 2017-06-11 15:10:00+00:00 (INVALID: EXPIRED)
        Certificate Path: /etc/letsencrypt/live/boby.hosthat.com/fullchain.pem
        Private Key Path: /etc/letsencrypt/live/boby.hosthat.com/privkey.pem
      Certificate Name: img.serverok.in
        Domains: img.serverok.in
        Expiry Date: 2018-05-02 16:06:53+00:00 (VALID: 66 days)
        Certificate Path: /etc/letsencrypt/live/img.serverok.in/fullchain.pem
        Private Key Path: /etc/letsencrypt/live/img.serverok.in/privkey.pem
      Certificate Name: lab.hostonnet.com
        Domains: lab.hostonnet.com
        Expiry Date: 2018-04-25 03:34:37+00:00 (VALID: 59 days)
        Certificate Path: /etc/letsencrypt/live/lab.hostonnet.com/fullchain.pem
        Private Key Path: /etc/letsencrypt/live/lab.hostonnet.com/privkey.pem
      Certificate Name: yboby.cf
        Domains: yboby.cf www.yboby.cf
        Expiry Date: 2018-03-21 19:43:49+00:00 (VALID: 25 days)
        Certificate Path: /etc/letsencrypt/live/yboby.cf/fullchain.pem
        Private Key Path: /etc/letsencrypt/live/yboby.cf/privkey.pem
    -------------------------------------------------------------------------------
    root@ok:~# 
    

    letsencrypt

  • Enable LetsEncrypt SSL in ISPConfig

    Login to ISPConfig at

    https://your-server-ip:8080

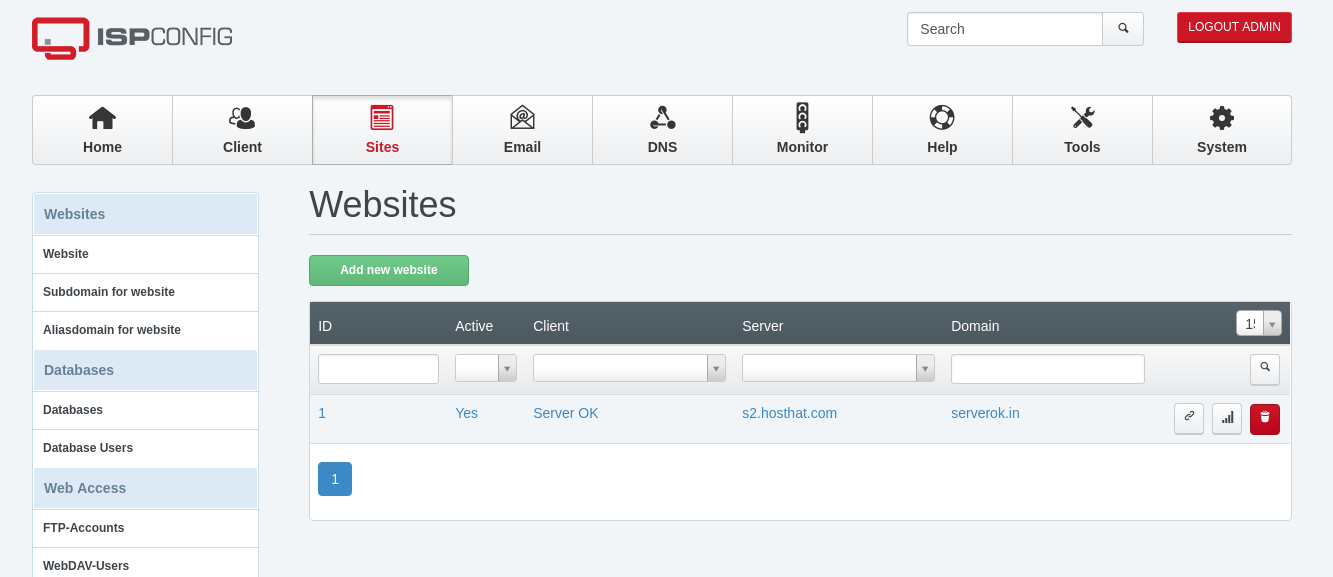
    On main menu, click on “Sites”. It will show all available web sites on your server.

    ISPConfig

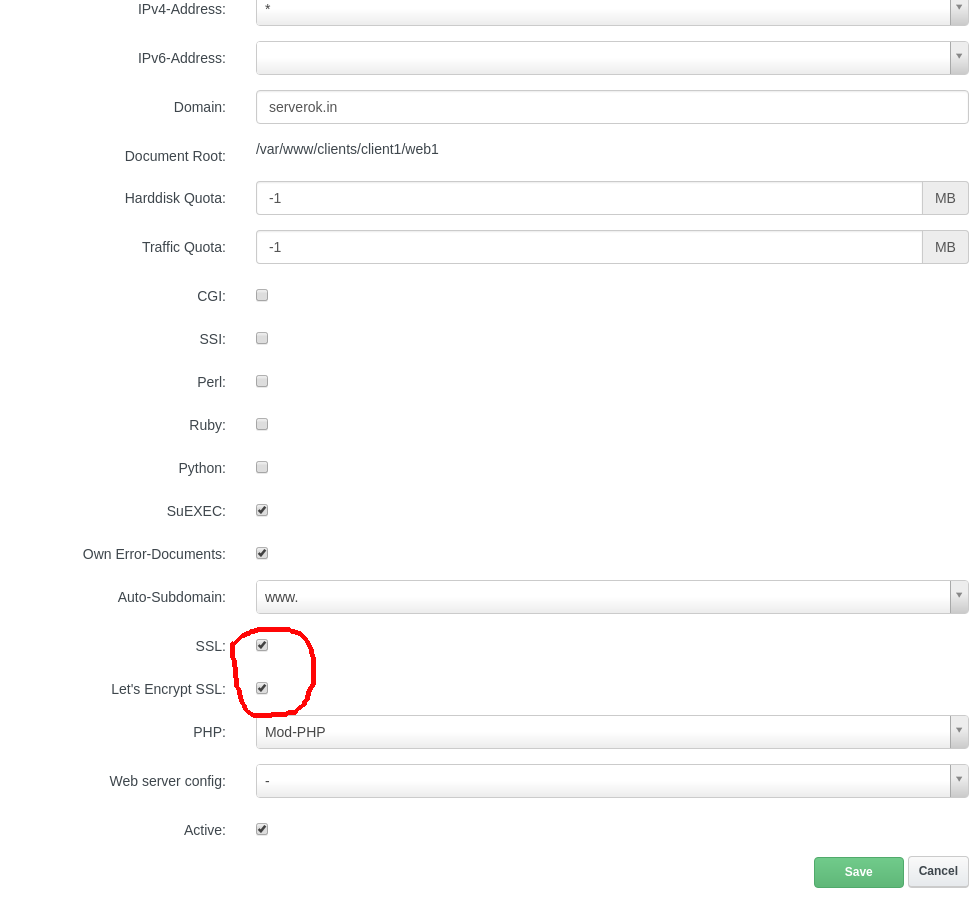
    Click on the domain on which you need LetsEncrypt SSL installed.

    On Next page, click the check boxes “SSL” and “LetsEncrypt”.

    ISPConfig LetsEncrypt Free SSL

    Click “Save” button. In few minutes you will get SSL installed on your web site.

    See LetsEncrypt