Tag: ovh

  • Configure Failover IP in Ubuntu 20.04 OVH VPS

    Configure Failover IP in Ubuntu 20.04 OVH VPS

    To configure IP on OVH VPS, you need to manually configure networking as OVH gateway is outside the failover IP subnet. For most hosting providers getaway will be in the same subnet as the IP address. To configure IP using netplan, see instruction here.

    First, install ifupdown package

    apt install -y ifupdown
    

    Now edit file

    vi /etc/network/interfaces
    

    Add

    auto NETWORK_INTERFACE_HERE
    iface NETWORK_INTERFACE_HERE inet static
        address FO_IP_ADDR
        netmask 255.255.255.255
        broadcast FO_IP_ADDR
        dns-nameservers 8.8.8.8 8.8.4.4
        post-up ip route add GATEWAY_ADDR dev NETWORK_INTERFACE_HERE
        post-up ip route add default via GATEWAY_ADDR dev NETWORK_INTERFACE_HERE
        pre-down ip route del GATEWAY_ADDR dev NETWORK_INTERFACE_HERE
        pre-down ip route del default via GATEWAY_ADDR dev NETWORK_INTERFACE_HERE
    

    In the above text, replace

    NETWORK_INTERFACE_HERE = with your actual network interface name, for example, eth0, ens18, etc.
    FO_IP_ADDR = Your VPS IP address, OVH calls this Failover IP address. It is just any secondary IP address you purchase.
    GATEWAY_ADDR = Gateway IP address. This is the same as the Main IP of the server with the last octal replaced by 254

    Example
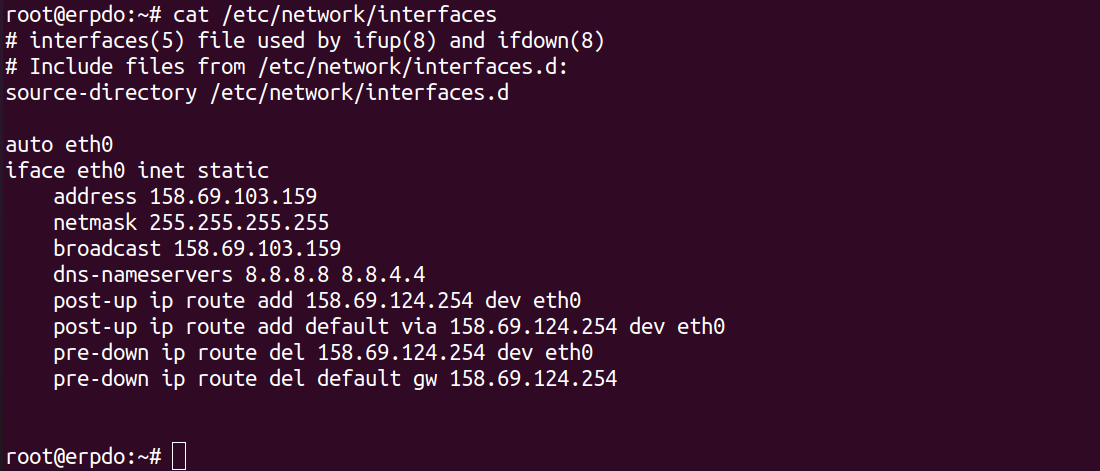
    Ubuntu 20.04 failover IP

    Configuration is the same as Ubuntu 18.04, the only difference is post-up and pre-down tines, where Ubuntu 18.04 used older route command, in Ubuntu 20.04, we use “ip route” command instead.

  • Set Static IP in RHEL 8 OVH VPS

    Set Static IP in RHEL 8 OVH VPS

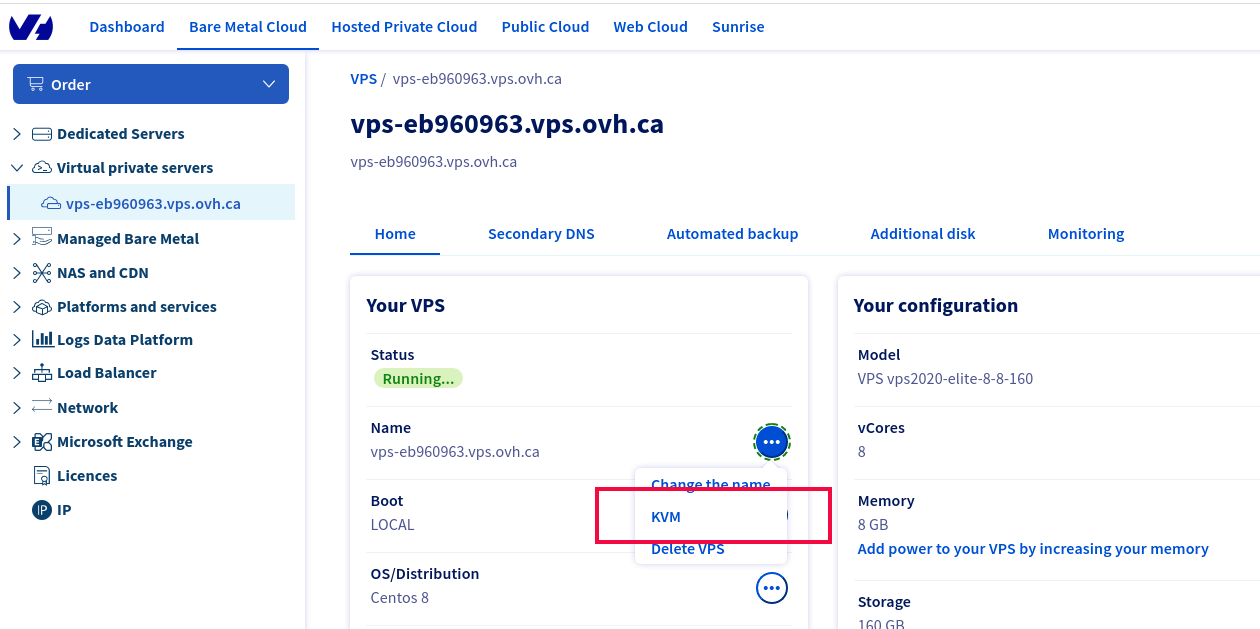
    On OVH VPS running AlmaLinux 8, IPv4 IP address gets dropped. I have to connect to the server using KVM feature available in OVH control panel.

    OVH Cloud VPS KVM

    I checked IP of the server with the command

    ip a
    

    It did hot show any IPv4 IP address. I checked the network configuration file

    vi /etc/sysconfig/network-scripts/ifcfg-eth0
    

    That had the following content

    BOOTPROTO=dhcp
    DEFROUTE=yes
    DEVICE=eth0
    DHCLIENT_SET_DEFAULT_ROUTE=yes
    HWADDR=fa:16:3e:6b:a6:1a
    IPV6ADDR=2607:5300:201:3100::952/56
    IPV6INIT=yes
    IPV6_AUTOCONF=no
    IPV6_DEFAULTGW=2607:5300:201:3100::1
    IPV6_FORCE_ACCEPT_RA=no
    MTU=1500
    ONBOOT=yes
    TYPE=Ethernet
    USERCTL=no
    

    To make the IP static, I made the following changes.

    Find

    BOOTPROTO=dhcp
    

    Replace with

    BOOTPROTO=static
    

    Also added following 2 entry

    IPADDR=144.217.13.76
    GATEWAY=144.217.12.1
    

    144.217.13.76 is the IP address of the VPS.

    144.217.12.1 is the gateway used on the VPS, found using “ip route” or “route -n” command.

    [root@vps-eb960963 network-scripts]# route -n
    Kernel IP routing table
    Destination     Gateway         Genmask         Flags Metric Ref    Use Iface
    0.0.0.0         144.217.12.1    0.0.0.0         UG    0      0        0 eth0
    144.217.12.1    0.0.0.0         255.255.255.255 UH    0      0        0 eth0
    [root@vps-eb960963 network-scripts]#
    

    Create a static route file

    vi /etc/sysconfig/network-scripts/route-eth0
    

    Add

    144.217.12.1 dev eth0
    default via 144.217.12.1 dev eth0
    

    Here 144.217.12.1 is the gateway IP address found in the above step.

    See IP

  • Configure OVH Failover IP in Ubuntu 20.04/22.04

    To configure IP in Ubuntu Server 20.04 guest, create a file

    vi /etc/netplan/50-netwrk.yaml

    add the following content

    network:
        version: 2
        ethernets:
            eth0:
                addresses:
                    - YOUR_FO_IP_HERE/32
                nameservers:
                    addresses:
                        - 1.1.1.1
                    search: []
                optional: true
                routes:
                    - to: 0.0.0.0/0
                      via: YOUR_GW_IP_HERE
                      on-link: true

    example

    root@easyengine:~# cat /etc/netplan/50-cloud-init.yaml
    network:
        version: 2
        ethernets:
            eth0:
                addresses:
                    - 164.132.150.95/32
                nameservers:
                    addresses:
                        - 1.1.1.1
                    search: []
                optional: true
                routes:
                    - to: 0.0.0.0/0
                      via: 51.255.79.254
                      on-link: true
    root@easyengine:~# 

    “on-link: true” is what makes it work. The “on-link: true” option is used to specify that a specific route should be considered “on-link.” This means that the route is directly reachable on the local network segment, and packets destined for that route should be sent directly to the network interface associated with that network segment, rather than being routed through a gateway.

    Test network config using

    netplan try

    If everything works fine, you can apply the changes with

    netplan apply

    See OVH, netplan

  • OVH Cloud

    Configure Failover IP in Ubuntu 20.04 OVH VPS
    Ubuntu Server 20.04 configure OVH failover IP
    Configure Failover IP in Ubuntu 18.04 OVH VPS
    Configure Networking in Fedora 28 OVH Proxmox
    Debian 9 OVH Bridge Network Configuration
    OVH VPS Configure failover IP in Ubuntu
    How to set Reverse DNS (rDNS/PTR Record) for IP in OVH Dedicated Server
    How to install OS on OVH VPS (Virtual Private Server)
    How to Install Cpanel + CentOS 7 on OVH Dedicated Server
    Set Static IP in RHEL 8 OVH VPS
    Install AlmaLinux + Cpanel on OVH VPS
    How to set rDNS/PTR Record on OVH VPS
    Reset root Password On OVH Dedicated Server
    How to install VMware ESXi on OVH Dedicated Server
    How to restart (reboot) OVH Dedicated Server
    How to change DNS nameservers for an OVHcloud domain name
    How to configure IPv6 on OVH AlmaLinux 8 server
    How to Reset OVH VPS root Password

    Install CentOS 8 on OVH Dedicated Server

    OVH Server Upgrade

    If you decide to purchase a new service with OVH, we can offer you a time transfer from your server ns538413.ip-144-217-71.net to the new one as long as the server ns538413.ip-144-217-71.net has at least 15 days left after you delete it.

    Keep in mind if the new server is a more expensive model, the monetary value will be transferred pro-rated to the new server and that if the new server is of equal or lesser value, we will transfer the balance on a day-for-day basis.

    OVH support Phone number: 1-855-684-5463

    If you need to attach image in ticket, upload your image at

    https://plik.ovhcloud.com

    Then share it in the ticket as OVH support won’t visit any other site and help desk have no option to attach files.

  • Configure Failover IP in Ubuntu 18.04 OVH VPS

    Default /etc/network/interfaces in Ubuntu 18.04 in OVH VPS look like following. Click here for Ubuntu 20.04 instructions.

    root@vps624512:~# cat /etc/network/interfaces 
    # ifupdown has been replaced by netplan(5) on this system.  See
    # /etc/netplan for current configuration.
    # To re-enable ifupdown on this system, you can run:
    #    sudo apt install ifupdown
    root@vps624512:~# 
    

    First install

    sudo apt install ifupdown -y
    

    Configure Main IP

    use “ip a” command to find out interface name and IP of the VPS

    root@vps624512:~# ip a
    1: lo:  mtu 65536 qdisc noqueue state UNKNOWN group default qlen 1000
        link/loopback 00:00:00:00:00:00 brd 00:00:00:00:00:00
        inet 127.0.0.1/8 scope host lo
           valid_lft forever preferred_lft forever
        inet6 ::1/128 scope host 
           valid_lft forever preferred_lft forever
    2: ens3:  mtu 1500 qdisc fq_codel state UP group default qlen 1000
        link/ether fa:16:3e:f4:1e:fd brd ff:ff:ff:ff:ff:ff
        inet 51.77.149.182/32 scope global dynamic ens3
           valid_lft 49349sec preferred_lft 49349sec
        inet6 fe80::f816:3eff:fef4:1efd/64 scope link 
           valid_lft forever preferred_lft forever
    root@vps624512:~#
    

    In this case,

    IP = 51.77.149.182
    Interface Name = ens3

    Use “route -n” command to find out gateway.

    root@vps624512:~# route -n
    Kernel IP routing table
    Destination     Gateway         Genmask         Flags Metric Ref    Use Iface
    0.0.0.0         51.77.148.1     0.0.0.0         UG    100    0        0 ens3
    51.77.148.1     0.0.0.0         255.255.255.255 UH    100    0        0 ens3
    root@vps624512:~# 
    

    GATEWAY = 51.77.148.1

    Edit /etc/network/interfaces

    vi /etc/network/interfaces
    

    Add following

    auto INTERFACE_NAME
    iface INTERFACE_NAME inet static
        address SEVER_MAIN_IP
        netmask 255.255.255.255
        broadcast SEVER_MAIN_IP
        dns-nameservers 8.8.8.8 1.1.1.1
        post-up route add GATEWAY_IP dev INTERFACE_NAME
        post-up route add default gw GATEWAY_IP
        post-down route del default gw GATEWAY_IP
        post-down route del GATEWAY_IP dev INTERFACE_NAME
    

    In the above, replace INTERFACE_NAME, SEVER_MAIN_IP and GATEWAY_IP.

    For this server, i added.

    auto ens3
    iface ens3 inet static
        address 51.77.149.182
        netmask 255.255.255.255
        broadcast 51.77.149.182
        post-up route add 51.77.148.1 dev ens3
        post-up route add default gw 51.77.148.1
        post-down route del default gw 51.77.148.1
        post-down route del 51.77.148.1 dev ens3
    

    Now reboot the server.

    Once server is back online, you can configure failover IPS.

    Configure Failover IP

    Use following script to generate your config, add in end of /etc/network/inferfaces file

    php script to generate ip config

    Once configured, you need to reboot the servr.

    Verify IP is up with fping command.

    fping
    /etc/inetnet/interfaces

  • Debian 9 OVH Bridge Network Configuration

    When you run VPS on OVH network behind bridge network, you need to create VMAC for each IP and assign to your network card.

    Once this is done, you need to use following network configuration in your /etc/network/inferfaces file.

    auto lo ens18
    iface lo inet loopback
    auto ens18
    iface ens18 inet static
        address FAILOVER_IP
        netmask 255.255.255.255
        broadcast FAILOVER_IP
        post-up ip route add GATEWAY_IP dev ens18
        post-up ip route add default via GATEWAY_IP dev ens18
        pre-down ip route del GATEWAY_IP dev ens18
        pre-down ip route del default via GATEWAY_IP dev ens18
    

    FAILOVER_IP = the IP you will be using for the virual machine.

    GATEWAY_IP = IP of the Host server with last digits replaced by 254. If your servers main IP is XX.YY.ZZ.100, then Your GATEWAY_IP is XX.YY.ZZ.254

    Here is an example config file i use in one of my VPS

    auto ens18
    iface ens18 inet static
        address 198.50.234.186
        netmask 255.255.255.255
        broadcast 198.50.234.186
        dns-nameservers 8.8.8.8 8.8.4.4
        post-up ip route add 158.69.124.254 dev ens18
        post-up ip route add default via 158.69.124.254 dev ens18
        pre-down ip route delete 158.69.124.254 dev ens18
        pre-down ip route delete default via 158.69.124.254 dev ens18
    

    I made a pull request to OVH as OVH documentation use route command, that is deprecated in Debian 9 and Ubuntu 18.04. We need to use “ip route” command instead of “route” command.