If you have installed Ubuntu with GUI and don’t want GUI, you can disable GUI from starting on boot with command
systemctl set-default multi-user
If you need to GUI auto-start on boot, run
systemctl set-default graphical.target
If you have installed Ubuntu with GUI and don’t want GUI, you can disable GUI from starting on boot with command
systemctl set-default multi-user
If you need to GUI auto-start on boot, run
systemctl set-default graphical.target

RAID 0 allows you to combine multiple disks into one large disk. Only use RAID 0 if the data is not important to you, for example, a backup server. If one disk fails in a RAID 0 array, all the data will be lost.
To create a software RAID 0 with 2 or more disks, first, we need to prepare the disks to be used as RAID members. Run the following commands on each of the disks we will be adding to the RAID 0 array.
parted /dev/sdX mklabel gpt
parted /dev/sdX mkpart primary ext4 0% 100%
parted /dev/sdX set 1 raid on
Replace /dev/sdX with actual device names and run the commands for all devices you will be adding to the RAID 0.
To create RAID 0, run the following command
mdadm --create --verbose /dev/md0 --raid-devices=2 --level=0 /dev/sdc1 /dev/sdd1In the above command,
–raid-devices=2 = number of disks in the RAID. In this case, we have 2 disks. If you have more than 2 disks, change the number accordingly.
/dev/sdc1 /dev/sdd1 = device names, change it with your actual device names. If you have more devices, add them.
/dev/md0 = raid device name, it can be md0, md1, md2 etc..
Before you can use RAID device, you need to format it.
mkfs.ext4 /dev/mdXReplace /dev/mdX with your actual device name.
Run
mdadm --detail --scanIt will print RAID definitions like the following example
root@grml ~ # mdadm --detail --scan
ARRAY /dev/md0 metadata=1.2 name=grml:0 UUID=44f0ec6b:f8311a0c:382295f8:d41fa0fe
root@grml ~ #
You need to edit the file
vi /etc/mdadm/mdadm.conf Add the ARRAY definitions at end of the file. If any definitions are already there, don’t repeat them.
Before you can mount RAID device, you need to find UUID for the raid device, this can be done with command
blkid
Example
root@grml ~ # blkid
/dev/loop0: TYPE="squashfs"
/dev/sda2: UUID="feacd62e-d23f-483d-8971-aa3f110fea05" TYPE="swap" PARTUUID="3019f70f-516a-493f-97cf-2aa001e1c574"
/dev/sda3: UUID="f162656d-bde9-4b14-8823-21e2a1618a2d" BLOCK_SIZE="4096" TYPE="ext4" PARTUUID="1fd4e63f-33a4-4c52-bc00-915c9d7965b8"
/dev/sda4: UUID="52ceb7c4-f065-4cc7-9c19-276a98be29a8" BLOCK_SIZE="4096" TYPE="ext4" PARTUUID="b8f92699-2892-482c-8abe-b90ca91b5fc0"
/dev/sdb1: UUID="44f0ec6b-f831-1a0c-3822-95f8d41fa0fe" UUID_SUB="65fd2c84-1217-2df7-2a2c-83046458805a" LABEL="grml:0" TYPE="linux_raid_member" PARTLABEL="primary" PARTUUID="b197077b-4a34-4459-8230-5c2a3b1c7085"
/dev/sdc1: UUID="44f0ec6b-f831-1a0c-3822-95f8d41fa0fe" UUID_SUB="fedb9e98-dd9f-daed-fc63-4f6a86ebfc9e" LABEL="grml:0" TYPE="linux_raid_member" PARTLABEL="primary" PARTUUID="807fda4f-d22b-4fa7-8810-839e68ae917e"
/dev/sdd1: UUID="44f0ec6b-f831-1a0c-3822-95f8d41fa0fe" UUID_SUB="071de57a-6d12-70e8-ed6d-cefe8371e915" LABEL="grml:0" TYPE="linux_raid_member" PARTLABEL="primary" PARTUUID="76f0cbbe-858a-4153-87dd-5665d1ac9939"
/dev/sda1: PARTUUID="9034a389-a6b2-424e-bd19-ce7e55561eba"
/dev/md0: UUID="9bd3d3ee-cc6b-43d5-91ed-627440cc9154" BLOCK_SIZE="4096" TYPE="ext4"
root@grml ~ #
In this cause UUID for /dev/md0 is
UUID="9bd3d3ee-cc6b-43d5-91ed-627440cc9154"Edit /etc/fstab
vi /etc/fstabAdd
UUID="9bd3d3ee-cc6b-43d5-91ed-627440cc9154" /home ext4 defaults 0 1In the above
/home = is the mount point. If you need to mount the new RAID device as another folder, you need to create an empty directory first.
UUID=”9bd3d3ee-cc6b-43d5-91ed-627440cc9154″ = replace with your actual UUID.
To see the status of the RAID, use the command
cat /proc/mdstat
To find RAID details, use the following command
mdadm --detail /dev/mdXBack to RAID
To see which files cause IO load, use filetop
apt install -y bpfcc-tools
filetop-bpfcc -C
fatrace can list files that and currently used
apt install fatrace
fatrace --timestamp --filter=R
fatrace --timestamp --filter=W
totop
apt install iotop
iotop
To get IO read/write rate, run
sar -b 1 30
Example
root@server12:~# sar -b 1 30
Linux 2.6.32-754.18.2.el6.x86_64 (server12.hosthat.com) 	12/07/2021 	_x86_64_	(8 CPU)

08:47:15 PM       tps      rtps      wtps   bread/s   bwrtn/s
08:47:16 PM    121.00      0.00    121.00      0.00    940.00
08:47:17 PM      0.00      0.00      0.00      0.00      0.00
08:47:18 PM      6.06      6.06      0.00    549.49      0.00
08:47:19 PM      0.00      0.00      0.00      0.00      0.00
08:47:20 PM    204.95     11.88    193.07    174.26   2879.21
08:47:21 PM    579.38      2.06    577.32     16.49   4950.52
08:47:22 PM      2.04      0.00      2.04      0.00      2.04
08:47:23 PM      6.06      6.06      0.00     48.48      0.00
08:47:24 PM     50.51     50.51      0.00    694.95      0.00
08:47:25 PM    206.12     16.33    189.80    195.92   2746.94
08:47:26 PM   1239.39     30.30   1209.09    985.86  10927.27
08:47:27 PM    369.70      3.03    366.67     24.24   4906.06
08:47:28 PM      7.14      5.10      2.04     40.82      1.02
08:47:29 PM      0.00      0.00      0.00      0.00      0.00
08:47:30 PM    211.22      6.12    205.10     97.96   3114.29
08:47:31 PM    646.00      0.00    646.00      0.00   5426.00
08:47:32 PM     16.16     14.14      2.02    129.29      2.02
08:47:33 PM      0.00      0.00      0.00      0.00      0.00
08:47:34 PM      4.08      4.08      0.00     48.98      0.00
08:47:35 PM    216.00      2.00    214.00    512.00   3410.00
08:47:36 PM    448.00      8.00    440.00     96.00   3652.00
08:47:37 PM      2.06      0.00      2.06      0.00      2.06
08:47:38 PM      0.00      0.00      0.00      0.00      0.00
08:47:39 PM     10.10     10.10      0.00    177.78      0.00
08:47:40 PM    189.00      8.00    181.00    160.00   2650.00
08:47:41 PM    294.85      0.00    294.85      0.00   2420.62
08:47:42 PM      8.00      6.00      2.00     48.00      2.00
08:47:43 PM      2.02      2.02      0.00    517.17      0.00
08:47:44 PM     12.12     12.12      0.00    113.13      0.00
08:47:45 PM    179.59      6.12    173.47     65.31   2434.69
Average:       168.06      7.02    161.04    157.19   1686.36
root@server12:~#
To see system load, run
sar -u -o 1 30To view the content of a systemd service file, run the command
systemctl cat SERVICE_NAME_HERE
Example
boby@sok-01:~$ systemctl cat nginx
# /lib/systemd/system/nginx.service
# Stop dance for nginx
# =======================
#
# ExecStop sends SIGSTOP (graceful stop) to the nginx process.
# If, after 5s (–retry QUIT/5) nginx is still running, systemd takes control
# and sends SIGTERM (fast shutdown) to the main process.
# After another 5s (TimeoutStopSec=5), and if nginx is alive, systemd sends
# SIGKILL to all the remaining processes in the process group (KillMode=mixed).
#
# nginx signals reference doc:
# http://nginx.org/en/docs/control.html
#
[Unit]
Description=A high performance web server and a reverse proxy server
Documentation=man:nginx(8)
After=network.target[Service]
Type=forking
PIDFile=/run/nginx.pid
ExecStartPre=/usr/sbin/nginx -t -q -g ‘daemon on; master_process on;’
ExecStart=/usr/sbin/nginx -g ‘daemon on; master_process on;’
ExecReload=/usr/sbin/nginx -g ‘daemon on; master_process on;’ -s reload
ExecStop=-/sbin/start-stop-daemon –quiet –stop –retry QUIT/5 –pidfile /run/nginx.pid
TimeoutStopSec=5
KillMode=mixed[Install]
WantedBy=multi-user.target
boby@sok-01:~$

When doing a FLUSHALl on redis server, i get following error message
[root@server ~]# redis-cli FLUSHALL
(error) MISCONF Redis is configured to save RDB snapshots, but it is currently not able to persist on disk. Commands that may modify the data set are disabled, because this instance is configured to report errors during writes if RDB snapshotting fails (stop-writes-on-bgsave-error option). Please check the Redis logs for details about the RDB error.
[root@server ~]#
The error was because redis data directory was not properly configured.
To fix, the error, edit redis config file
vi /etc/redis/redis.conf
Find
dir ./
Replace with
dir /var/lib/redis
Create a directory
mkdir /var/lib/redis
Make it owned by user redis
chown redis:redis /var/lib/redis
Restart redis server
systemctl restart redis
See Redis
To delete everything from redis cache, run the command
redis-cli FLUSHDB
This will delete all keys from the current DB.
To delete cache from all DB, run
redis-cli FLUSHALL
If Redis is on another server or needs password, you can use the following command
redis-cli -h IP_HERE -p PORT_HERE -a PASSWORD_HERE FLUSHDB
See Redis
To find the data directory in redis, run the command
redis-cli config get dir

Redis data directory is specified in the configuration file
/etc/redis/redis.conf
The entry is
dir /var/lib/redis
redis data directory should be owned by user redis
chown redis:redis /var/lib/redis
Example
[root@server redis]# cd /var/lib/redis/
[root@server redis]# ls -la
total 12
drwxrwx---   2 redis redis 4096 Dec  2 06:44 .
drwxr-xr-x. 37 root  root  4096 Nov 20 17:30 ..
-rw-r--r--   1 redis redis   92 Dec  2 06:44 dump.rdb
[root@server redis]#
See Redis
You can install Gnome Desktop + xdrp on a remote server (VPS/cloud or dedicated) and use it as a remote desktop for browsing or running applications. This instruction works for any RHEL 8 based distributions like CentOS 8, Alma Linux 8, Rocky Linux 8, and Oracle Linux 8.
Install Gnome Desktop with
dnf groupinstall -y --nobest Workstation
After installing, reboot the server
reboot
xrdp package is provided by epel repository, so let’s enable it with
dnf install -y epel-release
install xrdp
dnf install -y xrdp xrdp-selinux xorgxrdp
Enable and start xrdp
systemctl enable xrdp
systemctl start xrdp
Open port 3389 in the firewall
firewall-cmd --add-port=3389/tcp --permanent
firewall-cmd --reload
Create a user and set a password for the user. This user will be used to login to remote desktop
useradd -m --shell /bin/bash serverok
usermod -aG wheel serverok
passwd serverok
Now you should be able to login to remote desktop using RDP.
Once logged in, you may need to disable desktop animations to avoid lag by running the following command in the terminal.
gsettings set org.gnome.desktop.interface enable-animations false

To find files that are older than X minutes, use the command
find /path/ -type f -mmin +30This will find all files inside /path/ that are older than 30 minutes.
If you need to delete those files, run
find /path/ -type f -mmin +30 -deleteTo find files created in the last 30 minutes, run
find /path/ -type f -mmin 30See find
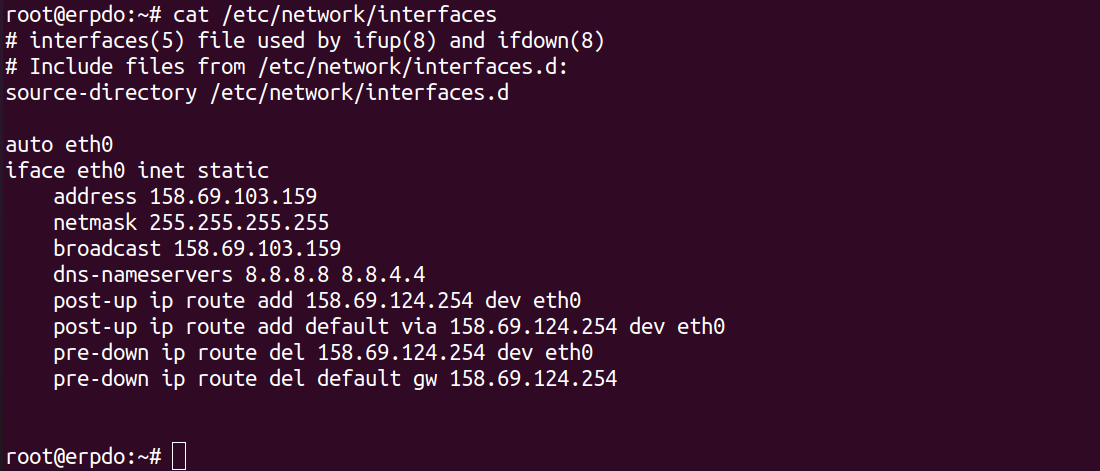
To configure IP on OVH VPS, you need to manually configure networking as OVH gateway is outside the failover IP subnet. For most hosting providers getaway will be in the same subnet as the IP address. To configure IP using netplan, see instruction here.
First, install ifupdown package
apt install -y ifupdown
Now edit file
vi /etc/network/interfaces
Add
auto NETWORK_INTERFACE_HERE
iface NETWORK_INTERFACE_HERE inet static
    address FO_IP_ADDR
    netmask 255.255.255.255
    broadcast FO_IP_ADDR
    dns-nameservers 8.8.8.8 8.8.4.4
    post-up ip route add GATEWAY_ADDR dev NETWORK_INTERFACE_HERE
    post-up ip route add default via GATEWAY_ADDR dev NETWORK_INTERFACE_HERE
    pre-down ip route del GATEWAY_ADDR dev NETWORK_INTERFACE_HERE
    pre-down ip route del default via GATEWAY_ADDR dev NETWORK_INTERFACE_HERE
In the above text, replace
NETWORK_INTERFACE_HERE = with your actual network interface name, for example, eth0, ens18, etc.
FO_IP_ADDR = Your VPS IP address, OVH calls this Failover IP address. It is just any secondary IP address you purchase.
GATEWAY_ADDR = Gateway IP address. This is the same as the Main IP of the server with the last octal replaced by 254
Example
Configuration is the same as Ubuntu 18.04, the only difference is post-up and pre-down tines, where Ubuntu 18.04 used older route command, in Ubuntu 20.04, we use “ip route” command instead.

On a Bitnami WordPress server, plugin installation/upgrade failed with permission error. The error is because the web server in bitmai servers runs as user daemon. When you upload a file as user bitnami, you need to make sure you set file permission properly so anyone in the group can write.
To fix the error, run
sudo chown -R bitnami:daemon /home/bitnami/stack/wordpress
sudo chown -R bitnami:daemon /bitnami/wordpress/wp-content
sudo chmod -R 770 /bitnami/wordpress/wp-content
sudo chmod -R 770 /home/bitnami/stack/wordpress
Some bitnami installations use different file structure
sudo chown -R bitnami:daemon /home/bitnami/apps/wordpress/htdocs
sudo chmod -R 770 /home/bitnami/apps/wordpress/htdocs
in wp-config.php, added the following when I migrated a site, refer to original wp-config.php for your exact path
define('FS_METHOD', 'direct');
define('WP_TEMP_DIR', '/opt/bitnami/apps/wordpress/tmp');
To install the latest version of Redis on Ubuntu/Debian server, run
curl https://packages.redis.io/gpg | sudo apt-key add -
echo "deb https://packages.redis.io/deb $(lsb_release -cs) main" | sudo tee /etc/apt/sources.list.d/redis.list
sudo apt-get update
sudo apt-get install redis
Enable redis server to start on boot
systemctl enable redis-server
Start redis server
systemctl start redis-server
See Redis