Category: Linux

  • Set Static IP in RHEL 8 OVH VPS

    Set Static IP in RHEL 8 OVH VPS

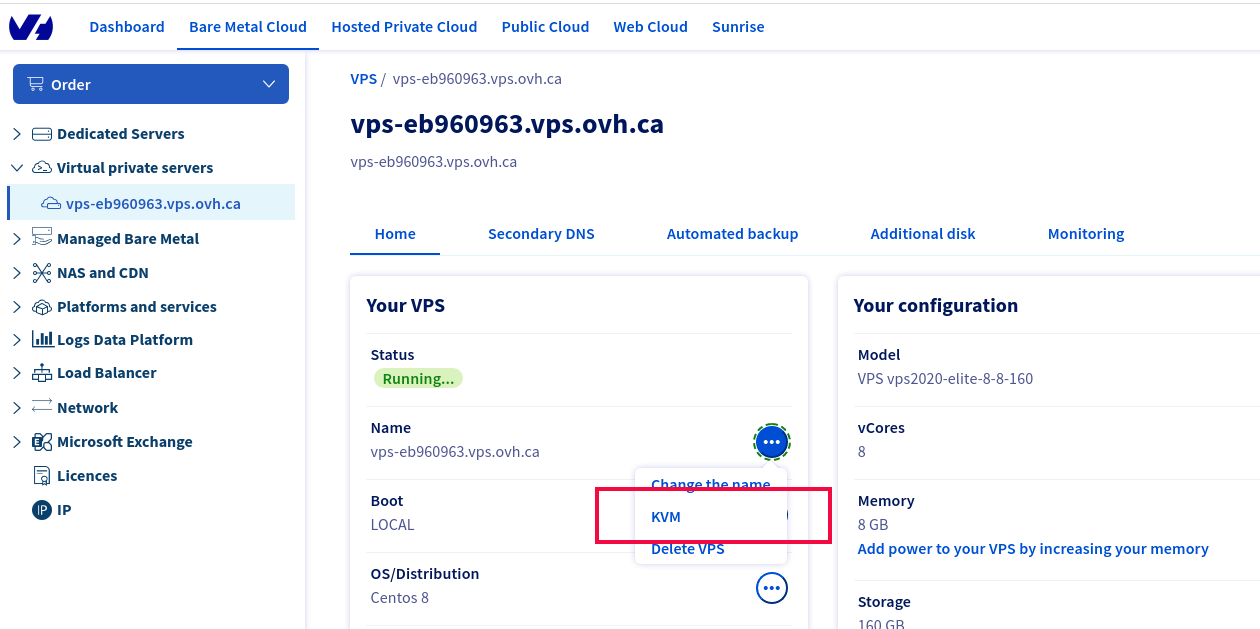
    On OVH VPS running AlmaLinux 8, IPv4 IP address gets dropped. I have to connect to the server using KVM feature available in OVH control panel.

    OVH Cloud VPS KVM

    I checked IP of the server with the command

    ip a
    

    It did hot show any IPv4 IP address. I checked the network configuration file

    vi /etc/sysconfig/network-scripts/ifcfg-eth0
    

    That had the following content

    BOOTPROTO=dhcp
    DEFROUTE=yes
    DEVICE=eth0
    DHCLIENT_SET_DEFAULT_ROUTE=yes
    HWADDR=fa:16:3e:6b:a6:1a
    IPV6ADDR=2607:5300:201:3100::952/56
    IPV6INIT=yes
    IPV6_AUTOCONF=no
    IPV6_DEFAULTGW=2607:5300:201:3100::1
    IPV6_FORCE_ACCEPT_RA=no
    MTU=1500
    ONBOOT=yes
    TYPE=Ethernet
    USERCTL=no
    

    To make the IP static, I made the following changes.

    Find

    BOOTPROTO=dhcp
    

    Replace with

    BOOTPROTO=static
    

    Also added following 2 entry

    IPADDR=144.217.13.76
    GATEWAY=144.217.12.1
    

    144.217.13.76 is the IP address of the VPS.

    144.217.12.1 is the gateway used on the VPS, found using “ip route” or “route -n” command.

    [root@vps-eb960963 network-scripts]# route -n
    Kernel IP routing table
    Destination     Gateway         Genmask         Flags Metric Ref    Use Iface
    0.0.0.0         144.217.12.1    0.0.0.0         UG    0      0        0 eth0
    144.217.12.1    0.0.0.0         255.255.255.255 UH    0      0        0 eth0
    [root@vps-eb960963 network-scripts]#
    

    Create a static route file

    vi /etc/sysconfig/network-scripts/route-eth0
    

    Add

    144.217.12.1 dev eth0
    default via 144.217.12.1 dev eth0
    

    Here 144.217.12.1 is the gateway IP address found in the above step.

    See IP

  • How to Convert CentOS 8 to Rocky Linux

    How to Convert CentOS 8 to Rocky Linux

    You can convert your remote VPS or Dedicated Server running CentOS 8 to Rocky Linux easily by running the following commands.

    Install wget and tmux packages.

    dnf install wget tmux
    

    Next, start a tmux session, so in case you get disconnected from the remote server, you can connect back

    tmux
    

    Now download migration script

    wget https://raw.githubusercontent.com/rocky-linux/rocky-tools/main/migrate2rocky/migrate2rocky.sh
    

    Now verify your system can be converted with command

    bash migrate2rocky.sh -V
    

    If all is good, you can convert CentOS 8 to Rocky Linux with the command

    bash migrate2rocky.sh -r
    
  • List contents of jks keystore file

    List contents of jks keystore file

    To list the content of jks keystore file used by tomcat web server, run command

    keytool -list -keystore FILE.jks 
    

    It will ask Keystore password. Once you enter the password, it will list the contents of the file.

    keytool list certificates

    In the above keystore, there are 5 certificates with names inter, root1, root2, ssl_tomcat2, and tomcat.

    To get detailed information on the certificates, use the command

    keytool -list -v -keystore FILE.jks 
    

    See keytool

  • keytool

    The keytool command is a key and certificate management utility. It enables users to administer their own public/private key pairs and associated certificates for use in self-authentication (where a user authenticates themselves to other users and services) or data integrity and authentication services, by using digital signatures. The keytool command also enables users to cache the public keys (in the form of certificates) of their communicating peers.

    A certificate is a digitally signed statement from one entity (person, company, and so on), which says that the public key (and some other information) of some other entity has a particular value. When data is digitally signed, the signature can be verified to check the data integrity and authenticity. Integrity means that the data hasn’t been modified or tampered with, and authenticity means that the data comes from the individual who claims to have created and signed it.

    The keytool command also enables users to administer secret keys and passphrases used in symmetric encryption and decryption (Data Encryption Standard). It can also display other security-related information.

    The keytool command stores the keys and certificates in a keystone.

    List contents of jks keystore file
    Extracting SSL certificate from the Java Keystore (JKS)

  • How to view the contents of tar.gz file

    How to view the contents of tar.gz file

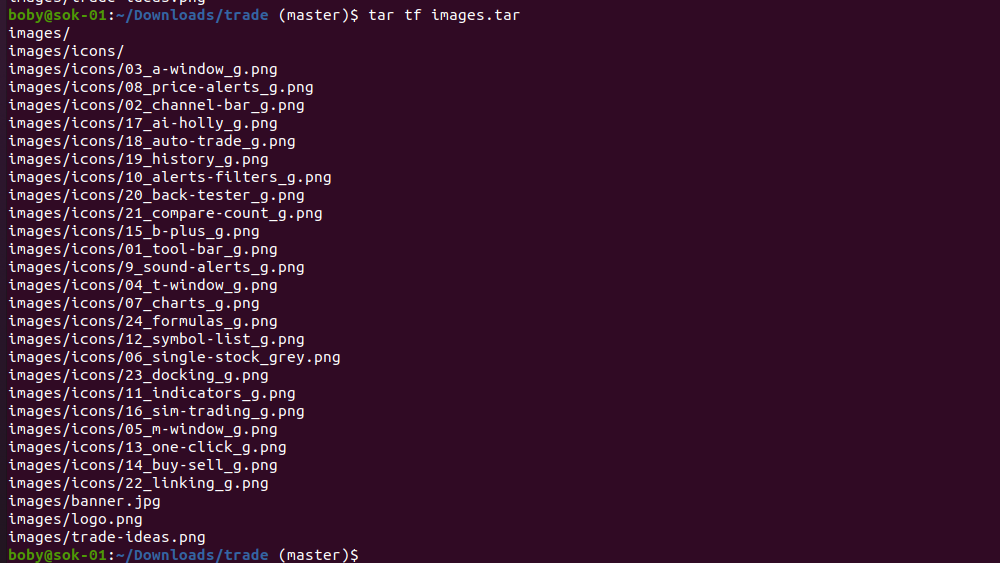
    To view the contents of tar.gz file, run

    tar tf FILE.tar.gz
    

    tar view files

    -f, --file=ARCHIVE         use archive file or device ARCHIVE
    -t, --list                 list the contents of an archive
    
  • How to install zabbix agent on Ubuntu

    How to install zabbix agent on Ubuntu

    To install the Zabbix agent on Ubuntu, run the command

    apt install zabbix-agent
    

    To autostart, Zabbix agent on boot, enable it with

    systemctl enable zabbix-agent
    

    To manage Zabbix, use commands

    systemctl stop zabbix-agent
    systemctl start zabbix-agent
    systemctl restart zabbix-agent
    

    To see Zabbix listening port

    netstat -lntp | grep zabbix
    

    Zabbix agent port

    Edit file

    vi /etc/zabbix/zabbix_agentd.conf 
    

    Find

    Server=127.0.0.1
    

    Replace with

    Server=127.0.0.1,IP_OF_ZABBIX_SERVER_HERE
    

    zabbix agent Server config

    Restart zabbix agent

    systemctl restart zabbix-agent
    

    After the Zabbix agent is installed, you need to add the sevrer in your Zabbix installation.

  • How to Migrate CentOS 8 to AlmaLinux

    How to Migrate CentOS 8 to AlmaLinux

    CentOS 8 is reaching its End of Life in December 2021. If you are using CentOS 8, you may need to consider migrating to other operating systems.

    Other alternatives for CentOS 8 are AlmaLinux, Rocky Linux, and Oracle Linux. All of these are free and are based on RHEL 8.

    AlmaLinux is released a migration script

    https://github.com/AlmaLinux/almalinux-deploy

    This script allows you to convert CentOS 8 to AlmaLinux.

    WARNING: Make sure you take a full system backup before migrating.

    Before migrating, make sure your system is up to date.

    dnf update
    

    If you get error, Error: Failed to download metadata for repo ‘appstream’, run

    sed -i -e "s|mirrorlist=|#mirrorlist=|g" /etc/yum.repos.d/CentOS-*
    sed -i -e "s|#baseurl=http://mirror.centos.org|baseurl=http://vault.centos.org|g" /etc/yum.repos.d/CentOS-*
    dnf update
    

    Reboot the server

    reboot
    

    Once the server is back online, we can run the AlmaLinux migration script to start the migration.

    curl -O https://raw.githubusercontent.com/AlmaLinux/almalinux-deploy/master/almalinux-deploy.sh
    bash almalinux-deploy.sh
    

    After the migration is complete, run

    dnf distro-sync -y 
    

    Now you need to reboot the server

    reboot
    
  • How to find out what service is using a certain port?

    To find out which service or program using a port on a Linux machine, you can use the command

    fuser -vn tcp PORT_HERE
    

    Example

    root@sok-01:~# fuser -vn tcp 80
                         USER        PID ACCESS COMMAND
    80/tcp:              root       1144 F.... nginx
                         boby       1145 F.... nginx
                         boby       1146 F.... nginx
                         boby       1147 F.... nginx
                         boby       1148 F.... nginx
    root@sok-01:~# 
    

    In this case, TCP port 80 is used by a process with PID 1144, that is Nginx. This process has multiple subprocesses with PID 1145, 1146, 1147, and 1148.

    You can also use

    root@sok-01:~# fuser 80/tcp
    80/tcp:               1144  1145  1146  1147  1148
    root@sok-01:~# 
    

    This just lists all process IDs. You can find the process by looking at the result of “ps aux” command and finding the process with the above process ids.

    Using netstat

    Another method is to use “netstat -lntp” command

    root@sok-01:~# netstat -lntp
    Active Internet connections (only servers)
    Proto Recv-Q Send-Q Local Address           Foreign Address         State       PID/Program name    
    tcp        0      0 127.0.0.1:631           0.0.0.0:*               LISTEN      913/cupsd           
    tcp        0      0 0.0.0.0:443             0.0.0.0:*               LISTEN      1144/nginx: master  
    tcp        0      0 127.0.0.1:5982          0.0.0.0:*               LISTEN      22719/VBoxHeadless  
    tcp        0      0 0.0.0.0:7070            0.0.0.0:*               LISTEN      1036/anydesk        
    tcp        0      0 127.0.0.1:7878          0.0.0.0:*               LISTEN      2969/ssh            
    tcp        0      0 127.0.0.1:3306          0.0.0.0:*               LISTEN      1118/mysqld         
    tcp        0      0 127.0.0.1:2222          0.0.0.0:*               LISTEN      22719/VBoxHeadless  
    tcp        0      0 0.0.0.0:111             0.0.0.0:*               LISTEN      1/init              
    tcp        0      0 0.0.0.0:80              0.0.0.0:*               LISTEN      1144/nginx: master  
    tcp        0      0 10.42.0.1:53            0.0.0.0:*               LISTEN      26291/dnsmasq       
    tcp        0      0 192.168.122.1:53        0.0.0.0:*               LISTEN      1532/dnsmasq        
    tcp        0      0 127.0.0.53:53           0.0.0.0:*               LISTEN      856/systemd-resolve 
    tcp6       0      0 ::1:631                 :::*                    LISTEN      913/cupsd           
    tcp6       0      0 ::1:7878                :::*                    LISTEN      2969/ssh            
    tcp6       0      0 :::5900                 :::*                    LISTEN      22719/VBoxHeadless  
    tcp6       0      0 :::111                  :::*                    LISTEN      1/init              
    root@sok-01:~# 
    

    This lists all listening ports. The last column shows PID/Program name. To find a specific port, you can use grep

    root@sok-01:~# netstat -lntp | grep 80
    tcp        0      0 0.0.0.0:80              0.0.0.0:*               LISTEN      1144/nginx: master  
    root@sok-01:~# 
    

    In the above command, we find which program uses port 80.