- Install Thin web server
- Install Xfce VNC remote desktop on CentOS 7
- How to install LetsEncrypt SSL on Bitnami WordPress Server
- Install Elasticsearch with Docker
- Install MySQL 8 on FreeBSD
- How to Install Xfce and VNC on Ubuntu 20.04
- How to install ImunifyAV+
- How to install development tools on Debian/Ubuntu
- Install Nginx ModSecurity on CentOS 7
- Install LetsEncrypt in CentOS 7
Category: Linux
-
linux software installation
-
Install Thin web server
Thin is a Ruby web server that can handle high levels of concurrency.
Install it with
gem install thin
root@server70 [/home/redmine]# gem install thin Building native extensions. This could take a while... Building native extensions. This could take a while... Successfully installed eventmachine-0.12.10 Successfully installed daemons-1.1.2 Successfully installed thin-1.2.11 3 gems installed Installing ri documentation for eventmachine-0.12.10... Installing ri documentation for daemons-1.1.2... Installing ri documentation for thin-1.2.11... Installing RDoc documentation for eventmachine-0.12.10... Could not find main page README Could not find main page README Could not find main page README Could not find main page README Installing RDoc documentation for daemons-1.1.2... Installing RDoc documentation for thin-1.2.11... root@server70 [/home/redmine]#
Installing thin on Ubuntu
You can install thin web server on Ubuntu/Debian using
apt install thin
-
How to host static site using pm2
PM2 is a process manager for node.js applications. You can use PM2 to host static websites.
To host a static website, create a folder, and put your files inside.
mkdir /home/website
Let’s create a static file, say index.html
echo "Welcome" > /home/website/index.html
Now you can make the site live using the following pm2 command
pm2 serve /home/website 8082
Now the static site will be available at
http://localhost:8082
If you have a Single Page Application (SPA) like Angular, React, you can use the option –spa with pm2 command so all non-existent pages get routed to index.html internally.
pm2 serve --spa
-
dmidecode
dmidecode is a tool for dumping a computer’s DMI (SMBIOS ) table contents in a human-readable format. This table contains a description of the system’s hardware components, as well as other useful pieces of information such as serial numbers and BIOS revision. Thanks to this table, you can retrieve this information without having to probe for the actual hardware. While this is a good point in terms of report speed and safeness, this also makes the presented information possibly unreliable.
The DMI table doesn’t only describe what the system is currently made of, it also can report the possible evolutions (such as the fastest supported CPU or the maximal amount of memory supported).
SMBIOS stands for System Management BIOS, while DMI stands for Desktop Management Interface. Both standards are tightly related and developed by the DMTF (Desktop Management Task Force).
To see system details, run
dmidecode
-
How to find RAM details in Linux
To find RAM memory details (model number/manufacturer) in Linux, you can use the command
dmidecode --type 17
To show only model numbers, run
dmidecode --type 17 | grep "Part Number"
Once you find the Part Number, you can search in google for the part number to see more details about the RAM.
On Ubuntu/Debian, you can install dmidecode with the command
apt install -y dmidecode
On RHEL, CentOS, OracleLinux, you can use the command
yum install dmidecode
On newer RHEL systems, you can use dnf instead of yum.
-
How to Install Elasticsearch in Docker
To Install Elasticsearch with Docker, first, you need to install docker on your server with command
wget -qO- https://get.docker.com/ | sh
Docker images for Elasticsearch are available from
https://hub.docker.com/_/elasticsearch
You can see all available versions at
https://hub.docker.com/_/elasticsearch?tab=tags&page=1&ordering=last_updated
To create an elasticsearch container, run
docker run -p 9200:9200 -p 9300:9300 -e "discovery.type=single-node" docker.elastic.co/elasticsearch/elasticsearch:7.5.2
To run it in the background
docker run --name sok-elasticsearch --restart=unless-stopped \ -d -p 9200:9200 -p 9300:9300 \ -e "xpack.security.enabled=false" \ -e "discovery.type=single-node" docker.elastic.co/elasticsearch/elasticsearch:7.5.2
To verify if ElasticSearch works, run
boby@sok-01:~$ curl localhost:9200 { "name" : "730d385743b3", "cluster_name" : "docker-cluster", "cluster_uuid" : "V9XDIPXZQt-Tfgcy8hoIDg", "version" : { "number" : "7.5.2", "build_flavor" : "default", "build_type" : "docker", "build_hash" : "8bec50e1e0ad29dad5653712cf3bb580cd1afcdf", "build_date" : "2020-01-15T12:11:52.313576Z", "build_snapshot" : false, "lucene_version" : "8.3.0", "minimum_wire_compatibility_version" : "6.8.0", "minimum_index_compatibility_version" : "6.0.0-beta1" }, "tagline" : "You Know, for Search" } boby@sok-01:~$
Back to Elasticsearch
-
How to find CPU of a Linux Server
To find CPU used on a Linux system, run command
cat /proc/cpuinfo
Example
boby@sok-01:~$ cat /proc/cpuinfo | grep -i "model name" model name : AMD Ryzen 3 2200G with Radeon Vega Graphics model name : AMD Ryzen 3 2200G with Radeon Vega Graphics model name : AMD Ryzen 3 2200G with Radeon Vega Graphics model name : AMD Ryzen 3 2200G with Radeon Vega Graphics boby@sok-01:~$
-
How to Delete Website (Virtual Server) in Virtualmin
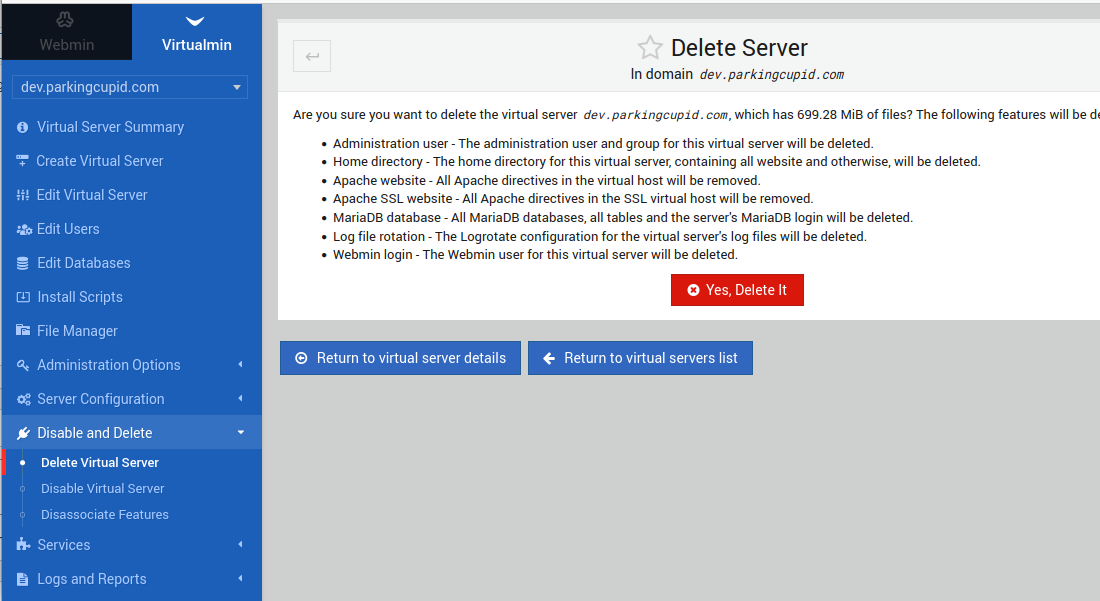
In the Virtualmin Hosting control panel, websites are called Virtual Server. To delete a website, click on the Virtualmin tab.
From the dropdown menu, select the website you need to delete.
On the left menu, click on “Disable and Delete’. Then click on “Delete Virtual Server” Link.
Virtualmin > Domain > Disable and Delete > Delete Virtial Server
It will ask for confirmation. Click on the red “Yes, Delete it” button to delete the website.
See Virtualmin
-
How to display /proc/*/environ file in separate lines?
environ is a file located in /proc/PID/environ, it shows environment variables for a process.
If you run “cat environ”, you will get a long string.
To make it readable, you can use sed command.
cat environ | sed -z 's/$/\n/'
Example
-
Watermark video using ffmpeg
To watermark video using FFmpeg, run
ffmpeg -i SOURCE.mp4 -vf "drawtext=text='WATERMARK_TEXT':x=10:y=H-th-10:fontsize=32:fontcolor=white:shadowcolor=black:shadowx=2:shadowy=2" OUT.mp4
In the above command replace
SOURCE.mp4 = file name of the video you need to watermark. OUT.mp4 = file name for the watermarked video. WATERMARK_TEXT = Text you need to watermark on the video.
See ffmpeg
-
Lego – LetsEncrypt client
Lego is a Let’s Encrypt client and ACME library written in Go.
https://go-acme.github.io/lego
Install Lego
To install go to the release page, download the latest version.
wget https://raw.githubusercontent.com/serverok/server-setup/master/install/lego.sh bash ./lego.sh
Create SSL certificate
To create an SSL certificate standalone (built-in webserver), run
lego --accept-tos --http --email="EMAIL-ADDRESS" --key-type rsa2048 --domains="DOMAIN_NAME" --domains="www.DOMAIN_NAME" --path="/etc/lego" run
If you need to verify using port 443, use “–tls” instead of “–http”
Verify SSL using webroot (existing webserver)
lego --accept-tos --http --http.webroot="/var/www/html/" --email="EMAIL-ADDRESS" --key-type rsa2048 --domains="DOMAIN_NAME" --domains="www.DOMAIN_NAME" --path="/etc/lego" run
Issue Wildcard SSL using manual DNS verification
lego --email "EMAIL-ADDRESS" --key-type rsa2048 --domains="DOMAIN_NAME" --domains="*.DOMAIN_NAME" --dns "manual" --path="/etc/lego" run
Renew SSL certificate
To renew the SSL certificate, use the same command as SSL creation with “run” replaced with
renew --days 30
–days 30 means SSL will be renewed if the expiry date is with 30 days. If you need to force renew SSL, use –days 90.
Now run
lego --http --http.webroot="/var/www/html/" --email="EMAIL-ADDRESS" --key-type rsa2048 --domains="DOMAIN_NAME" --domains="www.DOMAIN_NAME" --path="/etc/lego" renew --days 30
You need to restart the webserver after running this command.
Renew Hook
If you need to execute a script after SSL renewal, you can add
--renew-hook="./myscript.sh"
Example
lego --http --http.webroot="/var/www/html/" --email="EMAIL-ADDRESS" --key-type rsa2048 --domains="DOMAIN_NAME" --domains="www.DOMAIN_NAME" --path="/etc/lego" renew --days 30 --renew-hook="./myscript.sh"
If you are using the standalone method, you need to stop the webserver before running the lego command.
SSL certificates will be in the directory
/etc/lego/certificates/
Make it readable by the web server with the command
chmod -R 755 /etc/lego/
See letsencrypt
-
Debian 11.0 Bullseye released
Debian 11.0 Bullseye released on August 14th, 2021 is the next major Debian GNU/Linux distribution release. Debian 10 buster is designated as oldstable.
https://www.debian.org/releases/bullseye/
Debian 12 “Bookworm” is the new testing distribution with is expected to be released in 2023.
You can download the latest version of Debian 11.0 ISO from
https://www.debian.org/download
What is new in Debian 11.0
Debian 11.0 is powered by Linux 5.10 LTS kernel. It supports exFAT file system. Control groups v2 support. Improved support for alternative init systems.
The new release of Debian 11.0 comes with a lot more software packages. It includes 11294 new packages. Most software on the distribution has been updated.
You can find the list of software packages and versions at
https://www.debian.org/releases/stable/amd64/release-notes/ch-whats-new.en.html#major-packages
Upgrade Debian 10 to Debian 11.0
You can find instructions for upgrading Debian 10 to Debian 11.0 at
https://www.debian.org/releases/stable/amd64/release-notes/ch-upgrading.en.html
See Debian