Category: Web Server

  • How to Use Caddy as a Reverse Proxy

    How to Use Caddy as a Reverse Proxy

    Caddy is a powerful and user-friendly web server. One of its features is its ability to act as a reverse proxy, seamlessly directing client requests to the appropriate backend servers while offering robust security and performance benefits.

    To configure caddy as reverse proxy, add following to Caddyfile

    vi /etc/caddy/Caddyfile
    

    Add

    serverok.in {
        reverse_proxy * 10.1.1.1:443 {
            transport http {
                tls
                tls_insecure_skip_verify
            }
        }
    }
    

    Restart Caddy

    systemctl  restart caddy
    

    In this case, all request for domain serverok.in will be proxied to backend server IP address 10.1.1.1 on port 443.

    tls_insecure_skip_verify is to specify not to validate backend server SSL certificate to allow self signed SSL certificate.

    To enable logging

    serverok.in {
        reverse_proxy * 10.1.1.1:443 {
            transport http {
                tls
                tls_insecure_skip_verify
            }
        }
        log {
            output file /var/log/caddy/serverok.in.access.log
        }
    }
    

    This will save logs in JSON format.

    If you need to allow multiple domains, separate them with comma.

    serverok.in, www.serverok.in {
        reverse_proxy * 10.1.1.1:443 {
            transport http {
                tls
                tls_insecure_skip_verify
            }
        }
        log {
            output file /var/log/caddy/serverok.in.access.log
        }
    }
    

    To redirect www domain to non-www

    www.serverok.in {
        redir https://serverok.in{uri}
    }
    

    Back to Caddy

  • How to install lighttpd from source code

    How to install lighttpd from source code

    Lighttpd is a secure, fast, compliant, and very flexible web server that has been optimized for high-performance environments. In this post, we will be installing Lighttpd by compiling the source code.

    To install lighttpd from the source, first, let’s install the requirements

    For RHEL, CentOS, AlmaLinux, etc..

    dnf -y install wget
    dnf -y group install 'Development Tools'
    

    Use yum instead of dnf if you are using an older version, for example, CentOS 7

    For Ubuntu/Debian

    apt update
    apt -y install build-essential wget
    

    Next, we will download and install lighttpd, you can get the latest version download link from

    https://www.lighttpd.net/

    cd /usr/local/src
    wget http://download.lighttpd.net/lighttpd/releases-1.4.x/lighttpd-1.4.64.tar.gz
    tar -xvf lighttpd-1.4.64.tar.gz
    cd lighttpd-1.4.64
    make clean && make distclean
    ./configure --prefix=/usr --with-fam
    make
    make install
    

    If you get error

    configure: error: pcre2-config not found, install the pcre2-devel package or build with --without-pcre2
    

    install pcre2 devel package

    RHEL

    dnf install -y pcre2-devel
    

    For Ubuntu/Debian

    apt install -y libpcre2-dev
    

    If you get error related to zlib “configure: error: zlib headers not found, install them or build without –with-zlib”, install

    For Ubuntu/Debian

    apt install -y zlib1g-dev
    

    Create User

    Let’s create a user for running lighttpd

    groupadd lighttpd
    adduser -m -g lighttpd -d /var/www -s /sbin/nologin lighttpd
    

    For Ubuntu/Debian

    useradd -m  -d /var/www -s /sbin/nologin lighttpd
    

    Instead of creating a new user, you can also use user nobody on RHEL based distros, www-data on Ubuntu.

    Install configuration files

    To setup default lighttpd.conf file, run

    install -Dp ./doc/config/lighttpd.conf /etc/lighttpd/lighttpd.conf
    cp -R doc/config/conf.d/ /etc/lighttpd/
    cp doc/config/conf.d/mod.template /etc/lighttpd/modules.conf
    

    Create a directory for log files

    mkdir /var/log/lighttpd
    chown -R lighttpd:lighttpd /var/log/lighttpd
    

    Copy service files

    cp doc/systemd/lighttpd.service /usr/lib/systemd/system/
    cp doc/systemd/lighttpd.socket /usr/lib/systemd/system/
    

    Update configuration files

    Edit

    vi /etc/lighttpd/modules.conf
    

    Find

    server.modules += ( "mod_Foo" )
    

    Comment the line.

    Edit /etc/lighttpd/lighttpd.conf

    vi /etc/lighttpd/lighttpd.conf
    

    Find

    server.use-ipv6 = "enable"
    

    Replace with

    server.use-ipv6 = "disable"
    

    Update server document root as needed

    var.server_root = "/var/www"
    server.document-root = server_root + "/html"
    

    Starting lighttpd

    Verify configuration file has now errors

    /usr/sbin/lighttpd -tt -f /etc/lighttpd/lighttpd.conf
    

    Run lighttpd manually

    /usr/sbin/lighttpd -D -f /etc/lighttpd/lighttpd.conf
    

    You can enable/start lighttpd with

    systemctl enable lighttpd
    systemctl start lighttpd
    systemctl status lighttpd
    

    back to lighttpd

  • How to update LiteSpeed License from command line

    How to update LiteSpeed License from command line

    If you want to change the License key for your LiteSpeed webserver, you can do the following.

    cd /usr/local/lsws/conf
    mv serial.no serial.no.old
    mv license.key license.key.old
    

    Create file

    vi serial.no
    

    Inside the file, paste your LiteSpeed webserver license key.

    Restart LiteSpeed

    /usr/local/lsws/bin/lshttpd -r
    /usr/local/lsws/bin/lswsctrl restart
    

    Verify LiteSpeed License with command

    /usr/local/lsws/bin/lshttpd -V
    

    verify litespeed license

    See LiteSpeed

  • systemd service file for openlitespeed

    systemd service file for openlitespeed

    To start/stop OpenLiteSpeed web server, you can use the following systemd service file

    vi /usr/lib/systemd/system/lshttpd.service
    

    Add following content

    [Unit]
    Description=OpenLiteSpeed HTTP Server
    After=network-online.target remote-fs.target nss-lookup.target
    Wants=network-online.target
    
    [Service]
    Type=forking
    PIDFile=/var/run/openlitespeed.pid
    ExecStart=/usr/local/lsws/bin/lswsctrl start
    ExecReload=/usr/local/lsws/bin/lswsctrl restart 
    ExecStop=/usr/local/lsws/bin/lswsctrl delay-stop
    
    KillMode=none
    PrivateTmp=false
    Restart=on-failure
    RestartSec=5
    
    # do not want to be limited in anyway
    CPUAccounting=false
    TasksAccounting=false
    MemoryAccounting=false
    
    [Install]
    WantedBy=multi-user.target
    Alias=lsws.service
    Alias=openlitespeed.service
    

    To start openlitespeed on boot,

    systemctl enable lsws
    

    To start OpenLiteSpeed

    systemctl start lsws
    

    To stop OpenLiteSpeed

    systemctl stop lsws
    

    See OpenLiteSpeed

  • Enable HTTP_X_FORWARDED_FOR in Haproxy

    Enable HTTP_X_FORWARDED_FOR in Haproxy

    By default, Haproxy won’t forward visitor IP address to backend servers. To enable Haproxy forward visitor IP address to backend server using HTTP_X_FORWARDED_FOR header, edit haproxy.cfg

    vi /etc/haproxy/haproxy.cfg 
    

    Add

    option forwardfor 
    

    This can be added in blocks defaults, frontend, backend or listen.

    Example

    backend be_lamp
    mode http
    log global
    option forwardfor
    server fapi 10.0.3.106:80
    
  • Redirect HTTP to HTTPS with IIS 10

    Redirect HTTP to HTTPS with IIS 10

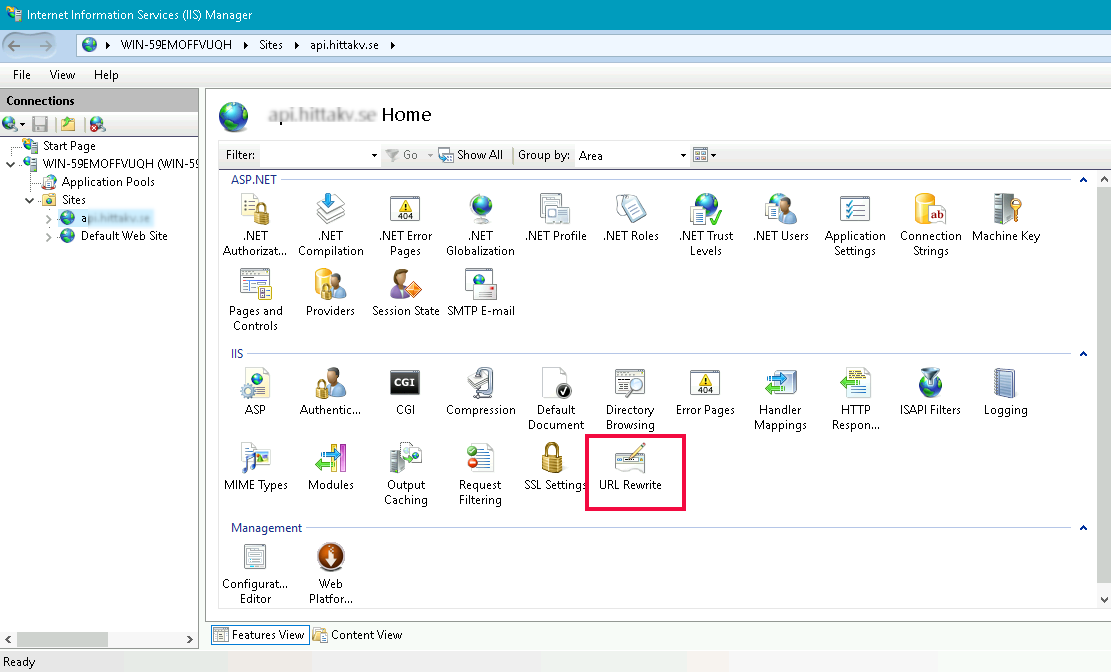
    To redirect a domain to HTTPS, Click on the website in IIS, you will see

    If you don’t see the “URL Rewrite” button, you need to install “URL Rewrite” extension

    https://www.iis.net/downloads/microsoft/url-rewrite

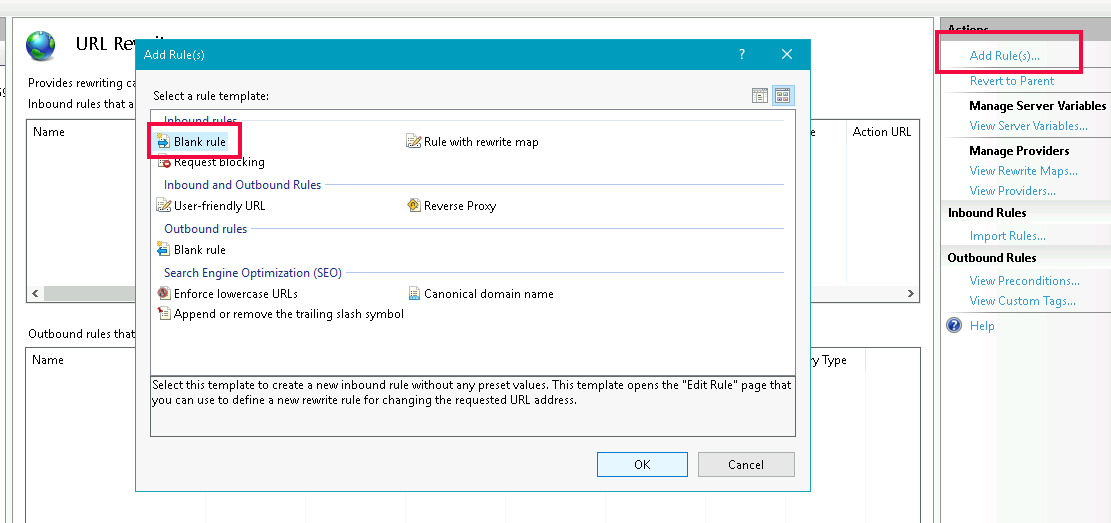
    Click on “URL Rewrite” button. On the next screen click on “Add Rule(s)” link on the right side menu.

    IIS URL Rewrite add rule

    Select “Blank Rule”, then click OK button.

    On the next screen, enter the following details

    Name = SSL
    Pattern = (.*)
    

    Keep all other options default.

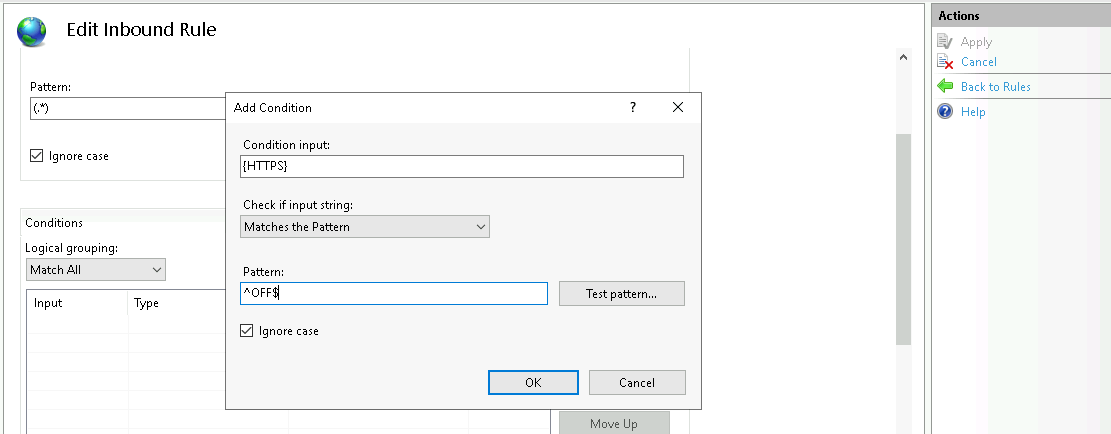
    Scroll down, expand “conditions” on the same screen. Click on Add button

    Enter the following values, keep everything else default as shown in the above picture.

    Condition input = {HTTPS}
    Pattern = ^OFF$
    

    Click “OK” button.

    Scroll Down to the actions section

    Action type = Redirect
    Rewrite URL = https://{HTTP_HOST}{REQUEST_URI}
    Redirect type =  Permanent (301)
    

    Click “Apply” from the right side “Actions” menu to save the changes.

    Method 2: using web.config

    Create a file with the name “web.config” in the document root of your website with the following content.


    You need “URL Rewrite” IIS module installed for this to work.

  • Enable Detailed Error Messages in IIS

    To show detailed error message on IIS web server, edit web.config, add the following


    See IIS

  • libnsl.so.1: cannot open shared object file: No such file or directory

    While installing LiteSpeed web server on a Cpanel server running on ALMALINUX 8.4, I get an error

    /usr/src/lsws/lsws-6.0.9/admin/fcgi-bin/admin_php5: error while loading shared libraries: libnsl.so.1: cannot open shared object file: No such file or directory

    To fix the error, install libnsl package

    yum install -y libnsl
    

    Back to LiteSpeed

  • Change SSH port in CyberPanel

    Change SSH port in CyberPanel

    CyberPanel is a free open source control panel for web hosting. It use OpenLiteSpeed web server. You have the option to use Commercial LiteSpeed web server with CyberPanel.

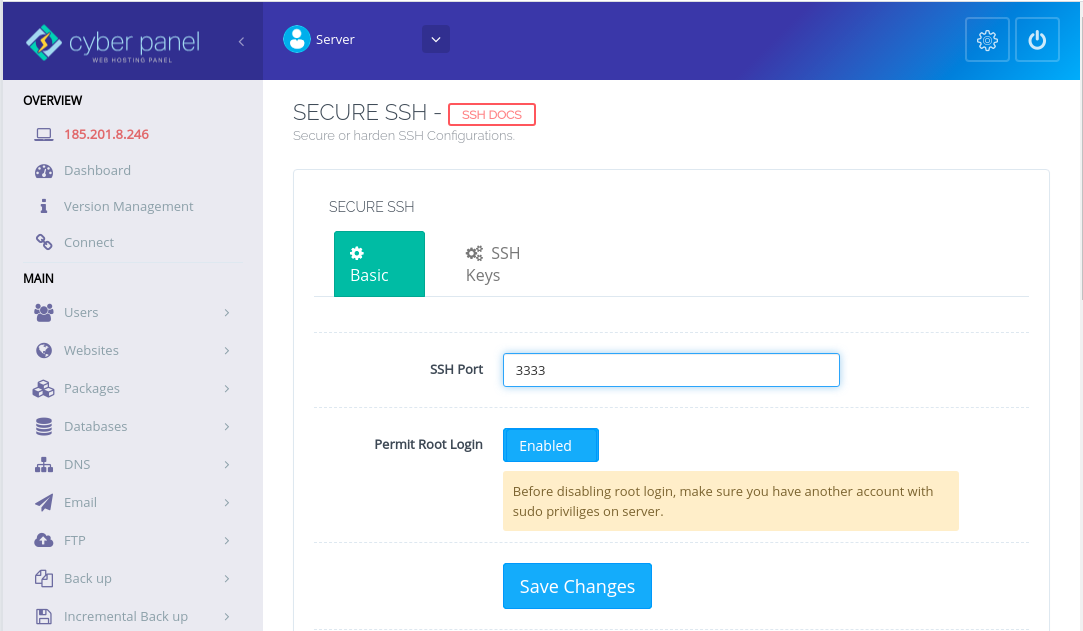
    To change SSH port on CyberPanel server, login to CyberPanel, then go to

    Securiy > Secure SSH
    

    From the left side menu. On next page, you will get option to change SSH port.

    CyberPanel Change SSH port

    Once port is changed, click on “Save Changes” button. Now your SSH port changed to non standard port.

    Fix Web Terminal

    On side bar, you have “Web Terminal” that allow you to access sevrers terminal. If you change SSH port, this feature stop working. To get Web Terminal work again, you need to edit file

    vi /usr/local/CyberCP/WebTerminal/CPWebSocket.py
    

    Find

    DEFAULT_PORT = 22
    

    Replace with

    DEFAULT_PORT = 3333
    

    3333 – replace with your actual SSH port.

    Now you need to restart the cyberpanel, for this find the CyberPanel process with command

    ps aux | grep CPWebSocket
    

    Kill the process with

    kill -9 PID
    

    Example

    [root@musiverse ~]# ps aux | grep CPWebSocket
    root     188833  3.2  3.4 412708 35684 ?        Sl   17:19   0:41 /usr/local/CyberCP/bin/python /usr/local/CyberCP/WebTerminal/CPWebSocket.py
    root     189672  0.0  0.2 112808  2364 pts/2    S+   17:40   0:00 grep --color=auto CPWebSocket
    [root@musiverse ~]# kill -9 188833
    [root@musiverse ~]# 
    

    It will auto restart once you killed and Web Termianl on CyberPanel will work with custom SSH port.

    See CyberPanel

  • WebSocket

    WebSocket

    WebSocket Server is a technology that enables real-time communication between a web application and a server. It provides a bidirectional data transmission mechanism that allows both the client and the server to send messages to each other simultaneously. Unlike traditional HTTP communication, WebSockets enable full-duplex communication between the client and server, making it ideal for real-time applications.

    A WebSocket Server works by establishing a persistent connection between the client and the server using the WebSocket Protocol. This connection remains open, allowing for two-way communication, unlike traditional HTTP communication, which is based on request-response interactions. The WebSocket Protocol allows for low latency and high-frequency data transfer, making it suitable for real-time applications.

    Enable WebSocket in Cpanel Server with Nginx

    To test a WebSocket server, use

    https://ws-playground.netlify.app/