Tag: amazon aws

  • How to Open Port in Amazon EC2 instance

    How to Open Port in Amazon EC2 instance

    By default Amazon EC2 only allow port 22 (SSH) on Linux servers and port 3389 (RDP) on Windows Instances. All other ports are closed for security reasons. Depending on your use case, you may need to open ports on the security group to allow connection to applications you run on the EC2 instance.

    Log in to the Amazon EC2 console.

    In the navigation pane, click instances. This will list all available Amazon EC2 instances. Find the instance ID of the EC2 instance where you need to open the port.

    AWS EC2 instance ID

    Click on the Instance ID to find more details about the Amazon EC2 server.
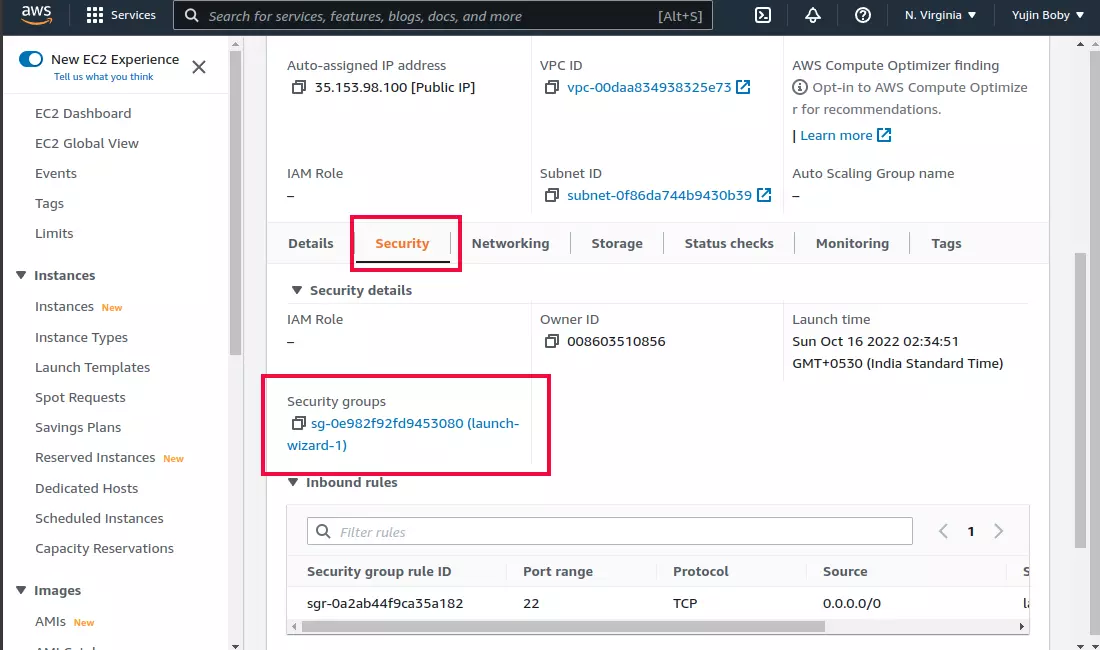
    AWS EC2 Security Group

    On the AWS EC2 Instance details page, click on the “Security” tab. Below you will see “security groups”. A security group is like a firewall, you can allow/disallow incoming and outgoing ports here. Click on the Security Group ID to go to the security group page.
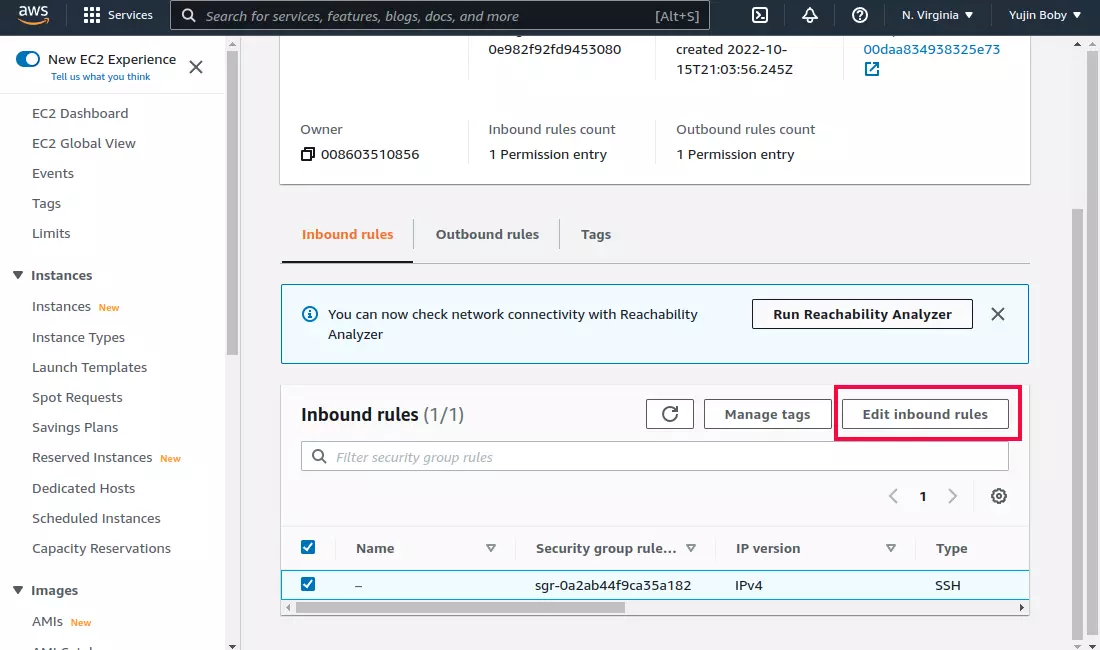
    Amazon EC2 security group details

    Click on the “Edit inbound rules” button. You can add or remove rules on the “Edit inbound rules” page.
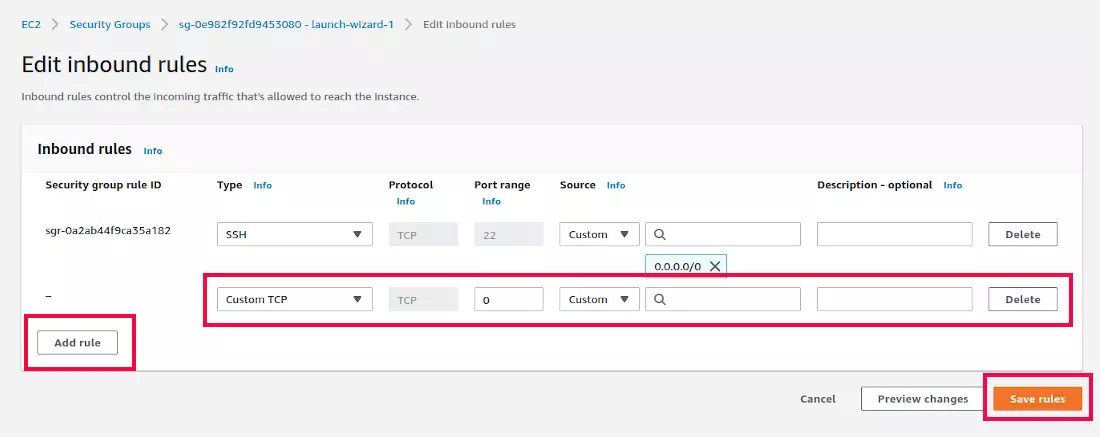
    Open Port in AWS

    To Ope a port, click on “Add rule” button.

    how to add inbound rules in aws ec2

    To open a port, you need to add a rule for the port by clicking “Add rule” button.

    You will get a new entry, where you need to select your rule.

    Type = This is a drop-down select box with the default value “Custom TCP”. You can find many predefined rules for common services like HTTP, HTTPS, MySQL, etc.. You can use Custom TCP or Custom UDP, then enter the port number you need to open.

    Port range = You can enter the port number to open on this text box.

    Source = This is IP add where you are allowed to connect. To allow all connections, use 0.0.0.0/0

    Description – optional = you can enter a note so you know what this port is used for.

    Once you added this, click on the “Save rule” button to save the rule. It will configure the security group to allow the port you added.

    aws ec2 open port 8080

    This screenshot shows the rules needed to Open Port 8080 on the AWS security group for Anyone.

    Back to Amazon EC2

  • Whitelist an IP in Amazon AWS security group from command line

    To white list an IP in Amazon AWS security group using aws command line tool, run

    aws ec2 authorize-security-group-ingress --group-id SECURITY_GROUP_ID_HERE --protocol tcp --port PORT_HERE --cidr IP_IN_CIDR_HERE
    

    Example

    aws ec2 authorize-security-group-ingress --group-id sg-a777eee6  --protocol tcp --port 443 --cidr 94.31.33.128/27
    
  • Amazon S3 CORS

    To enable CORS for Amazon S3 bucket, add


        *
        PUT
        POST
        DELETE
        1800
        *


  • Resize Amazon EC2 Boot Disk

    Resize Amazon EC2 Boot Disk

    Once you resize the disk in the Amazon AWS console, it gets auto resized on reboot. Sometimes this won’t happen, you have to manually resize the disk.

    Resize EC2 file system with LVM

    To resize the disk, do the following.

    1) Take a snapshot of the disk
    2) Create a new server in the same availability zone as the current server. Let’s call it tmpServer.
    3) Shutdown tmpServer.
    4) Shutdown the server that need disk resized. Lets call it mainServer. Make sure you have Elastic IP, if not shutting down changes IP of the server.
    5) Detach the disk.
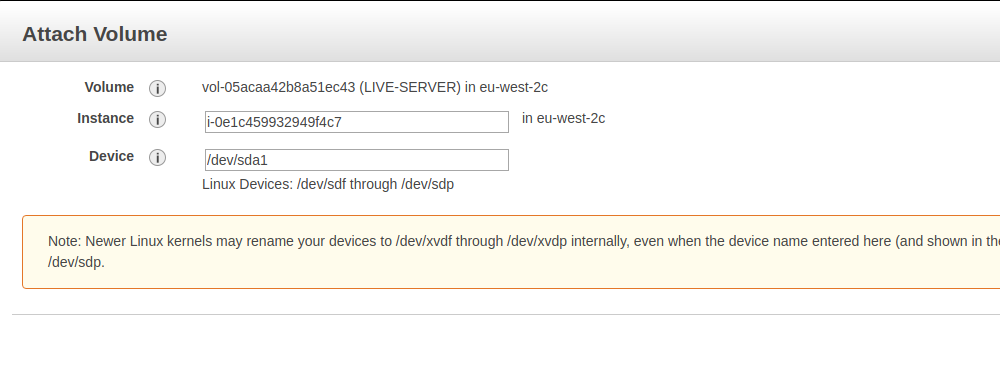
    6) Attack the disk in tmpServer as /dev/xvdf
    7) Start tmpServer.

    Login to tempServer and do the following.

    Resize Partition

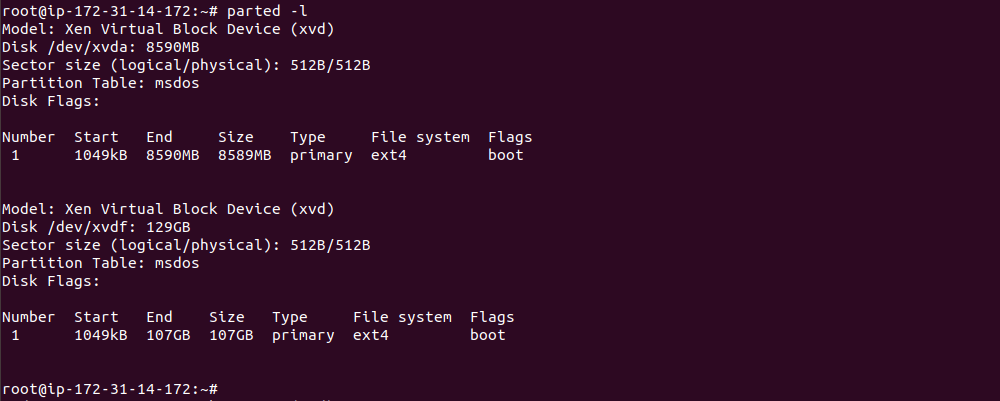
    Firt find the devices

    parted -l
    

    In this cause /dev/xvdf is the disk that need to be resized. Current Size is approx 107 GB.

    To see free disk space on this disk, run

    parted /dev/xvdf print free
    

    There is 21.5GB free space on the disk.

    To grow partition 1 to use up remaining disk space, run command

    growpart /dev/xvdf 1
    

    Verify free disk space after. Now you see there is not much free disk space left after partition 1.

    Resize FileSystem

    Resize file system depends on the type of file system you are using. For ext4, do the folllowing.

    Check disk using e2fsck

    e2fsck -f /dev/xvdf1
    

    If any errors found, you will be asked to press “y” to fix the errors. After e2fsck run, you can reszie filesystem with command

    resize2fs /dev/xvdf1
    

    You have completed resizeing the disk. All you need to do now is

    8) Shutdown tmpServer
    9) Detact the disk from tmpServer (/dev/xvdf)
    10) Attach the disk on original server mainServer as /dev/sda1.

    11) start the mainServer.

  • Enable Gzip in Amazon Linux

    To verify Apache module is loaded, run

    [root@ip-172-31-29-220 ~]# apachectl -M | grep deflate
     deflate_module (shared)
    [root@ip-172-31-29-220 ~]# 
    

    Create file

    vi /etc/httpd/conf.d/gzip.conf
    

    Add following content

    
      # Restrict compression to these MIME types
      AddOutputFilterByType DEFLATE text/plain
      AddOutputFilterByType DEFLATE text/html
      AddOutputFilterByType DEFLATE application/xhtml+xml
      AddOutputFilterByType DEFLATE text/xml
      AddOutputFilterByType DEFLATE application/xml
      AddOutputFilterByType DEFLATE application/xml+rss
      AddOutputFilterByType DEFLATE application/x-javascript
      AddOutputFilterByType DEFLATE text/javascript
      AddOutputFilterByType DEFLATE text/css
      AddOutputFilterByType DEFLATE image/png
      AddOutputFilterByType DEFLATE image/gif
      AddOutputFilterByType DEFLATE image/jpeg
    
      # Level of compression (Highest 9 - Lowest 1)
      DeflateCompressionLevel 9
    
      # Netscape 4.x has some problems.
      BrowserMatch ^Mozilla/4 gzip-only-text/html
    
      # Netscape 4.06-4.08 have some more problems
      BrowserMatch ^Mozilla/4\.0[678] no-gzip
    
      # MSIE masquerades as Netscape, but it is fine
      BrowserMatch \bMSI[E] !no-gzip !gzip-only-text/html
    
      
        # Make sure proxies don't deliver the wrong content
        Header append Vary User-Agent env=!dont-vary


    Restart Apache with

    service httpd restart
    

    To verify gzip is working, run

    curl -I -H 'Accept-Encoding: gzip,deflate' http://YOUR-SITE-URL/ 2>/dev/null | grep gzip
    

    You will see something like

    NOTE: gzip compression only works if you have a reasonably large file. If your file is very small, then gzip won’t do anything.

    See gzip

  • Configure Postfix to use Amazon SES

    Install postfix with

    apt-get update && apt-get install postfix libsasl2-modules -y
    

    Update postfix config with

    sed -i "s/default_transport = error/# default_transport = error/g" /etc/postfix/main.cf
    sed -i "s/relay_transport = error/# relay_transport = error/g" /etc/postfix/main.cf
    sed -i "s/relayhost =/# relayhost =/g" /etc/postfix/main.cf
    

    Edit

    vi /etc/postfix/main.cf
    

    Add to end of the file

    relayhost = [SMTP_SERVER_NAME]:587
    smtp_tls_security_level = encrypt
    smtp_sasl_auth_enable = yes
    smtp_sasl_password_maps = hash:/etc/postfix/sasl_passwd
    smtp_sasl_security_options = noanonymous
    

    In the above, replace SMTP_SERVER_NAME with your Amazon SES mail server, for example “email-smtp.us-east-1.amazonaws.com”, you can see it in your Amazon SES console.

    Run

    echo "[SMTP_SERVER_NAME]:587 SMTP_USERNAME:SMTP_PASSWORD" > /etc/postfix/sasl_passwd
    

    Replace SMTP_SERVER_NAME, SMTP_USERNAME and SMTP_PASSWORD with your actual credentials.

    Now run

    postmap /etc/postfix/sasl_passwd
    

    Restart postfix

    service postfix restart
    

    You can test mail working with

    echo "test" | mail -r you@SES_VERIFIED_DOMAIN -s "test" [email protected]
    

    For sending from Apache, you may need to set myorigin in postfix confgiration with your veirfied domain. This can be done by editing

    vi /etc/mailname
    

    You can verify myorgin with

    root@ip-172-31-30-228:~# postconf | grep myorigin
    append_at_myorigin = yes
    myorigin = /etc/mailname
    root@ip-172-31-30-228:~#
    

    Sending Mail from Amazon EC2

    When sending email from Amazon EC2, it rejected with

    Aug 28 17:20:59 ip-172-31-11-238 postfix/smtp[27260]: 1BB10831A0: to=, relay=email-smtp.us-east-1.amazonaws.com[23.23.196.20]:587, delay=2.9, delays=0.02/0.03/1.7/1.2, dsn=5.0.0, status=bounced (host email-smtp.us-east-1.amazonaws.com[23.23.196.20] said: 554 Message rejected: Email address is not verified. The following identities failed the check in region US-EAST-1: [email protected] (in reply to end of DATA command))
    

    Problem is solved by editing

    vi /etc/postfix/main.cf
    

    Find

    myhostname = ip-172-31-28-58.ap-southeast-2.compute.internal
    

    Replace with

    myhostname = AWS_VERIFIED_DOMAIN_HERE
    

    Amazon SES

  • Create Dummy Data in Amazon EFS

    Disk read/write speed in Amazon EFS depends on how much data you have on the file system.

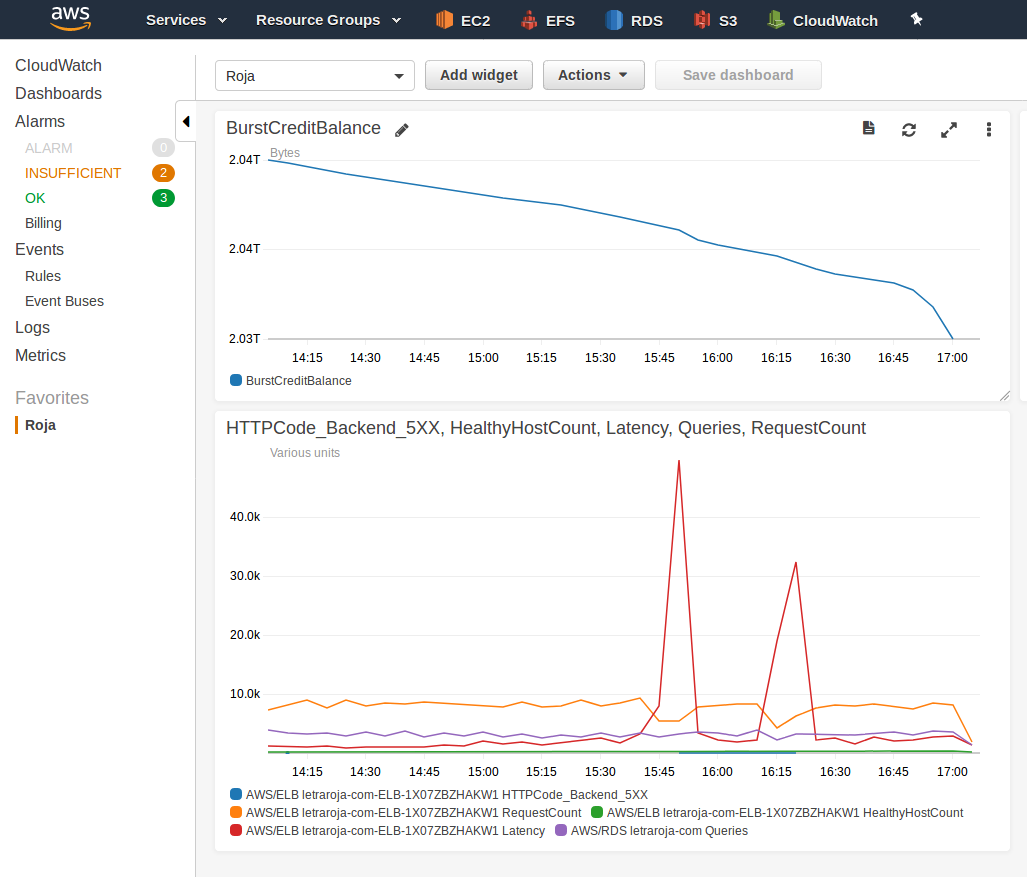
    Amazon EFS have something called BurstCreditBalance, that shows much much data balance you have available. Initially all file system have some 2 TB Burst credit, this is is for you to copy data. If you don’t copy dummy data or real data, your file system performance will degrade after your Burst credit used up.

    Amazon EFS burst credit

    To create dummy data, run

    cd /path/to/efs
    mkdir dummy
    cd dummy
    dd if=/dev/zero of=dymmy-data-1 bs=1M count=1024 oflag=sync
    cp dymmy-data-1 dymmy-data-2
    cp dymmy-data-1 dymmy-data-3
    cp dymmy-data-1 dymmy-data-4
    cp dymmy-data-1 dymmy-data-5
    cp dymmy-data-1 dymmy-data-6
    cp dymmy-data-1 dymmy-data-7
    cp dymmy-data-1 dymmy-data-8
    cp dymmy-data-1 dymmy-data-9
    cp dymmy-data-1 dymmy-data-10
    cp dymmy-data-1 dymmy-data-11
    cp dymmy-data-1 dymmy-data-12
    cp dymmy-data-1 dymmy-data-13
    cp dymmy-data-1 dymmy-data-14
    cp dymmy-data-1 dymmy-data-15
    cp dymmy-data-1 dymmy-data-16
    cp dymmy-data-1 dymmy-data-17
    cp dymmy-data-1 dymmy-data-18
    

    See Amazon EFS

  • Amazon AWS (awscli) command line interface

    awscli is a command line tool for Amazon AWS. To install, run

    apt-get install python3-pip -y
    

    If python 2, you need to install package python-pip.

    Install awscli with pip

    pip install awscli
    

    You can find more details at

    https://docs.aws.amazon.com/cli/latest/reference/

    Once installed, you need to configure it

    aws configure
    

    To sync content of a folder to Amazon S3 bucket, run

    aws s3 sync /opt/bitnami/apps/wordpress/htdocs/wp-content/uploads/ s3://your-bucket-name/wp-content/uploads/
    

    Whitelist IP in AWS security group using awscli
    Amazon AWS create key pair using awscli
    AWS Cloud​Formation

    See aws

  • Cpanel Server Behind NAT – Amazon EC2

    When your cpanel server is behind nat, for example Amazon EC2 where you have an internal IP and External IP.

    Go to

    Home > Server Configuration> Basic WebHost Manager® Setup

    Enter your servers internal IP where it ask for “The IPv4 address (only one address) to use to set up shared IPv4 virtual hosts.”.

    Now login to Server using SSH and run

    /scripts/build_cpnat
    

    For an Amazon EC2 server with internal IP 172.31.26.120, i added the IP in WHM > Basic WebHost Manager® Setup

    Run command /scripts/build_cpnat

    That associate the IP with external IP address.

    [root@ip-172-31-26-120 ~]# /scripts/build_cpnat
    info [build_cpnat] 172.31.26.120 => 13.210.58.114
    [root@ip-172-31-26-120 ~]#
    

    This allow DNS and Apache to resolve external IP properly. With out running this command DNS server will just reply with servers internal IP address.

  • Amazon Elastic IP The maximum number of addresses has been reached.

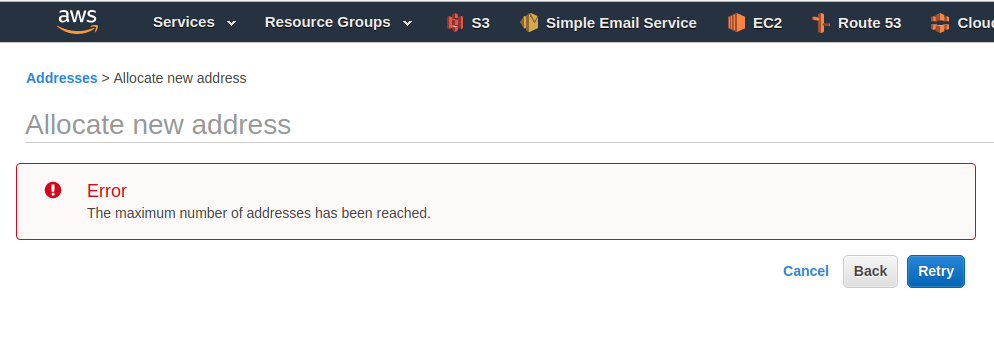
    When assigning Elastic IP in Amazon AWS, I get an error

    The maximum number of addresses has been reached.

    Amazon Elastic IP Limit

    This is because Amazon only allows 5 Elastic IP address per region.

    You can see the AWS service limits at

    http://docs.aws.amazon.com/general/latest/gr/aws_service_limits.html

    You can open a support ticket with Amazon, they will increase the Elastic IP limit. If your account is new, then you may need to wait for 30 days before you can get an increased Elastic IP limit.