Tag: Apache

  • MySQL cannot connect via localhost

    MySQL cannot connect via localhost

    On an Apache server, MySQL can’t connect when you use localhost, but it work when you chane to IP address 127.0.0.1

    When you use “localhost”, it use socket for connecting to MySQL server, this is faster than using TCP/IP connection, that is used when you use IP address to connect to MySQL server.

    First find out socket path. To do this login to MySQL server, run

    show variables like "socket";
    

    mysql socket

    See if you can connect using this socket with command

    mysql -S /var/lib/mysql/mysql.sock -u root -p
    

    login to mysql using socket

    In this cause, login to MySQL using socket worked.

    I created a simple test PHP script to verify MySQL connection, it was able to connect to MySQL server using “localhost”.


    Same script did not work when i try access it using web server. So the problem is web server user not able to connect to MySQL socket. You need to check permission for socket and parrent folders. In this case problem is fixed by running

    chmod 755 /var/lib/mysql/
    

    You can verify enabling SSH access for web server user, then connect to MySQL using command line or try access socket file as apache user.

    MySQL Socket Path in php.ini

    When a PHP application use localhost to connect, PHP find location of socket from php.ini, you need to verify this path set in php.ini is same as the socket path used by MySQL server.

    # cat /etc/php.ini  | grep socket
    ; Default timeout for socket based streams (seconds)
    ; http://php.net/default-socket-timeout
    default_socket_timeout = 60
    ;extension=php_sockets.dll
    ; Default socket name for local MySQL connects.  If empty, uses the built-in
    ; http://php.net/pdo_mysql.default-socket
    pdo_mysql.default_socket= /var/lib/mysql/mysql.sock
    ; Default socket name for local MySQL connects.  If empty, uses the built-in
    ; http://php.net/mysql.default-socket
    mysql.default_socket = /var/lib/mysql/mysql.sock
    ; Default socket name for local MySQL connects.  If empty, uses the built-in
    ; http://php.net/mysqli.default-socket
    mysqli.default_socket = /var/lib/mysql/mysql.sock
    # 
    

    If path is differnt, you need to make it same. You can either modify php.ini or MySQL server config file.

  • Install LAMP Server on Ubuntu/Debian

    To install LAMP (Apache, MySQL, PHP) on Ubuntu/Debian web server, run

    apt-get install lamp-server^
    

    This use meta package install LAMP. If you want to remove, don’t remove the meta package as it will remove many other required packages. You need to remove packages one by one.

    Related Posts

    Apache

    MySQL

  • Find IP with Most Access from Apache Log

    Find IP with Most Access from Apache Log

    To find IP with most access from Apache or other web server log file, run

    cat APACHE_ACCESS_LOG_FILE | awk -F' ' '{print $1}' | sort | uniq -c | sort -n
    

    If you want to see IP that made most POST request

    cat APACHE_ACCESS_LOG_FILE | grep POST | awk -F' ' '{print $1}' | sort | uniq -c | sort -n
    

    See Hacked log

  • Apache Show Real IP Address when using CloudFlare

    Apache Show Real IP Address when using CloudFlare

    When using Apache web server behind cloudflare, apache logs show cloudflare IP address instead of real visitor IP address. To show actual visitor IP address, you need to install mod_cloudflare apache module.

    Before you can install the module, you need to install following requirments.

    On Debian/Ubuntu server,

    apt-get install apache2-dev libtool git
    

    Now install mod_cloudflare with

    cd /usr/local/src
    git clone https://github.com/cloudflare/mod_cloudflare.git; cd mod_cloudflare
    apxs -a -i -c mod_cloudflare.c
    

    Restart apache web server with

    service apache2 restart
    

    Verify mod_cloudflare apache module is loaded with

    apachectl -M | grep cloudflare
    

    apache cloudflare module

  • Apache Performance Tuning

    Apache Performance Tuning

    To optimize Apache web server, run

    curl -sL https://raw.githubusercontent.com/richardforth/apache2buddy/master/apache2buddy.pl | sudo perl
    
  • Redirect site from www to non-www

    Redirect site from www to non-www

    It is better to make web site available with one URL. Many sites work with both wwww and non-www (naked domain) urls.

    Using www or non-www is personal choice. One advantage of using wwww for URL is when you have lot of sub domains. If you use non-www url, cookies set by the domain will be available to sub domains. This will increase bandwidth usage as cookie need to be sent with every request browser make to web server.

    Apache

    If you are using Apache web server, you can redirect wwww to non-www URL by adding the following code in the .htaccess file

    RewriteEngine On
    RewriteCond %{HTTP_HOST} ^www.yourdomain.com [NC]
    RewriteRule ^(.*)$ https://yourdomain.com$1 [L,R=301]

    Redirect non-www to www

    RewriteEngine On
    RewriteCond %{HTTP_HOST} ^yourdomain.com [NC]
    RewriteRule ^(.*)$ https://www.yourdomain.com$1 [L,R=301]

    Nginx

    If you use Nginx, it is better to create a server entry for the www URL, and then set a redirect

    server {
        server_name www.yourdomain.com;
        return 301 $scheme://yourdomain.com$request_uri;
    }

    If you want to use the same server entry for www and non-www, add the following code to the nginx server entry for the website.

    Redirect www domain to non-www

    if ( $host != 'yourdomain.com' ) {
        return 301 https://yourdomain.com$request_uri;
    }

    If you use custom ports, use

    if ( $host != 'yourdomain.com' ) {
        return 301 https://yourdomain.com:$server_port$request_uri;
    }

    Redirect Naked Domain to www

    if ( $host != 'www.serverok.in' ) {
        return 301 https://serverok.in$request_uri;
    }

    Related Posts

    Redirect

    htaccess

  • Apache Show Real IP Behind Reverse Proxy on CentOS

    Apache Show Real IP Behind Reverse Proxy on CentOS

    When Apache web server running behind reverse proxy or load balancer, server log and scripts show IP of reverse proxy server or load balancer as IP of visitor. To fix this, you need to configure revese proxy or load balancer to forward Real IP of visitor on Header X-Forwarded-For, this most load balacner do by default.

    Edit Apache configuration file

    vi /etc/httpd/conf.d/remoteip.conf
    

    Add

    RemoteIPHeader X-Forwarded-For
    RemoteIPTrustedProxy IP_OF_YOUR_PROXY_SERVER_HERE
    

    Example

    [root@localhost ~]# cat  /etc/httpd/conf.d/remoteip.conf
    RemoteIPHeader X-Forwarded-For
    RemoteIPTrustedProxy 192.168.122.1
    [root@localhost ~]# 
    

    Doing this will make PHP scripts show real IP of visitor. You need to restart Apache web server before the change take effect. You can verify by creating a PHP script with content


    To make Apache show real IP in access log, edit

    vi /etc/httpd/conf/httpd.conf
    

    Find

    LogFormat "%h %l %u %t \"%r\" %>s %b \"%{Referer}i\" \"%{User-Agent}i\"" combined
    

    Replace with

    LogFormat "%a %l %u %t \"%r\" %>s %O \"%{Referer}i\" \"%{User-Agent}i\"" combined
    

    Restart Apache web server

    systemctl restart httpd
    
  • Apachectl

    Apachectl

    apachectl command is used to interact with Apache web server.

    To see Apache status

    apachectl status
    

    To list virtualhost info, run

    apachectl -t -D DUMP_VHOSTS
    

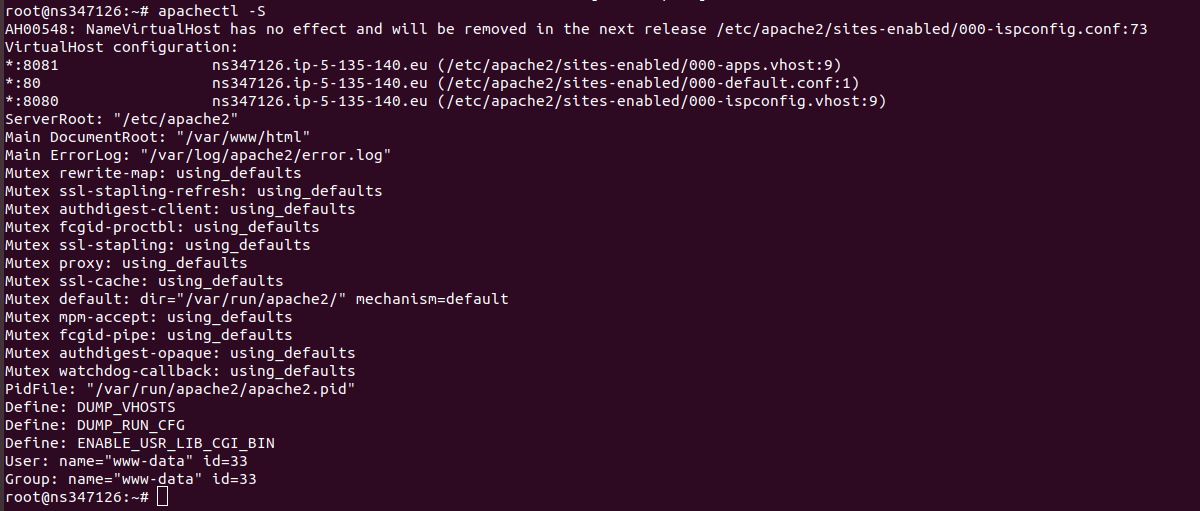
    List VirtualHost + server config.

    apachectl -S
    

    apachectl

    To list loaded apache modules, run

    apachectl -M
    

    Related Posts

    Apache Web Server
    apachectl status www-browser not found

  • Disable Apache Error log in ISPConfig

    ISPConfig is a free hosting control panel. It come with Nginx and Apache web servrs. You can select one during installation.

    if you are using Apache web server with ISPConfig and want to disable Apache Error logs, then do the following

    cd /etc/apache2/sites-available
    sed -i 's/ErrorLog .*/ErrorLog \/dev\/null/g'  *
    

    Now restart Apache

    systemctl restart apache2
    

    This is not a permanant solution as ISPCOnfig will rewrite apache configuration when you make changes to web site. I had to do this for a server which have too many sites writing errors to error_log, causing high IO load. Proper solution is to fix errors, until errors can be fixed, this is a quick fix, that will reduce IO usage due to error_log.

    Make sure you make a copy of files before you run the sed command that modify all apache config, so in cuase anything happens, you can revert back.

  • Redirect HTTP to HTTPS when using Reverse Proxy

    When you are using Reverse Proxy like Nginx, Haproxy or Amazon ELB in front of web server and web server use HTTP to serve all traffic, you can use normal redirect code based HTTPS variable to do the redirect to HTTPS. You need to use X-Forwarded-Proto to do the redirect.

    For Apache, add following code to .htaccess to Apache Virtual Host entry.

    RewriteEngine On
    RewriteCond %{HTTP:X-Forwarded-Proto} =http
    RewriteRule .* https://%{HTTP:Host}%{REQUEST_URI} [L,R=permanent]
    

    For Nginx, add following to server entry for the domain name

    if ($http_x_forwarded_proto = 'http'){
        return 301 https://$host$request_uri;
    }
    

    For IIS edit web.config, add following to section.


  • Apache run web site as user with mod_ruid2

    mod ruid2 allow you to run web site as differnt user from the one web server is running. This is helpfull when you have multiple web sites on same Apache web server.

    To install mod_ruid2 on Ubuntu/Debian server, run

    apt install libapache2-mod-ruid2
    

    Edit VirtualHost entry for the web site, add

    RMode config
    RUidGid USERNAME_HERE GROUP_HERE
    

    Restart Apache

    systemctl restart apache2
    

    Now website will run as user specified in line

    RUidGid USERNAME_HERE GROUP_HERE
    

    Example

    root@create:~# cat /etc/apache2/sites-enabled/serverok.in.conf 
    
        ServerName serverok.in
        ServerAdmin [email protected]
        DocumentRoot /home/serverok.in/html
        CustomLog ${APACHE_LOG_DIR}/serverok.in.log combined
        ErrorLog ${APACHE_LOG_DIR}/serverok.in-error.log
        
            RMode config
            RUidGid serverok serverok
            Options All
            AllowOverride All
            Require all granted
            Order allow,deny
            allow from all
        
    
    root@create:~# 
    

    See Apache

  • Apache Increase FD limit

    Apache Increase FD limit

    On CentOS 7 sevrer running apache, when try to install plugin in WordPress admin area, i get error

    Installazione fallita: Il download non è andato a buon fine. cURL error 35: Process open FD table is full
    

    This is due to Apache File Descriptor Limits.

    To see current Limits, use following PHP script

    FD Soft Limit: " . exec('ulimit -Sn');
    echo "
    FD Hard Limit: " . exec('ulimit -Hn');

    To see system wide limits, use following commands

    sysctl fs.file-nr
    sysctl fs.file-max
    

    Normally this will be high value. You need to increse limit for user running Apache. On CentOS 7, the username is “apache”. To increase limit for this user, edit

    vi /etc/security/limits.conf
    

    Add following lines

    apache soft nofile 10240
    apache hard nofile 900000
    

    To verify, we need to login as user Apache, and verify limits, for this, lets enable SSH or bash terminal for user apache. By default no SSH login allowed for this user.

    chsh --shell /bin/bash apache
    

    Now change to user, verify the limits

    su - apache
    ulimit -Hn
    ulimit -Sn
    

    Exit back to root, disable shell for user apache with command.

    chsh --shell /sbin/nologin apache
    

    We need to edit service file for Apache. Default service file look like following.

    [root@centos-s-1vcpu-1gb-blr1-01 ~]# cat /usr/lib/systemd/system/httpd.service
    [Unit]
    Description=The Apache HTTP Server
    After=network.target remote-fs.target nss-lookup.target
    Documentation=man:httpd(8)
    Documentation=man:apachectl(8)
    
    [Service]
    Type=notify
    EnvironmentFile=/etc/sysconfig/httpd
    ExecStart=/usr/sbin/httpd $OPTIONS -DFOREGROUND
    ExecReload=/usr/sbin/httpd $OPTIONS -k graceful
    ExecStop=/bin/kill -WINCH ${MAINPID}
    # We want systemd to give httpd some time to finish gracefully, but still want
    # it to kill httpd after TimeoutStopSec if something went wrong during the
    # graceful stop. Normally, Systemd sends SIGTERM signal right after the
    # ExecStop, which would kill httpd. We are sending useless SIGCONT here to give
    # httpd time to finish.
    KillSignal=SIGCONT
    PrivateTmp=true
    
    [Install]
    WantedBy=multi-user.target
    [root@centos-s-1vcpu-1gb-blr1-01 ~]# 
    

    Find

    [Service]
    

    Add below

    LimitNOFILE=65535
    LimitNPROC=65535
    

    Method 2

    create file

    mkdir -p /etc/systemd/system/httpd.service.d/
    vi /etc/systemd/system/httpd.service.d/limits.conf
    

    Add

    [Service]
    LimitNOFILE=65535
    LimitNPROC=65535
    

    Reload service file with

    systemctl daemon-reload
    

    Restart Apache

    systemctl restart httpd
    

    See Apache