Tag: WordPress

  • WordPress Redirect Visitor On 404 Error

    WordPress Redirect Visitor On 404 Error

    WordPress shows a 404 page when visitor navigate to a non existent page. To redirect visitor to a specific page, say home page when visiting non existent page, edit functions.php file in your themes folder, then add following code to it.

    function redirect_404_to_page() {
        if( is_404() ) {
            header( "Location: https://your-domain.tld/page/" , true, 404);
            exit;
        }
    }
    add_action( 'template_redirect', 'redirect_404_to_page' );
    

    Back to WordPress

  • How to Upgrade PHP on Bitnami WordPress in AWS Lightsail

    How to Upgrade PHP on Bitnami WordPress in AWS Lightsail

    I have an old Bitnami WordPress server on the Amazon Lightsail server. Bitnami does not support upgrading the PHP version. The recommended solution is to create a new bitnami WordPress instance and migrate the website to the new lightsail instance. Since this server had many websites configured, I do not want to migrate the websites to the new bitnami WordPress instance. Here is how I upgraded the PHP version on bitnami Debian 10 server from PHP 7.3 to PHP 8.1

    What we do is install the PHP version provided by the OS. Then update php.ini to use the non-defult MySQL socket location used by the Bitnami server. Create a php-fpm pool that runs as the “daemon” user. After that, we update the Apache configuration to use the new PHP version.

    First, enable PHP repository

    apt -y install apt-transport-https lsb-release ca-certificates
    wget -O /etc/apt/trusted.gpg.d/php.gpg https://packages.sury.org/php/apt.gpg
    echo "deb https://packages.sury.org/php/ $(lsb_release -sc) main" > /etc/apt/sources.list.d/php.list
    

    Install PHP 8.1

    apt update
    apt install -y  php8.1-bcmath php8.1-cli php8.1-common php8.1-curl php8.1-gd php8.1-imap php8.1-intl php8.1-mbstring php8.1-mysql php8.1-readline php8.1-soap php8.1-xml php8.1-xmlrpc php8.1-zip php8.1-fpm
    

    If you need a different version of PHP, change 8.1 with whatever version you need.

    Edit php.ini file

    vi /etc/php/8.1/fpm/php.ini
    

    Find

    [Pdo_mysql]
    ; Default socket name for local MySQL connects.  If empty, uses the built-in
    ; MySQL defaults.
    pdo_mysql.default_socket=
    

    Replace with

    [Pdo_mysql]
    ; Default socket name for local MySQL connects.  If empty, uses the built-in
    ; MySQL defaults.
    pdo_mysql.default_socket= "/opt/bitnami/mysql/tmp/mysql.sock"
    

    Find

    mysqli.default_socket =
    

    Replace with

    mysqli.default_socket = "/opt/bitnami/mysql/tmp/mysql.sock"
    

    Create a php-fpm pool file

    vi /etc/php/8.1/fpm/pool.d/wp.conf
    

    add

    [wordpress]
    listen=/opt/bitnami/php/var/run/ww2.sock
    user=daemon
    group=daemon
    listen.owner=daemon
    listen.group=daemon
    pm=dynamic
    pm.max_children=5
    pm.start_servers=2
    pm.min_spare_servers=1
    pm.max_spare_servers=3
    pm.max_requests=5000
    

    This pool will listen on unix socket “/opt/bitnami/php/var/run/ww2.sock”.

    Enable and restart PHP 8.1 fpm service

    systemctl enable php8.1-fpm
    systemctl restart php8.1-fpm
    

    Edit file

    vi /opt/bitnami/apache2/conf/bitnami/php-fpm.conf
    

    For some installations, file is located at

    vi /opt/bitnami/apache2/conf/php-fpm-apache.conf
    

    Inside you file find


          SetHandler "proxy:fcgi://www-fpm"


    Find

    www.sock
    

    Replace With

    www2.sock
    

    Restart Apache

    sudo /opt/bitnami/ctlscript.sh restart apache
    

    See Bitnami

  • How to reset WordPress Password using wpcli

    How to reset WordPress Password using wpcli

    If you lost your WordPress user password, you can use forget password link on the WordPress login screen to reset the password. For any reason, if you were unable to receive the password reset email, you have to reset your password by editing the wp_users table in MySQL Database or by using the WordPress command line tool (wpcli).

    If you don’t have wp-cli installed, you can install it with

    For root users

    cd && wget https://raw.githubusercontent.com/wp-cli/builds/gh-pages/phar/wp-cli.phar
    mv wp-cli.phar /usr/local/bin/wp
    chmod 755 /usr/local/bin/wp

    If you are logged in as a normal user, run the following command

    mkdir ~/bin
    wget https://raw.githubusercontent.com/wp-cli/builds/gh-pages/phar/wp-cli.phar -O ~/bin/wp-cli.phar
    alias wp="php -d memory_limit=-1 ~/bin/wp-cli.phar"

    To make wp command available when using as normal user, you need to run

    alias wp="php -d memory_limit=-1 ~/bin/wp-cli.phar"

    To make it permanent, you can edit the file ~/.bashrc and add the above line to the end of the file, so it gets executed whenever you log in to the server.

    To list all users, you can run

    wp user list

    To list all users with administrator role, run

    wp user list --role=administrator

    To reset the password for a user, run

    wp user update USERNAME --user_pass='NEW_PW_HERE'

    Reset the WordPress user password by editing the wp_users table using phpMyAdmin

    Back to WordPress

  • How to Speed Up Your WordPress Site

    How to Speed Up Your WordPress Site

    Getting your site to load faster is very important. Bounce rate (visitors leaving your website) on your website increases as load time increases. Many WordPress themes, and plugins add extra javascript/css resources to your page, so each page has to load these resources, making the site slow. It is better to use minimum plugins required. More plugins make the site slower.

    To check the speed of your website, you can use speed testing sites like

    https://gtmetrix.com

    Once you scan your website with gtmetrix, you will get some useful report, that shows how much time it takes to load your website and what you can do to improve your site speed.

    Here are some things you can do to improve your site speed.

    1) Opimize Images

    Make sure all images used in your web site is of proper size. If you want to show a 500 px width image on your web page, don’t use a bigger picture. Just use an image with proper size. This can avoid browser based scaling.

    2) Disable loading of unwanted JavaScript/Fonts

    WP Asset Clean Up plugin can help disable loading of unwanted resoucres.

    https://wordpress.org/plugins/wp-asset-clean-up/

    3) Datbase Cleanup

    Every time you save a page, WordPress keeps a copy of the page, over time, your database can grow bigger. Using a plugin to clean up the database can speed up your website.

    https://wordpress.org/plugins/wps-cleaner/

    4) Analyze Database Query

    Use Query Monitor Plugin to find out which SQL query is slowing up your website. This plugin shows how much time it takes to load a page.

    5) Disable Unused Plugins

    Using plugins can slow down your website as it adds more code to execute every time someone visits your website. Remove any unused, not essential plugins. Many features can be implemented without using a plugin by editing theme files or PHP code. Plugins are usually created by third-party developers, they may not be secure or bug free like core WordPress files.

    6) Cache Pages

    You can use a caching Plugin like W3 Total Cache to speed to WordPress load time.

  • Find WordPress Version from command line

    Find WordPress Version from command line

    To find the version of WordPress, you can check the file

    wp-includes/version.php
    

    Inside the file look for variable $wp_version

    You can do this with the grep command

    grep wp_version wp-includes/version.php
    

    Find WordPress version

    Using WP CLI

    You can use WordPress CLI to find the version of WordPress with the command

    wp core version
    

    find WordPress version using wpcli

    Back to WordPress

  • How to fix WordPress 404 Error htaccess

    How to fix WordPress 404 Error htaccess

    If your WordPress sites shows 404 page when accessing URLs, this is because .htaccess file is missing. WordPress uses .htaccess file to generate SEO-friendly URLs when using Apache or LiteSpeed webserver.

    To fix the 404 error on WordPress, create a file with the name .htaccess and copy the following content.

    If WordPress is installed on the root of your website, use the following .htaccess file

    # BEGIN WordPress
    
    RewriteEngine On
    RewriteRule .* - [E=HTTP_AUTHORIZATION:%{HTTP:Authorization}]
    RewriteBase /
    RewriteRule ^index\.php$ - [L]
    RewriteCond %{REQUEST_FILENAME} !-f
    RewriteCond %{REQUEST_FILENAME} !-d
    RewriteRule . /index.php [L]
    
    # END WordPress

    For WordPress installed on a subfolder, use

    <IfModule mod_rewrite.c>
    RewriteEngine On
    RewriteRule .* - [E=HTTP_AUTHORIZATION:%{HTTP:Authorization}]
    RewriteBase /FOLDER/
    RewriteRule ^index\.php$ - [L]
    RewriteCond %{REQUEST_FILENAME} !-f
    RewriteCond %{REQUEST_FILENAME} !-d
    RewriteRule . /FOLDER/index.php [L]
    </IfModule>

    Back to WordPress

  • CURL ERROR 7 could not establish a secure connection to WordPress.org

    CURL ERROR 7 could not establish a secure connection to WordPress.org

    On a WordPress website hosted on a CentOS server, I got the following error on the header of the website.

    Warning: An unexpected error occurred. Something may be wrong with WordPress.org or this server’s configuration. If you continue to have problems, please try the support forums. (WordPress could not establish a secure connection to WordPress.org. Please contact your server administrator.) in /var/www/html/wp-admin/includes/translation-install.php on line 68

    On debugging the code, I found the code returned “CURL ERROR 7”. This happens when the curl connection is blocked. I was able to curl to the URL from the command line.

    curl https://api.wordpress.org/translations/core/1.0/
    

    To error is due to SELinux. To fix the error, run the command

    setsebool -P httpd_can_network_connect on
    

    Or disable SELinux.

    See SELinux, WordPress.

  • How to Add Expires Headers in WordPress

    How to Add Expires Headers in WordPress

    What is Expires Headers

    Expires headers are a type of HTTP header that indicates how long until cached copies of site resources expire. Expires headers tell the browsers what resource can be stored and fetched from the browser’s cache or the source itself. Using the expires headers, you maximize the speed of your site by reducing the HTTP requests between your device and the Service and also help you load the site more easily.

    Caching

    Browser caching enables the browser to cache to locally store resources improving site speed. This tells the web browser how long it should store your website resources before they are deleted.

    How to enable Expires header in wordpress using .htaccess

    Find your .htaccess file. Download a backup copy of the .htaccess file to your local computer. Add the following code snippet in the file

    ExpiresActive On
    ExpiresByType image/jpg "access 1 year"
    ExpiresByType image/jpeg "access 1 year"
    ExpiresByType image/gif "access 1 year"
    ExpiresByType image/png "access 1 year"
    ExpiresByType image/svg "access 1 year"
    ExpiresByType text/css "access 1 month"
    ExpiresByType application/pdf "access 1 month"
    ExpiresByType application/javascript "access 1 month"
    ExpiresByType application/x-javascript "access 1 month"
    ExpiresByType application/x-shockwave-flash "access 1 month"
    ExpiresByType image/x-icon "access 1 year"
    ExpiresDefault "access 2 days"
    

    How to enable Expires header in Nginx

    Nginx works in a different way to Apache in that it does not make use of a specific file like Apache does with the .htaccess file. Instead, you need to edit the server configuration file then copy and paste the following line of code to your server block.

    location ~* \.(jpeg|jpg|png|svg|gif)$ {
    expires 365d;
    }
    
    location ~* \.(html|css|js)$ {
    expires 30d;
    }
    

    You can adjust the expiration times for different types of files as needed.

  • Bitnami WordPress Failed to update Plugin

    Bitnami WordPress Failed to update Plugin

    On a Bitnami WordPress server, plugin installation/upgrade failed with permission error. The error is because the web server in bitmai servers runs as user daemon. When you upload a file as user bitnami, you need to make sure you set file permission properly so anyone in the group can write.

    To fix the error, run

    sudo chown -R bitnami:daemon /home/bitnami/stack/wordpress
    sudo chown -R bitnami:daemon /bitnami/wordpress/wp-content
    sudo chmod -R 770 /bitnami/wordpress/wp-content
    sudo chmod -R 770 /home/bitnami/stack/wordpress
    

    Some bitnami installations use different file structure

    sudo chown -R bitnami:daemon /home/bitnami/apps/wordpress/htdocs
    sudo chmod -R 770 /home/bitnami/apps/wordpress/htdocs
    

    in wp-config.php, added the following when I migrated a site, refer to original wp-config.php for your exact path

    define('FS_METHOD', 'direct');
    define('WP_TEMP_DIR', '/opt/bitnami/apps/wordpress/tmp');
    
  • WordPress HyperDB

    WordPress HyperDB

    HyperDB is a WordPress plugin that allows you to use multiple MySQL database servers with large MySQL installations. It is used to WordPress.com to distribute MySQL server load amount multiple MYSQL database servers hosted in different data centers.

    HyperDB supports

    • Read and write servers (replication)
    • Configurable priority for reading and writing
    • Local and remote datacenters
    • Private and public networks
    • Different tables on different databases/hosts
    • Smart post-write master reads
    • Failover for downed host
    • Advanced statistics for profiling
    • WordPress Multisite

    You can find more about the HyperDB plugin at

    https://wordpress.org/plugins/hyperdb/

    How it works

    HyperDB replaces WordPress wpdb class so it can read from multiple MySQL database servers.

    On a default WordPress installation, when a website grows, you need to upgrade the server to a more powerful server, but there is a limit on this as at some point upgrading server becomes costly. What you can do is move MySQL into its own dedicate server. For larger WordPress sites, a single dedicated MySQL server is not enough. In such a case, you can set up MySQL replication. When you set up MySQL replication with read-only nodes, you can only write to “main” MySQL server, all Database reads can be distributed across multiple MySQL read-only replicas. HyperDB checks each MySQL query, detect if it is a read or write/update query. If read, it is sent to one of the read-only MySQL replica servers.

    See WordPress

  • How to fix WordPress 404 error in Webuzo

    How to fix WordPress 404 error in Webuzo

    Webuzo hosting control panel has the option for selecting web servers Apache or Nginx. On a server using Nginx, after uploading the WordPress site and restoring the database, the website home page worked. When I clicked on any web page, I get a 404 Page not found error.

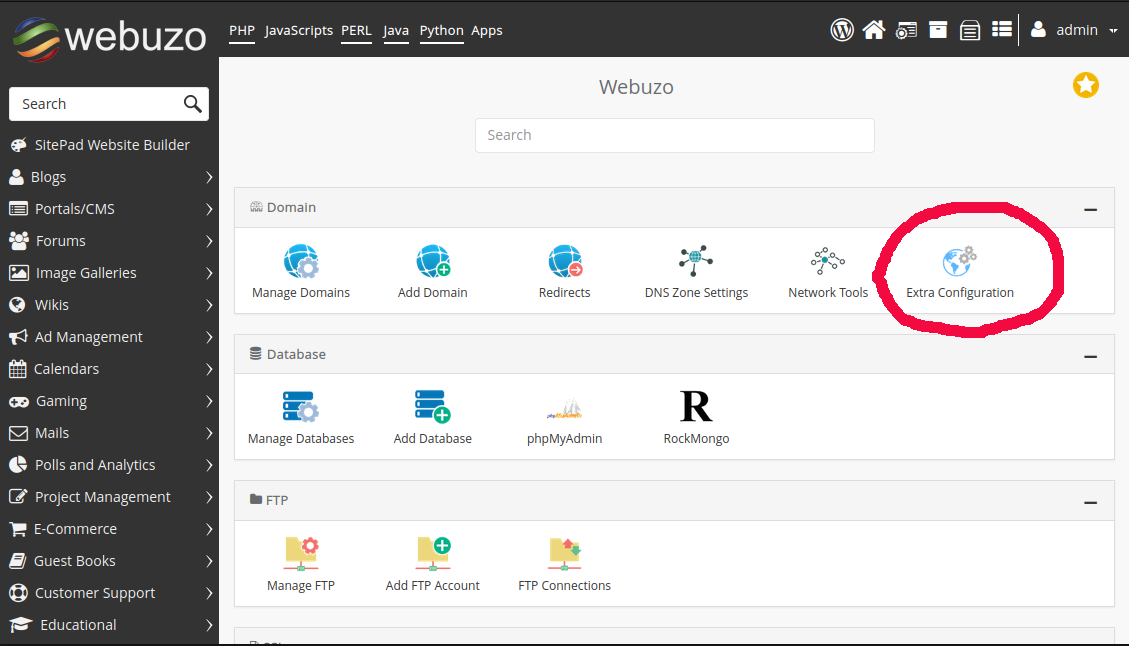
    To fix this, you need to add an extra configuration for Nginx. Login to Webuzo control panel.

    Webuzo Extra configuration

    Click on Extra Configuration.

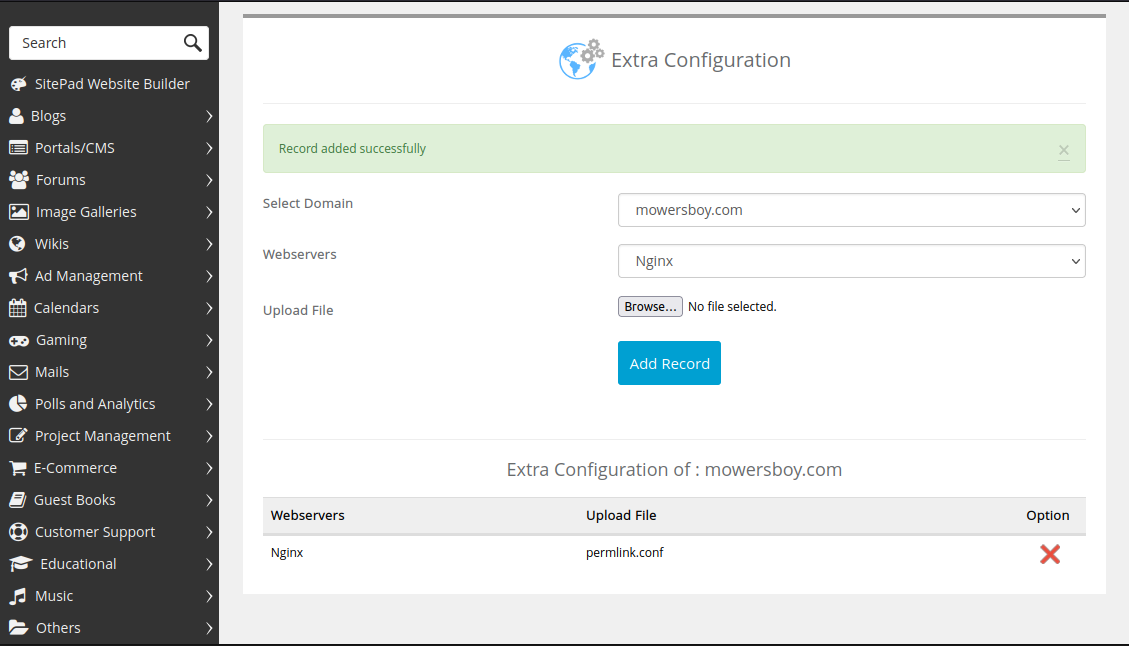
    webuzo

    On this page, select the domain name that you need 404 error fixed. On Webservers dropdown select Nginx.

    Create a file permlink.conf on your computer with the following content

    try_files $uri $uri/ /index.php?$args;
    

    Browse and upload this file in the Webuzo control panel. This will fix the 404 error for the WordPress site.

    Webuzo will create a configuration file at

    /usr/local/apps/nginx/etc/conf.d/YOUR-DOMAIN.TLD/permlink.conf