Category: Linux

  • Enable SSL on BitBucket Server

    Enable SSL on BitBucket Server

    BitBucket Server alloow you to host git repositories. By default bitbucket server have url in following format

    http://YOUR_IP_ADDR:7990/login
    

    To install SSL, first point a domain to the server IP.

    Install nginx

    apt install nginx
    

    Now install LetsEncrypt

    wget https://raw.githubusercontent.com/serverok/server-setup/master/install/letsencrypt.sh
    bash ./letsencrypt.sh
    

    Get SSL in standalone mode. We use standalone mode because nginx will proxy all request to bitbucket server, so SSL validation will be difficult using nginx.

    In this example, i will be using git.serverok.in, you need to replace with your actual domain.

    systemctl stop nginx
    certbot certonly --standalone -d git.serverok.in
    

    Edit file

    vi /usr/serverok/ssl-renew
    

    Find

    /usr/bin/certbot renew
    

    Add before

    systemctl stop nginx
    

    Create file

    vi /etc/nginx/sites-enabled/bitbucket.conf
    

    Add

    server {
        listen          443 ssl;
        server_name     git.serverok.in;
        ssl_certificate      	/etc/letsencrypt/live/git.serverok.in/fullchain.pem;
        ssl_certificate_key  	/etc/letsencrypt/live/git.serverok.in/privkey.pem;
        ssl_session_timeout  	5m;
        ssl_protocols  			TLSv1 TLSv1.1 TLSv1.2;
        ssl_ciphers  			HIGH:!aNULL:!MD5;
        ssl_prefer_server_ciphers   on;
        client_max_body_size 1000M;
        proxy_read_timeout 600s;
    
        location / {
            proxy_pass 			http://localhost:7990;
            proxy_set_header 	X-Forwarded-Host $host;
            proxy_set_header 	X-Forwarded-Server $host;
            proxy_set_header    X-Forwarded-For $proxy_add_x_forwarded_for;
            proxy_set_header    X-Real-IP $remote_addr;
            proxy_redirect 		off;
        }
    }
    
    server {
        listen 80;
        server_name     git.serverok.in;
        return       301 https://git.serverok.in$request_uri;
    }
    

    Restart nginx server

    systemctl restart nginx
    

    Edit file

    vi /var/atlassian/application-data/bitbucket/shared/bitbucket.properties
    

    At end of the file, add following code

    server.port=7990
    server.secure=true
    server.scheme=https
    server.proxy-port=443
    server.proxy-name=git.serverok.in
    

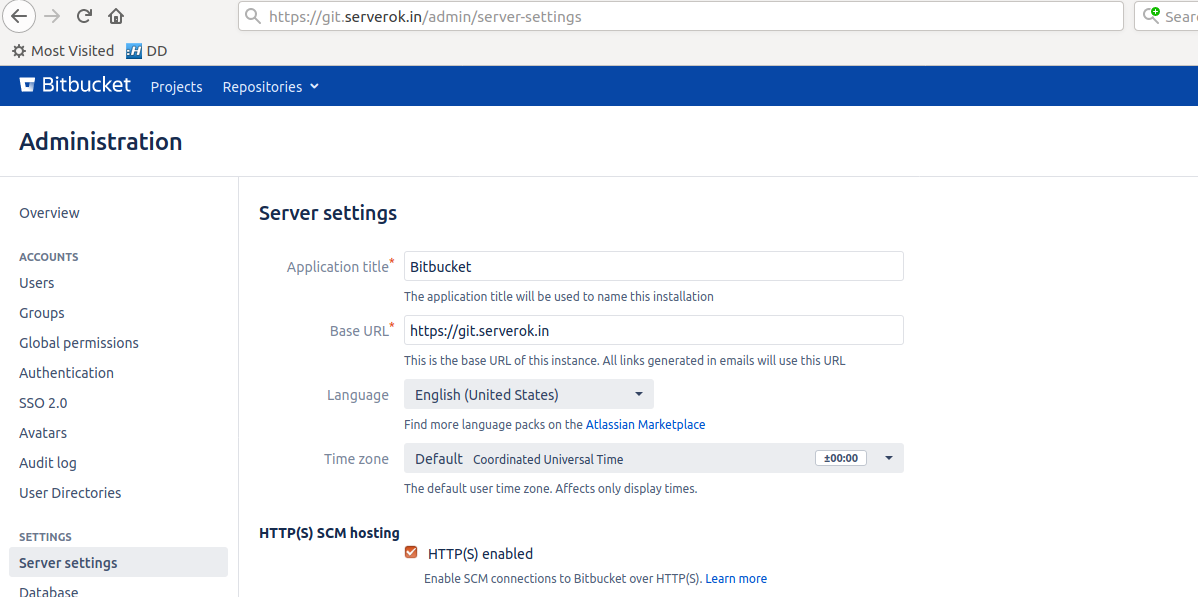
    Now login to Bitbucket server, Go to Bitbucket Server administration area and click Server settings, and change Base URL to

    https://git.serverok.in
    

    bitbucket server

    Restart bitbucket server

    systemctl stop atlbitbucket.service
    systemctl start atlbitbucket.service
    
  • Configure KVM Bridge Network on Debian 10

    Before you configure bridge network, make sure you have bridge-utils installed.

    apt install bridge-utils
    

    You may also need ifdown and resolvconf packages installed

    apt install ifupdown resolvconf
    

    Here is the default /etc/network/interfaces i had on the server

    root@PAR-199235:~# cat /etc/network/interfaces
    # This file describes the network interfaces available on your system
    # and how to activate them. For more information, see interfaces(5).
    
    source /etc/network/interfaces.d/*
    
    # The loopback network interface
    auto lo
    iface lo inet loopback
    
    # The primary network interface
    auto enp1s0f0
    allow-hotplug enp1s0f0
    iface enp1s0f0 inet static
    	address 163.172.107.119
    	broadcast 163.172.107.255
    	netmask 255.255.255.0
    	gateway 163.172.107.1
    	dns-nameservers 8.8.8.8
    
    root@PAR-199235:~# 
    

    enp1s0f0 is name of the network interface card on the server.

    To convert it to brudge configuration. You need to replace enp1s0f0 with br0.

    Then add following to the file

        bridge_ports enp1s0f0
        bridge_stp off
        bridge_maxwait 5
    

    Remember to replace enp1s0f0 with your actual network card interface name.

    Also remove the line

    allow-hotplug enp1s0f0
    

    Here is the final /etc/network/interface file i have.

    root@PAR-199235:~# cat /etc/network/interface
    cat: /etc/network/interface: No such file or directory
    root@PAR-199235:~# cat /etc/network/interfaces
    # This file describes the network interfaces available on your system
    # and how to activate them. For more information, see interfaces(5).
    
    source /etc/network/interfaces.d/*
    
    # The loopback network interface
    auto lo
    iface lo inet loopback
    
    # The primary network interface
    
    auto br0
    iface br0 inet static
    	address 163.172.107.119
    	broadcast 163.172.107.255
    	netmask 255.255.255.0
    	gateway 163.172.107.1
        bridge_ports enp1s0f0
        bridge_stp off
        bridge_maxwait 5
    	dns-nameservers 8.8.8.8
    
    root@PAR-199235:~# 
    
  • ps

    bash: ps: command not found

    List process by memory usage

    ps -eo vsz,pid,cmd | sort -nk 1
    
  • bash: ps: command not found

    On a docker image, when i run ps, i get error

    root@2efea503e8b7:~# ps
    bash: ps: command not found
    root@2efea503e8b7:~# 
    

    To install ps on Debian/Ubuntu, run

    apt -y install procps
    
  • Bash Script to Monitor Disk Usage

    This script will check disk usage on / partition and email you if disk usage is above 80%

    We can use df / command to find current disk usage

    df /
    

    As you can see, the result have 2 lines. We don’t need first line. To ignore first line, we can use

    df / | grep -v 'Filesystem'
    

    From the result, we only need the Use% part. In this case 66%, to find this, you can use awk command, that split the line, then prient specified part. In our case, we need 5th part.

    df / | grep -v 'Filesystem' | awk '{print $5}'
    

    To use disk usage % in our script for calculation, we need it converted to number. That is remove %. This can be done with sed command

    df / | grep -v 'Filesystem' | awk '{print $5}' | sed 's/%//g'
    

    Now we have disk usage as a number. We can use it in our script.

    vi disk-usage-checker
    

    Add following content to it

    #!/bin/bash
    
    CURRENT_USAGE=$(df / | grep -v 'Filesystem' | awk '{print $5}' | sed 's/%//g')
    ALERT_ON=80
    
    if [ "$CURRENT_USAGE" -gt "$ALERT_ON" ] ; then
        mail -s 'Disk Usage Warning' YOUR_EMAIL_HERE << EOF
    Disk almost full on / partition. Current Useage: $CURRENT_USAGE%
    EOF
    fi
    

    In above script, replace YOUR_EMAIL_HERE with your email address.

    disk usage bash script

    You can run the script daily using cronjob. If disk usage ever go above 80%, you will get email alert.

    See bash

  • Read mails in Maildir folder

    To read mail from Maildir folder, use mutt.

    You can run

    mutt -f /home/user/Maildir
    

    To install mutt on Ubuntu/Debian, run

    apt install mutt
    
  • Unblock an IP from fail2ban

    To check if an IP is banned by fail2ban, run

    zgrep "Ban" /var/log/fail2ban.log* | grep IP_ADDR_HERE

    To unblock an IP, you should find the jail that caused the IP to be blocked.

    In the following example, IP 152.67.19.86 is blocked by the sshd jail

    2020-07-28 00:47:09,763 fail2ban.actions        [3494]: NOTICE  [sshd] Ban 152.67.19.86
    2020-07-28 00:47:11,928 fail2ban.filter         [3494]: INFO    [sshd] Found 152.67.19.86 - 2020-07-28 00:47:11

    To unban the IP, run

    root@controlpanel:~# fail2ban-client set sshd unbanip 152.67.19.86
    152.67.19.86
    root@controlpanel:~# 

    You can see all jails with the command fail2ban-client status

    root@controlpanel:/var/log# fail2ban-client status 
    Status
    |- Number of jail:	4
    `- Jail list:	dovecot, postfix, pure-ftpd, sshd
    root@controlpanel:/var/log#

    See fail2ban

  • Install VirtualBox 6.1 on Ubuntu 18.04

    Install VirtualBox 6.1 on Ubuntu 18.04

    First you need to add VirtualBox repository

    sudo echo "deb [arch=amd64] https://download.virtualbox.org/virtualbox/debian bionic contrib" > /etc/apt/sources.list.d/virtualbox.list
    

    Add Keys

    wget -q https://www.virtualbox.org/download/oracle_vbox_2016.asc -O- | sudo apt-key add -
    wget -q https://www.virtualbox.org/download/oracle_vbox.asc -O- | sudo apt-key add -
    

    Do an apt upgrade

    sudo apt-get update
    

    If you have older version of VirtualBox installed, remove it

    sudo apt remove virtualbox virtualbox-dkms virtualbox-qt
    

    Install VirtualBox 6.1 with

    sudo apt-get install virtualbox-6.1
    

    VirtualBox 6.1 on Ubuntu

    If you use Vagrant, you may need to install latest version as the vagrant provided by ubuntu won’t work with VirtualBox 6.1

  • Install kvm on Debian 10

    To install kvm on Debian 10, run

    apt install -y qemu-kvm
    

    Install libvirt, it is a tool to manage kvm

    apt install libvirt-clients libvirt-daemon libvirt-daemon-system
    

    Set libvirtd to start on boot

    systemctl enable libvirtd
    

    Restart libvirtd

    systemctl restart libvirtd
    

    You can see libvirtd status with

    systemctl status libvirtd
    

    Install virtinst, it is used to create virtual machine.

    apt install virtinst
    

    To see network, run

    virsh net-list --all
    

    Start the “default” network

    virsh net-start default
    

    Set default network to auto start on boot

    virsh net-autostart default
    

    Now you have kvm and libvirtd installed. You can create virtual machine using virtinst or Virt Manager

    See KVM

  • chmod

    chmod command allow you to change permission for a file or folder.

    chmod 755 index.php

    The above command changes the permission of file index.php to 755.

    chmod -R 755 public_html
    

    Above command change permisison of folder public_html and files inside it to 755. -R option is for recursively chmod.

    Back to Linux Commands