Category: Linux

  • logrotate nginx log by date

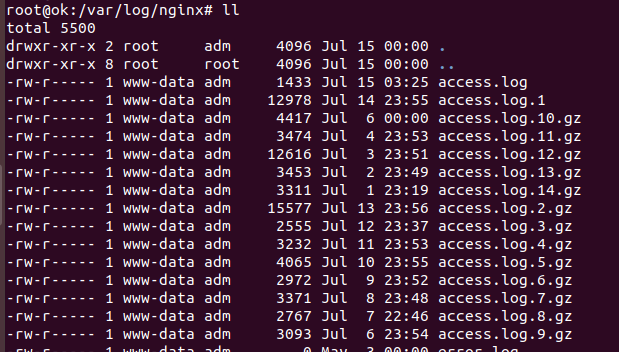
    Logrotate by default rotate logs with numbers like following

    logrotate nginx access log

    You can configure how many logs to keep and how to rotate lots by editing logrotate configuration file for nginx

    root@ok:~# cat /etc/logrotate.d/nginx 
    /var/log/nginx/*.log {
    	daily
    	missingok
    	rotate 14
    	compress
    	delaycompress
    	notifempty
    	create 0640 www-data adm
    	sharedscripts
    	prerotate
    		if [ -d /etc/logrotate.d/httpd-prerotate ]; then \
    			run-parts /etc/logrotate.d/httpd-prerotate; \
    		fi \
    	endscript
    	postrotate
    		invoke-rc.d nginx rotate >/dev/null 2>&1
    	endscript
    }
    root@ok:~# 

    rotate 14 – this tells logrotate to keep logs for 14 days.

    If you need to rotate logs by date, add

            dateext
            dateformat -%Y-%m-%d

    Example

    /var/log/nginx/*.log {
            daily
            missingok
            rotate 14
            compress
            delaycompress
            notifempty
            create 0640 www-data adm
            dateext
            dateformat -%Y-%m-%d
            sharedscripts
            prerotate
                    if [ -d /etc/logrotate.d/httpd-prerotate ]; then \
                            run-parts /etc/logrotate.d/httpd-prerotate; \
                    fi \
            endscript
            postrotate
                    invoke-rc.d nginx rotate >/dev/null 2>&1
            endscript
    }

    See Logrotate

  • CentovaCast Enable SSL for shoutcast

    To enable SSL for stream, you can use nginx reverse proxy.

    In this case, i have a stream available on

    http://my-domain.com:8000/index.html?sid=1

    I want to make it available using SSL at

    https://my-domain.com:9000/index.html?sid=1

    The port will need to be differnt as you can’t run both HTTP and HTTPS on same port. So i used Port 8000 here. All traffic to this port using HTTPS will be forwarded to HTTP port. To do this install nginx

    yum install nginx
    

    Add a virtual host configuration at

    vi /etc/nginx/conf.d/port8000.conf 
    

    with following content

    server {
        listen       8000 ssl;
        server_name  your-domain.com;
        root         /usr/share/nginx/html;
        ssl_certificate /etc/letsencrypt/live/your-domain.com/fullchain.pem;
        ssl_certificate_key /etc/letsencrypt/live/your-domain.com/privkey.pem;
        # include /etc/letsencrypt/options-ssl-nginx.conf;
        # ssl_dhparam /etc/letsencrypt/ssl-dhparams.pem;
        proxy_read_timeout 600s;
        location / {
            proxy_set_header X-Real-IP  $remote_addr;
            proxy_set_header X-Forwarded-For $remote_addr;
            proxy_set_header Host $host;
            proxy_pass http://YOUR_IP_HERE:8000;
        }
    }
    

    Now restart nginx

    systemctl restart nginx
    

    Auto restart Nginx

    Since we used free LetsEncrypt SSL for the domain, you will need to auto restart Nginx. This can be done by adding a cronjon

    @weekly systemctl restart nginx
    

    You may also need to add cronjob for renewing SSL, this you can find at https://serverok.in/letsencrypt. In case of CentovaCast, SSL is managed by CentovaCast, so you need to worry about auto renewing SSL certificate.

  • Install Pure-FTPd from source

    To instal pureftpd from source, go to

    http://download.pureftpd.org/pub/pure-ftpd/releases/

    find latest version download link.

    Download and Install

    At the time of this post, latest version is 1.0.49, always use latest version when you are installing.

    cd /usr/local/src
    wget https://download.pureftpd.org/pub/pure-ftpd/releases/pure-ftpd-1.0.49.tar.gz
    tar -zxvf pure-ftpd-1.0.49.tar.gz
    cd pure-ftpd-1.0.*
    ./configure --with-puredb
    make
    make check
    make install
    

    The software is now installed in /usr/local/sbin/pure-ftpd

    To start the server, just run the following command

    /usr/local/sbin/pure-ftpd
    

    Common Errors during install

    If you get error: no acceptable C compiler found in $PATH, install gcc with

    yum install gcc -y
    

    Firewall

    FTP need following ports open in firewall.

    TCP 21
    TCP 30000-50000
    

    Enable MySQL support

    If you need to enable MySQL support in pure-ftpd, then run configure command with following option.

    ./configure --with-mysql --with-uploadscript --with-extauth
    

    Configuration Files

    During installation, configuration file get copied to

    /etc/pure-ftpd.conf
    

    You can edit it as required.

    To start pure-ftpd with configuration file, run

    /usr/local/sbin/pure-ftpd /etc/pure-ftpd.conf
    

    To enable system users login, set UnixAuthentication to yes.

    UnixAuthentication            yes
    MinUID                      100
    

    MinUID specify lowest id of users that is allowed to login to user. You can uncomment it if you need user root or any other system users to login. But this maybe insecure as FTP comminication is done with out encryption.

    NAT

    If you are behind NAT, you need to uncomment following settings. This is required for most cloud providers like Amazon AWS, Google Cloud, Microsoft Azure. To see if you have NAT, see if your Public IP is configured inside your server. You can list IP configured in your server with command ip a

    PassivePortRange             30000 50000
    ForcePassiveIP               192.168.0.1
    

    Replace 192.168.0.1 with your public IP. If you are using Amazon AWS, then it will be your Elastic IP address. If you don’t use Elastic IP, then it is your public IP.

    See PureFTPd

  • Hacking

    expoloit-db.com contact many 0 day vlunerability and security related papers.

    https://www.exploit-db.com

  • Systemd Journal

    Systemd have its own loggin system called Systemd Journal. It keep track of logs for each service.

    To see log for a service, run

    journalctl -u SERVICE_NAME
    

    Example

    root@ocp-serverok-in:~# journalctl -u myapp
    -- Logs begin at Wed 2020-05-27 06:43:34 UTC, end at Fri 2020-06-26 09:33:19 UTC. --
    Jun 26 08:53:59 ocp-serverok-in systemd[1]: Started Sample web server.
    Jun 26 08:53:59 ocp-serverok-in cat[36147]: Starting web server
    root@ocp-serverok-in:~# 
    
  • Start an application using systemd

    systemd is used to start applications on linux systems.

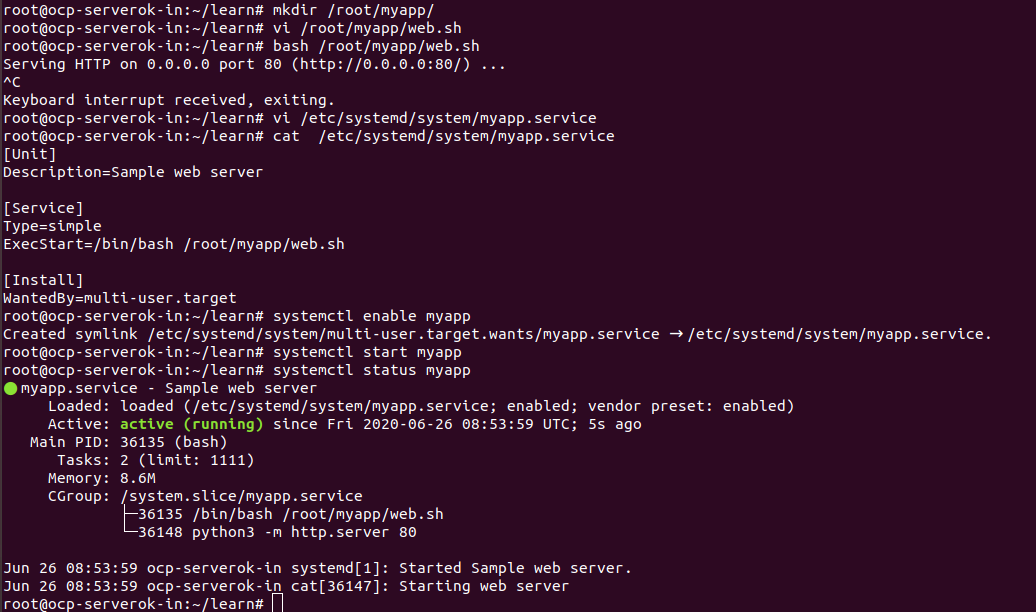
    In this post, we will create an application and run start it on boot using systemd.

    Lets create our sample application.

    mkdir /root/myapp/
    vi /root/myapp/web.sh
    

    Add following content to the file and save.

    #!/bin/bash
    
    echo "Starting web server" | systemd-cat -p info
    
    cd /root/myapp
    python3 -m http.server 80
    

    You can start the application by running following command on terminal

    bash /root/myapp/web.sh
    

    this will run a simple web server on port 80. If you already have a web server running on port 80, change the port to another.

    To stop web server, type CTRL+C.

    Create Systemd service file

    To manage this application using systemd, we need to create a service file.

    vi /etc/systemd/system/myapp.service
    

    Add

    [Unit]
    Description=Sample web server
    
    [Service]
    Type=simple
    ExecStart=/bin/bash /root/myapp/web.sh
    
    [Install]
    WantedBy=multi-user.target
    

    systemd service file

    Managing Systemd service

    First you need to enable the service with

    systemctl enable myapp
    

    To start the service, run

    systemctl start myapp
    

    To stop the service, run

    systemctl stop myapp
    

    To see status of the service, run

    systemctl status myapp
    
  • Application Performance Monitor (APM)

    Application Performance Monitor (APM) is used to monitor application performance. This help you identify problems with your application. If you are developing an application, this is very helpful as you can see changes in application performance during a software upgrade, this allow you to identify perofrmance issues related to changes in your application.

    Here are some useful sites that provide Application Performance Monitoring solutions.

    https://blackfire.io

    newrelic

  • serverpilot

    serverpilot is a SAAS hosting control panel for web servers.

    It use nginx as proxy with apache web server as backend. Services used by serverpilot are

    systemctl status nginx-sp
    systemctl status apache-sp
    systemctl status mysql
    systemctl status php7.1-fpm-sp
    systemctl status php7.2-fpm-sp
    systemctl status php7.3-fpm-sp
    

    Config file locations

    /etc/nginx-sp/
    /etc/apache-sp/
    

    Web site specific configurations are stored in the vhosts.d folder inside apache/nginx config folders.

    Apache installed at

    /opt/sp/apache/bin/apachectl start
    /opt/sp/apache/bin/apachectl configtest
    

    Back to Hosting Control Panel

  • sysdig

    sysdig is a tool like top, but more powerful, it is a combination of tools like htop, iftop, lsof.

    To install sysdig on ubuntu, run

    apt-get install sysdig
    

    To see files using top IO, run

    sysdig -c topfiles_bytes
    

    To access top like GU, run

    csysdig
    
  • Webuzo

    Install webuzo

    wget -N http://files.webuzo.com/install.sh
    chmod 0755 install.sh
    ./install.sh

    After installing you can login into the Webuzo control panel at

    https://server-ip:2005/

    Webuzo Config files

    /usr/local/apps/nginx/etc/conf.d/webuzoVH.conf - Nginx
    /var/webuzo/my.conf - MySQL root password
    /var/webuzo/certs - SSL certificates used by the control panel, mail server, FTP
    /var/webuzo/logs - update/import logs

    Back to Hosting Control Panels