Category: Linux
-
Joining files with Cat on Linux
I have a movie cut with hjspit.
-rw-r--r-- 1 root root 110100480 Apr 17 10:42 MSFT_1.avi.001 -rw-r--r-- 1 root root 110100480 Apr 17 10:45 MSFT_1.avi.002 -rw-r--r-- 1 root root 110100480 Apr 17 10:45 MSFT_1.avi.003 -rw-r--r-- 1 root root 110100480 Apr 17 10:47 MSFT_1.avi.004 -rw-r--r-- 1 root root 110100480 Apr 17 10:47 MSFT_1.avi.005 -rw-r--r-- 1 root root 110100480 Apr 17 10:49 MSFT_1.avi.006 -rw-r--r-- 1 root root 110100480 Apr 17 10:49 MSFT_1.avi.007 -rw-r--r-- 1 root root 110100480 Apr 17 10:51 MSFT_1.avi.008 -rw-r--r-- 1 root root 62759034 Apr 17 10:51 MSFT_1.avi.009
To join them on Linux, run
cat MSFT_1.avi.00? > MSFT_1.avi
Back to cat
-
Linux alias
alias can be used to create custom commands. To see all alias on your computer, you can run command
alias
Here are some of the avlias defined on my computer
alias ipy='/home/boby/venv/bin/ipython' alias ok='ssh [email protected] -p 3333' alias venv='source ~/venv/bin/activate'
First alias allow me to type ipy instead of typing the actual command /home/boby/venv/bin/ipython, which is larger and difficult to type.
Second command allow to to ssh to a server just by typing “ok” in command prompt.
To add alias, you need to edit
vi ~/.bashrc
and add alias commands you need in the file. Here is what i have on a server
root@ok:~# cat .bashrc # ~/.bashrc: executed by bash(1) for non-login shells. # Note: PS1 and umask are already set in /etc/profile. You should not # need this unless you want different defaults for root. # PS1='${debian_chroot:+($debian_chroot)}\h:\w\$ ' # umask 022 # You may uncomment the following lines if you want `ls' to be colorized: # export LS_OPTIONS='--color=auto' # eval "`dircolors`" # alias ls='ls $LS_OPTIONS' # alias ll='ls $LS_OPTIONS -l' # alias l='ls $LS_OPTIONS -lA' # # Some more alias to avoid making mistakes: # alias rm='rm -i' # alias cp='cp -i' # alias mv='mv -i' alias ll='ls -la --color' alias rm='rm -i' alias grep='grep --color=auto' export HISTTIMEFORMAT="%d/%m/%y %T " alias sra-fcloud='ssh [email protected]' root@ok:~#
-
Install bind in CentOS 7
bind is a DNS server. To install bind on CentOS 7, run
yum install bind bind-utils -y
Enable bind to start on boot
systemctl enable named
Start bind
systemctl start named
You can see status with
systemctl status named
Setup firewall
You need to allow DNS ports UDP/TCP 53 in firewall. On CentOS 7, you can run
firewall-cmd --zone=public --permanent --add-service=dns firewall-cmd --reload
Configure bind
By default bind only listens to local IP, to make it accessable from outside, you need to edit named.conf
vi /etc/named.conf
Find
listen-on port 53 { 127.0.0.1; }; listen-on-v6 port 53 { ::1; };
Comment out those two lines by adding # at start of the lines.
#listen-on port 53 { 127.0.0.1; }; #listen-on-v6 port 53 { ::1; };
We need our DNS server access query from anyone on internet. For this, find
allow-query { localhost; };
Replace with
allow-query { any; };
Since we only want our DNS server resolve domains hosted on our server, disable recursion.
Find
recursion yes;
Replace with
recursion no;
Now restart bind with
systemctl restart bind
Adding Domain to bind
To server a domain, you need to add the domain to bind. For this edit file
vi /etc/named.conf
at end of the file, add
zone "DOMAIN.EXTN" IN { type master; file "/var/named/DOMAIN.EXTN.zone"; allow-update { none; }; };
Now create zone file
vi /var/named/DOMAIN.EXTN.zone
Add following
$TTL 86400 @ IN SOA DOMAIN.EXT. admin.DOMAIN.EXT. ( 100 ; serial 1H ; refresh 1M ; retry 1W ; expiry 1D ) ; minimum @ IN NS ns1.DOMAIN.EXT. @ IN A YOUR_IP_ADDR_HERE ns1 IN A YOUR_IP_ADDR_HERE @ IN MX 10 mail.DOMAIN.EXT. mail IN A YOUR_IP_ADDR_HERE www IN A YOUR_IP_ADDR_HERE
Restart bind
vi /var/named/DOMAIN.EXTN.zone
You can verify domain is resolving with command
nslookup DOMAIN.EXT SERVER_IP_HERE
See bind
-
SSH Port Forwarding
On a remote server, we have an application running on 127.0.0.1:8010. Since the application is listening on internal IP address 127.0.0.1, we can’t access it remotely. To access this application, we can use SSH port forwarding.
ssh -L 8010:127.0.0.1:8010 [email protected] -p 3333
In above example, application running on server lab.serverok.in is available on my local computer at
http://127.0.0.1:8010
-
kex_exchange_identification: read: Connection reset by peer
When connecting to Ubuntu 20.04 server using SSH from a Mac computer, get an error
kex_exchange_identification: read: Connection reset by peer
On checking the servers log file (/var/log/auth.log), found the following error message
Jul 23 06:53:34 server sshd[24147]: Unable to negotiate with 17.19.44.24 port 47280: no matching key exchange method found. Their offer: diffie-hellman-group14-sha1,diffie-hellman-group-exchange-sha1,diffie-hellman-group1-sha1 [preauth]
To fix this, on the server, edit sshd_config
vi /etc/ssh/sshd_config
At end of the file, add
KexAlgorithms +diffie-hellman-group1-sha1
Restart ssh
systemctl restart ssh
See SSH
-
Cpanel CloudLinux set all users to use alt-php
If your cpanel server have cloudlinux + PHP Selector installed, you need to set all site to use inherit PHP before you can use PHP Selector.
This can be done in MultiPHP Manager or using command line
for i in $(cut -d: -f1 /etc/userdatadomains );do whmapi1 php_set_vhost_versions version=inherit vhost-0=$i;done
Tis command will set all web sites to use inherit PHP.
To set all site to use alt-PHP 7.4, run
selectorctl --change-to-version=7.4 --version=native
This will change PHP version for all sites that use native PHP to alt-PHP 7.4
Or you can use
cd /var/cpanel/users ls -1 | awk '{ print "selectorctl --set-user-current=7.4 --user="$1 }' | sh
See cloudlinux
-
Ant Media Server
Ant Media Server is a media streaming server with WebRTC support.
https://antmedia.io
Install Ant Media Server on CentOS 8
Ant Media Server Ubuntu firewall configuration
Steaming to Anti Media Server using ffmpegOpen Source versiong of Ant Media Server can be downloaded from
https://github.com/ant-media/Ant-Media-Server
Install Anti Media Server on Ubuntu 18.04
At the time of writing this post, latest version of Ant Media Server is ant-media-server-2.0.0-community-2.0.0-20200504_1842.zip, replace it with latest version available on github.
cd /usr/local/src wget https://github.com/ant-media/Ant-Media-Server/releases/download/ams-v2.0.0/ant-media-server-2.0.0-community-2.0.0-20200504_1842.zip wget https://raw.githubusercontent.com/ant-media/Scripts/master/install_ant-media-server.sh chmod 755 install_ant-media-server.sh ./install_ant-media-server.sh ant-media-server-2.0.0-community-2.0.0-20200504_1842.zip
After installation, you will see Ant Meida Server listens on following ports
[root@Ant-Media-Server ~]# netstat -lntp Active Internet connections (only servers) Proto Recv-Q Send-Q Local Address Foreign Address State PID/Program name tcp 0 0 127.0.0.1:5599 0.0.0.0:* LISTEN 1594/jsvc.exec tcp 0 0 0.0.0.0:34501 0.0.0.0:* LISTEN 1594/jsvc.exec tcp 0 0 0.0.0.0:1935 0.0.0.0:* LISTEN 1594/jsvc.exec tcp 0 0 0.0.0.0:5080 0.0.0.0:* LISTEN 1594/jsvc.exec [root@Ant-Media-Server ~]#
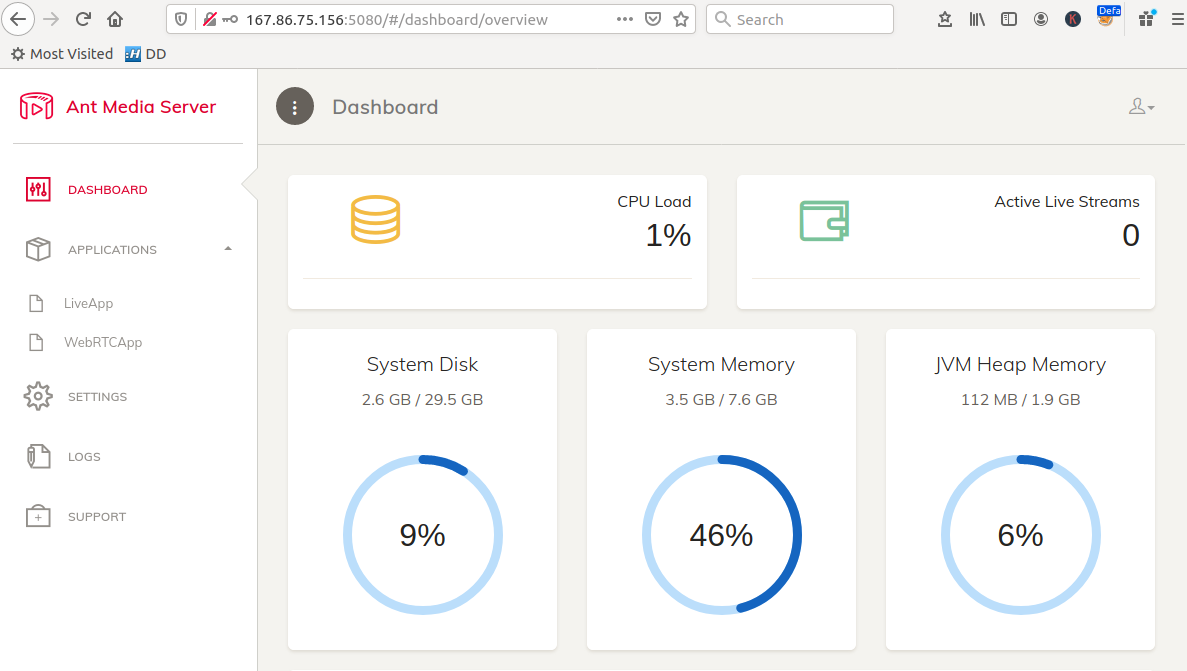
To access Ant Media Server, go to
http://your-server-ip:5080
When visiting first time, you will be asked to create a new user.
Installing SSL
To install SSL, you need to point a domain or sub domain to server IP, then run following commands
cd /usr/local/antmedia ./enable_ssl.sh -d YOUR_DOMAIN_HERE
After installation, you will be able to access site using HTTPS on following URL
https://YOUR_DOMAIN_HERE:5443
Test Video Streaming Applictaion available at
https://YOUR_DOMAIN_HERE::5443/WebRTCApp/
Manage Anti Media Server
To start/stop/restart Ant Media Server, use
systemctl start antmedia systemctl stop antmedia systemctl restart antmedia
Firewall
Anti Media Server use following ports
tcp:1935 - RTMP tcp:5080 - HTTP tcp:5443 - HTTPS tcp:5554 - RTSP udp:5000-65000 - WebRTC & RTSP
-
Bash if statement
Check if first augment to script is –help
if [ "$1" = "--help" ]; then echo "$0 --help = shows help" exit 0 fi
Check if a file exists and is executable
if [ -f "/usr/bin/curl" ]; then echo "curl exists" fi
Check if a binary file exists and is executable
if [ -x "/usr/bin/curl" ]; then echo "curl exists and executable" fi
Check if previous command was sucessfull or not
if [ "$?" != 0 ]; then echo failed exit 1 fi
Check if variabe set or not
if [ -z ${USER} ]; then echo "\$USER not set" else echo "\$USER = $USER" fi
-
Install Python 3.8 on CentOS 6 from source
To install Python 3.8 on CentOS, you need to install OpenSSL as the one installed by CentOS from yum is very old.
cd /usr/local/src wget https://www.openssl.org/source/openssl-1.1.1g.tar.gz tar xvf openssl-1.1.1g.tar.gz cd openssl-1.1.1g ./config --prefix=/usr/serverok/openssl --openssldir=/usr/serverok/openssl no-ssl2 make make install
Now edit file
vi ~/.bash_profile
at end of the file, add
export PATH=/usr/serverok/openssl/bin:$PATH export LD_LIBRARY_PATH=/usr/serverok/openssl/lib export LC_ALL="en_US.UTF-8" export LDFLAGS="-L/usr/serverok/openssl/lib -Wl,-rpath,/usr/serverok/openssl/lib"
Make the settings active with command
source ~/.bash_profile
Now we can install Python 3.8 with
cd /usr/local/src wget https://www.python.org/ftp/python/3.8.4/Python-3.8.4.tar.xz tar xvf Python-3.8.4.tar.xz cd /usr/local/src/Python-3.8.4 make clean && make distclean ./configure --enable-optimizations --with-openssl=/usr/serverok/openssl/ make altinstall
Now python 3.8 will be available in your system under /usr/local/bin
root@server12:~# python3.8 --version Python 3.8.4 root@server12:~# which python3.8 /usr/local/bin/python3.8 root@server12:~#
-
apt-get An error occurred during the signature verification
When running apt update, i get following error
W: An error occurred during the signature verification. The repository is not updated and the previous index files will be used. GPG error: http://packages.cloud.google.com cloud-sdk-jessie InRelease: The following signatures couldn't be verified because the public key is not available: NO_PUBKEY 6A030B21BA07F4FB
To fix this error, run
apt-key adv --keyserver keys.gnupg.net --recv-keys 6A030B21BA07F4FB
-
Expired Updates for this repository will not be applied
When running apt update on a Debian jessie server, i get following error
E: Release file for http://archive.debian.org/debian/dists/jessie-backports/InRelease is expired (invalid since 513d 20h 41min 47s). Updates for this repository will not be applied
To fix the error, run
echo "Acquire::Check-Valid-Until false;" | sudo tee -a /etc/apt/apt.conf.d/10-nocheckvalid