Tag: aws

  • Move Elastic IP from one AWS Account to Another

    Move Elastic IP from one AWS Account to Another

    AWS Elastic IP is a static, public IPv4 address that you can allocate and associate with your AWS resources, such as Amazon EC2 instances and Network Interface. It provides a persistent public IP address that remains associated with your resources even if they are stopped or restarted.

    Transferring an AWS Elastic IP address to another AWS account can be useful in scenarios where you want to migrate resources between accounts or share resources with another account.

    Enable Transfer (on source AWS Account)

    1. Log in to the AWS Management Console using the credentials of the source AWS account.
    2. Navigate to the EC2 Dashboard.
    3. In the left-hand menu, click on “Elastic IPs” under the “Network & Security” section.
    4. Select the Elastic IP address that you want to migrate to the other account.
    5. Click on the “Actions” button at the top of the Elastic IPs table.
    6. Choose “Enbale transfers” from the dropdown menu.
    7. It will show a popup page, where you need to enter destination AWS Account ID and confirm by typing enable. Click submit.
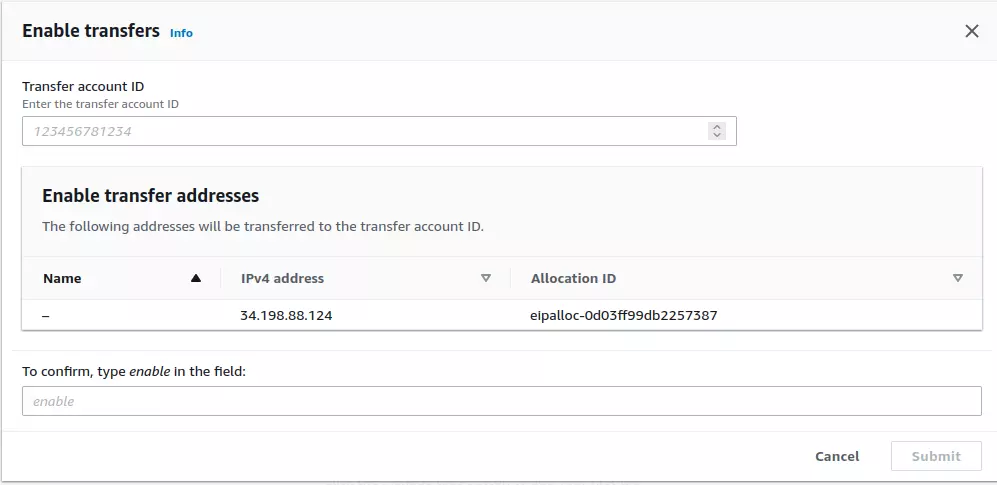
    Transfer AWS Elastic IP

    Accept Transfer on Destination AWS Account

    1. Log in to the AWS Management Console using the credentials of the destination AWS account.
    2. Navigate to the EC2 Dashboard.
    3. In the left-hand menu, click on “Elastic IPs” under the “Network & Security” section.
    4. Click on the “Actions” button at the top of the Elastic IP addresses page.
    5. Scroll down and select “Accept transfers”.
    6. In the popup, enter the IP address you need to accept, click “Submit” button, EIP will be transferred instantly.
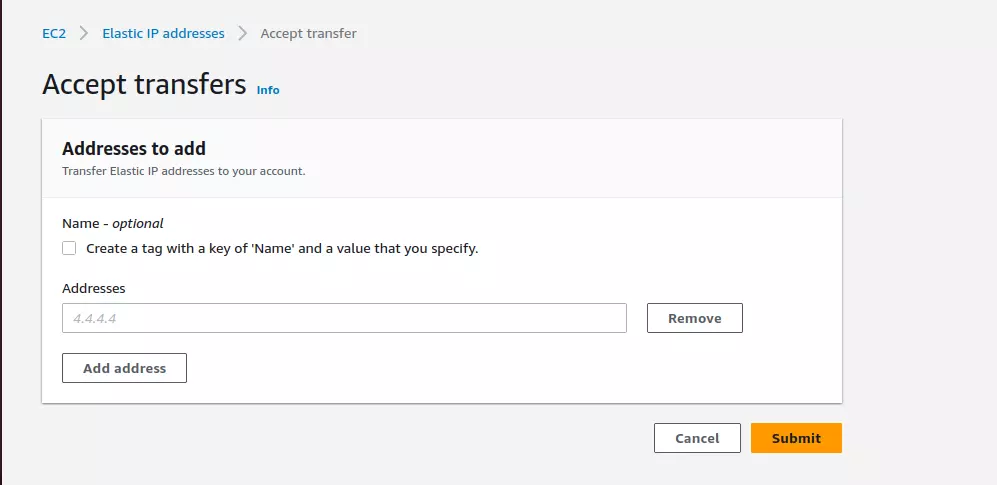
    Accept Elastic IP Transfer

    Back to AWS

  • How to export Amazon Route 53 DNS Zone

    How to export Amazon Route 53 DNS Zone

    To export DNS Records for a domain, you can use AWS CLI.

    First, you need to make an Access key to use with AWS CLI. To configure AWS CLI, run the command

    aws configure
    

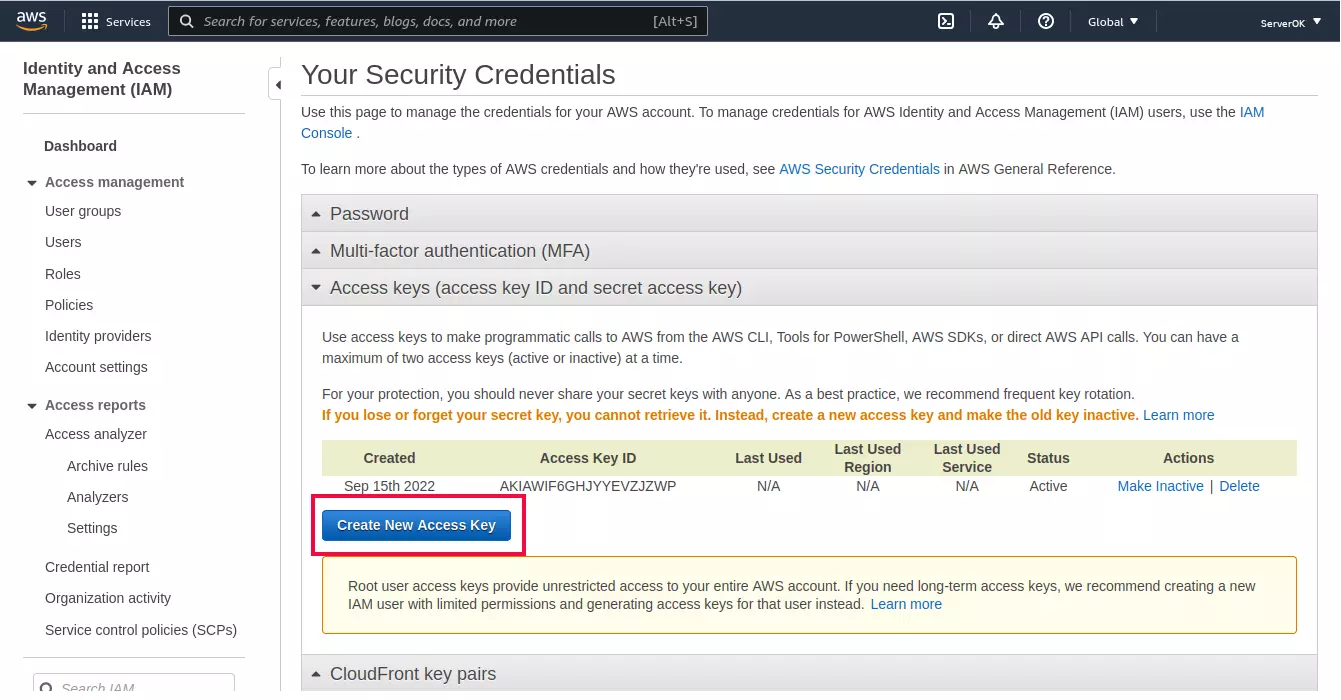
    You need to enter “Access Key ID:” and “Secret Access Key”. You can generate these in the AWS console by clicking on your name in the right top corner. Then from the drop-down menu, select “Security Credentials”. This will take you to page

    https://us-east-1.console.aws.amazon.com/iam/home?region=us-east-1#/security_credentials

    In the above URL us-east-1, can be changed with any region code.

    AWS Security Credentials

    On this page, expand “Access keys (access key ID and secret access key)”, then to create Access Key, click on the “Create New Access Key” button.

    To list all DNS Zones, use the command

    aws route53 list-hosted-zones --output json
    

    From the result, you need to find the numeric id of the hosted zone.

    Example

    boby@sok-01:~$ aws route53 list-hosted-zones --output json
    {
        "HostedZones": [
            {
                "Id": "/hostedzone/Z049372530XJK28PE5FZG",
                "Name": "serverok.in.",
                "CallerReference": "62949efe-088c-44fc-8f02-5f3f5b9fafc3",
                "Config": {
                    "Comment": "My DNS Zone",
                    "PrivateZone": false
                },
                "ResourceRecordSetCount": 18
            }
        ]
    }
    boby@sok-01:~$ 
    

    In the above example, the zone id is Z049372530XJK28PE5FZG

    To list all DNS records for the zone, use the command

    aws route53 list-resource-record-sets --hosted-zone-id ZONE_ID_HERE --output json
    

    You can use jq command to list DNS records in non json LogFormat

    aws route53 list-resource-record-sets --hosted-zone-id Z049372530XJK28PE5FZG --output json | jq -jr '.ResourceRecordSets[] | "\(.Name) \t\(.TTL) \t\(.Type) \t\(.ResourceRecords[]?.Value)\n"'
    

    In the above command, Z049372530XJK28PE5FZG is the zone id for the domain. Replace it with your DNS zone id.

    Back to Route 53

  • Amazon Lightsail Log in failed – CLIENT_UNAUTHORIZED

    Amazon Lightsail Log in failed – CLIENT_UNAUTHORIZED

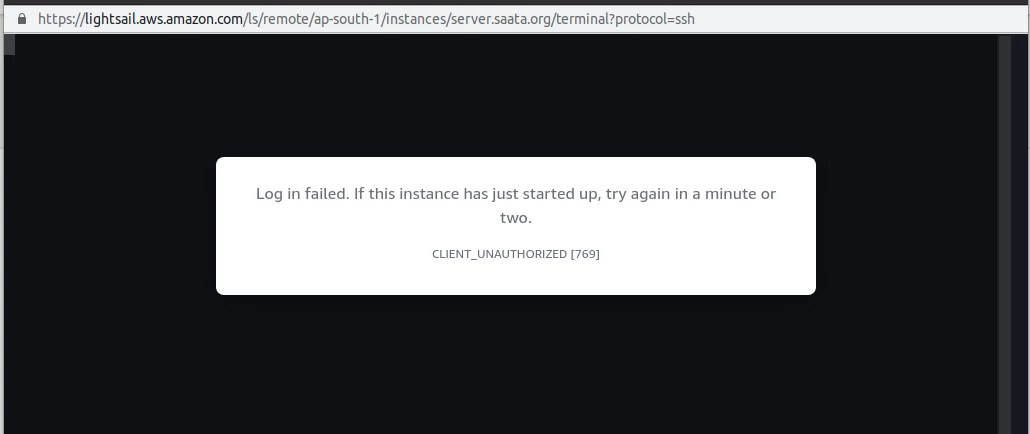
    When trying to log in to Amazon Lightsail instance, I got the error

    Log in failed. If this instance has just started up, try again in a minute or two.
    CLIENT_UNAUTHORIZED [769]
    

    Amazon Lightsail connect failed

    This lightsail refused to connect error happens because when you update the system, you replaced the default /etc/ssh/sshd_config file provided by Amazon AWS.

    To fix the error, connect to the Lightsail server using SSH (terminal on Linux/Mac, putty on windows), edit the file

    vi /etc/ssh/sshd_config
    

    At the end of the file, add the following 2 lines

    TrustedUserCAKeys /etc/ssh/lightsail_instance_ca.pub
    CASignatureAlgorithms +ssh-rsa
    

    Restart ssh service

    systemctl restart ssh
    

    Now you should be able to login to Amazon Lightsail using AWS Console.

    If your lightsail_instance_ca.pub file is corrupted, you can recreate it with the command

    cat /var/lib/cloud/instance/user-data.txt | grep ^ssh-rsa > /etc/ssh/lightsail_instance_ca.pub
    

    Method 2: Reover with shapshot

    If you can’t SSH into the server using putty or a terminal, you need to take a snapshot of the server. Create a new lightsail server based on the snapshot. During the new server creation, you have the option to reset the PEM file. You can also enter a startup script, that gets executed when the server is started the first time.

    Use the following startup script

    sudo sh -c "cat /var/lib/cloud/instance/user-data.txt | grep ^ssh-rsa > /etc/ssh/lightsail_instance_ca.pub"
    sudo sh -c "echo >> /etc/ssh/sshd_config" 
    sudo sh -c "echo 'TrustedUserCAKeys /etc/ssh/lightsail_instance_ca.pub' >> /etc/ssh/sshd_config"
    sudo sh -c "echo 'CASignatureAlgorithms ecdsa-sha2-nistp256,ecdsa-sha2-nistp384,ecdsa-sha2-nistp521,ssh-ed25519,rsa-sha2-512,rsa-sha2-256,ssh-rsa' >> /etc/ssh/sshd_config"
    sudo systemctl restart sshd
    
  • Amazon Elastic Container Registry

    Amazon Elastic Container Registry

    Amazon Elastic Container Registry is used to store docker images in Amazon AWS cloud.

    To create a repository using awscli command line tool, run

    aws ecr create-repository --repository-name sok-repository --region ap-southeast-1
    

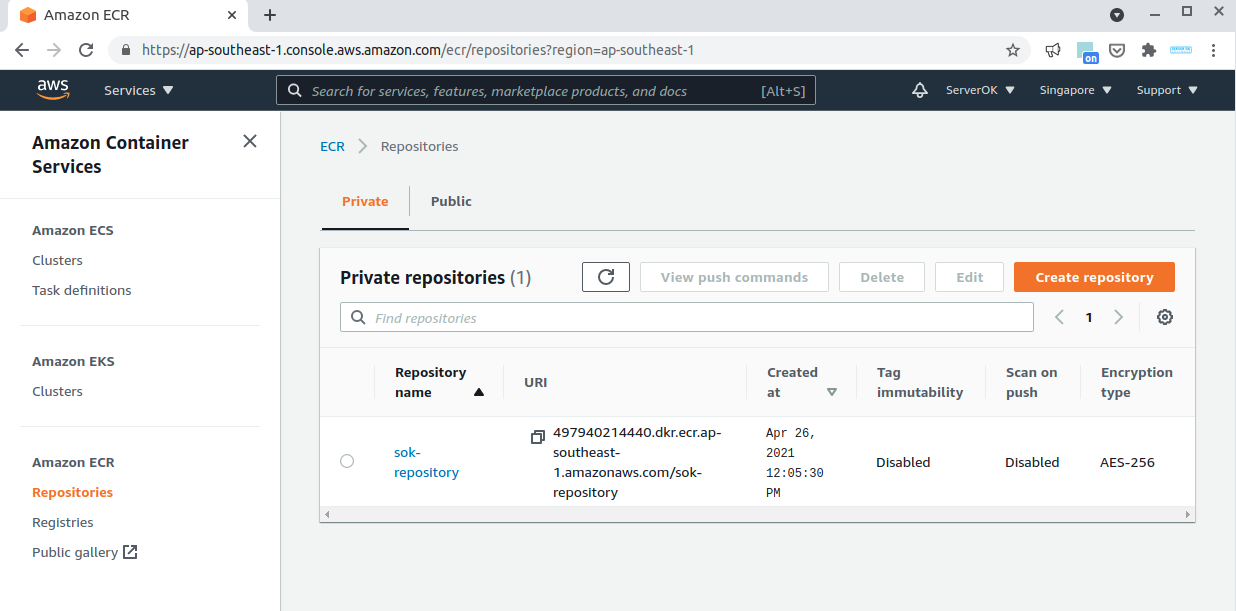
    In Amazon AWS console, you can see the newly created repository by going to “Elastic Container Registry” page in the region where you created the repository.

    https://ap-southeast-1.console.aws.amazon.com/ecr/repositories?region=ap-southeast-1

    amazon docker registry (ECR)

    To see the details from command line, run

    aws ecr describe-repositories --region ap-southeast-1
    

    Amazon AWS ECR awscli

    From the command, you will see repositoryUri, this is used to push your docker images.

    I have following docker images

    [root@instance-20210426-0136 ~]# docker images
    REPOSITORY          TAG                 IMAGE ID            CREATED             SIZE
    sevrerok/okapache   1.2                 c3832b03b548        2 hours ago         214MB
    sevrerok/okapache   1.1                 d1a86f0eb69a        2 hours ago         214MB
    ubuntu              20.04               7e0aa2d69a15        2 days ago          72.7MB
    sevrerok/okapache   1.0                 7e0aa2d69a15        2 days ago          72.7MB
    [root@instance-20210426-0136 ~]# 
    

    I need to push the image sevrerok/okapache:1.2 to Amazon ECR, for this first tag the docker image with repository name.

    docker tag sevrerok/okapache:1.2 497940214440.dkr.ecr.ap-southeast-1.amazonaws.com/sok-repository
    

    Now docker images will show

    [root@instance-20210426-0136 ~]# docker images
    REPOSITORY                                                         TAG                 IMAGE ID            CREATED             SIZE
    sevrerok/okapache                                                  1.2                 c3832b03b548        2 hours ago         214MB
    497940214440.dkr.ecr.ap-southeast-1.amazonaws.com/sok-repository   latest              c3832b03b548        2 hours ago         214MB
    sevrerok/okapache                                                  1.1                 d1a86f0eb69a        2 hours ago         214MB
    ubuntu                                                             20.04               7e0aa2d69a15        2 days ago          72.7MB
    sevrerok/okapache                                                  1.0                 7e0aa2d69a15        2 days ago          72.7MB
    [root@instance-20210426-0136 ~]# 
    

    Login to ECR

    aws ecr get-login
    

    It will display command you need to login to ECR using docker. Run the command to login to ECR.

    To push the docker image to ECR, run

    docker push 497940214440.dkr.ecr.ap-southeast-1.amazonaws.com/sok-repository
    

    ECR push

    Now the image is pushed to ECR, you will be able to see it using AWS console or awscli

    [root@instance-20210426-0136 ~]# aws ecr list-images --repository-name sok-repository
    {
        "imageIds": [
            {
                "imageTag": "latest", 
                "imageDigest": "sha256:3cb5b8ef33bf913018f28dc3adf93b96c66667b517fe800a99bd0defd9dc6130"
            }
        ]
    }
    [root@instance-20210426-0136 ~]# 
    

    To delete the ECR repo, use following command

    aws ecr delete-repository --repository-name sok-repository --region ap-southeast-1 --force
    

    See AWS

  • Amazon EC2 disk resize No space left on device

    On an Amazon EC2 instamce disk usage was full.

    root@ip-172-31-46-249:/# df -h
    Filesystem      Size  Used Avail Use% Mounted on
    udev            3.9G     0  3.9G   0% /dev
    tmpfs           791M  8.9M  782M   2% /run
    /dev/nvme0n1p1  9.7G  9.6G   65M 100% /
    tmpfs           3.9G     0  3.9G   0% /dev/shm
    tmpfs           5.0M     0  5.0M   0% /run/lock
    tmpfs           3.9G     0  3.9G   0% /sys/fs/cgroup
    /dev/loop0       97M   97M     0 100% /snap/core/9665
    /dev/loop1       97M   97M     0 100% /snap/core/9436
    /dev/loop2       18M   18M     0 100% /snap/amazon-ssm-agent/1566
    /dev/loop3       29M   29M     0 100% /snap/amazon-ssm-agent/2012
    tmpfs           791M     0  791M   0% /run/user/998
    tmpfs           791M     0  791M   0% /run/user/1000
    root@ip-172-31-46-249:/#
    

    I increased disk size on Amazone AWS console. But disk did not get changed in EC2 instance.

    root@ip-172-31-46-249:~# parted -l
    Model: NVMe Device (nvme)
    Disk /dev/nvme0n1: 21.5GB
    Sector size (logical/physical): 512B/512B
    Partition Table: msdos
    Disk Flags: 
    
    Number  Start   End     Size    Type     File system  Flags
     1      1049kB  10.7GB  10.7GB  primary  ext4         boot
    
    
    root@ip-172-31-46-249:~# 
    

    The partition still shows 10 GB. When i try growpart, i get error

    root@ip-172-31-46-249:/# growpart /dev/nvme0n1 1
    mkdir: cannot create directory ‘/tmp/growpart.1889’: No space left on device
    FAILED: failed to make temp dir
    root@ip-172-31-46-249:/# 
    

    This is because disk is full. I try delete some unwanted files. But was not able to free up much disk space. To fix the error, i mounted /tmp in memory with commands.

    mkdir /dev/shm/tmp
    chmod 1777 /dev/shm/tmp
    mount --bind /dev/shm/tmp /tmp
    

    This ec2 instance had lot of free RAM, so it should handle /tmp folder with out any issue. Now growpart worked.

    root@ip-172-31-46-249:/# growpart /dev/nvme0n1 1
    CHANGED: partition=1 start=2048 old: size=20969439 end=20971487 new: size=41940959,end=41943007
    root@ip-172-31-46-249:/# 
    

    parted -l shows the partition using all available disk space

    root@ip-172-31-46-249:/# parted -l
    Model: NVMe Device (nvme)
    Disk /dev/nvme0n1: 21.5GB
    Sector size (logical/physical): 512B/512B
    Partition Table: msdos
    Disk Flags: 
    
    Number  Start   End     Size    Type     File system  Flags
     1      1049kB  21.5GB  21.5GB  primary  ext4         boot
    
    
    root@ip-172-31-46-249:/# 
    

    still df -h won’t show increased disk space, this is because you need to increase filesystem size.

    resize2fs /dev/nvme0n1p1
    

    See Amazon EC2

  • Ubuntu pure-ftpd reply with unroutable address

    On AWS Ubuntu server running pure-ftpd, when i try connecting, i get error

    Status:	Server sent passive reply with unroutable address. Using server address instead.
    

    To fix this, run

    echo "30000 50000" > /etc/pure-ftpd/conf/PassivePortRange
    echo "YOUR_PUBLIC_IP_HERE" > /etc/pure-ftpd/conf/ForcePassiveIP
    

    YOUR_PUBLIC_IP_HERE = Replace with your Elastic IP or Public IP (if you don’t have an Elastic IP).

    Restart pure-ftpd

    systemctl stop pure-ftpd
    systemctl start pure-ftpd
    

    On AWS security groups, you need to open following ports

    TCP 21
    TCP 30000-50000
    
  • AWS Elastic Beanstalk

    Here are some useful command working with AWS Elastic Beanstalk

    eb init = initialize environment
    eb list
    eb logs
    eb console = open aws console
    eb open = open application in web browser
    eb appversion = show application versions
    eb health = show health of application
    eb codesource = select local or codecommit
    eb deploy = deploy code
    eb events = Gets recent events.
    eb create = Creates a new environment.
    eb labs download = download application to local computer
    

    Application get stored in folder

    /var/app/ondeck
    
  • Amazon S3 CORS

    To enable CORS for Amazon S3 bucket, add


        *
        PUT
        POST
        DELETE
        1800
        *


  • Deploy Docker Image using Elastic Beanstalk

    Deploy Docker Image using Elastic Beanstalk

    First create a file docker-eb-run.json with following content

    {
        "AWSEBDockerrunVersion": "1",
        "Image": {
            "Name": "bitnami/tomcat"
        },
        "Ports": [
            { "ContainerPort": "8080" }
        ]
    }
    

    here i used docker container bitnami/tomcat, you can use any container.

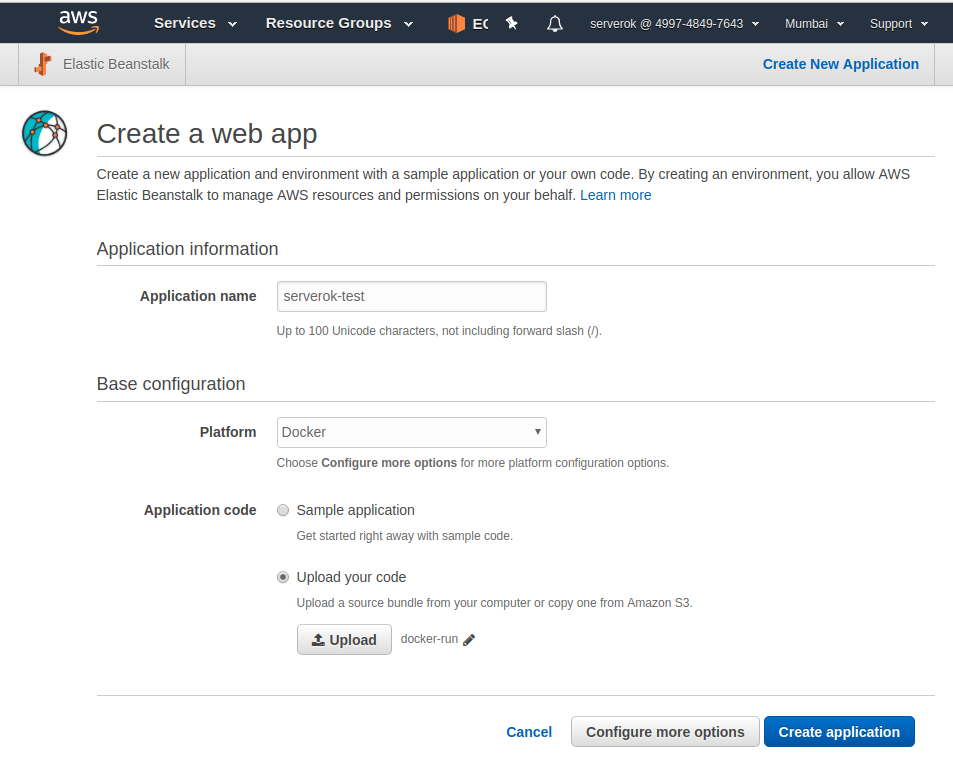
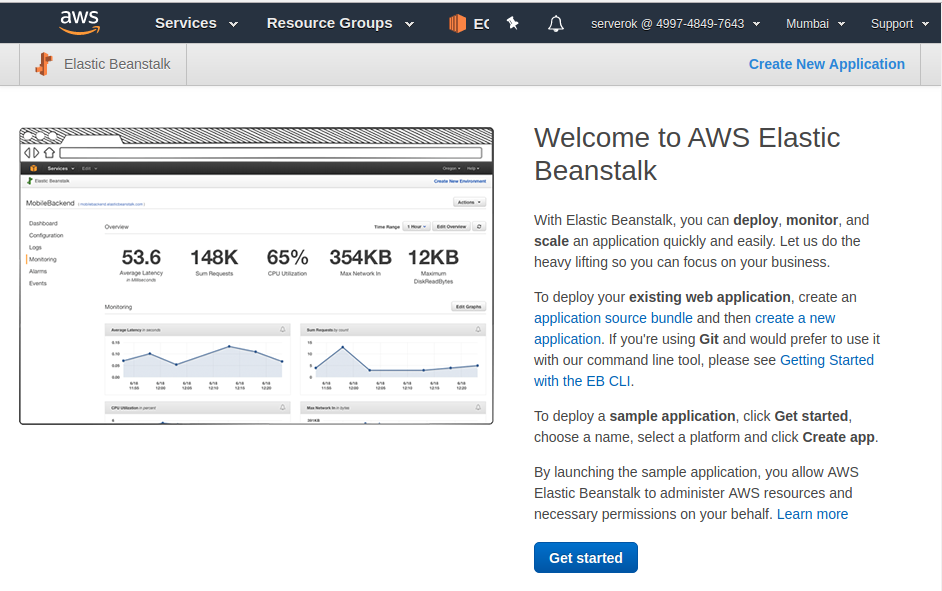
    Login to AWS Console, go to AWS Elastic Beanstalk page. Click Get Started.

    On next page, it ask for

    Application Name  = put anything you like here
    Platform = Docker
    

    For Application code, select Upload your code, click upload button and select “docker-eb-run.json” file you created.

    Click “Create application” button. AWS will start deploying your docker container in Elastic Beanstalk, it will take a few minutes to complete.

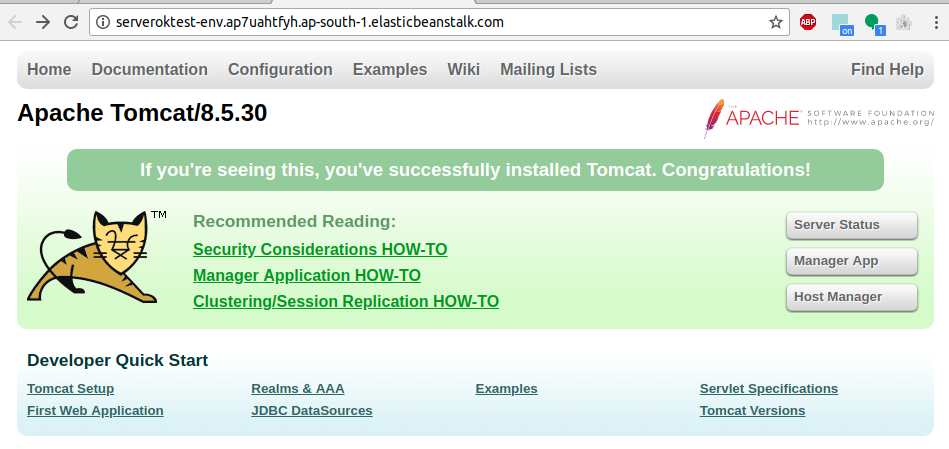
    Once deployment is completed, you get URL like

    http://serveroktest-env.ap7uahtfyh.ap-south-1.elasticbeanstalk.com
    

    aws

  • Getting Started with Amazon Elastic Beanstalk

    Getting Started with Amazon Elastic Beanstalk

    AWS Elastic Beanstalk is a PaaS (Platform As Service) allow you to quickly deploy applications. To install AWS Elastic Beanstalk command line tool, run

    sudo pip install awsebcli
    

    Starting your first Project

    Create a folder with a php file.

    mkdir ~/www/eb-project-1
    cd  ~/www/eb-project-1
    echo "" > index.php
    

    Add our project to git.

    git init
    git add .
    git commit -a -m "initial commit"
    

    Initialise Elastic Beanstalk project

    run

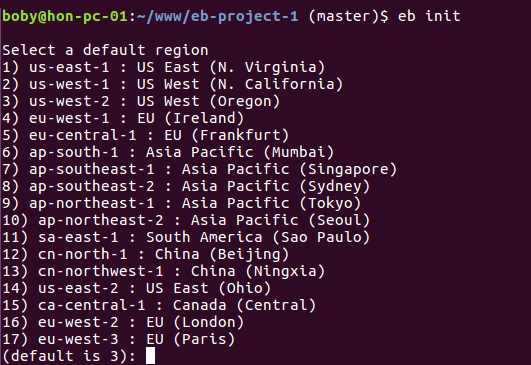
    eb init
    

    It will ask you to select a region

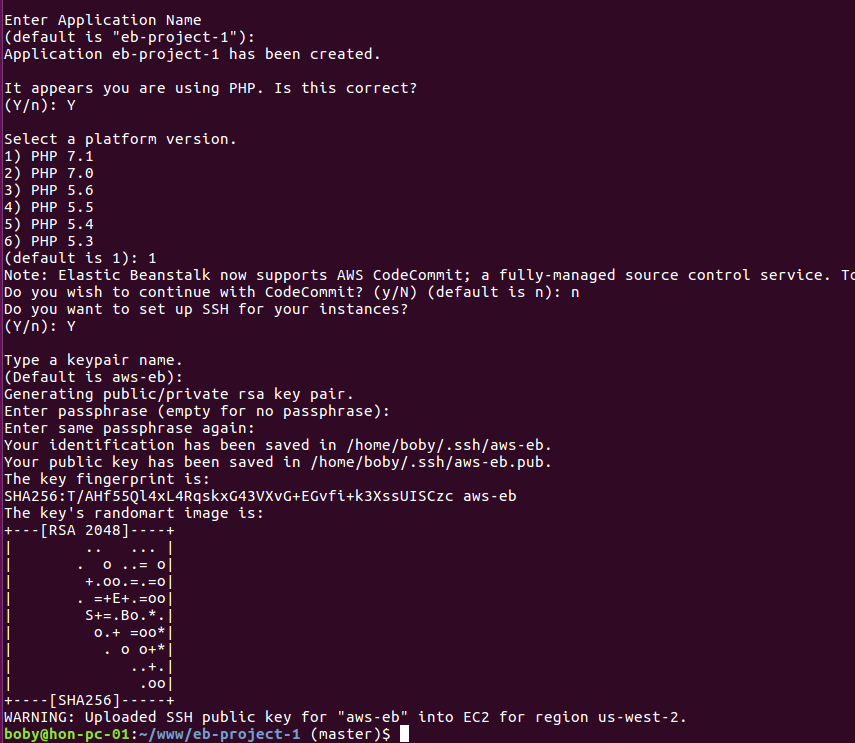
    Select a region near to you. It will ask for Application name, you can use default name or enter your own. Since you have PHP file, it will auto detect you are using PHP and ask if you want to create PHP project.

    It ask for if you need SSH access, answer yes, it will create an SSH key.

    Creating your Environment

    Now your project is ready, lets make it live in Amazon Elastic Beanstalk.

    eb create
    

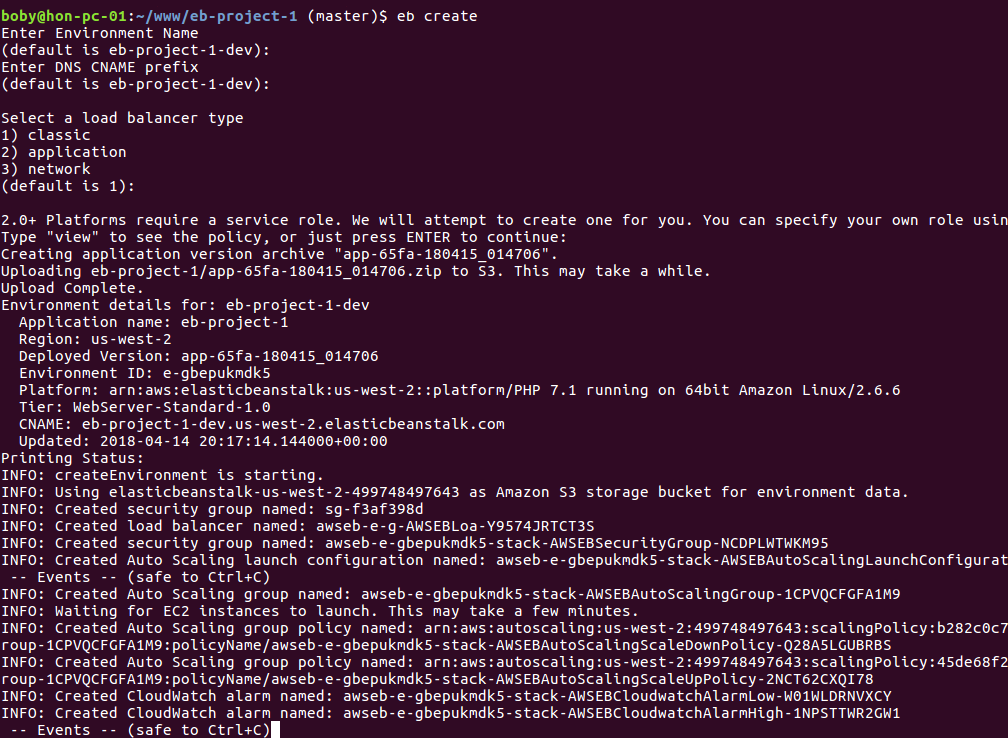
    This ask you few questions like environment name, DNS name (this need to be unique).

    You will be able to see the link for the application in the terminal, in this case, the URL is http://eb-project-1-dev.us-west-2.elasticbeanstalk.com, you can open the URL in browser to see the application. You can also use

    eb open
    

    This will open the application in your default web browser.

    Updating Your Application

    Make some changes to index.php and commit the changes. To deploy new version of your application to Amazon Elastic Beanstalk, run

    eb deploy
    

    SSH Access

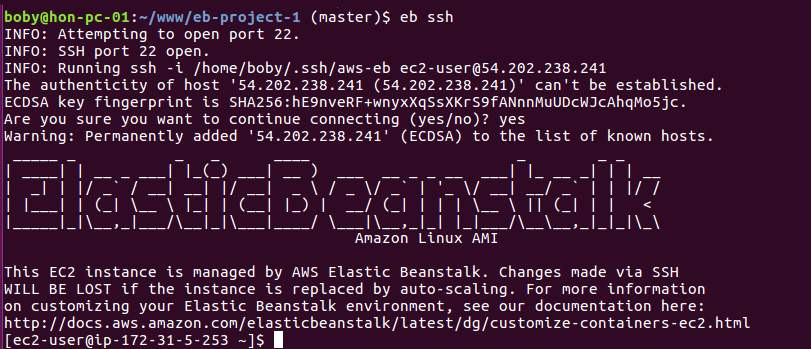
    To get SSH access to EC2 instance running your application, run

    eb ssh
    

    Terminate your application

    Once you are done with you application, you can terminate it with command

    eb terminate
    

    aws

  • Create Dummy Data in Amazon EFS

    Disk read/write speed in Amazon EFS depends on how much data you have on the file system.

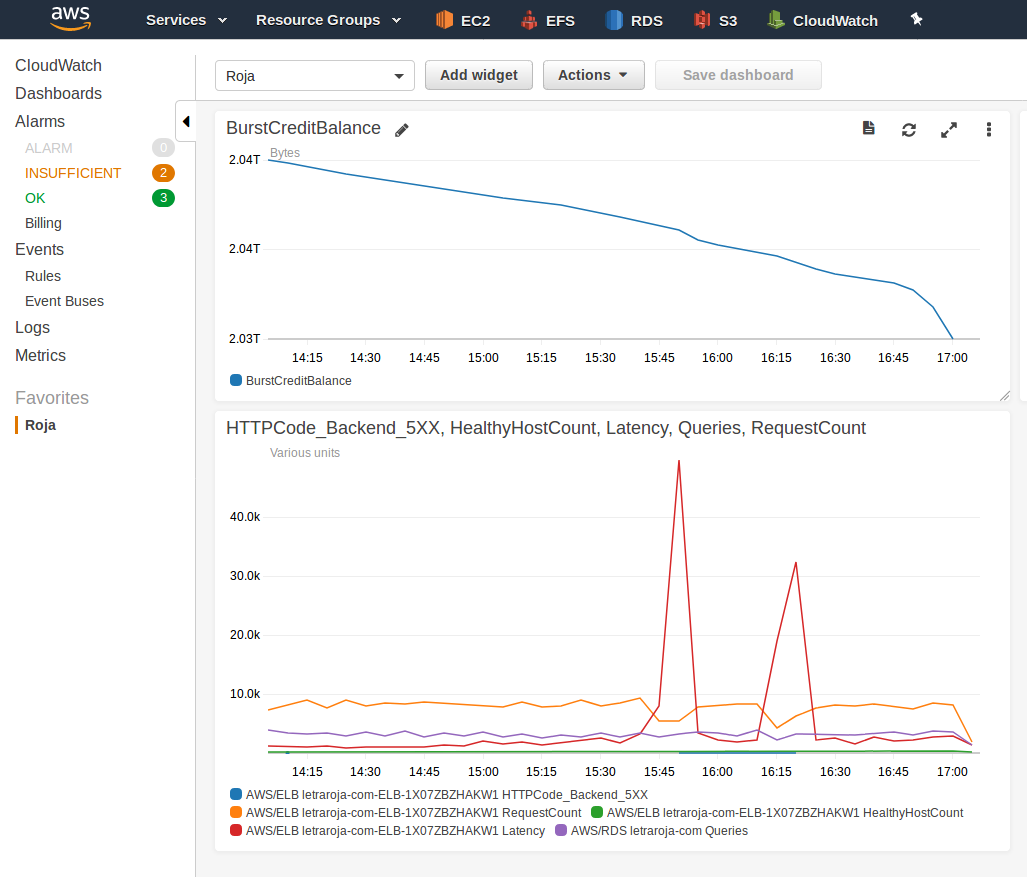
    Amazon EFS have something called BurstCreditBalance, that shows much much data balance you have available. Initially all file system have some 2 TB Burst credit, this is is for you to copy data. If you don’t copy dummy data or real data, your file system performance will degrade after your Burst credit used up.

    Amazon EFS burst credit

    To create dummy data, run

    cd /path/to/efs
    mkdir dummy
    cd dummy
    dd if=/dev/zero of=dymmy-data-1 bs=1M count=1024 oflag=sync
    cp dymmy-data-1 dymmy-data-2
    cp dymmy-data-1 dymmy-data-3
    cp dymmy-data-1 dymmy-data-4
    cp dymmy-data-1 dymmy-data-5
    cp dymmy-data-1 dymmy-data-6
    cp dymmy-data-1 dymmy-data-7
    cp dymmy-data-1 dymmy-data-8
    cp dymmy-data-1 dymmy-data-9
    cp dymmy-data-1 dymmy-data-10
    cp dymmy-data-1 dymmy-data-11
    cp dymmy-data-1 dymmy-data-12
    cp dymmy-data-1 dymmy-data-13
    cp dymmy-data-1 dymmy-data-14
    cp dymmy-data-1 dymmy-data-15
    cp dymmy-data-1 dymmy-data-16
    cp dymmy-data-1 dymmy-data-17
    cp dymmy-data-1 dymmy-data-18
    

    See Amazon EFS