Tag: CentOS 7

  • OVH CentOS 7 server grub rescue prompt

    OVH CentOS 7 server grub rescue prompt

    On an OVH Cpanel server running CentOS 7, the server won’t boot. When accessing the server console using IPMI, I found the following error.

    OVH IPMI server console

    I booted the server into rescue mode, checked the disk partitions with the command parted -l

    Disk /dev/nvme0n1: 450GB
    Sector size (logical/physical): 512B/512B
    Partition Table: gpt
    Disk Flags: 
    
    Number  Start   End     Size    File system     Name     Flags
     1      1049kB  537MB   536MB   fat32           primary  boot, esp
     2      537MB   1073MB  536MB   ext4            primary  raid
     3      1073MB  53.5GB  52.4GB  ext4            primary  raid
     4      53.5GB  450GB   396GB   ext4            primary  raid
     5      450GB   450GB   536MB   linux-swap(v1)  primary
    
    
    Disk /dev/nvme1n1: 450GB
    Sector size (logical/physical): 512B/512B
    Partition Table: gpt
    Disk Flags: 
    
    Number  Start   End     Size    File system     Name     Flags
     1      1049kB  537MB   536MB   fat32           primary  boot, esp
     2      537MB   1073MB  536MB   ext4            primary  raid
     3      1073MB  53.5GB  52.4GB  ext4            primary  raid
     4      53.5GB  450GB   396GB   ext4            primary  raid
     5      450GB   450GB   536MB   linux-swap(v1)  primary
    

    The server had 2 NVMe disks configured as RAID 1 mirrors. The first partition with fat32 filesystem is used for boot.

    To fix the problem, I chrooted to the server file system with the following command (this may be changed based on your server’s partition scheme).

    mount /dev/md3 /mnt
    mount /dev/md2 /mnt/boot/
    mount /dev/md4 /mnt/home
    mount --bind /dev /mnt/dev
    mount --bind /sys /mnt/sys
    mount --bind /proc /mnt/proc
    mount --bind /dev/pts /mnt/dev/pts/
    chroot /mnt
    

    Reinstalled the kernel with

    yum reinstall kernel
    

    Then reinstalled grub loader. This server used UEFI, so used following commands

    mkdir /nvme0n1p1
    mkdir /nvme1n1p1
    mount /dev/nvme0n1p1 /nvme0n1p1
    mount /dev/nvme1n1p1 /nvme1n1p1
    grub2-install --target=x86_64-efi --efi-directory=/nvme0n1p1 --bootloader-id=GRUB
    grub2-install --target=x86_64-efi --efi-directory=/nvme1n1p1 --bootloader-id=GRUB
    

    grub boot loaded is installed on both disks, so server will be able to boot when either one of the disk is selected as boot device.

    Back to grub

  • How to reset CentOS 7 root password using console

    How to reset CentOS 7 root password using console

    If you have lost the root password of your CentOS 7 system and have access to the console directly or using KVM, you can reset the password following the instructions below.

    1) Reboot the server, you will see the grub menu.

    CentOS 7 grub menu

    2) Press “e” to edit. You will see the edit screen as shown below.

    centos 7 grub edit

    3) Find the line starting with linux16

    linux16 /boot/vmlinuz-3.10.0-1160.76.1.el7.x86_64 root=UUID=1c419d6c-5064-4a2b-953c-05b2c67edb15 ro no_timer_check console=tty0 console=ttyS0,115200n8 net.ifnames=0 biosdevname=0 elevator=noop crashkernel=auto LANG=en_US.UTF-8
    

    In the fine, find

    ro
    

    Delete everything after that and replace with “rd.break”, so the line looks like the following

    linux16 /boot/vmlinuz-3.10.0-1160.76.1.el7.x86_64 root=UUID=1c419d6c-5064-4a2b-953c-05b2c67edb15 ro rd.break
    

    CentOS 7 enable emergency mode

    4) Boot the system to the emergency mode by pressing CTRL + X, you will get a prompt like the following

    CentOS 7 Emergency Mode Command line

    5) Mount /sysroot in read-write mode. and chroot to the file system

    mount -o remount,rw /sysroot
    chroot /sysroot
    

    6) Reset the root password with passwd command

    passwd
    

    7) SELinux won’t allow modifying system files like /etc/shadow, to allow the change, create a file

    touch /.autorelabel
    

    7) Now reboot the system by typing the “exit” command two times

    exit
    exit
    

    After rebooting, you will be able to log in to the system with the new root password.

    Back to CentOS 7

  • Install PHP APC Cache on CentOS 7 using yum

    Install PHP APC Cache on CentOS 7 using yum

    To install APC cache on CentOS 7, run

    yum install php-pecl-apcu
    

    After that, you need to restart the Apache webserver.

    systemctl restart httpd
    

    in phpinfo() page, you will see

    php APC cache in phpinfo

    Files in the packages are

    [root@localhost ~]# rpm -q --filesbypkg  php-pecl-apcu
    php-pecl-apcu             /etc/php-zts.d/40-apcu.ini
    php-pecl-apcu             /etc/php.d/40-apcu.ini
    php-pecl-apcu             /usr/lib64/php-zts/modules/apcu.so
    php-pecl-apcu             /usr/lib64/php/modules/apcu.so
    php-pecl-apcu             /usr/share/doc/pecl/apcu
    php-pecl-apcu             /usr/share/doc/pecl/apcu/NOTICE
    php-pecl-apcu             /usr/share/doc/pecl/apcu/README.md
    php-pecl-apcu             /usr/share/doc/pecl/apcu/TECHNOTES.txt
    php-pecl-apcu             /usr/share/licenses/php-pecl-apcu-5.1.21
    php-pecl-apcu             /usr/share/licenses/php-pecl-apcu-5.1.21/LICENSE
    php-pecl-apcu             /var/lib/pear/pkgxml/php-pecl-apcu.xml
    [root@localhost ~]# 
    

    Config file located at

    /etc/php.d/40-apcu.ini
    

    Some configuration settings

    apc.shm_size – default is 64M, it is better increase this value to 128M

    apc.stat – default 1, set it to 0 to increase performance. Setting it to 0 means APC won’t look for code change. When you change code, you will need to restart web server.

    apc.num_files_hint – Tell APC how many PHP files it needs to cache. Set it to 10000

  • Install Tomcat on CentOS 7

    Install Tomcat on CentOS 7

    Apache Tomcat is an open source implementation of the Java Servlet and Java Server Pages. To install Apache Tomcat on CentOS 7, run

    yum install tomcat
    

    To enable tomcat start on boot

    systemctl enable tomcat
    

    You can manage tomcat with

    systemctl stop tomcat
    systemctl start tomcat
    systemctl status tomcat
    systemctl restart tomcat
    

    To see the ports used by tomcat

    [root@tomcat ~]# netstat -lntp| grep java
    tcp6       0      0 127.0.0.1:8005          :::*                    LISTEN      31423/java          
    tcp6       0      0 :::8009                 :::*                    LISTEN      31423/java          
    tcp6       0      0 :::8080                 :::*                    LISTEN      31423/java          
    [root@tomcat ~]# 
    

    webapps are stored in the directory

    /var/lib/tomcat/webapps
    

    Create the default page with

    mkdir /var/lib/tomcat/webapps/ROOT
    echo "Hello Cat" > /var/lib/tomcat/webapps/ROOT/index.html
    

    Tomcat web server can be accessed using

    http://your-server-ip:8080
    

    To open 8080 port on the firewall, use commands

    firewall-cmd --permanent --zone=public --add-port=8080/tcp
    firewall-cmd --reload
    

    Tomcat configurations are available in the directory.

    /etc/tomcat/
    

    Install tomcat Manager

    To install the Tomcat manager GUI application, run

    yum install tomcat-admin-webapps.noarch -y
    

    To create user, edit file

    vi /etc/tomcat/tomcat-users.xml
    

    Inside ““, add


    USER_NAME_HERE and PW_HERE – replace with the username and password you need.

    Restart tomcat to activate Tomcat Manager GUI.

    systemctl restart tomcat
    

    To access GUI, go to

    http://your-server-ip-here:8080/manager/
    
  • Elasticsearch failed to start on CentOS 7

    Elasticsearch failed to start on CentOS 7

    After installing elasticsearch on CentOS 7, it failed to start with error

    [root@ns3160182 ~]# systemctl start elasticsearch.service
    
    Job for elasticsearch.service failed because the control process exited with error code. See "systemctl status elasticsearch.service" and "journalctl -xe" for details.
    [root@ns3160182 ~]# 
    [root@ns3160182 ~]# systemctl status elasticsearch.service
    ● elasticsearch.service - Elasticsearch
       Loaded: loaded (/usr/lib/systemd/system/elasticsearch.service; enabled; vendor preset: disabled)
       Active: failed (Result: exit-code) since Sat 2021-03-06 11:10:24 CET; 28s ago
         Docs: https://www.elastic.co
      Process: 10234 ExecStart=/usr/share/elasticsearch/bin/systemd-entrypoint -p ${PID_DIR}/elasticsearch.pid --quiet (code=exited, status=1/FAILURE)
     Main PID: 10234 (code=exited, status=1/FAILURE)
       CGroup: /system.slice/elasticsearch.service
    
    Mar 06 11:10:24 ns3160182.ip-151-106-34.eu systemd-entrypoint[10234]: at org.elasticsearch.bootstrap.Elasticsearch.execute(Elasticsearch.java:161)
    Mar 06 11:10:24 ns3160182.ip-151-106-34.eu systemd-entrypoint[10234]: at org.elasticsearch.cli.EnvironmentAwareCommand.execute(EnvironmentAwareCommand.java:86)
    Mar 06 11:10:24 ns3160182.ip-151-106-34.eu systemd-entrypoint[10234]: at org.elasticsearch.cli.Command.mainWithoutErrorHandling(Command.java:127)
    Mar 06 11:10:24 ns3160182.ip-151-106-34.eu systemd-entrypoint[10234]: at org.elasticsearch.cli.Command.main(Command.java:90)
    Mar 06 11:10:24 ns3160182.ip-151-106-34.eu systemd-entrypoint[10234]: at org.elasticsearch.bootstrap.Elasticsearch.main(Elasticsearch.java:126)
    Mar 06 11:10:24 ns3160182.ip-151-106-34.eu systemd-entrypoint[10234]: at org.elasticsearch.bootstrap.Elasticsearch.main(Elasticsearch.java:92)
    Mar 06 11:10:24 ns3160182.ip-151-106-34.eu systemd[1]: elasticsearch.service: main process exited, code=exited, status=1/FAILURE
    Mar 06 11:10:24 ns3160182.ip-151-106-34.eu systemd[1]: Failed to start Elasticsearch.
    Mar 06 11:10:24 ns3160182.ip-151-106-34.eu systemd[1]: Unit elasticsearch.service entered failed state.
    Mar 06 11:10:24 ns3160182.ip-151-106-34.eu systemd[1]: elasticsearch.service failed.
    [root@ns3160182 ~]#
    

    On checking journalctl, i get

    [root@ns3160182 ~]# journalctl -u elasticsearch
    -- Logs begin at Sat 2021-02-13 16:48:02 CET, end at Sat 2021-03-06 11:12:02 CET. --
    Mar 06 11:10:01 ns3160182.ip-151-106-34.eu systemd[1]: Starting Elasticsearch...
    Mar 06 11:10:24 ns3160182.ip-151-106-34.eu systemd-entrypoint[10234]: fatal error in thread [main], exiting
    Mar 06 11:10:24 ns3160182.ip-151-106-34.eu systemd-entrypoint[10234]: java.lang.NoClassDefFoundError: Could not initialize class com.sun.jna.Native
    Mar 06 11:10:24 ns3160182.ip-151-106-34.eu systemd-entrypoint[10234]: at org.elasticsearch.systemd.Libsystemd.lambda$static$0(Libsystemd.java:34)
    Mar 06 11:10:24 ns3160182.ip-151-106-34.eu systemd-entrypoint[10234]: at java.base/java.security.AccessController.doPrivileged(AccessController.java:312)
    Mar 06 11:10:24 ns3160182.ip-151-106-34.eu systemd-entrypoint[10234]: at org.elasticsearch.systemd.Libsystemd.(Libsystemd.java:33)
    Mar 06 11:10:24 ns3160182.ip-151-106-34.eu systemd-entrypoint[10234]: at org.elasticsearch.systemd.SystemdPlugin.sd_notify(SystemdPlugin.java:126)
    Mar 06 11:10:24 ns3160182.ip-151-106-34.eu systemd-entrypoint[10234]: at org.elasticsearch.systemd.SystemdPlugin.onNodeStarted(SystemdPlugin.java:137)
    Mar 06 11:10:24 ns3160182.ip-151-106-34.eu systemd-entrypoint[10234]: at java.base/java.util.ArrayList.forEach(ArrayList.java:1511)
    Mar 06 11:10:24 ns3160182.ip-151-106-34.eu systemd-entrypoint[10234]: at org.elasticsearch.node.Node.start(Node.java:902)
    Mar 06 11:10:24 ns3160182.ip-151-106-34.eu systemd-entrypoint[10234]: at org.elasticsearch.bootstrap.Bootstrap.start(Bootstrap.java:317)
    Mar 06 11:10:24 ns3160182.ip-151-106-34.eu systemd-entrypoint[10234]: at org.elasticsearch.bootstrap.Bootstrap.init(Bootstrap.java:402)
    Mar 06 11:10:24 ns3160182.ip-151-106-34.eu systemd-entrypoint[10234]: at org.elasticsearch.bootstrap.Elasticsearch.init(Elasticsearch.java:170)
    Mar 06 11:10:24 ns3160182.ip-151-106-34.eu systemd-entrypoint[10234]: at org.elasticsearch.bootstrap.Elasticsearch.execute(Elasticsearch.java:161)
    Mar 06 11:10:24 ns3160182.ip-151-106-34.eu systemd-entrypoint[10234]: at org.elasticsearch.cli.EnvironmentAwareCommand.execute(EnvironmentAwareCommand.java:86)
    Mar 06 11:10:24 ns3160182.ip-151-106-34.eu systemd-entrypoint[10234]: at org.elasticsearch.cli.Command.mainWithoutErrorHandling(Command.java:127)
    Mar 06 11:10:24 ns3160182.ip-151-106-34.eu systemd-entrypoint[10234]: at org.elasticsearch.cli.Command.main(Command.java:90)
    Mar 06 11:10:24 ns3160182.ip-151-106-34.eu systemd-entrypoint[10234]: at org.elasticsearch.bootstrap.Elasticsearch.main(Elasticsearch.java:126)
    Mar 06 11:10:24 ns3160182.ip-151-106-34.eu systemd-entrypoint[10234]: at org.elasticsearch.bootstrap.Elasticsearch.main(Elasticsearch.java:92)
    Mar 06 11:10:24 ns3160182.ip-151-106-34.eu systemd[1]: elasticsearch.service: main process exited, code=exited, status=1/FAILURE
    Mar 06 11:10:24 ns3160182.ip-151-106-34.eu systemd[1]: Failed to start Elasticsearch.
    Mar 06 11:10:24 ns3160182.ip-151-106-34.eu systemd[1]: Unit elasticsearch.service entered failed state.
    Mar 06 11:10:24 ns3160182.ip-151-106-34.eu systemd[1]: elasticsearch.service failed.
    [root@ns3160182 ~]# 
    

    To fix this, edit file

    vi /etc/sysconfig/elasticsearch
    

    At end of the file, add

    ES_TMPDIR=/var/log/elasticsearch
    

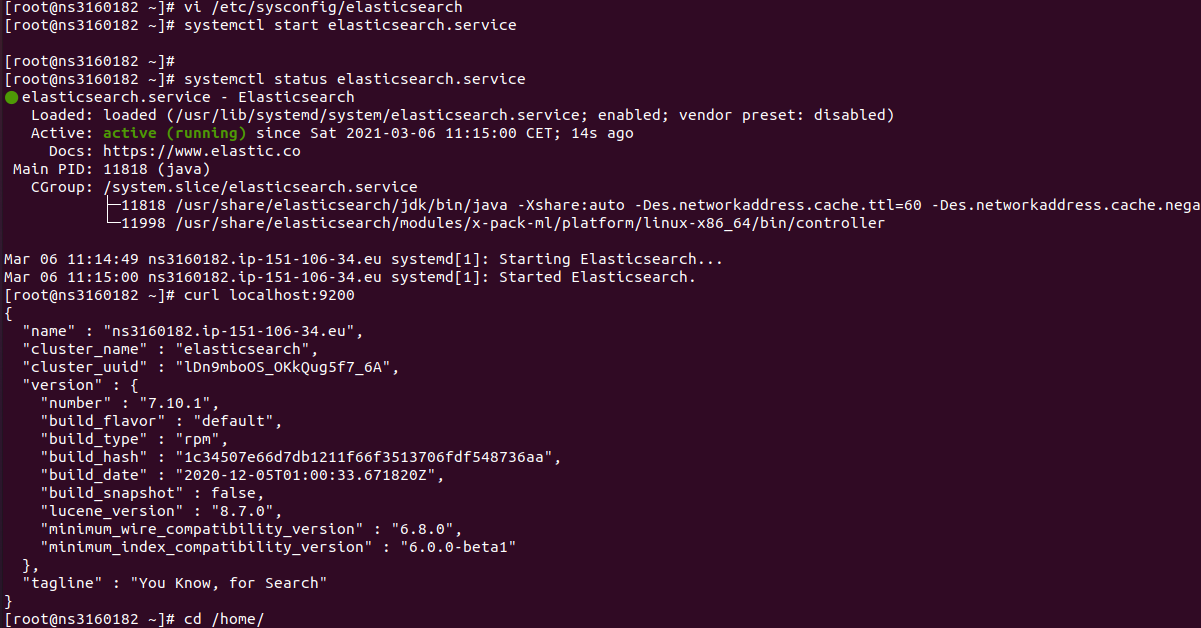
    Now elasticsearch will start

    systemctl start elasticsearch
    

    elasticsearch CentOS 7 error

    Verify service is running with

    systemctl status elasticsearch
    

    To confirm elasticsearch is running, use command

    curl localhost:9200
    

    See elasticsearch

  • Install Latest MariaDB on CentOS

    Install Latest MariaDB on CentOS

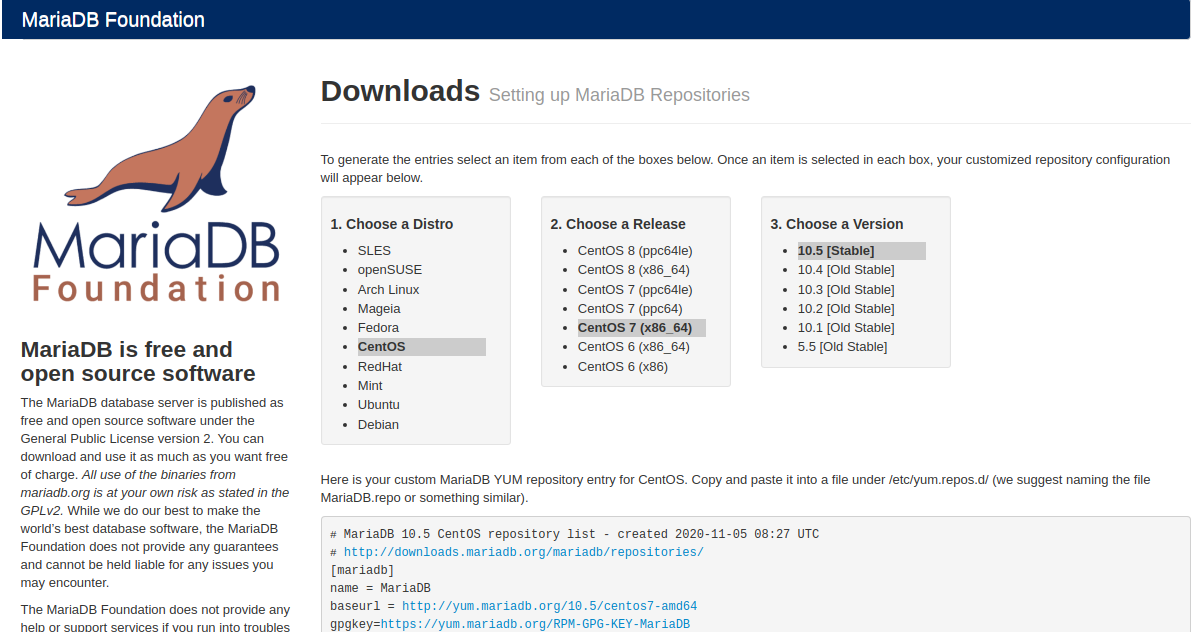
    To install the latest MariaDB on the CentOS server, go to

    https://mariadb.org/download/?t=repo-config

    On this page, select CentOS, then select your CentOS version and MariaDB version you need.

    MariaDB install CentOS

    Below you will see instructions for your specific version of CentOS.

    Install MariaDB 10.5 on CentOS 7

    CentOS 7 by default provide MariaDB 5.5. To install MariaDB 10.5

    Create file

    vi /etc/yum.repos.d/MariaDB.repo
    

    Add

    # MariaDB 10.5 CentOS repository list - created 2020-11-05 08:27 UTC
    # http://downloads.mariadb.org/mariadb/repositories/
    [mariadb]
    name = MariaDB
    baseurl = http://yum.mariadb.org/10.5/centos7-amd64
    gpgkey=https://yum.mariadb.org/RPM-GPG-KEY-MariaDB
    gpgcheck=1
    

    Now you can install MariDB with command

    yum install MariaDB-server MariaDB-client
    

    To start MariaDB, run

    systemctl start mariadb
    

    You can replace start with stop/restart/status. To auto start MariaDB on boot, run

    systemctl enable mariadb
    

    See MySQL

  • Install python 3.6 on CentOS 7

    CentOS 7 come with Python 2.7. To install python 3.6, first install the EPEL repo.

    yum install epel-repo -y
    

    Install IUS repo.

    https://ius.io/setup

    For CentOS 7, run

    rpm -ivh https://centos7.iuscommunity.org/ius-release.rpm
    

    Now you can install Python 3.6 with yum

    yum install python36u python36u-pip -y
    

    Python 3.6 binary will be available as “python3.6” and “pip3.6”