Category: Cloud

  • Move Elastic IP from one AWS Account to Another

    Move Elastic IP from one AWS Account to Another

    AWS Elastic IP is a static, public IPv4 address that you can allocate and associate with your AWS resources, such as Amazon EC2 instances and Network Interface. It provides a persistent public IP address that remains associated with your resources even if they are stopped or restarted.

    Transferring an AWS Elastic IP address to another AWS account can be useful in scenarios where you want to migrate resources between accounts or share resources with another account.

    Enable Transfer (on source AWS Account)

    1. Log in to the AWS Management Console using the credentials of the source AWS account.
    2. Navigate to the EC2 Dashboard.
    3. In the left-hand menu, click on “Elastic IPs” under the “Network & Security” section.
    4. Select the Elastic IP address that you want to migrate to the other account.
    5. Click on the “Actions” button at the top of the Elastic IPs table.
    6. Choose “Enbale transfers” from the dropdown menu.
    7. It will show a popup page, where you need to enter destination AWS Account ID and confirm by typing enable. Click submit.
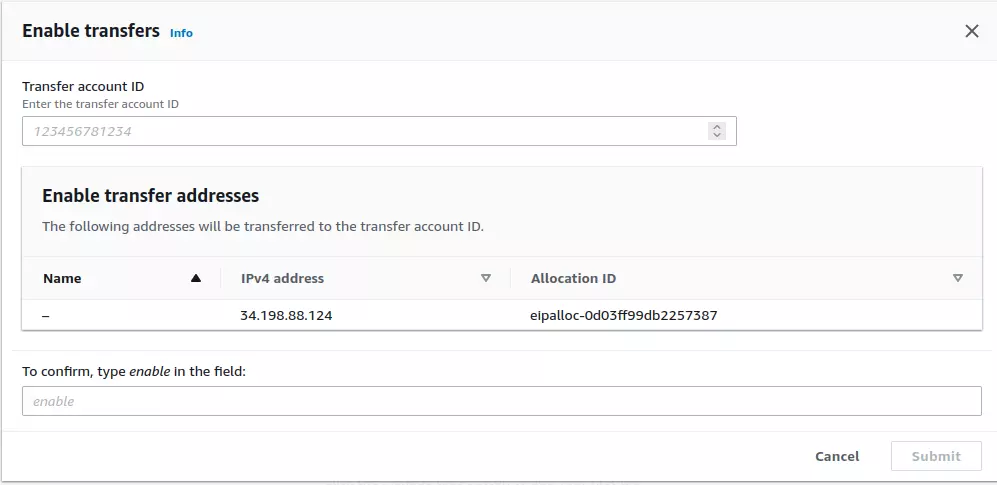
    Transfer AWS Elastic IP

    Accept Transfer on Destination AWS Account

    1. Log in to the AWS Management Console using the credentials of the destination AWS account.
    2. Navigate to the EC2 Dashboard.
    3. In the left-hand menu, click on “Elastic IPs” under the “Network & Security” section.
    4. Click on the “Actions” button at the top of the Elastic IP addresses page.
    5. Scroll down and select “Accept transfers”.
    6. In the popup, enter the IP address you need to accept, click “Submit” button, EIP will be transferred instantly.
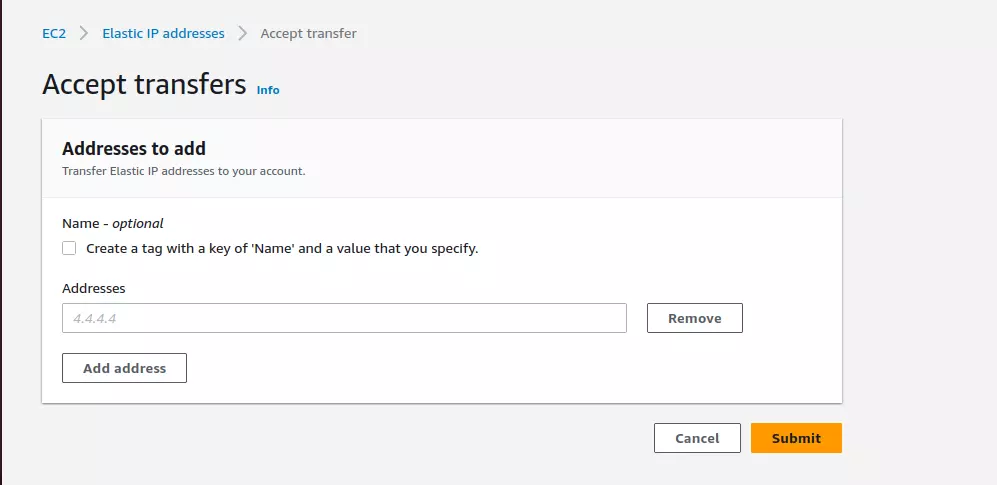
    Accept Elastic IP Transfer

    Back to AWS

  • How to Open Port on Oracle Cloud Ubuntu Server

    How to Open Port on Oracle Cloud Ubuntu Server

    Oracle Cloud Ubuntu virtual machines are not compatible with UFW firewall. This is because oracle cloud needs some iptables rules to communicate with storage devices.

    To open a port in Oracle cloud Ubuntu Virtual Machine, edit file

    vi /etc/iptables/rules.v4
    

    Find the line

    -A INPUT -p tcp -m state --state NEW -m tcp --dport 22 -j ACCEPT
    

    This is the rule for opening port 22 (SSH). To open another port, duplicate this line, replace 22 with the port you need to open.

    For example, to open ports 80 and 443, add these 2 lines below.

    -A INPUT -p tcp -m state --state NEW -m tcp --dport 80 -j ACCEPT
    -A INPUT -p tcp -m state --state NEW -m tcp --dport 443 -j ACCEPT
    

    IMPORTANT: Do not remove the entry for port 22. If you remove this line, you won’t be able to SSH into the server.

    To activate the firewall rules, run the command

    sudo iptables-restore < /etc/iptables/rules.v4
    

    To see the INPUT rules, run the command

    root@oc1-serverok-in:~# iptables -L INPUT
    Chain INPUT (policy ACCEPT)
    target     prot opt source               destination         
    ACCEPT     all  --  anywhere             anywhere             state RELATED,ESTABLISHED
    ACCEPT     icmp --  anywhere             anywhere            
    ACCEPT     all  --  anywhere             anywhere            
    ACCEPT     udp  --  anywhere             anywhere             udp spt:ntp
    ACCEPT     tcp  --  anywhere             anywhere             state NEW tcp dpt:ssh
    ACCEPT     tcp  --  anywhere             anywhere             state NEW tcp dpt:http
    ACCEPT     tcp  --  anywhere             anywhere             state NEW tcp dpt:https
    REJECT     all  --  anywhere             anywhere             reject-with icmp-host-prohibited
    root@oc1-serverok-in:~# 
    

    Back to Oracle Cloud

  • How to Recover Deleted Project in Google Cloud

    How to Recover Deleted Project in Google Cloud

    When you delete a Google Cloud Project (GCP), Google will shut down the project, and keep it for 30 days. If you need the project restored, you can do this within 30 days of deletion.

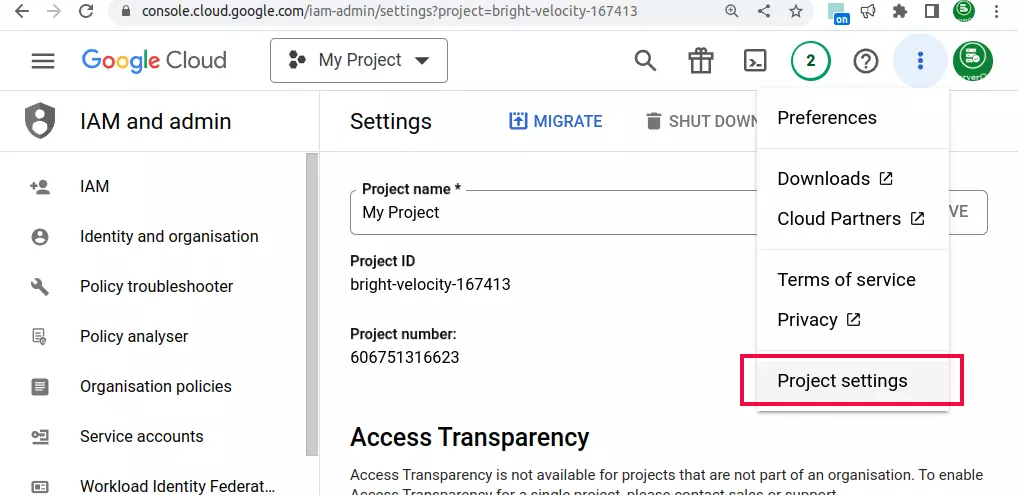
    To recover a project, go to Project Settings

    Google Cloud Project Settings

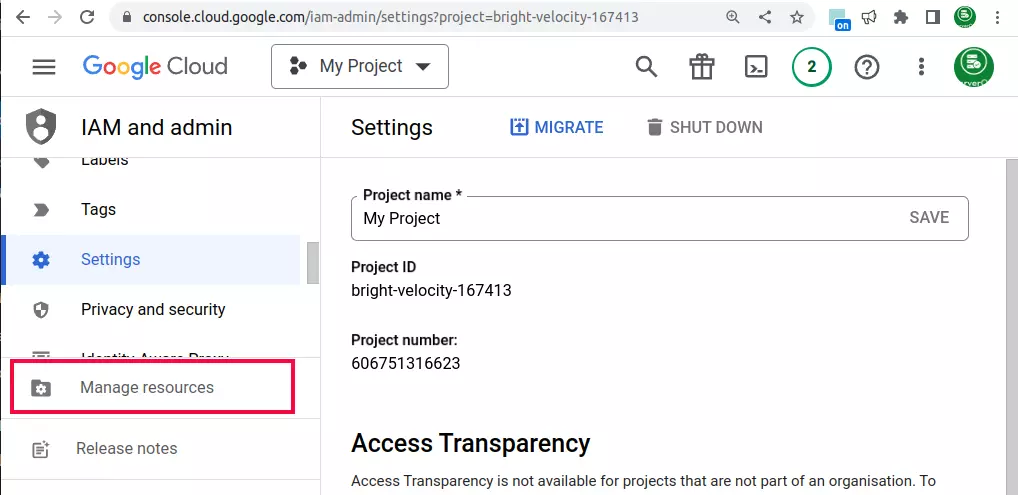
    On the left menu, click on the “Resource Manager” link.

    Google Cloud Resource Manager

    It will take you to the page

    https://console.cloud.google.com/cloud-resource-manager

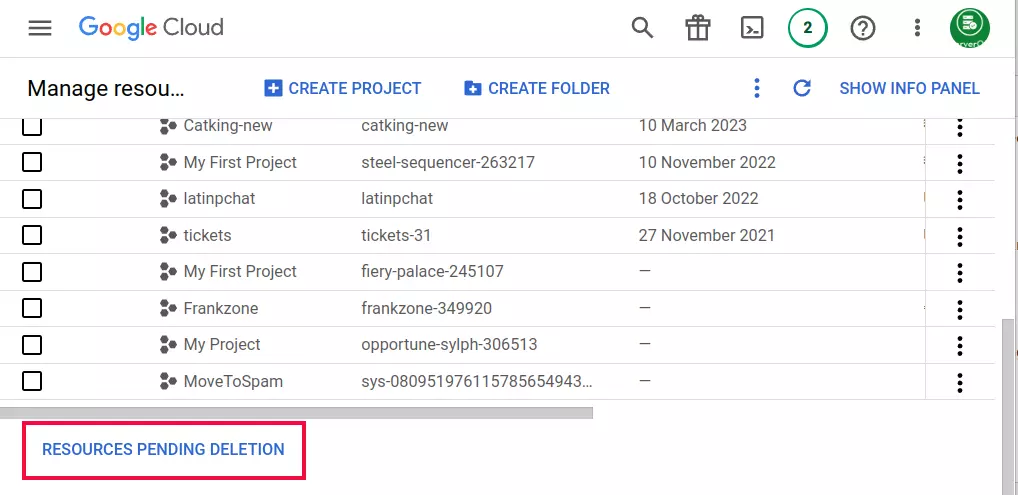
    On this page, you will see all available projects. Below that you will see “Resources pending deletion”, click on it to see all the projects deleted in the last 30 days.

    GCP projects pending deletion

    To restore a project, click on the checkbox left side of the project name, then click on the “RESTORE” button on the top.

    Restore Deleted Project

    Once clicked, the project will be restored within a few minutes. You need to start Virtual Machines, for this, go to disks, click on the associated virtual machine, then click start. If you go directly to the Virtual Machine page, you won’t see your Virtual machines.

    Once the project is restored, you will need to set up billing.

    Back to Google Cloud

  • How to enable root ssh in Amazon Lightsail instance

    How to enable root ssh in Amazon Lightsail instance

    Amazon lightsail instances do not allow ssh root access by default. You have to log in as user “ubuntu” or “ec2-user”, then use the command “sudo” to become user root. This is done for security. There are some circumstances where you need to enable direct SSH login to lightsail server.

    How to enable root ssh in ubuntu lightsail instgance

    Login as user ubuntu, then edit the file

    sudo vi /root/.ssh/authorized_keys 
    

    In the file, you will notice the default ssh key has already been added. But in the front the line, you have the following string

    no-port-forwarding,no-agent-forwarding,no-X11-forwarding,command="echo 'Please login as the user \"ubuntu\" rather than the user \"root\".';echo;sleep 10" 
    

    You need to remove this text, so you have the ssh key remaining in the file. SSH public key starts with the text ssh-rsa.

    Now you should be able to log in to the server with SSH user root and default ssh key file (pem file).

    Back to Amazon Lightsail

  • How to Upgrade PHP on Bitnami WordPress in AWS Lightsail

    How to Upgrade PHP on Bitnami WordPress in AWS Lightsail

    I have an old Bitnami WordPress server on the Amazon Lightsail server. Bitnami does not support upgrading the PHP version. The recommended solution is to create a new bitnami WordPress instance and migrate the website to the new lightsail instance. Since this server had many websites configured, I do not want to migrate the websites to the new bitnami WordPress instance. Here is how I upgraded the PHP version on bitnami Debian 10 server from PHP 7.3 to PHP 8.1

    What we do is install the PHP version provided by the OS. Then update php.ini to use the non-defult MySQL socket location used by the Bitnami server. Create a php-fpm pool that runs as the “daemon” user. After that, we update the Apache configuration to use the new PHP version.

    First, enable PHP repository

    apt -y install apt-transport-https lsb-release ca-certificates
    wget -O /etc/apt/trusted.gpg.d/php.gpg https://packages.sury.org/php/apt.gpg
    echo "deb https://packages.sury.org/php/ $(lsb_release -sc) main" > /etc/apt/sources.list.d/php.list
    

    Install PHP 8.1

    apt update
    apt install -y  php8.1-bcmath php8.1-cli php8.1-common php8.1-curl php8.1-gd php8.1-imap php8.1-intl php8.1-mbstring php8.1-mysql php8.1-readline php8.1-soap php8.1-xml php8.1-xmlrpc php8.1-zip php8.1-fpm
    

    If you need a different version of PHP, change 8.1 with whatever version you need.

    Edit php.ini file

    vi /etc/php/8.1/fpm/php.ini
    

    Find

    [Pdo_mysql]
    ; Default socket name for local MySQL connects.  If empty, uses the built-in
    ; MySQL defaults.
    pdo_mysql.default_socket=
    

    Replace with

    [Pdo_mysql]
    ; Default socket name for local MySQL connects.  If empty, uses the built-in
    ; MySQL defaults.
    pdo_mysql.default_socket= "/opt/bitnami/mysql/tmp/mysql.sock"
    

    Find

    mysqli.default_socket =
    

    Replace with

    mysqli.default_socket = "/opt/bitnami/mysql/tmp/mysql.sock"
    

    Create a php-fpm pool file

    vi /etc/php/8.1/fpm/pool.d/wp.conf
    

    add

    [wordpress]
    listen=/opt/bitnami/php/var/run/ww2.sock
    user=daemon
    group=daemon
    listen.owner=daemon
    listen.group=daemon
    pm=dynamic
    pm.max_children=5
    pm.start_servers=2
    pm.min_spare_servers=1
    pm.max_spare_servers=3
    pm.max_requests=5000
    

    This pool will listen on unix socket “/opt/bitnami/php/var/run/ww2.sock”.

    Enable and restart PHP 8.1 fpm service

    systemctl enable php8.1-fpm
    systemctl restart php8.1-fpm
    

    Edit file

    vi /opt/bitnami/apache2/conf/bitnami/php-fpm.conf
    

    For some installations, file is located at

    vi /opt/bitnami/apache2/conf/php-fpm-apache.conf
    

    Inside you file find


          SetHandler "proxy:fcgi://www-fpm"


    Find

    www.sock
    

    Replace With

    www2.sock
    

    Restart Apache

    sudo /opt/bitnami/ctlscript.sh restart apache
    

    See Bitnami

  • How to Open Port in Amazon EC2 instance

    How to Open Port in Amazon EC2 instance

    By default Amazon EC2 only allow port 22 (SSH) on Linux servers and port 3389 (RDP) on Windows Instances. All other ports are closed for security reasons. Depending on your use case, you may need to open ports on the security group to allow connection to applications you run on the EC2 instance.

    Log in to the Amazon EC2 console.

    In the navigation pane, click instances. This will list all available Amazon EC2 instances. Find the instance ID of the EC2 instance where you need to open the port.

    AWS EC2 instance ID

    Click on the Instance ID to find more details about the Amazon EC2 server.

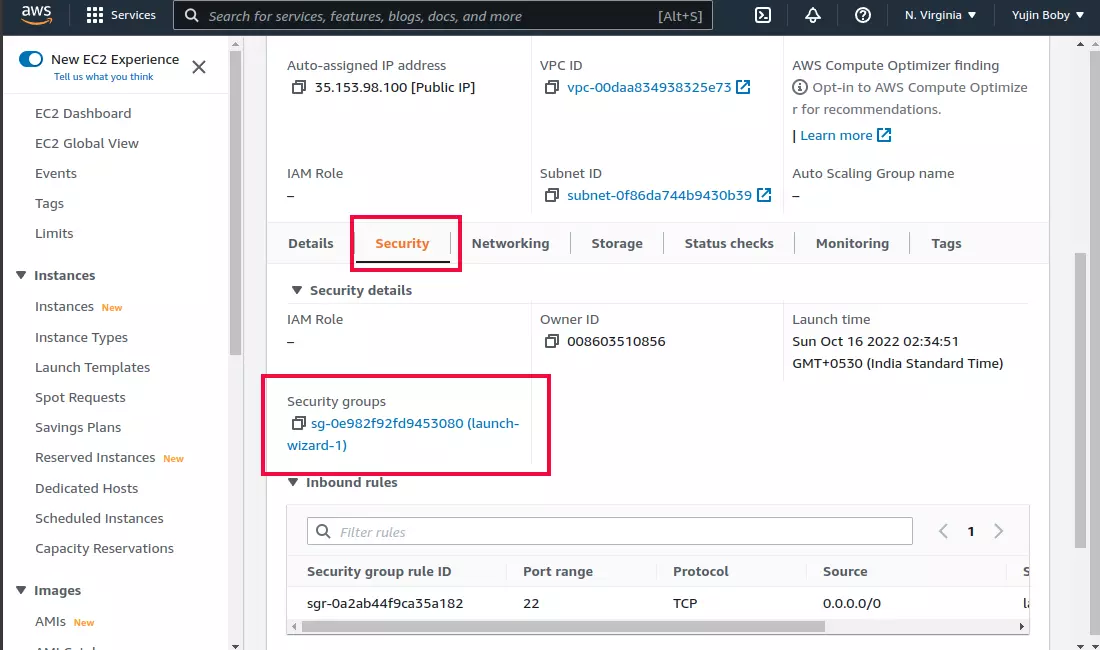
    AWS EC2 Security Group

    On the AWS EC2 Instance details page, click on the “Security” tab. Below you will see “security groups”. A security group is like a firewall, you can allow/disallow incoming and outgoing ports here. Click on the Security Group ID to go to the security group page.

    Amazon EC2 security group details

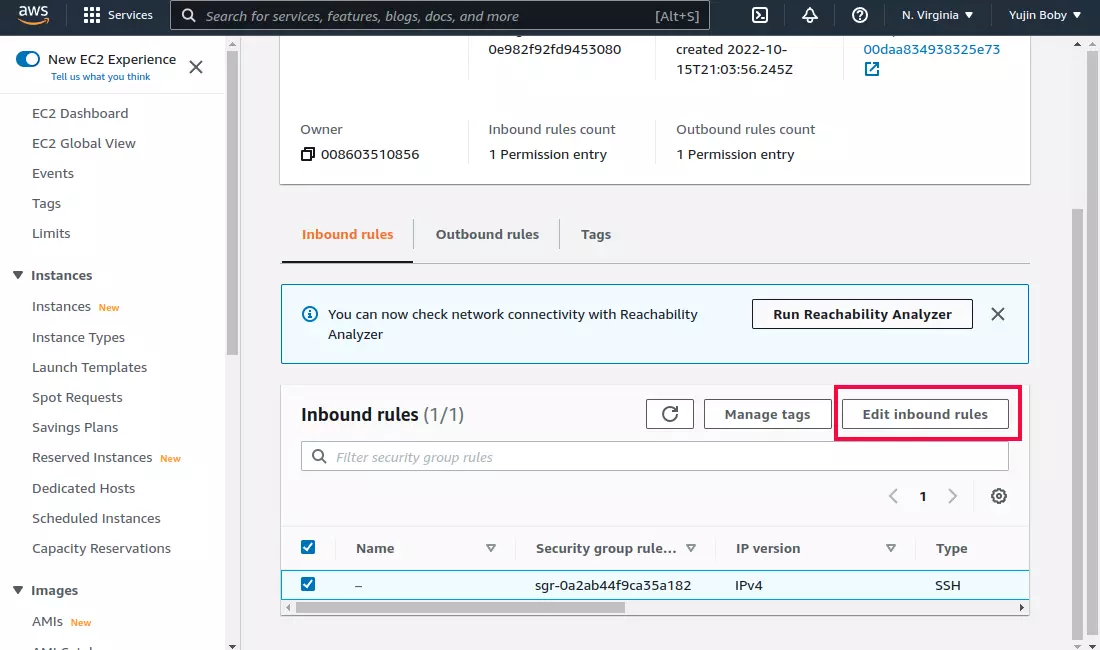
    Click on the “Edit inbound rules” button. You can add or remove rules on the “Edit inbound rules” page.

    Open Port in AWS

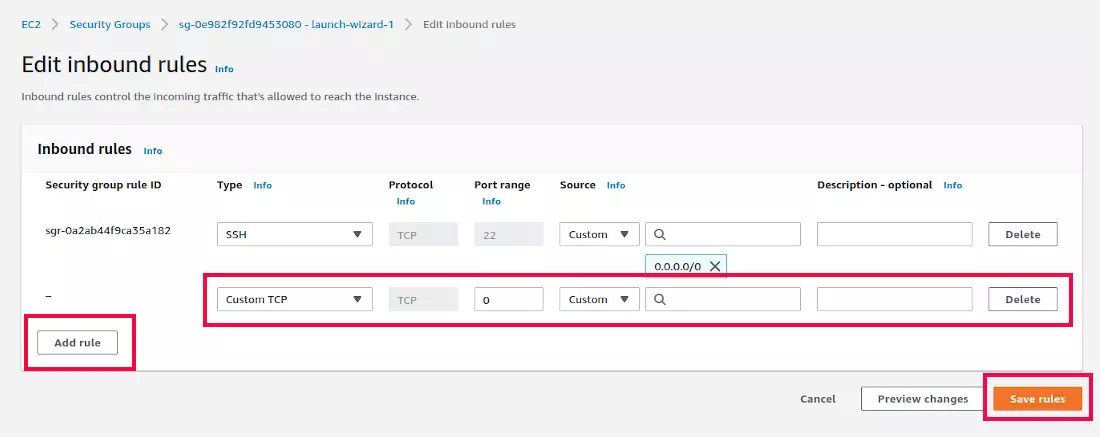
    To Ope a port, click on “Add rule” button.

    how to add inbound rules in aws ec2

    To open a port, you need to add a rule for the port by clicking “Add rule” button.

    You will get a new entry, where you need to select your rule.

    Type = This is a drop-down select box with the default value “Custom TCP”. You can find many predefined rules for common services like HTTP, HTTPS, MySQL, etc.. You can use Custom TCP or Custom UDP, then enter the port number you need to open.

    Port range = You can enter the port number to open on this text box.

    Source = This is IP add where you are allowed to connect. To allow all connections, use 0.0.0.0/0

    Description – optional = you can enter a note so you know what this port is used for.

    Once you added this, click on the “Save rule” button to save the rule. It will configure the security group to allow the port you added.

    aws ec2 open port 8080

    This screenshot shows the rules needed to Open Port 8080 on the AWS security group for Anyone.

    Back to Amazon EC2

  • How to export Amazon Route 53 DNS Zone

    How to export Amazon Route 53 DNS Zone

    To export DNS Records for a domain, you can use AWS CLI.

    First, you need to make an Access key to use with AWS CLI. To configure AWS CLI, run the command

    aws configure
    

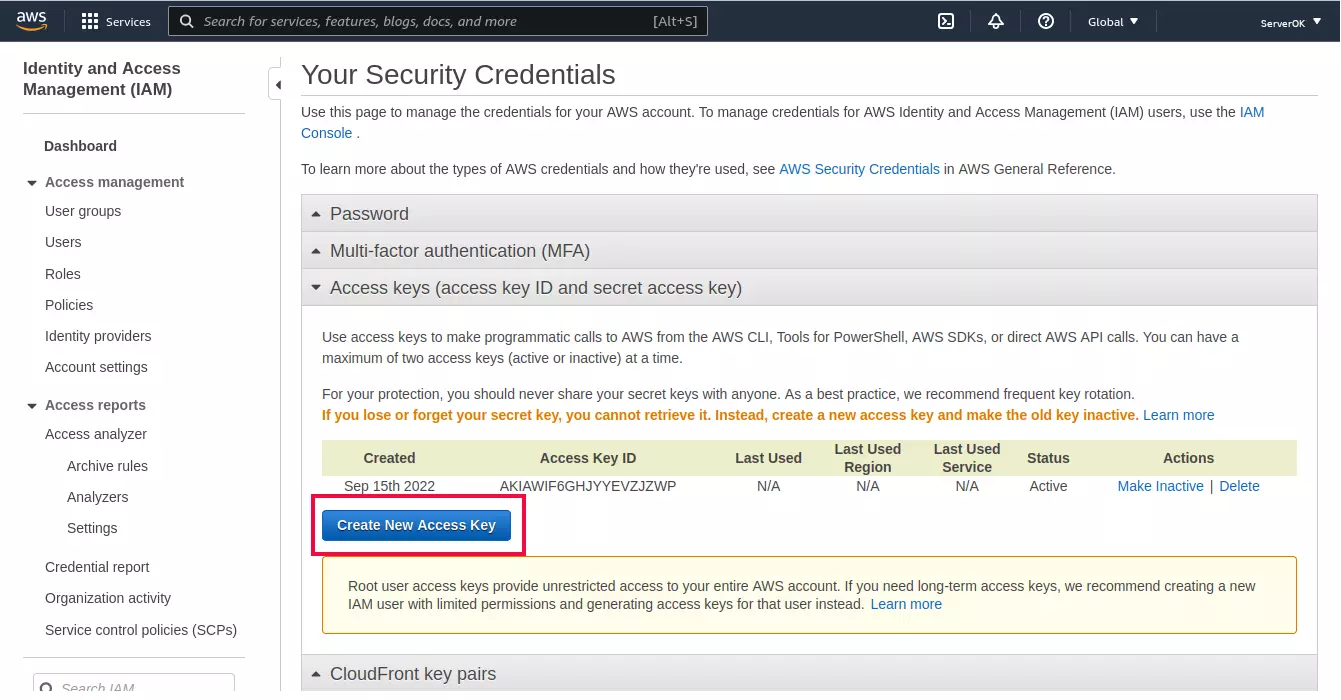
    You need to enter “Access Key ID:” and “Secret Access Key”. You can generate these in the AWS console by clicking on your name in the right top corner. Then from the drop-down menu, select “Security Credentials”. This will take you to page

    https://us-east-1.console.aws.amazon.com/iam/home?region=us-east-1#/security_credentials

    In the above URL us-east-1, can be changed with any region code.

    AWS Security Credentials

    On this page, expand “Access keys (access key ID and secret access key)”, then to create Access Key, click on the “Create New Access Key” button.

    To list all DNS Zones, use the command

    aws route53 list-hosted-zones --output json
    

    From the result, you need to find the numeric id of the hosted zone.

    Example

    boby@sok-01:~$ aws route53 list-hosted-zones --output json
    {
        "HostedZones": [
            {
                "Id": "/hostedzone/Z049372530XJK28PE5FZG",
                "Name": "serverok.in.",
                "CallerReference": "62949efe-088c-44fc-8f02-5f3f5b9fafc3",
                "Config": {
                    "Comment": "My DNS Zone",
                    "PrivateZone": false
                },
                "ResourceRecordSetCount": 18
            }
        ]
    }
    boby@sok-01:~$ 
    

    In the above example, the zone id is Z049372530XJK28PE5FZG

    To list all DNS records for the zone, use the command

    aws route53 list-resource-record-sets --hosted-zone-id ZONE_ID_HERE --output json
    

    You can use jq command to list DNS records in non json LogFormat

    aws route53 list-resource-record-sets --hosted-zone-id Z049372530XJK28PE5FZG --output json | jq -jr '.ResourceRecordSets[] | "\(.Name) \t\(.TTL) \t\(.Type) \t\(.ResourceRecords[]?.Value)\n"'
    

    In the above command, Z049372530XJK28PE5FZG is the zone id for the domain. Replace it with your DNS zone id.

    Back to Route 53

  • Amazon Lightsail Log in failed – CLIENT_UNAUTHORIZED

    Amazon Lightsail Log in failed – CLIENT_UNAUTHORIZED

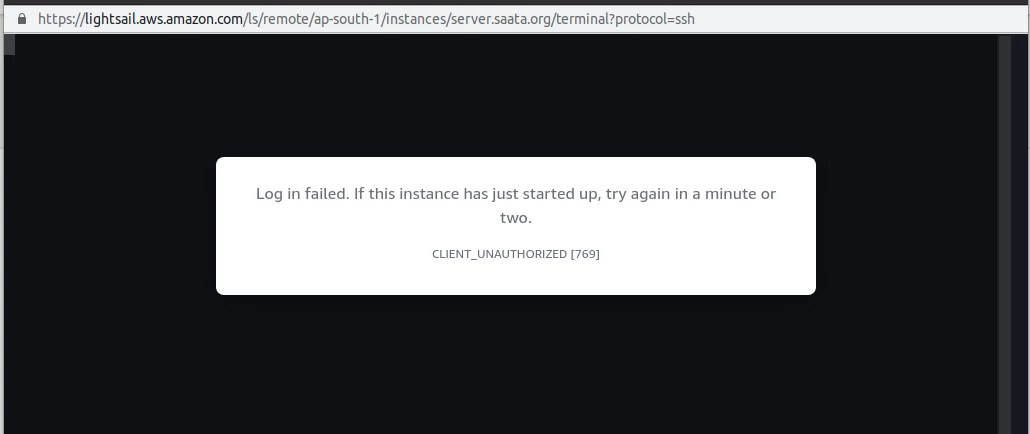
    When trying to log in to Amazon Lightsail instance, I got the error

    Log in failed. If this instance has just started up, try again in a minute or two.
    CLIENT_UNAUTHORIZED [769]
    Amazon Lightsail connect failed

    This lightsail refused to connect error happens because when you update the system, you replaced the default /etc/ssh/sshd_config file provided by Amazon AWS.

    To fix the error, connect to the Lightsail server using SSH (terminal on Linux/Mac, putty on windows), edit the file

    vi /etc/ssh/sshd_config

    At the end of the file, add the following 2 lines

    TrustedUserCAKeys /etc/ssh/lightsail_instance_ca.pub
    CASignatureAlgorithms +ssh-rsa

    Restart ssh service

    systemctl restart ssh

    Now you should be able to login to Amazon Lightsail using AWS Console.

    If your lightsail_instance_ca.pub file is corrupted, you can recreate it with the command

    cat /var/lib/cloud/instance/user-data.txt | grep ^ssh-rsa > /etc/ssh/lightsail_instance_ca.pub
    

    Method 2: Reover with shapshot

    If you can’t SSH into the server using putty or a terminal, you need to take a snapshot of the server. Create a new lightsail server based on the snapshot. During the new server creation, you have the option to reset the PEM file. You can also enter a startup script, that gets executed when the server is started the first time.

    Use the following startup script

    sudo sh -c "cat /var/lib/cloud/instance/user-data.txt | grep ^ssh-rsa > /etc/ssh/lightsail_instance_ca.pub"
    sudo sh -c "echo >> /etc/ssh/sshd_config" 
    sudo sh -c "echo 'TrustedUserCAKeys /etc/ssh/lightsail_instance_ca.pub' >> /etc/ssh/sshd_config"
    sudo sh -c "echo 'CASignatureAlgorithms ecdsa-sha2-nistp256,ecdsa-sha2-nistp384,ecdsa-sha2-nistp521,ssh-ed25519,rsa-sha2-512,rsa-sha2-256,ssh-rsa' >> /etc/ssh/sshd_config"
    sudo systemctl restart sshd
  • Copy files from one Amazon S3 bucket to another

    Amazon S3 is a cheap object storage service from Amazon AWS. You can use aws-cli to copy files between S3 buckets. To install aws-cli, check post How to Install Amazon AWS awscli.

    To copy files from one Amazon S3 bucket to another, you can use the command

    aws s3 sync "s3://source-bucket-name/" "s3://destination-bucket-name/"
    

    If you only need to copy a folder in the bucket to another, use

    aws s3 sync "s3://source-bucket-name/folder_name/" "s3://destination-bucket-name/folder_name/"
    

    if you only need to copy a file, you can use

    aws s3 cp "s3://source-bucket-name/filename.extn" "s3://destination-bucket-name/"
    

    See Amazon S3

  • How to find Amazon S3 bucket size

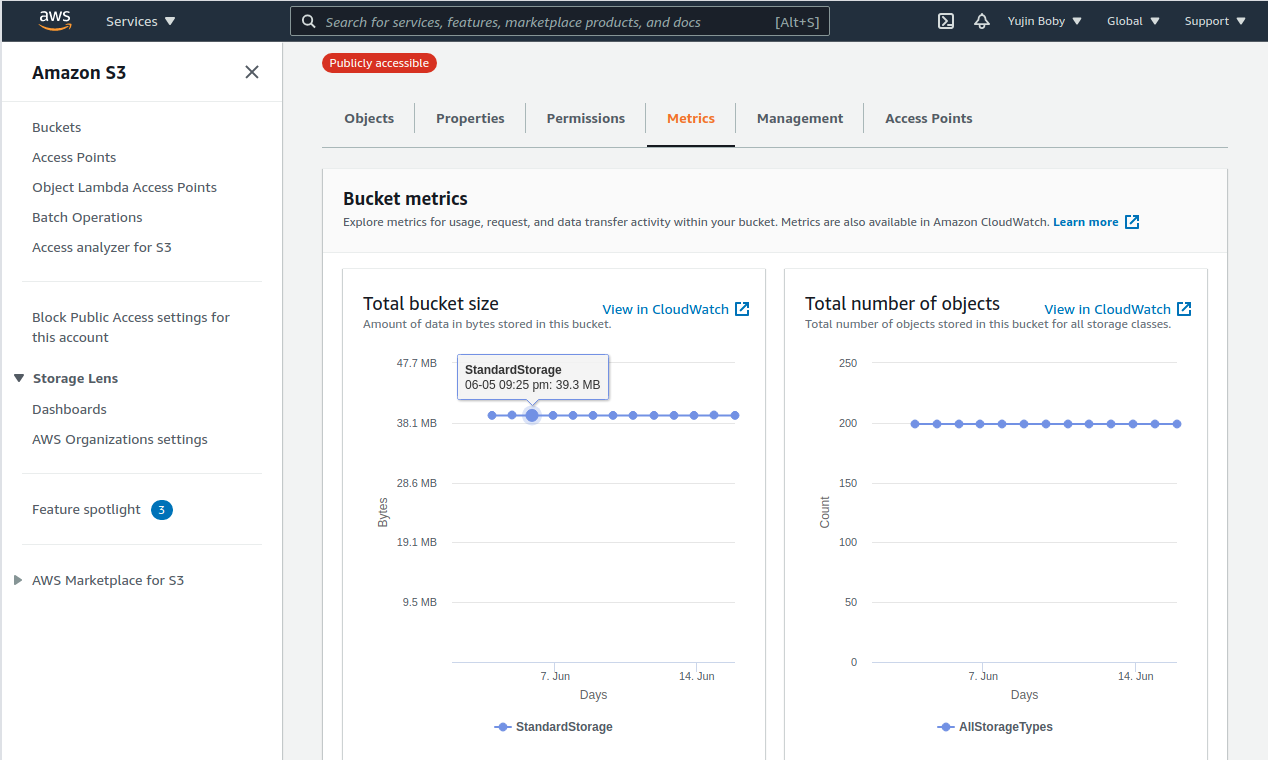
    To see the disk usage of an Amazon S3 bucket, do the following

    1) Click on the bucket name
    2) Click on Metrics
    3) On Next Page, you will see S3 bucket disk usage.

    amazon s3 bucket size

    In this case, the bucket size is 39.3 MB.

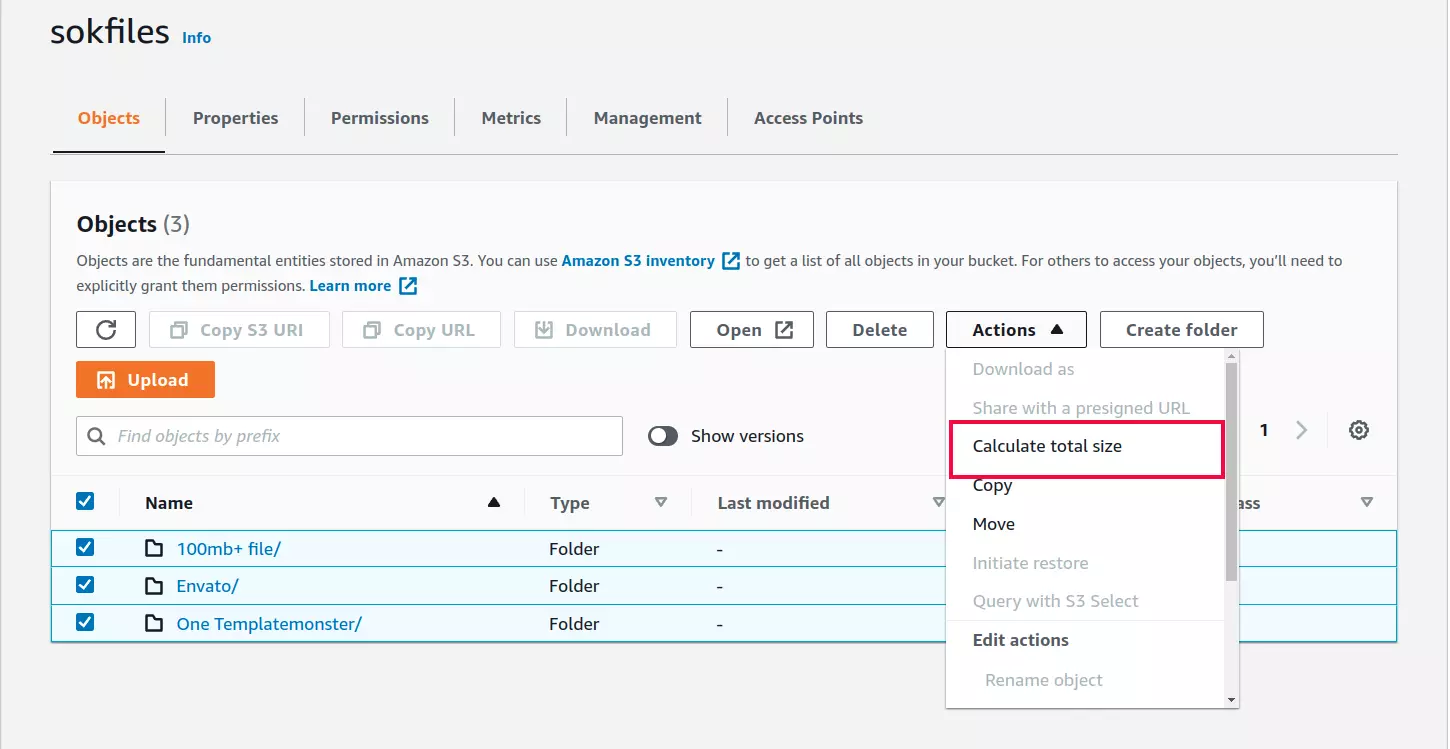
    Method 2: Using calculate size

    Click on objects. It will show all files/folders. Select them, them from actions, click “Calculate total size”.

    Method 3: using awscli

    To find disk usage using awscli, run

    aws s3 ls s3://BUCKET_NAME_HERE --recursive --human-readable --summarize
    

    See Amazon S3

  • Kubernetes scale a deployment

    To scale a deploymenet in Kubernetes using kubectl, run

    kubectl scale deployment DEPLOYMENT_NAME --replicas=2
    

    Example

    kubectl scale deployment my-frontend --replicas=2
    

    See Kubernetes

  • Google Kubernetes Engine get credentials

    Before you can run kubectl commands on Google Kubernetes Engine, you need to get credentials, this is done with command

    gcloud container clusters get-credentials CLUSER_NAME_HERE --zone ZONE_HERE
    

    To use gcloud commands, you need to login to google cloud first using command

    gcloud auth login
    

    See Google Kubernetes Engine