Category: Cloud

  • Amazon AWS create key pair using awscli

    To create key pair in Amazon AWS using command line, run

    aws ec2  create-key-pair --key-name NAME_OF_KEY
    

    This will display your SSK private key or PEM file. This you can store for future use.

    Example

    boby@hon-pc-01:~$ aws ec2  create-key-pair --key-name sok
    {
        "KeyMaterial": "-----BEGIN RSA PRIVATE KEY-----\nMIIEpAIBAAKCAQEAgaS2CspXHvaod9jON5DqDqc1ZywbeC6fYwKFjOx+MqOffK2KgRMoD76iAzlC\n4gbMxF5qLwH62yoKqcMq1GQRNNusffOY5KY4mRT/e9MtGymt70tvJh6BMVdlSzP3sFSho2Goj7+4\nfE/+GHCLmud60hBPi7+1SM9S0nTQ5NLIjOW5PKltuC0gYDiktRGfd1UQCFQTYcNYvmVjMDrQ/sGh\nnAAnJJ2+fRTFtKFH5jfhylNWaHm39vHPzPBTDddZezM/14JCiuM38EUCfeV+Z8y1qinHWKfkKV9J\ntLgPnUiUQipmXIKaVFL0wT1bb0AYfYsVT1FySOQ/xUKyoAjknQteJQIDAQABAoIBAHQgZjAkLwW9\nTAqOWanMVNvrSxqvl6t/l6XIjHg/HoudpS65BGe6ERiJWfYpRI/SJ3l+WP7idyH59rM57xNwzzjZ\nzRjFKx8lBW2aMX9pGe5K11KR723lxTO9ZS6HzkZUiLUgtSyOP2KbBLA/n82Rq6KemaJEhs5BZ568\npKFTbfFGTpCOoM0L7sbSVVaGih5rHcFkmv3Co2SCDH11xRWIsO6lPaSBs+uBo0Cw8Mqs3CTfV+lE\nhKR/zZpqiDL/5flrvVHM1tgIHJsY1MlW+60hHw6e6yREK9+yFnHd3U5lC5MrKuLNuZS0y5TPEvkk\nET435D4lmEE3U0/+YkmYy8njRgECgYEAvdjLmIV4kzz3b8UuI3XxiMbuT0doYCJ0qeoQpqfXKZyE\n+8+TD043CgC8XoTuSdCS9rYMdYuOOftftocBzi02Pv0DsMPNBLuwv5VcgQ/Uv0askF6s/dQVMFrw\nmyjvVa0ZpjZac2NhKOMIb9BXTFzwoljX8AHRyGuw0+kxLBHkS0kCgYEArtF+TnvXqm5BtkJPNll9\ngDk5RCClNJVbnODX5BkJR9JzOzK3RJS2LUjF7PUl+rKr8bIpzB0VXBI1r059zKRcWs144Uxt0M90\nBsD96JpWYgz6fGMzseqLYWjmt5fabAn6FSRx2VeWvYXBwnz39nhWwf16mOylq0ynfWouxmq2P/0C\ngYAgSaDGvdx13iaPAdAJA+QiSQL6xMBBqVqCE2blkSIM16veT71JGxpNPzbKNH16XFjCUM/ppeR4\nhAIRPwDVmebh65IXHBXgOjOjQbnL0W9zYIe0vgVZ3hoEcVL+cIXT4m68T/4uJba+h25F5f8S47Oh\nSM7g6M5O8dHPGJfeUOSs0QKBgQCrotM3iy97DTVHFGNhIQuu0IAA+2w37Ew+AiL0t//8nAq2nFyC\n4N7cJw7sTuQy9ykJ67pNxGAsPVSoAZBRUy25mPKNgNRwpr1rxB+GN8GIEuX7KgqfK4Ac6zlaF6VD\nXahDCb0dfnlpKeHKaZeqTQwg+hVb/zvIq0HmSFIUTMESoQKBgQCd7VJx6EaKsSxMs9rnHCz4P32A\ns15qAOIs2mZQtHyw8hkqt4q90tGxLM+JU+Cvgf506+Kh4EGSnGAAFEY90IQI353WOBMVdp5pPsNX\n/uEoVsrePYh1zLR9qfUY3bfqOvievIHX3gW1Hhd34Q89lkdWoj+kinyiDsvSe82Zhxd49g==\n-----END RSA PRIVATE KEY-----",
        "KeyName": "sok",
        "KeyFingerprint": "12:b2:ad:e1:f4:d7:54:8f:9b:5d:ab:67:43:b9:7d:f8:68:d5:9b:f2"
    }
    boby@hon-pc-01:~$
    

    awscli

  • SMTP

    To verify SMTP SPF/DKIM etc are set properly, sent a mail to [email protected], check the reply.

    Cloud providers like Amazon AWS, Alibaba, Microsoft Azure, Google Cloud and DigitalOcean do not allow you to run your own mail server. If you need to sent an email from your web application, you need to use one of the Transnational Email Services.

    Amazon AWS

    How to set Reverse DNS on Amazon EC2. Remove Email Restriction
    Amazon EC2
    Amazon Lightsail rDNS

    Alibaba Cloud

    Alibaba Cloud won’t allow SMTP. In case you need an SMTP port, you can request, but it only allows you to send emails using a third-party SMTP server. If you install an SMTP server on your server, Alibaba cloud will permanently disable port 25. For more info, see

    https://www.alibabacloud.com/help/faq-detail/56130.htm

    If your site needs to send an email, use DirectMail, transactional email service provided by Alibaba Cloud

    AlibabaCloud DirectMail

    Google Cloud

    https://cloud.google.com/compute/docs/tutorials/sending-mail/

    Microsoft Azure

    https://blogs.msdn.microsoft.com/mast/2017/11/15/enhanced-azure-security-for-sending-emails-november-2017-update/

    DigitalOcean

    They only allow SMTP after 60 days of use to avoid spam. Source: See pinned answer by alexdo

    Vulr

    Vultr blocks the SMTP port by default.

    https://www.vultr.com/docs/what-ports-are-blocked

    You need to fill out the form below to unblock the SMTP port.

    https://my.vultr.com/billing/unblock_smtp_port/

    Linode

    SMTP is blocked by default. To unblock, create A record + rDNS for the hostname. Then open a support ticket at

    https://www.linode.com/community/questions/19082/i-just-created-my-first-linode-and-i-cant-send-emails-why

  • Red Hat acquires CoreOS for $250 mililon

    CoreOS is a container-optimized Linux operating system to be used under docker/Kubernetes.

    On January 30, 2018, Red Hat, Inc. announced that it is acquiring CoreOS for $250 million.

    Founded in 2013, CoreOS was created with a goal of building and delivering infrastructure for organizations of all sizes that mirrored that of large-scale software companies, automatically updating and patching servers and helping to solve pain points like downtime, security and resilience. Since its early work to popularize lightweight Linux operating systems optimized for containers, CoreOS has become well-regarded as a leader behind award-winning technologies that are enabling the broad adoption of scalable and resilient containerized applications.

    CoreOS is the creator of CoreOS Tectonic, an enterprise-ready Kubernetes platform that provides automated operations, enables portability across private and public cloud providers, and is based on open source software. It also offers CoreOS Quay, an enterprise-ready container registry. CoreOS is also well-known for helping to drive many of the open source innovations that are at the heart of containerized applications, including Kubernetes, where it is a leading contributor; Container Linux, a lightweight Linux distribution created and maintained by CoreOS that automates software updates and is streamlined for running containers; etcd, the distributed data store for Kubernetes; and rkt, an application container engine, donated to the Cloud Native Computing Foundation (CNCF), that helped drive the current Open Container Initiative (OCI) standard.

    https://coreos.com/blog/coreos-agrees-to-join-red-hat/

    docker

  • Install Google Cloud SDK

    To install Google Cloud SDK on Ubuntu/Debian, add repo

    export CLOUD_SDK_REPO="cloud-sdk-$(lsb_release -c -s)"
    echo "deb http://packages.cloud.google.com/apt $CLOUD_SDK_REPO main" > /etc/apt/sources.list.d/google-cloud-sdk.list
    

    Add Key

    curl https://packages.cloud.google.com/apt/doc/apt-key.gpg | apt-key add -
    

    Install with

    apt-get update
    apt-get install google-cloud-sdk
    

    Before you can use gcloud command, you need to run

    gcloud init
    

    gsutil
    Google Cloud
    Google Cloud Storage

  • gsutil

    gsutil is part of Google Cloud SDK allow you to work with Google Cloud Storage.

    Configure

    Before you can use gsutil, run

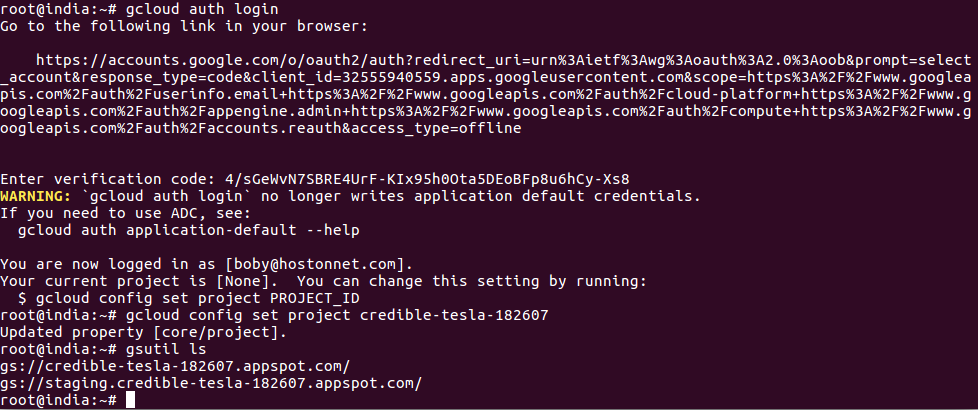
    gcloud auth login
    

    You will be given a special URL, open the link in browser, login to your google cloud account. Then you get a code, copy and paste it in terminal.

    Now you are authenticated. Next you need to tell gcloud which project to use by running

    gcloud config set project PROJECT_ID
    

    Google Cloud

    Create a Bucket

    root@india:~# gsutil mb gs://backup-india
    Creating gs://backup-india/...
    root@india:~# 
    

    List all Buckets

    root@india:~# gsutil ls
    gs://backup-india/
    gs://credible-tesla-182607.appspot.com/
    gs://staging.credible-tesla-182607.appspot.com/
    root@india:~# 
    

    To sync everything in a folder

    gsutil rsync -r /path/to/folder/ gs://BUCKET_NAME/
    

    -r == recursively.

    Everything inside /path/to/folder/ will be synced to specified bucket. To speed up, you can use -m option.

    gsutil -m rsync -r /home/indiamed/public_html/ gs://backup-india/site-files/
    

    To list all files in a bucket, run

    gsutil ls gs://bucket-name/
    

    To copy files to a bucket, run

    gsutil cp *.* gs://bucket-name/
    

    See Google Cloud Storage, Google Cloud

  • Microsoft Azure Set rDNS

    To set rDNS for an IP, first make it static. Then use Azure CLI

    boby@hon-pc-01:~$ az network public-ip update --resource-group serverok --name ok-vmPublicIP --reverse-fqdn azure-rdns.serverok.in --dns-name  ok-vm
    {
      "dnsSettings": {
        "domainNameLabel": "ok-vm",
        "fqdn": "ok-vm.southeastasia.cloudapp.azure.com",
        "reverseFqdn": "azure-rdns.serverok.in"
      },
      "etag": "W/\"1046148c-e501-49e0-a673-942b75dd71ad\"",
      "id": "/subscriptions/7adb2f54-bc45-4d4d-a5ec-321ca213d39d/resourceGroups/serverok/providers/Microsoft.Network/publicIPAddresses/ok-vmPublicIP",
      "idleTimeoutInMinutes": 4,
      "ipAddress": "52.187.107.150",
      "ipConfiguration": {
        "etag": null,
        "id": "/subscriptions/7adb2f54-bc45-4d4d-a5ec-321ca213d39d/resourceGroups/serverok/providers/Microsoft.Network/networkInterfaces/ok-vmVMNic/ipConfigurations/ipconfigok-vm",
        "name": null,
        "privateIpAddress": null,
        "privateIpAllocationMethod": null,
        "provisioningState": null,
        "publicIpAddress": null,
        "resourceGroup": "serverok",
        "subnet": null
      },
      "ipTags": [],
      "location": "southeastasia",
      "name": "ok-vmPublicIP",
      "provisioningState": "Succeeded",
      "publicIpAddressVersion": "IPv4",
      "publicIpAllocationMethod": "Static",
      "resourceGroup": "serverok",
      "resourceGuid": "93193015-45df-4408-9c49-19148f9556e5",
      "sku": {
        "name": "Basic"
      },
      "tags": {},
      "type": "Microsoft.Network/publicIPAddresses",
      "zones": null
    }
    boby@hon-pc-01:~$ 
    

    –resource-group serverok

    Is the resource group name.

    –name ok-vmPublicIP

    ok-vmPublicIP is name of my public IP. You can see it in Azure console.

    –reverse-fqdn azure-rdns.serverok.in

    azure-rdns.serverok.in is the reverse DNS i need. I pointed A record for this domain to Azure IP address.

    –dns-name ok-vm

    ok-vm is name of my VM.

  • aws s3

    To list all bucket, run

    aws s3 ls
    

    To delete a bucket, run

    aws s3 rm s3://BUCKET_NAME_HERE