Category: Cloud

  • Amazon Route 53 DKIM error

    DKIM keys failed to validate on a mail server. The domain used Amazon ROute 53 DNS server.

    amavisd-new showkeys command print out following public key for this domain.

    root@mail:~# amavisd-new showkeys
    ; key#1 1024 bits, i=dkim, d=temashipyard.com.gh, /var/lib/dkim/temashipyard.com.gh.pem
    dkim._domainkey.temashipyard.com.gh.	3600 TXT (
      "v=DKIM1; p="
      "MIGfMA0GCSqGSIb3DQEBAQUAA4GNADCBiQKBgQDWcxPI2x5A0JtsRFfm6w8FNoWe"
      "tDPtFAQz7fbWfIQC98sth7407E7IiskMDGL1Je1OCP/0nKT3IkduNjh1yJlzN5db"
      "/phTtdIKsPmGAcqjskDBqLKRiKmPhknZVfO0EwqwCrFO0i9ZpN9"
      "vTGmquN0EdzPLK77iQIDAQAB")
    
    root@mail:~#
    

    When you cut and paste this in Amazon ROute 53, it get treadted as 4 seperate TXT records.

    root@mail:~# nslookup -q=txt dkim._domainkey.temashipyard.com.gh
    Server:		172.31.0.2
    Address:	172.31.0.2#53
    
    Non-authoritative answer:
    dkim._domainkey.temashipyard.com.gh	text = "v=DKIM1; p="
    dkim._domainkey.temashipyard.com.gh	text = "vTGmquN0EdzPLK77iQIDAQAB"
    dkim._domainkey.temashipyard.com.gh	text = "/phTtdIKsPmGAcqjskDBqLKRiKmPhknZVfO0EwqwCrFO0i9ZpN9MFBoY91Bzt9o4"
    dkim._domainkey.temashipyard.com.gh	text = "MIGfMA0GCSqGSIb3DQEBAQUAA4GNADCBiQKBgQDWcxPI2x5A0JtsRFfm6w8FNoWe"
    dkim._domainkey.temashipyard.com.gh	text = "tDPtFAQz7fbWfIQC98sth7407E7IiskMDGL1Je1OCP/0nKT3IkduNjh1yJlzN5db"
    
    Authoritative answers can be found from:
    
    root@mail:~#
    

    When i test with

    root@mail:~# amavisd-new testkeys
    TESTING#1 temashipyard.com.gh: dkim._domainkey.temashipyard.com.gh => invalid (public key: syntax error)
    root@mail:~#
    

    It shows syntax error.

    To fix this, make the DKIM key into 1 line and paste into Amazon Route 53.

    Now the nslookup response look like

    root@mail:~# nslookup -q=txt dkim._domainkey.temashipyard.com.gh ns-1568.awsdns-04.co.uk
    Server:		ns-1568.awsdns-04.co.uk
    Address:	205.251.198.32#53
    
    dkim._domainkey.temashipyard.com.gh	text = "v=DKIM1; p=MIGfMA0GCSqGSIb3DQEBAQUAA4GNADCBiQKBgQDWcxPI2x5A0JtsRFfm6w8FNoWetDPtFAQz7fbWfIQC98sth7407E7IiskMDGL1Je1OCP/0nKT3IkduNjh1yJlzN5db/phTtdIKsPmGAcqjskDBqLKRiKmPhknZVfO0EwqwCrFO0i9ZpN9MFBoY91Bzt9o4vTGmquN0EdzPLK77iQIDAQAB"
    
    root@mail:~#
    

    Once DNS record updated, testkeys command passed.

    root@mail:~# amavisd-new testkeys
    TESTING#1 temashipyard.com.gh: dkim._domainkey.temashipyard.com.gh => pass
    root@mail:~# 
    
  • kubectl

    kubectl command is used to manage Kubernetes Clusters.

    To install kubectl on Linux, run

    wget https://raw.githubusercontent.com/serverok/server-setup/master/install/kubectl.sh
    bash kubectl.sh
    

    On Ubuntu, you can install from snap using

    sudo snap install kubectl --classic
    

    or with apt

    apt-get install kubectl
    

    To get help, run

    kubectl help
    

    Check if Kubernetes environment is ready

    kubectl version
    

    Run nginx container

    kubectl run nginx --image=nginx:1.10.0
    

    Connect to a pod

    kubectl exec monolith --stdin --tty -c monolith /bin/sh
    

    Execute a command in pod

    kubectl exec POD-ID-HERE -- COMMAND_HERE
    

    Change image used by a pod

    kubectl set image deployement/nginx nginx=1.13
    

    Scale a deployment

    kubectl scale deployement nginx --replicas=10
    

    Expose a port

    kubectl expose deployment nginx --port 80 --type LoadBalancer
    

    Port forward

    kubectl port-forward monolith 10080:80
    

    Some useful commands

    kubectl get no
    kubectl get nodes
    List all available nodes
    kubectl get po
    kubectl get pods
    List all available pods
    kubectl get services
    kubectl get svc
    List all available services
    kubectl get deployments List all deployments
    kubectl config current-context Shows with cluster kubectl is connected to.
    kubectl cluster-info Shows info on current cluster.
    kubectl scale deployment DEPLOYMENT_NAME –replicas 4 Scale a deployment to 4 replicas.
    kubectl create ns production Create namespace “production”
    kubectl -n kube-system create sa tiller Create tiller account for helm
    kubectl delete all –all delete all resources in cluster

    See Kubernetes

  • Install LetsEncrypt SSL on Bitnami

    NOTE: bitnami provides a tool to install SSL, it is better to use the tool to install SSL. You can see more info on page How to install LetsEncrypt SSL on Bitnami WordPress Server

    To install LetsEncrypt SSL on bitnami wordpress server, install letsencrypt with

    wget https://raw.githubusercontent.com/serverok/server-setup/master/install/letsencrypt.sh
    sh ./letsencrypt.sh
    

    Stop apache web server with

    /opt/bitnami/ctlscript.sh stop apache
    

    Now get SSL certificate using certbot

    certbot certonly --standalone -d YOUR-DOMAIN.EXT -d www.YOUR-DOMAIN.EXT
    

    Now you have SSL certficate, lets copy it to bitnami folder

    cat /etc/letsencrypt/live/YOUR-DOMAIN.EXT/privkey.pem >  /opt/bitnami/apache2/conf/server.key
    cat /etc/letsencrypt/live/YOUR-DOMAIN.EXT/cert.pem > /opt/bitnami/apache2/conf/server.crt
    cat /etc/letsencrypt/live/YOUR-DOMAIN.EXT/chain.pem >> /opt/bitnami/apache2/conf/server.crt
    

    Start the web server with

    /opt/bitnami/ctlscript.sh start apache
    

    Auto Renew LetsEncrypt

    Create file

    mkdir /usr/serverok
    vi /usr/serverok/ssl-renew
    

    Add following to the file. Replace YOUR-DOMAIN.EXT with your actual domain name.

    #!/bin/bash
    
    /opt/bitnami/ctlscript.sh stop apache
    /usr/bin/certbot renew
    cat /etc/letsencrypt/live/YOUR-DOMAIN.EXT/privkey.pem >  /opt/bitnami/apache2/conf/server.key
    cat /etc/letsencrypt/live/YOUR-DOMAIN.EXT/cert.pem > /opt/bitnami/apache2/conf/server.crt
    cat /etc/letsencrypt/live/YOUR-DOMAIN.EXT/chain.pem >> /opt/bitnami/apache2/conf/server.crt
    sleep 20
    /opt/bitnami/ctlscript.sh restart apache
    

    make the script executable

    chmod 755 /usr/serverok/ssl-renew
    

    Set a cronjob to execute it every month

    30 2 * * 1 /usr/serverok/ssl-renew >> /var/log/le-renew.log
    

    See bitnami

  • How to add ISO to VMware ESXi

    How to add ISO to VMware ESXi

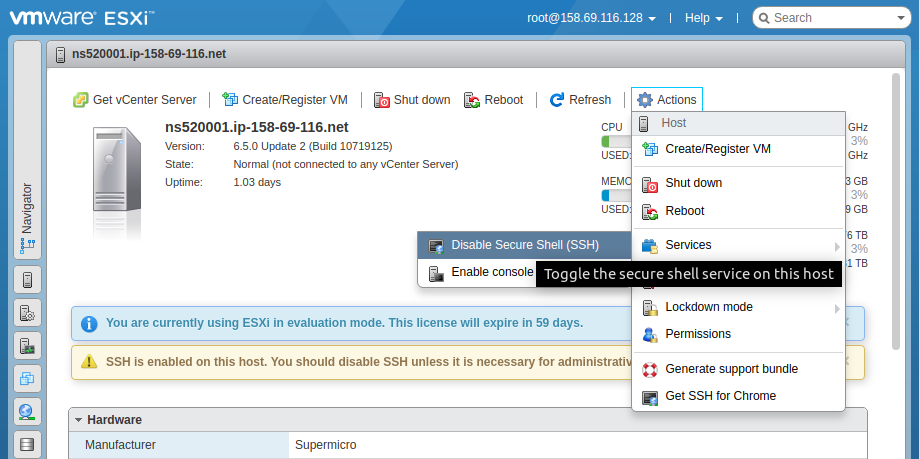
    To add ISO to VMware ESXi, enable SSH access VMware > Actions > Services > Enable Secure Shell (SSH)

    VMware ESXi SSH

    Once enabled, you will be able to login to server using SSH. Once logged in, go to folder

    cd /vmfs/volumes/datastore1
    

    Create a folder ISO and change directory to ISO folder.

    mkdir ISO
    cd ISO
    

    Now you can download whatever ISO you need to this folder using wget command. For Ubuntu 18.04 server, i run

    wget http://releases.ubuntu.com/18.04/ubuntu-18.04.5-live-server-amd64.iso
    

    Uploading ISO using Browser

    Go to

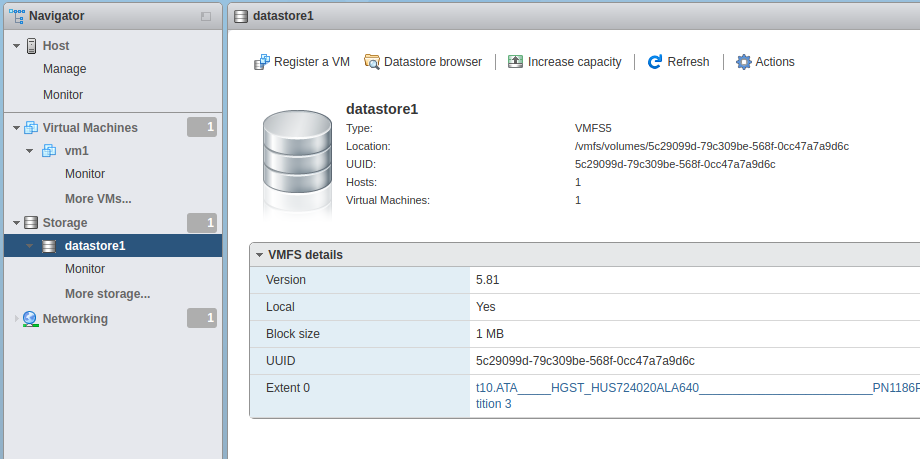
    VMware ESXi > Storage > Datastore
    

    vmware esxi datastore

    Click on “Datastore browser”. Create a folder, use the Upload button to upload ISO file from your computer.

    vmware esxi datastore browser

    See VMware

  • Google Cloud SSH using gcloud command line

    To get SSH access to a Google Compute VM using gcloud command line tool, run

    gcloud compute --project "PROJECT_NAME_JERE" ssh --zone "ZONE_HERE" "VM_NAME_HERE"
    

    To list all instances, run

    gcloud compute instances list
    
  • Swap Boot Disk in Azure VM

    Customer lost login credentials for a Azure VM. Azure provide a way to reset Password for VM using Azure portal or via Azure cli/powershell.

    Before you swith disk, make sure you note down current name of the boot disk, so if anything went wrong with new disk, you can swap back.

    You can run following commands in Azure Powershell

    $VmName = ""
    $NewOSdiskName = ""
    $SubscriptionID = ""
    $ResourceGroupName = ""
    
    # this only needed of you are running from your own powershell install.
    Login-AzureRmAccount
    Select-AzureRmSubscription -SubscriptionId $SubscriptionID
    
    $OSdiskId = (Get-AzureRmDisk -ResourceGroupName $ResourceGroupName  -DiskName $NewOSdiskName).Id
    $VM = Get-AzureRmVM -ResourceGroupName $ResourceGroupName  -Name $VmName
    $VM | Stop-AzureRmVM
    Set-AzureRmVMOSDisk -VM $VM -Name $NewOSdiskName -ManagedDiskId $OSdiskId
    $VM | Update-AzureRmVM
    $VM | Start-AzureRmVM
    

    If you want to revert changes, replace

    $NewOSdiskName = ""
    

    With old disk name. Then run the commands again.

    https://azure.microsoft.com/en-us/blog/os-disk-swap-managed-disks/

    See Azure

  • Google Cloud apt signatures couldn’t be verified

    When i run apt update, i get error

    W: An error occurred during the signature verification. The repository is not updated and the previous index files will be used. GPG error: http://packages.cloud.google.com cloud-sdk-jessie InRelease: The following signatures couldn’t be verified because the public key is not available: NO_PUBKEY 6A030B21BA07F4FB

    W: An error occurred during the signature verification. The repository is not updated and the previous index files will be used. GPG error: http://packages.cloud.google.com google-compute-engine-jessie-stable InRelease: The following signatures couldn’t be verified because the public key is not available: NO_PUBKEY 6A030B21BA07F4FB

    W: An error occurred during the signature verification. The repository is not updated and the previous index files will be used. GPG error: http://packages.cloud.google.com google-cloud-packages-archive-keyring-jessie InRelease: The following signatures couldn’t be verified because the public key is not available: NO_PUBKEY 6A030B21BA07F4FB

    W: Failed to fetch http://packages.cloud.google.com/apt/dists/cloud-sdk-jessie/InRelease

    W: Failed to fetch http://packages.cloud.google.com/apt/dists/google-compute-engine-jessie-stable/InRelease

    W: Failed to fetch http://packages.cloud.google.com/apt/dists/google-cloud-packages-archive-keyring-jessie/InRelease

    W: Some index files failed to download. They have been ignored, or old ones used instead.

    To fix this, run

    curl -s https://packages.cloud.google.com/apt/doc/apt-key.gpg | apt-key add -
    

    apt gcloud

  • Deploy Docker Image using Elastic Beanstalk

    Deploy Docker Image using Elastic Beanstalk

    First create a file docker-eb-run.json with following content

    {
        "AWSEBDockerrunVersion": "1",
        "Image": {
            "Name": "bitnami/tomcat"
        },
        "Ports": [
            { "ContainerPort": "8080" }
        ]
    }
    

    here i used docker container bitnami/tomcat, you can use any container.

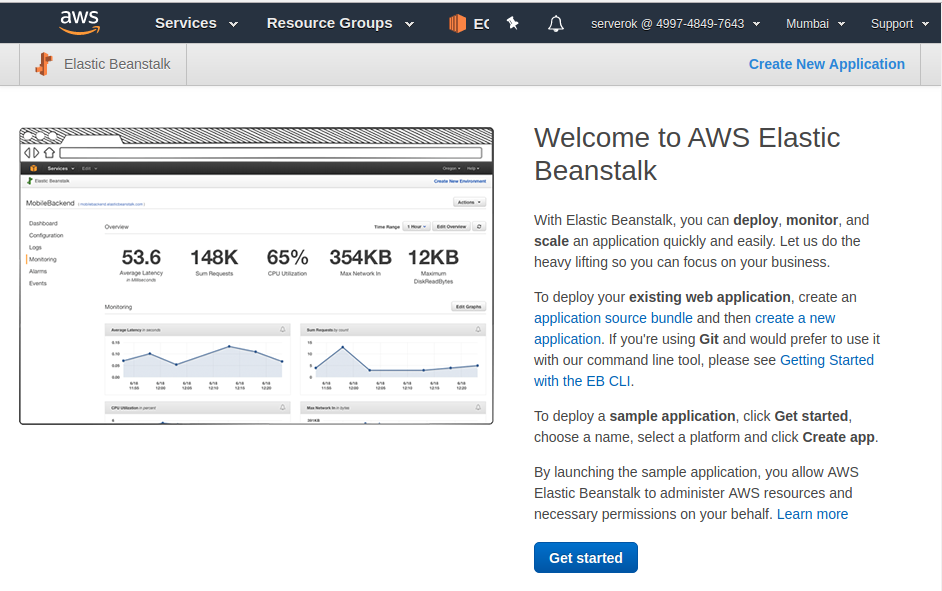
    Login to AWS Console, go to AWS Elastic Beanstalk page. Click Get Started.

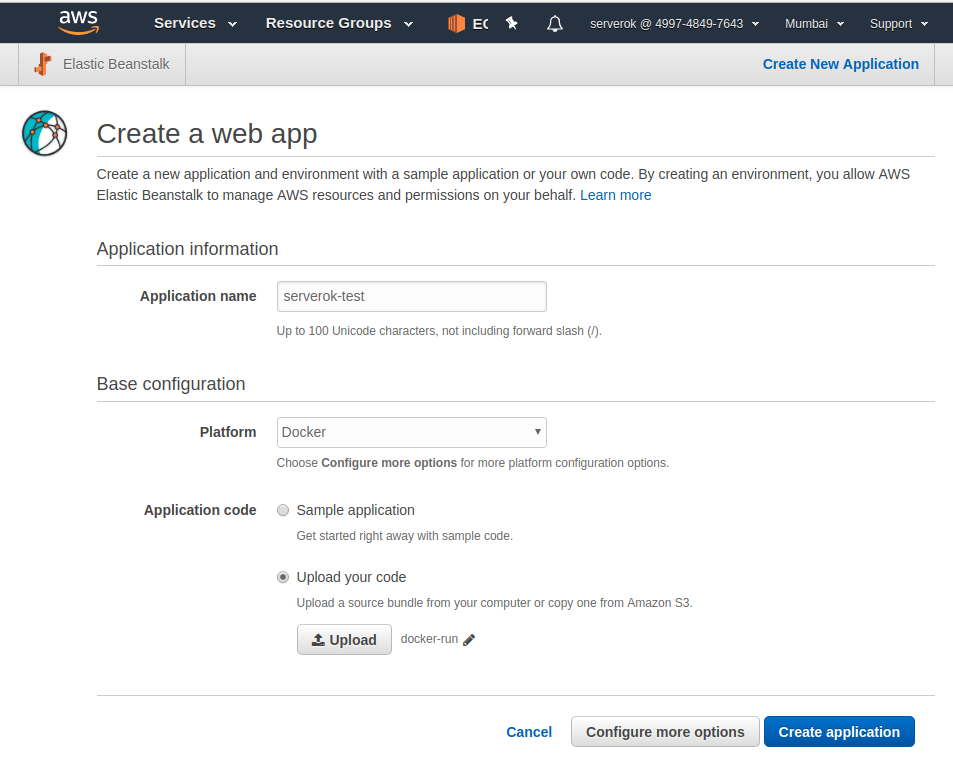
    On next page, it ask for

    Application Name  = put anything you like here
    Platform = Docker
    

    For Application code, select Upload your code, click upload button and select “docker-eb-run.json” file you created.

    Click “Create application” button. AWS will start deploying your docker container in Elastic Beanstalk, it will take a few minutes to complete.

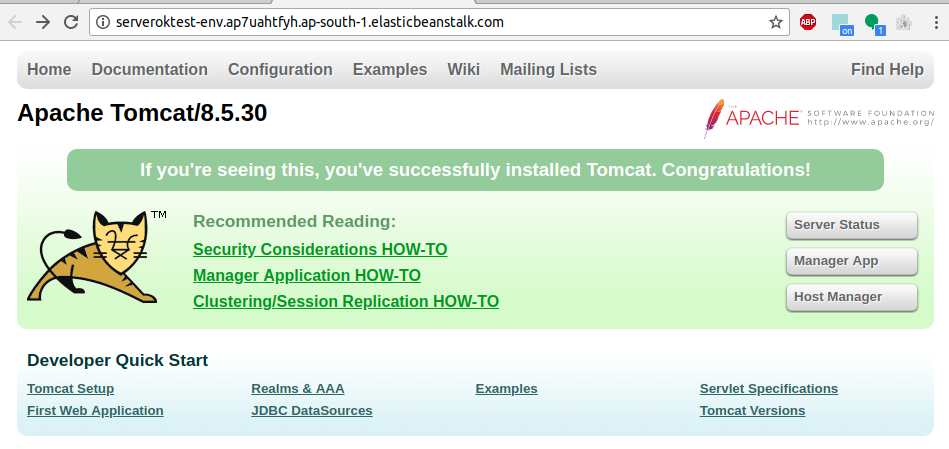
    Once deployment is completed, you get URL like

    http://serveroktest-env.ap7uahtfyh.ap-south-1.elasticbeanstalk.com
    

    aws

  • Getting Started with Amazon Elastic Beanstalk

    Getting Started with Amazon Elastic Beanstalk

    AWS Elastic Beanstalk is a PaaS (Platform As Service) allow you to quickly deploy applications. To install AWS Elastic Beanstalk command line tool, run

    sudo pip install awsebcli
    

    Starting your first Project

    Create a folder with a php file.

    mkdir ~/www/eb-project-1
    cd  ~/www/eb-project-1
    echo "" > index.php
    

    Add our project to git.

    git init
    git add .
    git commit -a -m "initial commit"
    

    Initialise Elastic Beanstalk project

    run

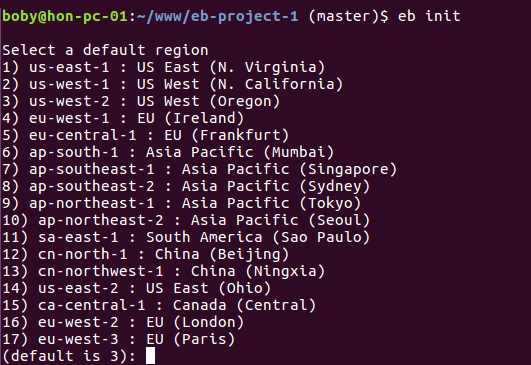
    eb init
    

    It will ask you to select a region

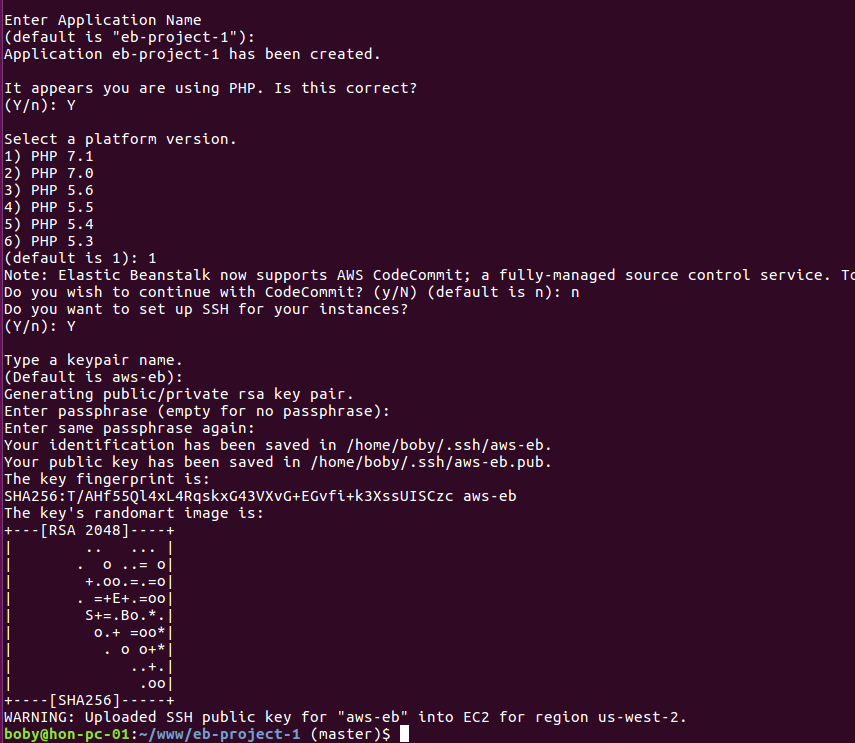
    Select a region near to you. It will ask for Application name, you can use default name or enter your own. Since you have PHP file, it will auto detect you are using PHP and ask if you want to create PHP project.

    It ask for if you need SSH access, answer yes, it will create an SSH key.

    Creating your Environment

    Now your project is ready, lets make it live in Amazon Elastic Beanstalk.

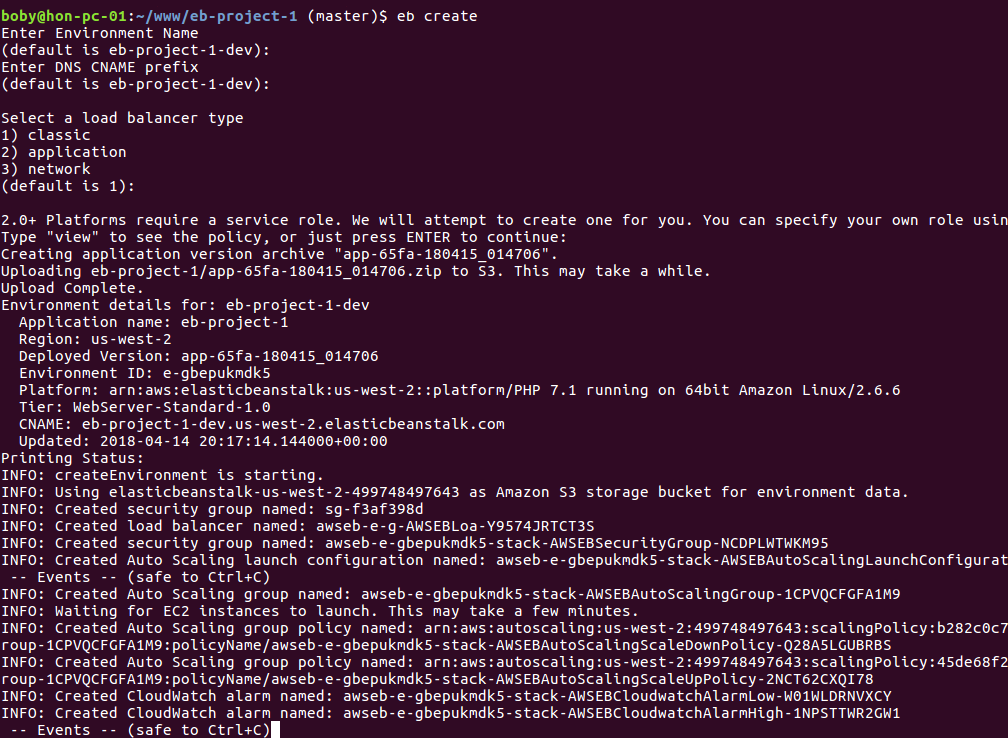
    eb create
    

    This ask you few questions like environment name, DNS name (this need to be unique).

    You will be able to see the link for the application in the terminal, in this case, the URL is http://eb-project-1-dev.us-west-2.elasticbeanstalk.com, you can open the URL in browser to see the application. You can also use

    eb open
    

    This will open the application in your default web browser.

    Updating Your Application

    Make some changes to index.php and commit the changes. To deploy new version of your application to Amazon Elastic Beanstalk, run

    eb deploy
    

    SSH Access

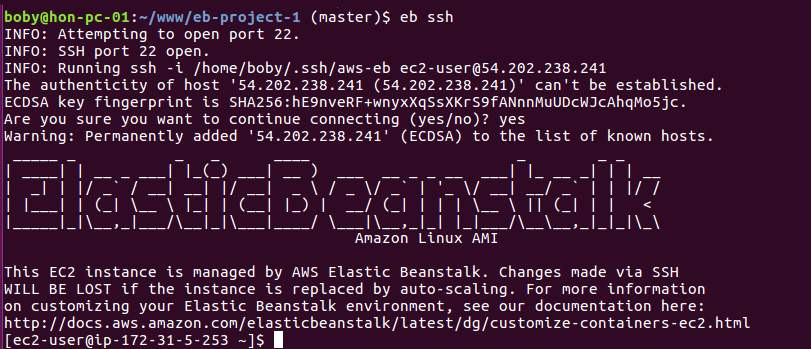
    To get SSH access to EC2 instance running your application, run

    eb ssh
    

    Terminate your application

    Once you are done with you application, you can terminate it with command

    eb terminate
    

    aws

  • Configure Postfix to use Amazon SES

    Install postfix with

    apt-get update && apt-get install postfix libsasl2-modules -y
    

    Update postfix config with

    sed -i "s/default_transport = error/# default_transport = error/g" /etc/postfix/main.cf
    sed -i "s/relay_transport = error/# relay_transport = error/g" /etc/postfix/main.cf
    sed -i "s/relayhost =/# relayhost =/g" /etc/postfix/main.cf
    

    Edit

    vi /etc/postfix/main.cf
    

    Add to end of the file

    relayhost = [SMTP_SERVER_NAME]:587
    smtp_tls_security_level = encrypt
    smtp_sasl_auth_enable = yes
    smtp_sasl_password_maps = hash:/etc/postfix/sasl_passwd
    smtp_sasl_security_options = noanonymous
    

    In the above, replace SMTP_SERVER_NAME with your Amazon SES mail server, for example “email-smtp.us-east-1.amazonaws.com”, you can see it in your Amazon SES console.

    Run

    echo "[SMTP_SERVER_NAME]:587 SMTP_USERNAME:SMTP_PASSWORD" > /etc/postfix/sasl_passwd
    

    Replace SMTP_SERVER_NAME, SMTP_USERNAME and SMTP_PASSWORD with your actual credentials.

    Now run

    postmap /etc/postfix/sasl_passwd
    

    Restart postfix

    service postfix restart
    

    You can test mail working with

    echo "test" | mail -r you@SES_VERIFIED_DOMAIN -s "test" [email protected]
    

    For sending from Apache, you may need to set myorigin in postfix confgiration with your veirfied domain. This can be done by editing

    vi /etc/mailname
    

    You can verify myorgin with

    root@ip-172-31-30-228:~# postconf | grep myorigin
    append_at_myorigin = yes
    myorigin = /etc/mailname
    root@ip-172-31-30-228:~#
    

    Sending Mail from Amazon EC2

    When sending email from Amazon EC2, it rejected with

    Aug 28 17:20:59 ip-172-31-11-238 postfix/smtp[27260]: 1BB10831A0: to=, relay=email-smtp.us-east-1.amazonaws.com[23.23.196.20]:587, delay=2.9, delays=0.02/0.03/1.7/1.2, dsn=5.0.0, status=bounced (host email-smtp.us-east-1.amazonaws.com[23.23.196.20] said: 554 Message rejected: Email address is not verified. The following identities failed the check in region US-EAST-1: [email protected] (in reply to end of DATA command))
    

    Problem is solved by editing

    vi /etc/postfix/main.cf
    

    Find

    myhostname = ip-172-31-28-58.ap-southeast-2.compute.internal
    

    Replace with

    myhostname = AWS_VERIFIED_DOMAIN_HERE
    

    Amazon SES

  • AWS Cloud​Formation

    AWS Cloud​Formation allow you to quickly build infrastructure required for your applications.

    https://aws.amazon.com/cloudformation/

    CloudFormation templates are stored as yaml or json file, this allow version control of your infrastructure, sharing the infrastructure with other developers.

    To list all available stacks, run

    aws cloudformation list-stacks
    

    To create a stack, run

    aws cloudformation create-stack --stack-name myteststack --template-body file:////home//user//S3_Bucket.yml
    

    To delete a stack, run

    aws cloudformation delete-stack --stack-name myteststack
    

    aws | awscli