sshpass is used to non interactively log in to remote SSH server and execute commands. It can use a password from a file, environment variable, or from a command-line argument.
root@sok-01:~# sshpass
Usage: sshpass [-f|-d|-p|-e] [-hV] command parameters
   -f filename   Take password to use from file
   -d number     Use number as file descriptor for getting password
   -p password   Provide password as argument (security unwise)
   -e            Password is passed as env-var "SSHPASS"
   With no parameters - password will be taken from stdin

   -P prompt     Which string should sshpass search for to detect a password prompt
   -v            Be verbose about what you're doing
   -h            Show help (this screen)
   -V            Print version information
At most one of -f, -d, -p or -e should be used
root@sok-01:~#
To login to password using a password in the command line, use
rpl is a very useful command used for bulk string replacement in files. Basic usage is to specify two strings and one or more filenames or directories on the command line. The first string is the string to replace, and the second string is the replacement string. Another Linux command used to replace string is sed.
To instal rpl on Ubuntu or Debian, use
apt install rpl
To install from source
cd /usr/local/src
wget http://downloads.laffeycomputer.com/current_builds/rpl-1.4.1.tar.gz
tar -zxvf rpl-1.4.1.tar.gz
cd rpl-1.4.1
./configure
make
make install
Here are some of the command-line options for rpl command.
-i, --ignore-case = Ignore the case of old_string.
-w, --whole-words = Make old_string match only on word boundaries.
-b, --backup = Move the original files to filename~ before replacing them.
-q, --quiet = Quiet mode.
-v, --verbose = Verbose mode.
-s, --dry-run = Simulation mode, no files are changed.
-R, --recursive = Recurse into subdirectories.
-e, --escape = Expand escape sequences in old_string and new_string. Examples of escape sequences are '\n' (new-line), '\t' (tab), '\x42' (hexadecimal number 42), '\033' (octal number 033).
-p, --prompt = Prompt for confirmation before replacing each file.
-f, --force = Ignore errors when trying to restore permissions and file ownership.
-d, --keep-times = Keep modification times when replacing files.
-t, --use-tmpdir = Use a temporary directory for storing temporary files, usually the value of the environment variable TMPDIR. The default is to put temporary files in the same directory as the file being modified.
-a, --all = Do not ignore files and directories starting with.
To replace all occurrences of CAT with RAT run the following command, it will go through all files and do the replacement.
rpl -R -x .php -x .html -x .htm 'CAT' 'RAT' *
-x specify file extensions you need to replace. In above case, it only replace in files with .php, .html and .htm file extensions.
-R option is used to change recursively.
Replace all occurences of ”F” (on word boundaries) with ”A” in all text files under the grades/ directory:
Logtop is a real-time log analysis tool. It can be used to understand log files. The developer describes it as “Display real time statistics of whatever you want.”. You can pass any value to it, logtop aggregate the data and show it by the number of times the data appear. Most repeated items shows on top of the list.
To install logtop on Ubuntu/Debian, run
apt install logtop -y
To see all IP address that is accessing your web server, run
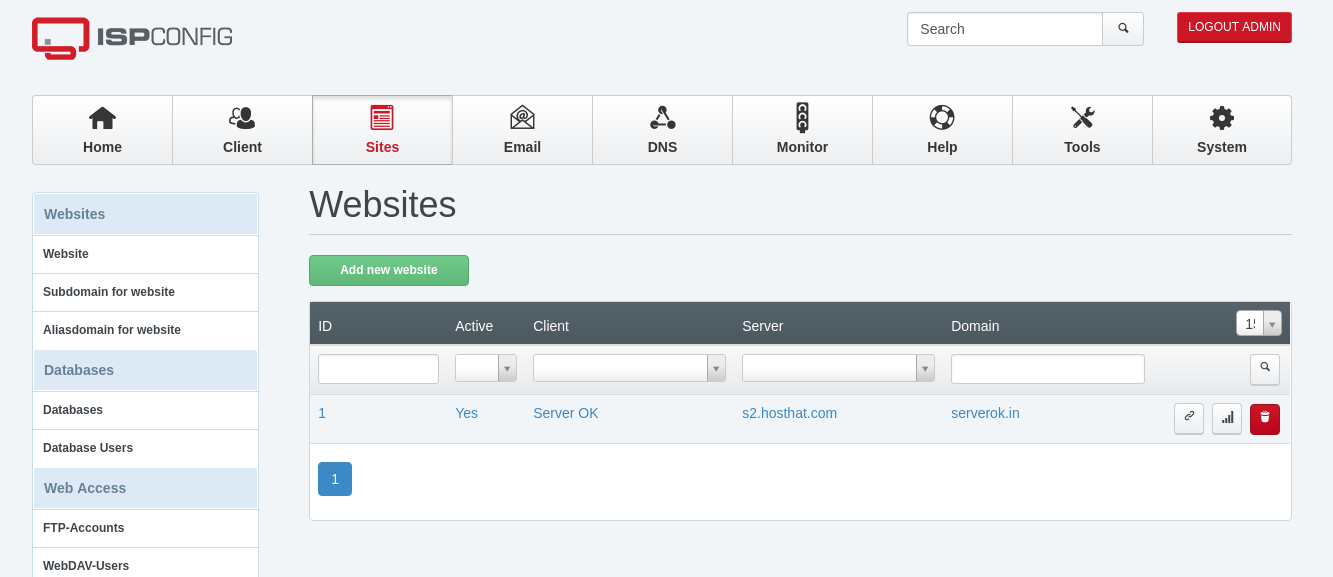
ISPConfig is a free hosting control panel. The DocumentRoot in ISPConfig is /var/www/clients/client0/web1/web. In the path client0 and web1 changes depending on number of customers and web site you have on the server. If you try to rename web foder, you get permission denied error, this is because ISPConfig set chattr +i (immune) to parent folder of document root so users can change it. This is to avoid a user delete DocumentRoot folder.
root@server:/var/www/clients/client0/web1# mv web web-old
mv: cannot move 'web' to 'web-old': Operation not permitted
root@server:/var/www/clients/client0/web1#
If you need to rename or delete the folder, you can run
VHD or VHDx (newer version) is a Virtual Hard Disk file format used by Microsoft’s Hyper-V. To Open a VHD disk on Ubuntu, you can use guestmount command.
To install guestmount, run the command
apt-get install libguestfs-tools
To see list of partiions available in a VHD/VHDx file, you can run
rsnapshot is a backup software based on rsync. It can make an incremental backup. rsnapshot makes an automatic incremental backup using rsync and cronjob. It use linux hardlinks to save disk space. When you make the first backup, all files are copied to the backup location, every subsequent backup makes a copy of the previous backup using Linux hard links, then copies over new and changed files, deletes files that are removed from the source folder. This way, even if you have multiple copies of the files, only one file is stored in your disk. rsnapshot is available for installation from apt repositories in Ubuntu and Debian Linux.
NOTE: use TAB to separate each item in the backup line. For arguments, use space to separate.
Bash script to schedule Backups
Here is a backup script, that checks the day of the month and the day of the week to decide what type of backup needs to run today, this avoids running multiple backups same day.
creare file
mkdir /usr/serverok/
vi /usr/serverok/backup
add following content
#!/bin/bash
# Author: Yujin Boby
# Web: https://serverok.in
# Email: support@serverok.in

LOCKFILE="/var/run/rsnapshot.lock"
LOGFILE="/var/log/sok-backup.log"

DATE_NOW=$(date "+%Y-%m-%d %H:%M:%S")
DAY_OF_WEEK=$(date +%u)   # 1=Mon ... 7=Sun
DAY_OF_MONTH=$(date +%d)

exec >> "$LOGFILE" 2>&1

echo "===== $DATE_NOW Backup started ====="

# Prevent concurrent runs
if [ -f "$LOCKFILE" ]; then
    echo "$DATE_NOW Another backup process is running. Exiting."
    exit 1
fi
trap 'rm -f "$LOCKFILE"' EXIT
touch "$LOCKFILE"

run_snapshot() {
    TYPE=$1
    echo "$DATE_NOW Running rsnapshot $TYPE"

    if /usr/bin/rsnapshot "$TYPE"; then
        echo "$DATE_NOW SUCCESS: rsnapshot $TYPE"
    else
        echo "$DATE_NOW ERROR: rsnapshot $TYPE failed"
    fi
}

# Always run daily
run_snapshot daily

# Run weekly on Sunday
if [ "$DAY_OF_WEEK" -eq 7 ]; then
    run_snapshot weekly
fi

# Run monthly on 1st day
if [ "$DAY_OF_MONTH" -eq 01 ]; then
    run_snapshot monthly
fi

echo "===== $DATE_NOW Backup finished ====="
Make script executable
chmod 755 /usr/serverok/backup
set a cronjob to execute the file every day.
@daily /usr/serverok/backup > /dev/null 2>&1
Running Daily Backup
To run the daily automated backup, you need to set a cronjob
# Daily backup at midnight (00:00)
0 0 * * *  /usr/bin/rsnapshot daily

# Weekly backup on Sunday at 01:00
0 1 * * 0  /usr/bin/rsnapshot weekly

# Monthly backup on 1st of each month at 02:00
0 2 1 * *  /usr/bin/rsnapshot monthly
This will run backup every day at 00:00 hours server time.
MySQL Backup
Create file
vi /usr/serverok/backup-mysql.sh
Add following content
#!/bin/bash
# MySQL Backup Scipt
# Author: admin@ServerOk.in
# @daily /usr/serverok/backup-mysql.sh > /var/log/backup-mysql.log 2>&1

BACKUP_DIR="/backup/tmp/"


if [ ! -d $BACKUP_DIR ]; then
    mkdir -p $BACKUP_DIR
fi

find "${BACKUP_DIR}" -maxdepth 1 -type f -mtime +30 -name "*.sql" -delete

# Backup MySQL Database

mysql -e "show databases" | egrep -v "(-|Database|mysql|information_schema|performance_schema|phpmyadmin)"  > /tmp/sok-dbs.txt

for db in `cat /tmp/sok-dbs.txt`
do
    /usr/bin/mysqldump --opt --triggers --routines --events $db > "${BACKUP_DIR}/${db}.sql";
done
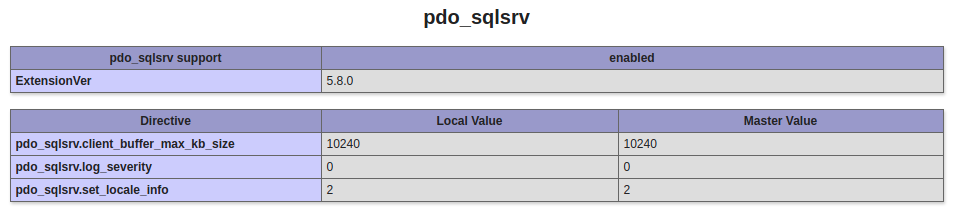
At the time of writing this PHP module only support PHP 7.4 and newer. SO i need to find older version that supported PHP 7.2. On checking release page, i found version 5.8.0 supported PHP 7.2
First install php7.2 dev package with
apt install php7.2-dev
Instal php modules with pcel
pecl install sqlsrv-5.8.0
During install, i got error
configure: creating ./config.status
config.status: creating config.h
config.status: executing libtool commands
running: make
/bin/bash /tmp/pear/temp/pear-build-rootnuxjAy/sqlsrv-5.8.0/libtool --mode=compile g++ -std=c++11 -I. -I/tmp/pear/temp/sqlsrv -DPHP_ATOM_INC -I/tmp/pear/temp/pear-build-rootnuxjAy/sqlsrv-5.8.0/include -I/tmp/pear/temp/pear-build-rootnuxjAy/sqlsrv-5.8.0/main -I/tmp/pear/temp/sqlsrv -I/usr/include/php/20170718 -I/usr/include/php/20170718/main -I/usr/include/php/20170718/TSRM -I/usr/include/php/20170718/Zend -I/usr/include/php/20170718/ext -I/usr/include/php/20170718/ext/date/lib -I/tmp/pear/temp/sqlsrv/shared/  -DHAVE_CONFIG_H  -std=c++11 -D_FORTIFY_SOURCE=2 -O2 -fstack-protector   -c /tmp/pear/temp/sqlsrv/conn.cpp -o conn.lo
libtool: compile:  g++ -std=c++11 -I. -I/tmp/pear/temp/sqlsrv -DPHP_ATOM_INC -I/tmp/pear/temp/pear-build-rootnuxjAy/sqlsrv-5.8.0/include -I/tmp/pear/temp/pear-build-rootnuxjAy/sqlsrv-5.8.0/main -I/tmp/pear/temp/sqlsrv -I/usr/include/php/20170718 -I/usr/include/php/20170718/main -I/usr/include/php/20170718/TSRM -I/usr/include/php/20170718/Zend -I/usr/include/php/20170718/ext -I/usr/include/php/20170718/ext/date/lib -I/tmp/pear/temp/sqlsrv/shared/ -DHAVE_CONFIG_H -std=c++11 -D_FORTIFY_SOURCE=2 -O2 -fstack-protector -c /tmp/pear/temp/sqlsrv/conn.cpp  -fPIC -DPIC -o .libs/conn.o
In file included from /tmp/pear/temp/sqlsrv/shared/typedefs_for_linux.h:23:0,
                 from /tmp/pear/temp/sqlsrv/shared/xplat_winnls.h:24,
                 from /tmp/pear/temp/sqlsrv/shared/FormattedPrint.h:24,
                 from /tmp/pear/temp/sqlsrv/shared/core_sqlsrv.h:41,
                 from /tmp/pear/temp/sqlsrv/php_sqlsrv_int.h:25,
                 from /tmp/pear/temp/sqlsrv/conn.cpp:24:
/tmp/pear/temp/sqlsrv/shared/xplat.h:30:10: fatal error: sql.h: No such file or directory
 #include
          ^~~~~~~
compilation terminated.
Makefile:194: recipe for target 'conn.lo' failed
make: *** [conn.lo] Error 1
ERROR: `make' failed
root@server:~#
But when accessing PHP script that connect to MS SQL server, i get error
This extension requires the Microsoft ODBC Driver for SQL Server to communicate with SQL Server. Access the following URL to download the ODBC Driver for SQL Server for x64