Category: Mail

  • SpamAssassin

    SpamAssassin

    SpamAssassin is a powerful open-source tool designed to filter out spam emails. Developed by the Apache Software Foundation, it helps users manage their inboxes by identifying and blocking unsolicited bulk emails.

    How SpamAssassin Works

    SpamAssassin employs various techniques to detect spam. It analyzes incoming emails using methods such as:

    • Header and Text Analysis: It examines the content and metadata of emails to identify patterns typical of spam.
    • Bayesian Filtering: This statistical method evaluates the likelihood that an email is spam based on previous user interactions.
    • DNS Blocklists: It checks if the sender’s IP address is listed on known spam databases.
    • Collaborative Filtering: This approach uses data from multiple users to improve spam detection accuracy.

    When an email is processed, SpamAssassin assigns a score based on these analyses. If the score exceeds a certain threshold (commonly set at 5), the email is flagged as spam. This scoring system allows users to customize their sensitivity settings according to their needs.

    Install SpamAssasin

    To install SpamAssasin on Ubuntu, run

    apt update
    apt-get install spamassassin spamc -y

    To update rules, run

    sa-update

    Configuration files located at

    /etc/spamassassin/local.cf

    To stop/start SpamAssasin

    systemctl start spamassassin
    systemctl stop spamassassin
    systemctl restart spamassassin

    White List a Sender

    To whitelist a sender, edit /etc/spamassassin/local.cf, add

    whitelist_from *@serverok.in
    whitelist_from [email protected]

    Restart spamassasin

    systemctl restart spamassassin

    Back to Email

  • How to block a domain in Zimbra

    How to block a domain in Zimbra

    To block all emails from a specific domain in Zimbra, run the following commands as user zimbra (su – zimbra).

    zmprov md yourdomain.com +amavisBlacklistSender bad-domain.com
    zmamavisdctl restart

    To block a specific email address, run

    zmprov md yourdomain.com +amavisBlacklistSender [email protected]
    zmamavisdctl restart

    How to unblock

    If you have blocked a domain or email address and want to unblock, you can use

    -amavisBlacklistSender

    Example

    zmprov md yourdomain.com -amavisBlacklistSender bad-domain.com
    zmamavisdctl restart

    Back to zimbra

  • How to disable Zimbra dnscache service

    How to disable Zimbra dnscache service

    When you are using the Zimbra mail server behind NAT with Split DNS, you need to disable dnscache service.

    To view all enabled/installed services, run

    zmprov gs `zmhostname` zimbraServiceEnabled zimbraServiceInstalled
    

    Example

    zimbra@mail:~$ zmprov gs `zmhostname` zimbraServiceEnabled zimbraServiceInstalled
    # name mail.serverok.in
    zimbraServiceEnabled: amavis
    zimbraServiceEnabled: antivirus
    zimbraServiceEnabled: antispam
    zimbraServiceEnabled: opendkim
    zimbraServiceEnabled: logger
    zimbraServiceEnabled: ldap
    zimbraServiceEnabled: mta
    zimbraServiceEnabled: dnscache
    zimbraServiceEnabled: memcached
    zimbraServiceEnabled: snmp
    zimbraServiceEnabled: stats
    zimbraServiceEnabled: proxy
    zimbraServiceEnabled: service
    zimbraServiceEnabled: zimbra
    zimbraServiceEnabled: zimbraAdmin
    zimbraServiceEnabled: zimlet
    zimbraServiceEnabled: mailbox
    zimbraServiceEnabled: spell
    zimbraServiceInstalled: amavis
    zimbraServiceInstalled: antivirus
    zimbraServiceInstalled: antispam
    zimbraServiceInstalled: opendkim
    zimbraServiceInstalled: logger
    zimbraServiceInstalled: ldap
    zimbraServiceInstalled: mta
    zimbraServiceInstalled: dnscache
    zimbraServiceInstalled: snmp
    zimbraServiceInstalled: stats
    zimbraServiceInstalled: memcached
    zimbraServiceInstalled: proxy
    zimbraServiceInstalled: mailbox
    zimbraServiceInstalled: spell
    
    zimbra@mail:~$ 
    

    To disable dnscache service, run

    zmprov ms `zmhostname` -zimbraServiceEnabled dnscache
    zmprov ms `zmhostname` -zimbraServiceInstalled dnscache
    

    Stop dnscache service

    zmdnscachectl stop
    

    Stop zimbra

    zmcontrol stop
    

    Start Zimbra

    zmcontrol start
    

    Back to Zimbra

  • How to Zimbra Split DNS with dnsmasq

    How to Zimbra Split DNS with dnsmasq

    When you install Zimbra on a server behind NAT, your public IP is not configured in the server, instead, it gets routed to the server using NAT gateway. Zimbra wants the IP address of your MX record present in the server.

    To solve this problem, we can use Split DNS. When you check the IP of the MX record from the server, it resolves to the internal IP address of the server. For everyone else, the MX record resolves to the public IP Address of the server.

    IMPORTANT: Do not install Zimbra dnscache (unbound) as it listens on port 53, which will cause conflict with Split DNS.

    Disable systemd-resolved

    On Ubuntu, local DNS resolving is done by systemd-resolved, you need it disabled.

    systemctl disable systemd-resolved.service
    systemctl stop systemd-resolved
    rm -f /etc/resolv.conf
    tee /etc/resolv.conf << END
    nameserver 127.0.0.1
    END
    

    Install dnsmasq

    Install dnsmasq with command

    apt install dnsmasq -y
    

    Configure dnsmasq

    Edit file

    vi /etc/dnsmasq.conf
    

    Add

    server=8.8.8.8
    server=1.1.1.1
    domain=aei.gt
    mx-host=yourdomain.com,mail.yourdomain.com,5
    listen-address=127.0.0.1
    

    Restart dnsmasq

    systemctl restart dnsmasq
    

    Edit /etc/hosts file

    vi /etc/hosts
    

    Add

    YOUR_LOCAL_IP  mail.yourdomain.com mail
    

    Edit /etc/resolv.conf

    vi  /etc/resolv.conf
    

    Add

    nameserver 127.0.0.1
    

    Remove any other name server entry, do all DNS requests go to dnsmasq.

    At this point, if you do a nslookup/dig for MX record, you should see your internal IP address.

    Back to Zimbra

  • Fake SMTP Server for testing

    Fake SMTP Server for testing

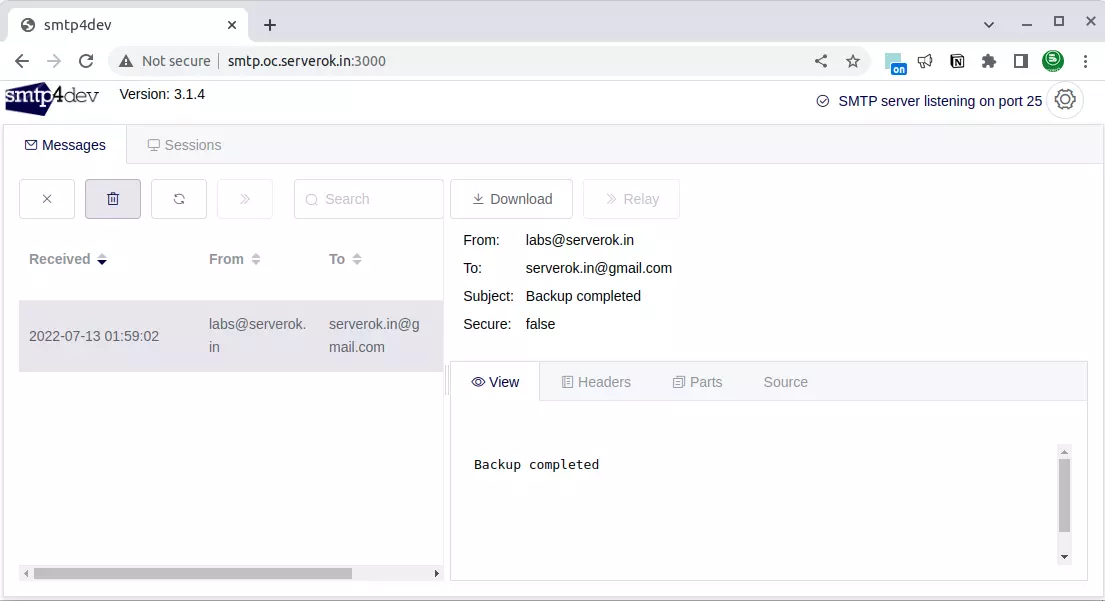
    When you develop a website or an application, you may need to use a fake SMTP server for debugging. Fake SMTP servers access emails, but they won’t deliver emails to the recipient’s email address.

    The simplest way to run a debugging SMTP server is using the following python code

    python3 -m smtpd -n -c DebuggingServer 0.0.0.0:2525
    

    This will start an SMTP server on port 2525. It does not support SMTP authentication.

    If you want to run a Fake SMTP server with Authentication support, use

    https://github.com/rnwood/smtp4dev

    You can install it using docker.

    First you need to install Docker. On Ubuntu, run

    apt install docker.io
    

    Run smtp4dev with the command

    docker run -d -it -p 3000:80 -p 2525:25 --restart=unless-stopped rnwood/smtp4dev
    

    SMTP Server will listen on port 2525. On port 3000, you have a web interface to read the mails

    Fake SMTP Server

    See SMTP

  • How to configure Hostname in PowerMTA

    How to configure Hostname in PowerMTA

    By default, PowerMTA uses the server’s hostname. You can specify a custom hostname per Virtual MTA.

    To set a hostname for VitualMTA, add host-name entry as follows.

    
        host-name smtp1.serverok.in
        #domain-key default,smtp1.serverok.in,/etc/pmta/default.smtp1.serverok.in.pem
        
        max-msg-rate 100/h


  • iRedMail Intentional policy rejection

    iRedMail Intentional policy rejection

    On an iRedMail, when receiving an email from steam, the mail server rejects the email with the error message “Recipient address rejected: Intentional policy rejection, please try again later”.

    Jan 31 20:31:46 mail postfix/smtpd[2042109]: Anonymous TLS connection established from smtp-03-tuk1.steampowered.com[208.64.202.39]: TLSv1.2 with cipher ECDHE-RSA-AES256-GCM-SHA384 (256/256 bits)
    Jan 31 20:31:47 mail postfix/smtpd[2042109]: NOQUEUE: reject: RCPT from smtp-03-tuk1.steampowered.com[208.64.202.39]: 451 4.7.1 : Recipient address rejected: Intentional policy rejection, please try again later; from= to= proto=ESMTP helo=
    Jan 31 20:31:47 mail postfix/smtpd[2042109]: disconnect from smtp-03-tuk1.steampowered.com[208.64.202.39] ehlo=2 starttls=1 mail=1 rcpt=0/1 data=0/1 quit=1 commands=5/7
    

    This is due to gray listing in iRedMail server.

    To whitelist steam in iRedMail, run

    /opt/iredapd/tools/greylisting_admin.py --disable --from '@steampowered.com'
    

    Example

    root@mail:/var/log# /opt/iredapd/tools/greylisting_admin.py --disable --from '@steampowered.com'
    * Disable greylisting: @steampowered.com -> @.
    root@mail:/var/log# 
    
  • 554 5.7.1 Unknown Sender in Local Domain

    When sending an email from one server to another, the email gets bounced with an error

    SMTP error from remote mail server after MAIL FROM: SIZE=1575: 554 5.7.1 Unknown Sender in Local Domain .
    

    The error is because both servers have the sender domain name configured. The solution is to remove the domain name from one of the servers.

  • Google Workspace DKIM authentication settings failed.

    Google Workspace DKIM authentication settings failed.

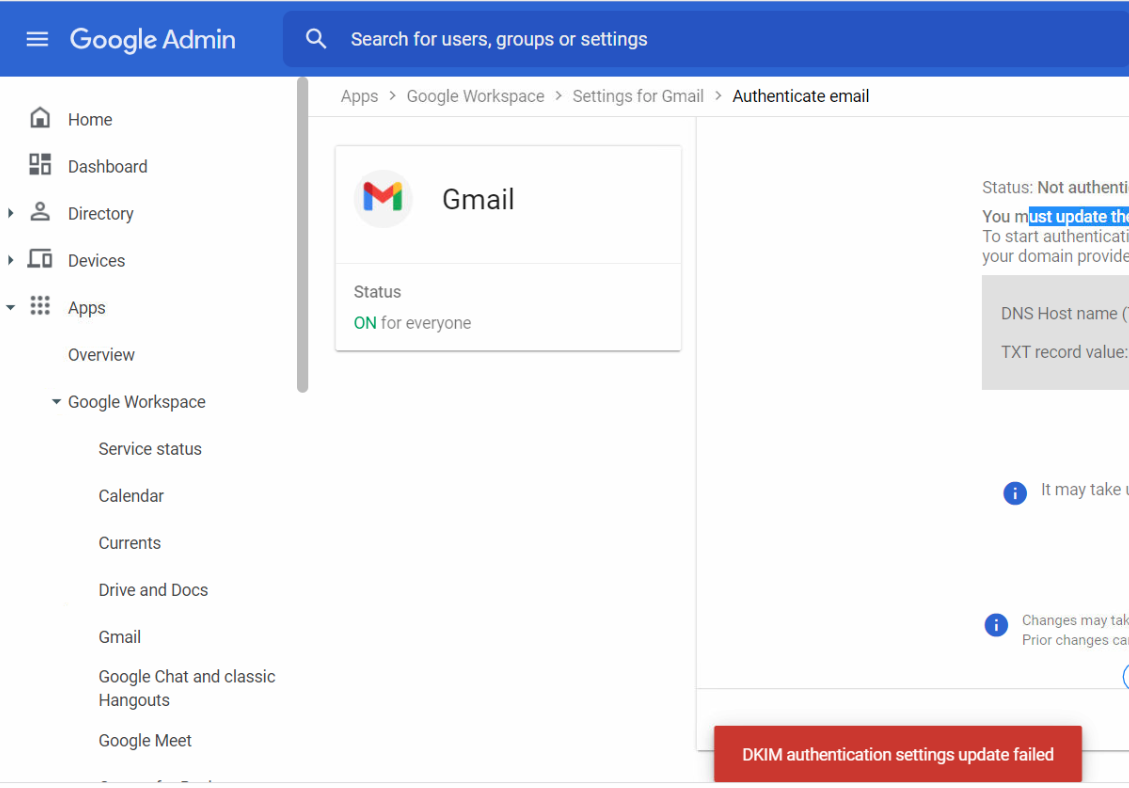
    When generating DKIM in google Google Workspace I got the following error message.

    DKIM authentication settings failed
    

    This error happens when you have a newly activated Google Workspace account.

    As per Google support instructions at

    https://support.google.com/a/answer/174126

    You need to wait 24 to 78 hours before activating DKIM.

    Important: After you create your Google Workspace account and turn on Gmail, you must wait 24–72 hours before you can generate a DKIM key.

  • .forward file

    Users can create a .forward file in their home directories that is used by mail servers like exim, sendmail used to redirect email to another email account.

    When mail is sent to a local user, the sendmail command checks for the $HOME/.forward file. The $HOME/.forward file can contain one or more addresses or aliases. If the file exists, the message is not sent to the user. The message is sent to the addresses or aliases in the .forward file.

    On Cpanel servers, /root/.forward contains the email address of the server administrator, so all emails to root get forwarded to the Server Admin email account.

    Example

    [root@server52 ~]# cat /root/.forward 
    [email protected]
    [root@server52 ~]# 
    

    To create a .forward file, you can run

    echo "[email protected]" > ~/.forward
    

    This will create a file $HOME/.forward with your email address inside it.

  • postfix smtp Must issue a STARTTLS command first

    postfix smtp Must issue a STARTTLS command first

    When sending an email to a server, mail bounced with the following error message.

    Action: failed
    Status: 5.7.0
    Remote-MTA: dns; mail01.riedelbau.de
    Diagnostic-Code: smtp; 530 5.7.0 Must issue a STARTTLS command first
    

    To fix the error, first enabled debug in postfix for the Remote-MTA, for this, edit file

    vi /etc/postfix/main.cf
    

    Add the following lines. You need to remove these lines after debug is completed or your log file will get larger with debug log.

    debug_peer_list=mail01.riedelbau.de
    debug_peer_level=3
    

    Restart postfix mail server.

    systemctl restart postfix
    

    Now I send a mail, in /var/log/mail.log, I got the detailed error message.

    Sep 17 08:32:25 mail postfix/smtp[31356]: vstream_buf_get_ready: fd 14 got 64
    Sep 17 08:32:25 mail postfix/smtp[31356]: < mail01.riedelbau.de[93.188.26.3]:25: 220 mail01.riedelbau.de ESMTP Fri, 17 Sep 2021 08:32:23 +0200 
    Sep 17 08:32:25 mail postfix/smtp[31356]: > mail01.riedelbau.de[93.188.26.3]:25: EHLO smtp1.serverok.in
    Sep 17 08:32:25 mail postfix/smtp[31356]: vstream_fflush_some: fd 14 flush 31
    Sep 17 08:32:25 mail postfix/smtp[31356]: vstream_buf_get_ready: fd 14 got 221
    Sep 17 08:32:25 mail postfix/smtp[31356]: < mail01.riedelbau.de[93.188.26.3]:25: 250-mail01.riedelbau.de Hello [173.249.63.91]
    Sep 17 08:32:25 mail postfix/smtp[31356]: < mail01.riedelbau.de[93.188.26.3]:25: 250-TURN
    Sep 17 08:32:25 mail postfix/smtp[31356]: < mail01.riedelbau.de[93.188.26.3]:25: 250-SIZE 36700160
    Sep 17 08:32:25 mail postfix/smtp[31356]: < mail01.riedelbau.de[93.188.26.3]:25: 250-ETRN
    Sep 17 08:32:25 mail postfix/smtp[31356]: < mail01.riedelbau.de[93.188.26.3]:25: 250-PIPELINING
    Sep 17 08:32:25 mail postfix/smtp[31356]: < mail01.riedelbau.de[93.188.26.3]:25: 250-DSN
    Sep 17 08:32:25 mail postfix/smtp[31356]: < mail01.riedelbau.de[93.188.26.3]:25: 250-ENHANCEDSTATUSCODES
    Sep 17 08:32:25 mail postfix/smtp[31356]: < mail01.riedelbau.de[93.188.26.3]:25: 250-8bitmime
    Sep 17 08:32:25 mail postfix/smtp[31356]: < mail01.riedelbau.de[93.188.26.3]:25: 250-BINARYMIME
    Sep 17 08:32:25 mail postfix/smtp[31356]: < mail01.riedelbau.de[93.188.26.3]:25: 250-CHUNKING
    Sep 17 08:32:25 mail postfix/smtp[31356]: < mail01.riedelbau.de[93.188.26.3]:25: 250-VRFY
    Sep 17 08:32:25 mail postfix/smtp[31356]: < mail01.riedelbau.de[93.188.26.3]:25: 250-TLS
    Sep 17 08:32:25 mail postfix/smtp[31356]: < mail01.riedelbau.de[93.188.26.3]:25: 250-STARTTLS
    Sep 17 08:32:25 mail postfix/smtp[31356]: < mail01.riedelbau.de[93.188.26.3]:25: 250 OK
    Sep 17 08:32:25 mail postfix/smtp[31356]: server features: 0x901f size 36700160
    Sep 17 08:32:25 mail postfix/smtp[31356]: Using ESMTP PIPELINING, TCP send buffer size is 87040, PIPELINING buffer size is 4096
    Sep 17 08:32:25 mail postfix/smtp[31356]: Host offered STARTTLS: [mail01.riedelbau.de]
    Sep 17 08:32:25 mail postfix/smtp[31356]: smtp_stream_setup: maxtime=300 enable_deadline=0
    Sep 17 08:32:25 mail postfix/smtp[31356]: > mail01.riedelbau.de[93.188.26.3]:25: MAIL FROM: SIZE=676
    Sep 17 08:32:25 mail postfix/smtp[31356]: > mail01.riedelbau.de[93.188.26.3]:25: RCPT TO: ORCPT=rfc822;[email protected]
    Sep 17 08:32:25 mail postfix/smtp[31356]: > mail01.riedelbau.de[93.188.26.3]:25: DATA
    Sep 17 08:32:25 mail postfix/smtp[31356]: smtp_stream_setup: maxtime=300 enable_deadline=0
    Sep 17 08:32:25 mail postfix/smtp[31356]: vstream_fflush_some: fd 14 flush 116
    Sep 17 08:32:25 mail postfix/smtp[31356]: vstream_buf_get_ready: fd 14 got 141
    Sep 17 08:32:25 mail postfix/smtp[31356]: < mail01.riedelbau.de[93.188.26.3]:25: 530 5.7.0 Must issue a STARTTLS command first
    

    The error is fixed by running

    postconf -e "smtp_tls_security_level=encrypt"
    systemctl restart postfix
    

    You may also need to check the value of smtpd_tls_CAfile

    root@mail:~# postconf smtpd_tls_CAfile
    smtpd_tls_CAfile = /etc/ssl/certs/ca-certificates.crt
    root@mail:~# 
    

    If you don't have this set, run

    postconf -e "smtpd_tls_CAfile = /etc/ssl/certs/ca-certificates.crt"
    

    See postfix