Category: Nginx

  • How to send plain text response from Nginx

    How to send plain text response from Nginx

    You can use a return statement in Nginx to send a plain text response.

    In your Nginx server entry, add

    location ~* "^/hello/(.*)" {
        default_type text/plain;
        return 200 "Hello $1\n";
    }
    

    Now you can access the page with the URL

    boby@sok-01:~$ curl http://localhost/hello/World
    Hello World
    boby@sok-01:~$ 
    

    Here is another example

    location  "/hello" {
        default_type text/plain;
        return 200 "Hello World\n";
    }
    

    For any URL starting with /hello, you get the “Hello World” response.

    Back to Nginx

  • How to block bad bots User-Agents in Nginx

    How to block bad bots User-Agents in Nginx

    To block bots by User-Agent in Nginx, add the following to the server entry of the website.

    if ($http_user_agent ~ (semrush|opensiteexplorer|ahrefs|seekport|mj12bot)) {
        return 403;
    }

    Restart Nginx

    systemctl restart nginx

    To block acces to a specific file or folder, use

    location /file-to-block.php {
        return 408;
    }

    If you are using Apache web server, see How to block Bad Bots (User Agents) using .htaccess or Block User-Agent using Cloudflare

    Back to Nginx

  • Nginx ModSecurity Not able to open file

    Nginx ModSecurity Not able to open file

    On an Nginx server after updating Nginx and ModSecurity, I got the following error

    [root@localhost ~]# nginx -t
    nginx: [emerg] "modsecurity_rules_file" directive Rules error. File: /etc/nginx/modsecurity.conf. Line: 275. Column: 51. "/etc/nginx/coreruleset-3.3.2/rules/*.conf": Not able to open file. Looking at: '"/etc/nginx/coreruleset-3.3.2/rules/*.conf"', '"/etc/nginx/coreruleset-3.3.2/rules/*.conf"', '/etc/nginx/"/etc/nginx/coreruleset-3.3.2/rules/*.conf"', '/etc/nginx/"/etc/nginx/coreruleset-3.3.2/rules/*.conf"'. in /etc/nginx/conf.d/default.conf:5
    nginx: configuration file /etc/nginx/nginx.conf test failed
    [root@localhost ~]# 
    

    To fix the error, edit file

    vi /etc/nginx/modsecurity.conf
    

    Find

    Include "/etc/nginx/coreruleset-3.3.2/rules/*.conf"
    

    Replace with

    Include /etc/nginx/coreruleset-3.3.2/rules/*.conf
    

    Now restart Nginx, it will work.

    systemctl restart nginx
    

    Back to Install Nginx ModSecurity on CentOS 7

  • How to configure Security Headers in Nginx

    How to configure Security Headers in Nginx

    You can add the following headers in your nginx.conf or server entry to improve website security

    add_header X-Frame-Options sameorigin;
    add_header X-Content-Type-Options nosniff;
    add_header X-XSS-Protection '1; mode=block';
    add_header X-Download-Options noopen;
    add_header X-Permitted-Cross-Domain-Policies none;
    add_header Content-Security-Policy "default-src https: data: 'unsafe-inline' 'unsafe-eval'";
    add_header Referrer-Policy strict-origin;
    

    See Nginx

  • Nginx configuration for Angular

    Nginx configuration for Angular

    Angular is a single-page application (SPA) framework. To serve Angular application using Nginx web server, use following configuration.

    server {
        listen *:80;
        root /var/www/html;
        index index.html;
        location / {
            try_files $uri$args $uri$args/ /index.html;
        }
    }
    

    You can build static files using the command

    ng build
    

    Upload the static files it builds, usually in the dist folder to document the root of your website, in this case, /var/www/html

    Back to Nginx

  • Nginx Configuration for Drupal 7

    Nginx Configuration for Drupal 7

    Here is Drupal 7 server configuration for Nginx with letsencrypt SSL.

    server {
        listen 443 ssl http2;
        ssl_certificate /etc/letsencrypt/live/yourdomain.com/fullchain.pem; # managed by Certbot
        ssl_certificate_key /etc/letsencrypt/live/yourdomain.com/privkey.pem; # managed by Certbot
        server_name yourdomain.com www.yourdomain.com;
        root /home/yourdomain.com/html/;
        index index.php index.html index.htm;
        access_log /var/log/nginx/yourdomain.com.log;
        error_log /var/log/nginx/yourdomain.com-error.log;
        client_max_body_size 1000M;
        proxy_read_timeout 600s;
        fastcgi_read_timeout 600s;
        fastcgi_send_timeout 600s;
    
        # Forbidden files or directories
        location ~ ^/(\.user.ini|\.htaccess|\.git|\.svn|\.project|\.env) {
            return 404;
        }
    
    
        location = /favicon.ico {
            log_not_found off;
            access_log off;
        }
    
        location = /robots.txt {
            allow all;
            log_not_found off;
            access_log off;
        }
    
        # Very rarely should these ever be accessed outside of your lan
        location ~* \.(txt|log)$ {
            allow 192.168.0.0/16;
            deny all;
        }
    
        location ~ \..*/.*\.php$ {
            return 403;
        }
    
        location ~ ^/sites/.*/private/ {
            return 403;
        }
    
        # Block access to scripts in site files directory
        location ~ ^/sites/[^/]+/files/.*\.php$ {
            deny all;
        }
    
        # Allow "Well-Known URIs" as per RFC 5785
        location ~* ^/.well-known/ {
            allow all;
        }
    
        # Block access to "hidden" files and directories whose names begin with a
        # period. This includes directories used by version control systems such
        # as Subversion or Git to store control files.
        location ~ (^|/)\. {
            return 403;
        }
    
        location / {
            # try_files $uri @rewrite; # For Drupal <= 6
            try_files $uri /index.php?$query_string; # For Drupal >= 7
        }
    
        location @rewrite {
            #rewrite ^/(.*)$ /index.php?q=$1; # For Drupal <= 6
            rewrite ^ /index.php; # For Drupal >= 7
        }
    
        # Don't allow direct access to PHP files in the vendor directory.
        location ~ /vendor/.*\.php$ {
            deny all;
            return 404;
        }
    
        # Protect files and directories from prying eyes.
        location ~* \.(engine|inc|install|make|module|profile|po|sh|.*sql|theme|twig|tpl(\.php)?|xtmpl|yml)(~|\.sw[op]|\.bak|\.orig|\.save)?$|/(\.(?!well-known).*|Entries.*|Repository|Root|Tag|Template|composer\.(json|lock)|web\.config)$|/#.*#$|\.php(~|\.sw[op]|\.bak|\.orig|\.save)$ {
            deny all;
            return 404;
        }
    
        # In Drupal 8, we must also match new paths where the '.php' appears in
        # the middle, such as update.php/selection. The rule we use is strict,
        # and only allows this pattern with the update.php front controller.
        # This allows legacy path aliases in the form of
        # blog/index.php/legacy-path to continue to route to Drupal nodes. If
        # you do not have any paths like that, then you might prefer to use a
        # laxer rule, such as:
        #   location ~ \.php(/|$) {
        # The laxer rule will continue to work if Drupal uses this new URL
        # pattern with front controllers other than update.php in a future
        # release.
        location ~ '\.php$|^/update.php' {
            fastcgi_split_path_info ^(.+?\.php)(|/.*)$;
            # Ensure the php file exists. Mitigates CVE-2019-11043
            try_files $fastcgi_script_name =404;
            # Security note: If you're running a version of PHP older than the
            # latest 5.3, you should have "cgi.fix_pathinfo = 0;" in php.ini.
            # See http://serverfault.com/q/627903/94922 for details.
            include fastcgi_params;
            # Block httpoxy attacks. See https://httpoxy.org/.
            fastcgi_param HTTP_PROXY "";
            fastcgi_param SCRIPT_FILENAME $document_root$fastcgi_script_name;
            fastcgi_param PATH_INFO $fastcgi_path_info;
            fastcgi_param QUERY_STRING $query_string;
            fastcgi_intercept_errors on;
            # PHP 5 socket location.
            #fastcgi_pass unix:/var/run/php5-fpm.sock;
            # PHP 7 socket location.
            fastcgi_pass unix:/run/php/php-fpm-USERNAME.sock;
        }
    
        location ~* \.(js|css|png|jpg|jpeg|gif|ico|svg)$ {
            try_files $uri @rewrite;
            expires max;
            log_not_found off;
        }
    
        # Fighting with Styles? This little gem is amazing.
        # location ~ ^/sites/.*/files/imagecache/ { # For Drupal <= 6
        location ~ ^/sites/.*/files/styles/ { # For Drupal >= 7
            try_files $uri @rewrite;
        }
    
        # Handle private files through Drupal. Private file's path can come
        # with a language prefix.
        location ~ ^(/[a-z\-]+)?/system/files/ { # For Drupal >= 7
            try_files $uri /index.php?$query_string;
        }
    
        # Enforce clean URLs
        # Removes index.php from urls like www.example.com/index.php/my-page --> www.example.com/my-page
        # Could be done with 301 for permanent or other redirect codes.
        if ($request_uri ~* "^(.*/)index\.php/(.*)") {
            return 307 $1$2;
        }


    }
    
    server {
        if ($host = yourdomain.com) {
            return 301 https://$host$request_uri;
        } # managed by Certbot
    
        listen 80;
        server_name yourdomain.com www.yourdomain.com;
        return 404; # managed by Certbot
    }
    

    In the above config, replace

    fastcgi_pass unix:/run/php/php-fpm-USERNAME.sock;
    

    with the location of php-fpm socket on your server.

    yourdomain.com with your actual domain name.

  • Nginx Redirect HTTP to HTTPS

    Nginx Redirect HTTP to HTTPS

    To force SSL (HTTPS) on a website hosted on an Nginx web server, edit server entry for the website, add

    if ($server_port !~ 443){
        rewrite ^(/.*)$ https://$host$1 permanent;
    }

    Method 2

    if ($scheme = http) {
        return 301 https://$server_name$request_uri;
    }

    Method 3

    Create a server entry for port 80, that only do the redirect to HTTPS like the following

    server {
        listen 80;
        server_name  DOMAIN_NAME www.DOMAIN_NAME;
        return       301 https://DOMAIN_NAME$request_uri;
    }

    Restart Nginx

    systemctl restart nginx

    Nginx > Nginx Redirect

  • Nginx php-fpm No input file specified

    Nginx php-fpm No input file specified

    When accessing PHP files from location block that have different document root specified using alias, i get error

    No input file specified.

    nginx php-fpm  error

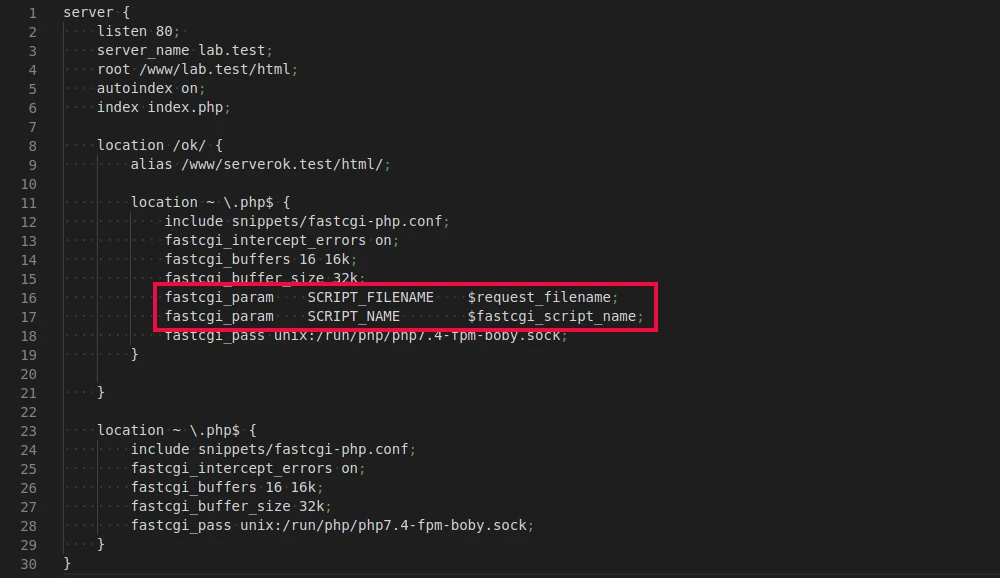
    Here is the Nginx config i used

    server {
        listen 80; 
        server_name lab.test;
        root /www/lab.test/html;
        autoindex on;
        index index.php;
    
        location /ok/ {
            alias /www/serverok.test/html/;
    
            location ~ \.php$ {
                include snippets/fastcgi-php.conf;
                fastcgi_intercept_errors on;
                fastcgi_buffers 16 16k;
                fastcgi_buffer_size 32k;
                fastcgi_pass unix:/run/php/php7.4-fpm-boby.sock;
            }
    
        }
    
        location ~ \.php$ {
            include snippets/fastcgi-php.conf;
            fastcgi_intercept_errors on;
            fastcgi_buffers 16 16k;
            fastcgi_buffer_size 32k;
            fastcgi_pass unix:/run/php/php7.4-fpm-boby.sock;
        }
    }
    

    If I access an HTML file or any non-PHP file, it works properly from/ok/ location.

    The problem is due to php-fpm not able to find the proper path when using the alias. If I put the PHP files inside a folder /ok/, it worked.

    To fix the problem, add the following code before fastcgi_pass

    fastcgi_param    SCRIPT_FILENAME    $request_filename;
    fastcgi_param    SCRIPT_NAME        $fastcgi_script_name;
    

    Example

    nginx php-fpm error no input

    Back to Nginx

  • How to hide Nginx version

    How to hide Nginx version

    On a default installation of the Nginx web server, the error pages show the version of Nginx software running on your server. Displaying software version is not good for security and visitors don’t need to know what version of Nginx web server you are using. For hackers, if they know the version, they can see if that particular version of the Nginx web server is vulnerable to any exploit and hack the server if there is an exploit available.

    Nginx hide version

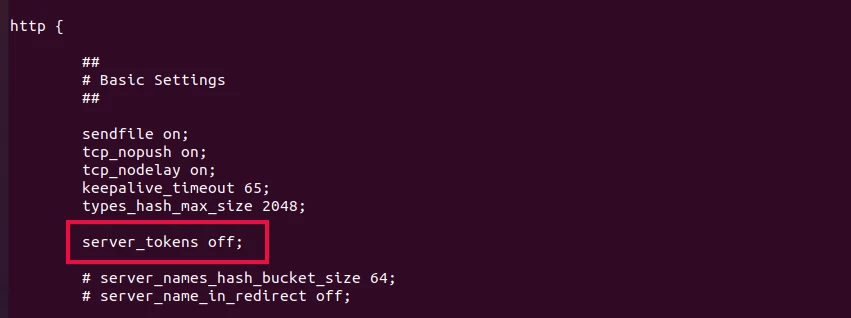
    To hide the Nginx version, edit

    vi /etc/nginx/nginx.conf
    

    Under “http” section, add

    server_tokens off;
    

    edit nginx.conf

    Restart Nginx

    systemctl restart nginx
    

    After restart, the error page won’t show the Nginx version.

    hide nginx version

    Before

    boby@sok-01:~$ curl -I http://serverok.test/
    HTTP/1.1 404 Not Found
    Server: nginx/1.18.0 (Ubuntu)
    Date: Sun, 14 Nov 2021 06:11:24 GMT
    Content-Type: text/html
    Content-Length: 162
    Connection: keep-alive

    boby@sok-01:~$

    After

    boby@sok-01:~$ curl -I http://serverok.test/
    HTTP/1.1 404 Not Found
    Server: nginx
    Date: Sun, 14 Nov 2021 06:20:54 GMT
    Content-Type: text/html
    Content-Length: 146
    Connection: keep-alive

    boby@sok-01:~$

    See Nginx

  • Nginx Rate Limiting

    Nginx Rate Limiting

    Nginx web server support rate-limiting with module ngx_http_limit_req_module.

    Block WordPress wp-login.php attack

    To block the WordPress wp-login.php attack, add the following to http section of your nginx.conf file.

    limit_req_zone $binary_remote_addr zone=WPRATELIMIT:10m rate=2r/s;
    limit_req_status 429;
    

    2r/2 = Lmit 2 requests per second.

    Inside server entry for the website, add

    location ~ \wp-login.php$ {
        limit_req zone=WPRATELIMIT;
        include snippets/fastcgi-php.conf;
    }
    
  • How to redirect a domain with html extension in Nginx

    A WordPress website needs to migrate to a different domain, on a new domain site use static HTML pages. On the source site, WordPress is configured to use URL like https://domain1/page-name/, on the new server, the same page available on URL https://domain2/page-name.html

    Source = https://domain1/page-name/
    Destinatation = https://domain2/page-name.html
    

    To do the redirection, edit Nginx configuration for the website, on top of it (inside server entry), add

    rewrite ^/$ https://new-domain.tld permanent;
    rewrite ^(.*)/$ https://new-domain.tld$1.html permanent;
    rewrite ^(.*)$ https://new-domain.tld$1.html permanent;
    

    Restart Nginx

    systemctl restart nginx
    

    See Nginx Redirect

  • Nginx file upload error

    When uploading a file on a PHP Application running under an Nginx web server, I get the following error

    2021/08/14 12:32:04 [crit] 1722576#1722576: *42823 open() "/var/lib/nginx/tmp/client_body/0000000006" failed (13: Permission denied), client: 59.12.21.51, server: team.serverok.in, request: "POST /index.php/ijci/$$$call$$$/wizard/file-upload/file-upload-wizard/upload-file?submissionId=311&stageId=1&fileStage=2&reviewRoundId=&assocType=&assocId= HTTP/2.0", host: "team.serverok.in", referrer: "https://team.serverok.in/index.php/ijci/submission/wizard/2?submissionId=311"
    

    The error was due to wrong ownership for folder /var/lib/nginx/tmp/client_body/ or one of its parent folders.

    On this web server, nginx was running as user nobody, so to fix the error, I run the following command

    chown -R nobody:nobody /var/lib/nginx/
    

    See Nginx