Tag: kvm

  • Set Static IP in RHEL 8 OVH VPS

    Set Static IP in RHEL 8 OVH VPS

    On OVH VPS running AlmaLinux 8, IPv4 IP address gets dropped. I have to connect to the server using KVM feature available in OVH control panel.
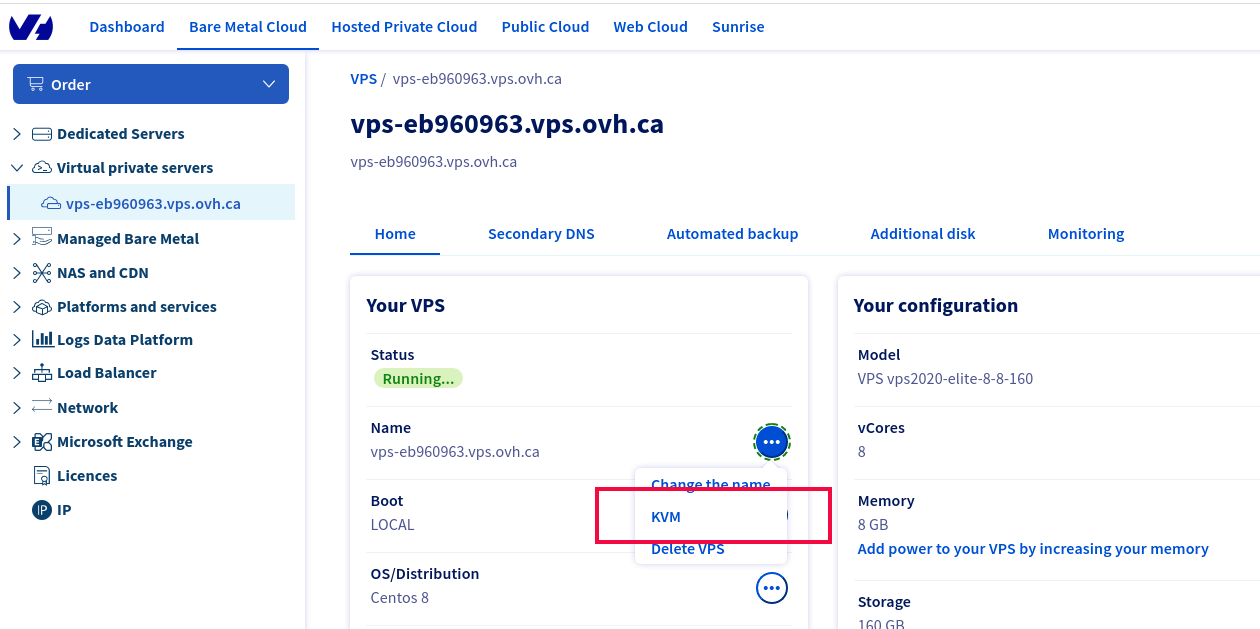
    OVH Cloud VPS KVM

    I checked IP of the server with the command

    ip a
    

    It did hot show any IPv4 IP address. I checked the network configuration file

    vi /etc/sysconfig/network-scripts/ifcfg-eth0
    

    That had the following content

    BOOTPROTO=dhcp
    DEFROUTE=yes
    DEVICE=eth0
    DHCLIENT_SET_DEFAULT_ROUTE=yes
    HWADDR=fa:16:3e:6b:a6:1a
    IPV6ADDR=2607:5300:201:3100::952/56
    IPV6INIT=yes
    IPV6_AUTOCONF=no
    IPV6_DEFAULTGW=2607:5300:201:3100::1
    IPV6_FORCE_ACCEPT_RA=no
    MTU=1500
    ONBOOT=yes
    TYPE=Ethernet
    USERCTL=no
    

    To make the IP static, I made the following changes.

    Find

    BOOTPROTO=dhcp
    

    Replace with

    BOOTPROTO=static
    

    Also added following 2 entry

    IPADDR=144.217.13.76
    GATEWAY=144.217.12.1
    

    144.217.13.76 is the IP address of the VPS.

    144.217.12.1 is the gateway used on the VPS, found using “ip route” or “route -n” command.

    [root@vps-eb960963 network-scripts]# route -n
    Kernel IP routing table
    Destination     Gateway         Genmask         Flags Metric Ref    Use Iface
    0.0.0.0         144.217.12.1    0.0.0.0         UG    0      0        0 eth0
    144.217.12.1    0.0.0.0         255.255.255.255 UH    0      0        0 eth0
    [root@vps-eb960963 network-scripts]#
    

    Create a static route file

    vi /etc/sysconfig/network-scripts/route-eth0
    

    Add

    144.217.12.1 dev eth0
    default via 144.217.12.1 dev eth0
    

    Here 144.217.12.1 is the gateway IP address found in the above step.

    See IP

  • libvirt qemu unexpectedly closed the monitor Failed to create chardev

    On CentOS 7 server, after installing KVM, i connected to server using Virt Manager. During VM creation, i get following error

    libvirt.libvirtError: internal error: qemu unexpectedly closed the monitor: 2021-02-01T18:09:38.214356Z qemu-kvm: -chardev pty,id=charserial0: Failed to create chardev

    To fix this, edit file

    vi /etc/fstab
    

    Find

    devpts          /dev/pts        devpts  defaults	    	0       0
    

    Replace with

    devpts          /dev/pts        devpts  gid=5,mode=620	0       0
    

    Reboot the server. After reboot, VM creation will work properly.

    See KVM

  • Install Linux KVM on CentOS 7

    Install kvm with

    yum install -y qemu-kvm
    

    Install libvirt, this is used to manage KVM virtual machines.

    yum install -y libvirt-daemon-kvm libvirt-client
    

    Enable libvirtd to start on boot

    systemctl enable libvirtd
    

    Start libvirtd

    systemctl start libvirtd
    

    To see status, run

    systemctl status libvirtd
    

    centos 7 kvm libvirtd status

    Install virt-install

    yum install virt-install
    

    Now you have Linux KVM installed. You can use virt-install or Virt Manager to create virtual machine.

    When i create a Virtual Machine on CentOS 7, i get error reated to Failed to create chardev. If you get this error, click here for solution.

    See KVM

  • Auto Start KVM Virtual Machine

    To auto start a KVM Virtual Machine on boot time, use command

    virsh autostart VMNAME_HERE
    

    To disable a VM from auto starting, run

    virsh autostart VMNAME_HERE --disable
    

    kvm virtual machine autostart

    See KVM

  • KVM VNC Allow Remote Access

    By default VNC Console on a KVM virtual Machine only listens to localhost. So you need to do SSH tunnel to access VNC console.

    To make VNC available on all interfaces on Host machine, you need to edit file

    vi  /etc/libvirt/qemu.conf
    

    You need to uncomment the line vnc_listen = “0.0.0.0”.

    # VNC is configured to listen on 127.0.0.1 by default.
    # To make it listen on all public interfaces, uncomment
    # this next option.
    #
    # NB, strong recommendation to enable TLS + x509 certificate
    # verification when allowing public access
    #
    vnc_listen = "0.0.0.0"
    

    Once this is done, you need to shutdown and start the virtual machine. Just reboot won’t work.

    root@PAR-199235:~# virsh vncdisplay kali-linux
    127.0.0.1:0
    
    root@PAR-199235:~# virsh shutdown kali-linux
    Domain kali-linux is being shutdown
    
    root@PAR-199235:~# virsh list --all
     Id   Name         State
    -----------------------------
     -    kali-linux   shut off
    
    root@PAR-199235:~# virsh start  kali-linux
    Domain kali-linux started
    
    root@PAR-199235:~# virsh vncdisplay kali-linux
    :0
    
    root@PAR-199235:~# 
    

    See Linux KVM

  • Configure KVM Bridge Network on Debian 10

    Before you configure bridge network, make sure you have bridge-utils installed.

    apt install bridge-utils
    

    You may also need ifdown and resolvconf packages installed

    apt install ifupdown resolvconf
    

    Here is the default /etc/network/interfaces i had on the server

    root@PAR-199235:~# cat /etc/network/interfaces
    # This file describes the network interfaces available on your system
    # and how to activate them. For more information, see interfaces(5).
    
    source /etc/network/interfaces.d/*
    
    # The loopback network interface
    auto lo
    iface lo inet loopback
    
    # The primary network interface
    auto enp1s0f0
    allow-hotplug enp1s0f0
    iface enp1s0f0 inet static
    	address 163.172.107.119
    	broadcast 163.172.107.255
    	netmask 255.255.255.0
    	gateway 163.172.107.1
    	dns-nameservers 8.8.8.8
    
    root@PAR-199235:~# 
    

    enp1s0f0 is name of the network interface card on the server.

    To convert it to brudge configuration. You need to replace enp1s0f0 with br0.

    Then add following to the file

        bridge_ports enp1s0f0
        bridge_stp off
        bridge_maxwait 5
    

    Remember to replace enp1s0f0 with your actual network card interface name.

    Also remove the line

    allow-hotplug enp1s0f0
    

    Here is the final /etc/network/interface file i have.

    root@PAR-199235:~# cat /etc/network/interface
    cat: /etc/network/interface: No such file or directory
    root@PAR-199235:~# cat /etc/network/interfaces
    # This file describes the network interfaces available on your system
    # and how to activate them. For more information, see interfaces(5).
    
    source /etc/network/interfaces.d/*
    
    # The loopback network interface
    auto lo
    iface lo inet loopback
    
    # The primary network interface
    
    auto br0
    iface br0 inet static
    	address 163.172.107.119
    	broadcast 163.172.107.255
    	netmask 255.255.255.0
    	gateway 163.172.107.1
        bridge_ports enp1s0f0
        bridge_stp off
        bridge_maxwait 5
    	dns-nameservers 8.8.8.8
    
    root@PAR-199235:~# 
    
  • Install Linux KVM on CentOS 8

    To install Linux KVM hypervisor on CentOS 8, run

    dnf install qemu-kvm
    

    Install libvirtd

    dnf install libvirt-daemon libvirt-daemon-kvm libvirt-client
    

    Enable libvirtd to start on boot

    systemctl enable libvirtd
    

    Start libvirtd

    systemctl start libvirtd
    

    To see status, run

    systemctl status libvirtd
    

    Install virt-install

    dnf install virt-install
    

    Now you have Linux KVM installed. You can use virt-install or Virt Manager to create virtual machine.

    See Linux KVM Virtualization

  • Install kvm on Debian 10

    To install kvm on Debian 10, run

    apt install -y qemu-kvm
    

    Install libvirt, it is a tool to manage kvm

    apt install libvirt-clients libvirt-daemon libvirt-daemon-system
    

    Set libvirtd to start on boot

    systemctl enable libvirtd
    

    Restart libvirtd

    systemctl restart libvirtd
    

    You can see libvirtd status with

    systemctl status libvirtd
    

    Install virtinst, it is used to create virtual machine.

    apt install virtinst
    

    To see network, run

    virsh net-list --all
    

    Start the “default” network

    virsh net-start default
    

    Set default network to auto start on boot

    virsh net-autostart default
    

    Now you have kvm and libvirtd installed. You can create virtual machine using virtinst or Virt Manager

    See KVM

  • Install virt-manager on Ubuntu

    virt-manager is a GUI tool used to manage KVM virtial machines. To install virt-manager on Ubuntu, run

    apt install virt-manager
    
  • virsh list

    To list all VM on a KVM server, run

    virsh list

    Example

    root@s3-m12:~# virsh list
     Id    Name                           State
    ----------------------------------------------------
     6     foo                            running
    
    root@s3-m12:~# 

    To view all Virtual machines including stopped VM’s, use –all option.

    root@mail:~# virsh list --all
     Id   Name       State
    ---------------------------
     1    iredmail   running
     -    win10      shut off
    
    root@mail:~# 

    To see all network

    root@server1:~# virsh net-list --all
     Name      State    Autostart   Persistent
    --------------------------------------------
     Bridge0   active   yes         yes
    
    root@server1:~#

    See virsh

  • proxmox

    Proxmox is a Virtualization software that allows you to run KVM virtual machines and LXC containers.

    Once installed, you will be able to access proxmox on port 8006.

    https://YOUR_SERVER_IP:8006

    Some commands

    pvecm nodes
    pvecm status
    systemctl status pve-cluster
    systemctl status pvestatd
    systemctl status pvedaemon

    General

    KVM

    Containers (LXC)