Category: CentOS

  • SSH no hostkey alg

    SSH no hostkey alg

    When connecting to an Ubuntu 24.04 server from CentOS 6 server, i got error “no hostkey alg”

    root@server12:~# ssh [email protected]
    no hostkey alg
    root@server12:~#

    To fix this error, edit /etc/ssh/sshd_config on Ubuntu server and add followng to end of the file

    HostKeyAlgorithms +ssh-rsa,ssh-dss
    PubkeyAcceptedKeyTypes +ssh-rsa,ssh-dss

    Restart ssh service on Ubuntu

    systemctl restart ssh

    Now you should be able to connect to Ubuntu server from CentOS 6 using SSH. If you are using ssh key auth, use RSA key, newer keys like ed25519 won’t work and result in following error message

    root@server12:~# ssh [email protected]
    key_from_blob: remaining bytes in key blob 36
    key_to_blob: unsupported key type 11
    Permission denied (publickey).
    root@server12:~# 

    Once the ile transfer is done, edit /etc/ssh/sshd_config on ubuntu server and remove the older (less secure) algorithms.

    Back to ssh

  • CentOS 7 yum update HTTP Error 404: Not found

    CentOS 7 yum update HTTP Error 404: Not found

    If you’re still running CentOS 7 on your systems, you may have recently encountered errors when trying to run `yum update`.

    http://mirror.centos.org/centos/7/os/x86_64/repodata/repomd.xml: [Errno 14] HTTP Error 404 - Not Found

    This error occurs because CentOS 7 reached its end-of-life (EOL) on June 30, 2024. As a result, the main CentOS mirrors no longer host packages for this version.

    CentOS maintains an archive of older repositories at vault.centos.org. To fix the YUM update errors, we need to point our system to these archive repositories. You can do this using sed command. First take a backup of your current yum.repo.d folder.

    cd /etc/
    tar -cvf yum-backup.tar yum.repos.d

    Do a search and replace with sed command

    sed -i 's/mirror\.centos\.org/vault.centos.org/g' /etc/yum.repos.d/*

    If your repo files are modified by server provider, above command may not fix it as repo urls are pointing to local repository provided by data center. In that case, you can edit file manually and use following config

    vi /etc/yum.repos.d/CentOS-Base.repo

    In the file, add following content

    [base]
    name=CentOS-7 - Base
    baseurl=https://vault.centos.org/7.9.2009/os/$basearch/
    gpgcheck=1
    gpgkey=file:///etc/pki/rpm-gpg/RPM-GPG-KEY-CentOS-7
    
    [updates]
    name=CentOS-7 - Updates
    baseurl=https://vault.centos.org/7.9.2009/updates/$basearch/
    gpgcheck=1
    gpgkey=file:///etc/pki/rpm-gpg/RPM-GPG-KEY-CentOS-7
    
    [extras]
    name=CentOS-7 - Extras
    baseurl=https://vault.centos.org/7.9.2009/extras/$basearch/
    gpgcheck=1
    gpgkey=file:///etc/pki/rpm-gpg/RPM-GPG-KEY-CentOS-7
    
    [centosplus]
    name=CentOS-7 - Plus
    baseurl=https://vault.centos.org/7.9.2009/centosplus/$basearch/
    gpgcheck=1
    enabled=0
    gpgkey=file:///etc/pki/rpm-gpg/RPM-GPG-KEY-CentOS-7

    Clear the YUM cache and regenerate it:

    yum clean all
    yum makecache

    Now “yum update” command should work.

    yum update

    Keep using CentOS 7 is insecure. You should upgrade to RHEL 8 based OS like AlmaLinux 8 or RockyLinux to keep your server secure.

    Back to CentOS

  • OVH CentOS 7 server grub rescue prompt

    OVH CentOS 7 server grub rescue prompt

    On an OVH Cpanel server running CentOS 7, the server won’t boot. When accessing the server console using IPMI, I found the following error.

    OVH IPMI server console

    I booted the server into rescue mode, checked the disk partitions with the command parted -l

    Disk /dev/nvme0n1: 450GB
    Sector size (logical/physical): 512B/512B
    Partition Table: gpt
    Disk Flags: 
    
    Number  Start   End     Size    File system     Name     Flags
     1      1049kB  537MB   536MB   fat32           primary  boot, esp
     2      537MB   1073MB  536MB   ext4            primary  raid
     3      1073MB  53.5GB  52.4GB  ext4            primary  raid
     4      53.5GB  450GB   396GB   ext4            primary  raid
     5      450GB   450GB   536MB   linux-swap(v1)  primary
    
    
    Disk /dev/nvme1n1: 450GB
    Sector size (logical/physical): 512B/512B
    Partition Table: gpt
    Disk Flags: 
    
    Number  Start   End     Size    File system     Name     Flags
     1      1049kB  537MB   536MB   fat32           primary  boot, esp
     2      537MB   1073MB  536MB   ext4            primary  raid
     3      1073MB  53.5GB  52.4GB  ext4            primary  raid
     4      53.5GB  450GB   396GB   ext4            primary  raid
     5      450GB   450GB   536MB   linux-swap(v1)  primary
    

    The server had 2 NVMe disks configured as RAID 1 mirrors. The first partition with fat32 filesystem is used for boot.

    To fix the problem, I chrooted to the server file system with the following command (this may be changed based on your server’s partition scheme).

    mount /dev/md3 /mnt
    mount /dev/md2 /mnt/boot/
    mount /dev/md4 /mnt/home
    mount --bind /dev /mnt/dev
    mount --bind /sys /mnt/sys
    mount --bind /proc /mnt/proc
    mount --bind /dev/pts /mnt/dev/pts/
    chroot /mnt
    

    Reinstalled the kernel with

    yum reinstall kernel
    

    Then reinstalled grub loader. This server used UEFI, so used following commands

    mkdir /nvme0n1p1
    mkdir /nvme1n1p1
    mount /dev/nvme0n1p1 /nvme0n1p1
    mount /dev/nvme1n1p1 /nvme1n1p1
    grub2-install --target=x86_64-efi --efi-directory=/nvme0n1p1 --bootloader-id=GRUB
    grub2-install --target=x86_64-efi --efi-directory=/nvme1n1p1 --bootloader-id=GRUB
    

    grub boot loaded is installed on both disks, so server will be able to boot when either one of the disk is selected as boot device.

    Back to grub

  • access denied: tty ‘tty1’ is not secure

    access denied: tty ‘tty1’ is not secure

    On a CentOS 7 server, when login as user root on the console, login fails. If I log in as a normal user, then I am able to switch to user root with the command “su – root”.

    On checking /var/log/secure, I found the following error.

    Nov 10 03:44:42 localhost login: pam_securetty(login:auth): access denied: tty 'tty1' is not secure !
    Nov 10 03:44:45 localhost login: pam_succeed_if(login:auth): requirement "uid >= 1000" not met by user "root"
    Nov 10 03:44:47 localhost login: FAILED LOGIN 1 FROM tty1 FOR root, Authentication failure

    To fix the error, edit the file

    vi /etc/securetty

    In the file, add

    tty1

    On CentOS 7 server, the contents of the file are

    [root@localhost ~]# cat /etc/securetty 
    console
    vc/1
    vc/2
    vc/3
    vc/4
    vc/5
    vc/6
    vc/7
    vc/8
    vc/9
    vc/10
    vc/11
    tty1
    tty2
    tty3
    tty4
    tty5
    tty6
    tty7
    tty8
    tty9
    tty10
    tty11
    ttyS0
    ttysclp0
    sclp_line0
    3270/tty1
    hvc0
    hvc1
    hvc2
    hvc3
    hvc4
    hvc5
    hvc6
    hvc7
    hvsi0
    hvsi1
    hvsi2
    xvc0
    [root@localhost ~]# 

    Permission for the file is 600, in case you have the wrong permission, change it with

    chmod 600 /etc/securetty

    Back to CentOS 7

  • How to install cwebp on CentOS 7

    How to install cwebp on CentOS 7

    cwebp is a command line program used to convert images into webp format.

    To install cwebp on CentOS 7, run

    sudo yum -y install libwebp-tools

    WebP is an image format that does lossy compression of digital photographic images. WebP consists of a codec based on VP8, and a container based on RIFF. Webmasters, web developers and browser developers can use WebP to compress, archive and distribute digital images more efficiently.

    To see files in this package, run the command “rpm -q –filesbypkg libwebp-tools”

    [root@ns540127 ~]# rpm -q --filesbypkg libwebp-tools
    libwebp-tools             /usr/bin/cwebp
    libwebp-tools             /usr/bin/dwebp
    libwebp-tools             /usr/bin/gif2webp
    libwebp-tools             /usr/bin/webpmux
    libwebp-tools             /usr/share/man/man1/cwebp.1.gz
    libwebp-tools             /usr/share/man/man1/dwebp.1.gz
    libwebp-tools             /usr/share/man/man1/gif2webp.1.gz
    libwebp-tools             /usr/share/man/man1/webpmux.1.gz
    [root@ns540127 ~]# 

    Back to CentOS 7

  • How to reset CentOS 7 root password using console

    How to reset CentOS 7 root password using console

    If you have lost the root password of your CentOS 7 system and have access to the console directly or using KVM, you can reset the password following the instructions below.

    1) Reboot the server, you will see the grub menu.

    CentOS 7 grub menu

    2) Press “e” to edit. You will see the edit screen as shown below.

    centos 7 grub edit

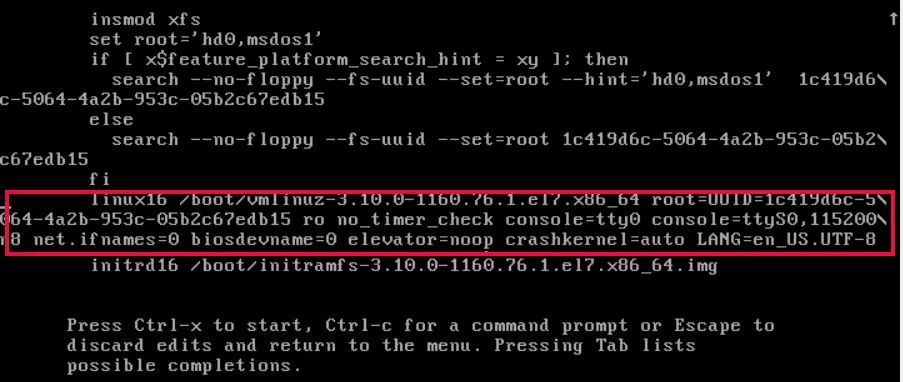
    3) Find the line starting with linux16

    linux16 /boot/vmlinuz-3.10.0-1160.76.1.el7.x86_64 root=UUID=1c419d6c-5064-4a2b-953c-05b2c67edb15 ro no_timer_check console=tty0 console=ttyS0,115200n8 net.ifnames=0 biosdevname=0 elevator=noop crashkernel=auto LANG=en_US.UTF-8
    

    In the fine, find

    ro
    

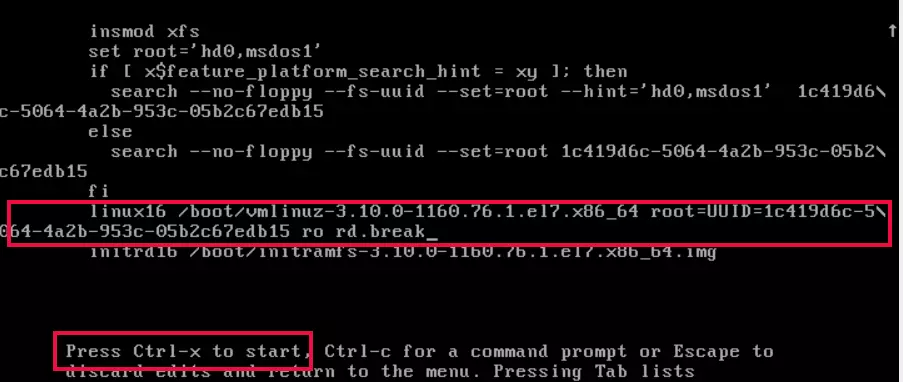
    Delete everything after that and replace with “rd.break”, so the line looks like the following

    linux16 /boot/vmlinuz-3.10.0-1160.76.1.el7.x86_64 root=UUID=1c419d6c-5064-4a2b-953c-05b2c67edb15 ro rd.break
    

    CentOS 7 enable emergency mode

    4) Boot the system to the emergency mode by pressing CTRL + X, you will get a prompt like the following

    CentOS 7 Emergency Mode Command line

    5) Mount /sysroot in read-write mode. and chroot to the file system

    mount -o remount,rw /sysroot
    chroot /sysroot
    

    6) Reset the root password with passwd command

    passwd
    

    7) SELinux won’t allow modifying system files like /etc/shadow, to allow the change, create a file

    touch /.autorelabel
    

    7) Now reboot the system by typing the “exit” command two times

    exit
    exit
    

    After rebooting, you will be able to log in to the system with the new root password.

    Back to CentOS 7

  • CentOS Error checking for OpenSSL library … not found

    CentOS Error checking for OpenSSL library … not found

    When installing Nginx from source on a CentOS 7 server, I got the following error

    checking for OpenSSL library ... not found
    checking for OpenSSL library in /usr/local/ ... not found
    checking for OpenSSL library in /usr/pkg/ ... not found
    checking for OpenSSL library in /opt/local/ ... not found
    

    To fix the error, install openssl-devel package with the command

    yum install openssl-devel -y
    

    Back to Errors

  • CentOS 8 Error: Failed to download metadata for repo ‘appstream’

    CentOS 8 Error: Failed to download metadata for repo ‘appstream’

    When updating packages on CentOS 8 server, I got the following error

    [root@instance-20220409-2340 ~]# dnf update
    Failed loading plugin "osmsplugin": No module named 'librepo'
    CentOS Linux 8 - AppStream                                                                                                                                                  51  B/s |  38  B     00:00    
    Error: Failed to download metadata for repo 'appstream': Cannot prepare internal mirrorlist: No URLs in mirrorlist
    [root@instance-20220409-2340 ~]# 
    

    This is because CentOS 8 have reached its End of life.

    To fix the dnf error, you can change the repository baseurl to vault.centos.org

    sed -i -e "s|mirrorlist=|#mirrorlist=|g" /etc/yum.repos.d/CentOS-*
    sed -i -e "s|#baseurl=http://mirror.centos.org|baseurl=http://vault.centos.org|g" /etc/yum.repos.d/CentOS-*
    

    You may need to convert CentOS 8 to one of the supported Linux distributions.

    Convert CentOS 8 to CentOS 8 Stream

    To convert CentOS 8 to CentOS 8 Stream, run

    dnf --disablerepo '*' --enablerepo=extras swap centos-linux-repos centos-stream-repos
    dnf distro-sync
    

    Convert CentOS 8 to AlmaLinux 8

    AlmaLinux is RHEL 8 based (same as CentOS 8) Linux operating system. They provide easy way to convert CentOS 8 server to AlmaLinux.

    How to Migrate CentOS 8 to AlmaLinux

    Convert CentOS 8 to Rocky Linux 8

    Rocky Linux is an open-source enterprise operating system designed to be 100% bug-for-bug compatible with Red Hat Enterprise Linux.

    How to Convert CentOS 8 to Rocky Linux

    Convert CentOS 8 to Oracle Linux 8

    Oracle Linux 8 is free and open source, based on RHEL 8

    https://docs.oracle.com/en/learn/switch_centos8_linux8/index.html

    Convert CentOS 8 to RHEL 8

    RedHat provides Convert2RHEL script to convert CentOS 8 to RHEL 8. RHEL is now FREE for production up to 16 servers.

    https://www.redhat.com/en/technologies/linux-platforms/enterprise-linux/migration-process/convert2rhel-how-to-convert-from-centos-linux-to-red-hat-enterprise-linux

    See CentOS 8

  • How to install MySQL 5.7 on CentOS 7 Server

    How to install MySQL 5.7 on CentOS 7 Server

    To install MySQL 5.7 on CentOS 7 server, install the repository

    rpm -ivh http://repo.mysql.com/mysql57-community-release-el7.rpm
    

    import MySQL GPG key with

    rpm --import https://repo.mysql.com/RPM-GPG-KEY-mysql-2022
    

    Install MySQL with the command

    yum install mysql-community-server.x86_64
    

    Enable MySQL to start on boot

    systemctl enable mysqld
    

    Start MySQL with

    systemctl start mysqld
    

    Find the initial MySQL password with the command

    grep 'password' /var/log/mysqld.log
    

    This initial password is expired, you should change this password before you can start using MySQL server.

    To set MySQL password and secure MySQL server, run the command

    mysql_secure_installation
    
  • How to Install Supervisord on CentOS 7

    How to Install Supervisord on CentOS 7

    Supervisor is a program used to monitor and control programs. It can auto startup application on server boot time, and restart if the application fails.

    http://supervisord.org

    To install supervisors on CentOS 7, first, enable epel repository.

    yum install -y epel-release
    

    Once EPEL repository is enabled, you can install supervisors with the yum command

    yum install -y supervisor
    

    Enable supervisord to start on boot, run

    systemctl enable supervisord
    

    Start supervisord

    systemctl start supervisord
    

    To start a python application on boot time, I created file

    vi /etc/supervisord.d/telegram-bot.ini
    

    With the following content

    [program:telegram_bot]
    command=/root/bots/telegram_bot/bot.py
    directory=/root/bots/telegram_bot
    ;process_name=%(program_name)s ; process_name expr (default %(program_name)s)
    numprocs=1
    autostart=true
    autorestart=true
    stdout_logfile=/var/log/telegram-bot.log
    stdout_logfile_maxbytes=1MB
    stdout_logfile_backups=10
    stdout_capture_maxbytes=1MB
    stdout_events_enabled=false
    stderr_logfile=/var/log/telegram-bot-error.log
    stderr_logfile_maxbytes=1MB
    stderr_logfile_backups=10
    stderr_capture_maxbytes=1MB
    stderr_events_enabled=false
    

    Started application with

    supervisorctl reload
    

    See supervisord

  • Install Tomcat on CentOS 7

    Install Tomcat on CentOS 7

    Apache Tomcat is an open source implementation of the Java Servlet and Java Server Pages. To install Apache Tomcat on CentOS 7, run

    yum install tomcat
    

    To enable tomcat start on boot

    systemctl enable tomcat
    

    You can manage tomcat with

    systemctl stop tomcat
    systemctl start tomcat
    systemctl status tomcat
    systemctl restart tomcat
    

    To see the ports used by tomcat

    [root@tomcat ~]# netstat -lntp| grep java
    tcp6       0      0 127.0.0.1:8005          :::*                    LISTEN      31423/java          
    tcp6       0      0 :::8009                 :::*                    LISTEN      31423/java          
    tcp6       0      0 :::8080                 :::*                    LISTEN      31423/java          
    [root@tomcat ~]# 
    

    webapps are stored in the directory

    /var/lib/tomcat/webapps
    

    Create the default page with

    mkdir /var/lib/tomcat/webapps/ROOT
    echo "Hello Cat" > /var/lib/tomcat/webapps/ROOT/index.html
    

    Tomcat web server can be accessed using

    http://your-server-ip:8080
    

    To open 8080 port on the firewall, use commands

    firewall-cmd --permanent --zone=public --add-port=8080/tcp
    firewall-cmd --reload
    

    Tomcat configurations are available in the directory.

    /etc/tomcat/
    

    Install tomcat Manager

    To install the Tomcat manager GUI application, run

    yum install tomcat-admin-webapps.noarch -y
    

    To create user, edit file

    vi /etc/tomcat/tomcat-users.xml
    

    Inside ““, add


    USER_NAME_HERE and PW_HERE – replace with the username and password you need.

    Restart tomcat to activate Tomcat Manager GUI.

    systemctl restart tomcat
    

    To access GUI, go to

    http://your-server-ip-here:8080/manager/
    
  • Install Caddy Webserver on CentOS 7

    Install Caddy Webserver on CentOS 7

    To install Caddy Webserver on CentOS 7, run

    yum install yum-plugin-copr
    yum copr enable @caddy/caddy
    yum install caddy
    

    Enable caddy start on boot

    systemctl enable caddy
    

    To start caddy, run

    systemctl start caddy
    

    Caddy configuration file available at

    /etc/caddy/Caddyfile
    

    See Caddy