Category: CentOS

  • Set hostname in CentOS 7

    Hostname is a sub domain. To set hosting, edit file

    vi /etc/hosts
    

    Add

    SERVER_IP_HERE HOSTNAME.yourdomain.com HOSTNAME
    

    Example

    72.21.51.194 server32.serverok.in server32
    

    Now run

    echo HOSTNAME.yourdomain.com > /etc/hostname
    

    Example

    echo server32.serverok.in > /etc/hostname
    

    Run

    /bin/hostname -F /etc/hostname
    

    Edit file

    vi /etc/sysconfig/network
    

    Edit or add HOSTNAME entry

    NETWORKING=yes
    HOSTNAME=HOSTNAME.yourdomain.com
    

    Reboot the server with

    reboot
    

    You can verify hostname with command

    hostname
    

    Related Posts

    Change Server Hostname in VestaCP
    Set Permanant hostname on AWS EC2 CentOS 7 server
    Install SSL for Cpanel Server Hostname

  • CentOS 7 VestaCP Upgrade PHP to 7.x

    On CentOS 7 VestaCP install PHP 5.6 by default. This is very old version of PHP. To upgrade PHP to latest version 7.x, you can install remi repo.

    Install EPEL repo

    yum install -y epel-release
    

    Install yum-utils

    yum install -y yum-utils
    

    Install remi repo

    rpm -ivh http://rpms.remirepo.net/enterprise/remi-release-7.rpm
    

    Select PHP version you need

    yum-config-manager --enable remi-php73
    

    Here i selected PHP 7.3. You can select differnt PHP versions with commands like.

    yum-config-manager --enable remi-php56
    yum-config-manager --enable remi-php71
    yum-config-manager --enable remi-php72
    yum-config-manager --enable remi-php73
    yum-config-manager --enable remi-php74
    

    Make sure you only enable one PHP version. If you enabled a PHP version from remi repo, disable it with

    yum-config-manager --disable remi-php56
    yum-config-manager --disable remi-php70
    yum-config-manager --disable remi-php71
    yum-config-manager --disable remi-php72
    yum-config-manager --disable remi-php73
    yum-config-manager --disable remi-php74
    

    Once you have desired version enabled, run yum upgrade

    yum upgrade
    

    Or only for PHP, run

    yum upgrade php*
    
  • CentOS 7 Grub 2

    CentOS 7 Grub 2

    To regenerate grub config on CentOS 7, run

    grub2-mkconfig -o /boot/grub2/grub.cfg
    

    If you use UEFI, run

    grub2-mkconfig -o /boot/efi/EFI/centos/grub.cfg
    

    OVH CentOS 7 server grub rescue prompt

    Back to grub

  • How to reinstall packages using yum

    How to reinstall packages using yum

    To reinstall a package with yum, run

    yum reinstall PKG_NAME
    

    Example

    yum reinstall kernel
    
  • Install Nginx on CentOS 8

    Install Nginx on CentOS 8

    To install Nginx web server on CentOS 8, create repo

    vi /etc/yum.repos.d/nginx.repo
    

    Add

    [nginx]
    name=nginx repo
    baseurl=http://nginx.org/packages/centos/$releasever/$basearch/
    gpgcheck=0
    enabled=1
    

    Install nginx with dnf or yum

    dnf install nginx
    

    Open HTTP and HTTPS ports on firewall

    firewall-cmd --zone=public --permanent --add-service=http
    firewall-cmd --zone=public --permanent --add-service=https
    firewall-cmd --zone=public --permanent --add-service=ssh
    firewall-cmd --reload
    
  • Install PHP 7.4 on CentOS 7

    To install PHP 7.4 on CentOS 7, first install remi repository.

    yum install epel-release -y
    rpm -ivh https://rpms.remirepo.net/enterprise/remi-release-7.rpm
    

    Set PHP 7.4 as default PHP

    yum install yum-utils
    yum-config-manager --enable remi-php74
    

    Install PHP with

    yum install -y php php-bcmath php-cli php-common php-devel php-gd \
        php-imap php-intl php-json php-ldap php-lz4 php-mbstring php-mysqlnd \
        php-soap php-intl php-opcache php-xml php-pdo
    

    After installing check PHP version with php -v, you will see

    CentOS 7 iinstall PHP 7.4

    At the time of installation, it is PHP version 7.4.0RC3, it will change as new 7.4 release become available.

    Related Posts

    Install PHP 7.2 on Ubuntu
    Install PHP 7.3 in CentOS 8
    PHP

  • Install PHP 7.3 in CentOS 8

    CentOS 8 comes with PHP 7.2. To install PHP 7.3, you need to enable remi repo. You can download remi-release rpm file from

    http://rpms.remirepo.net

    Download and install remi-release rpm

    cd ; wget http://rpms.remirepo.net/enterprise/remi-release-8.rpm
    dnf install remi-release-8.rpm
    

    if you have older php version and don’t want to keep it, uninstall it with

    dnf remove php-gd php-xml php-mbstring php-common php php-odbc php-mysqlnd php-json php-process php-cli php-fpm php-intl php-bcmath php-soap php-pdo 
    

    Install PHP 7.3

    dnf install php73
    

    Set it as default PHP version

    update-alternatives --install /usr/bin/php php /usr/bin/php73 1
    

    Install PHP modules

    dnf install -y php73-php php73-php-gd php73-php-fpm php73-php-pdo php73-php-xml php73-php-json php73-php-imap php73-php-intl php73-php-json php73-php-soap php73-php-bcmath php73-php-xmlrpc php73-php-mysqlnd php73-php-mbstring php73-php-zip
    

    Install php-fpm package

    dnf install php73-php-fpm
    

    set php-fpm to start on boot

    systemctl enable php73-php-fpm
    

    Start php-fpm

    systemctl start php73-php-fpm
    

    Restart Apache

    systemctl restart httpd
    

    PHP 7.3 php.ini located at

    /etc/opt/remi/php73/php.ini
    

    Module directory for PHP 7.3 at

    /opt/remi/php73/root/usr/lib64/php/modules/
    

    Related Posts

    CentOS 8

    PHP

  • Install Apache, MySQL, PHP (LAMP) Stack on CentOS 8

    First disable SELinux by editing file

    vi /etc/selinux/config
    

    Find

    SELINUX=enforcing
    

    Replace with

    SELINUX=disabled
    

    Now restart the server.

    reboot
    

    Verify SELinux is disabled by running “sestatus” command. It should show disabled.

    CentOS 8 sestatus

    Install basic tools

    Lets start by installing some basic tools like whois, curl, git etc..

    dnf -y install wget curl telnet bind-utils net-tools git
    

    Configure Firewall

    On CentOS 8 by default only port 22 (SSH) is open to public. To run a web server, you need to open ports 80 and 443.

    Run following command to open ports in firewall

    firewall-cmd --zone=public --permanent --add-service=http
    firewall-cmd --zone=public --permanent --add-service=https
    firewall-cmd --zone=public --permanent --add-service=ssh
    firewall-cmd --zone=public --permanent --add-port=25/tcp
    firewall-cmd --reload
    

    Install Apache

    To install Apache, run

    dnf -y install httpd
    

    Enable Apache to start on boot by running

    systemctl start httpd
    

    Verify Apache is running with command

    netstat -lntp | grep 80
    

    If Apache is running, you will see something like

    CentOS 8 apache netstat

    If all works good, you should be able to access your web server by opening your server IP in a web browser.

    CentOS 8 Apache Default page

    Install PHP

    CentOS 8 comes with PHP 7.2

    To install PHP, run

    dnf -y install php php-cli php-xml php-json php-intl php-odbc php-pdo php-soap php-mysqlnd php-process php-bcmath php-gd php-mbstring
    

    Install php-fpm

    dnf -y install php-fpm
    

    Enable php-fpm start on boot

    systemctl enable php-fpm
    

    Start php-fpm with

    systemctl start php-fpm
    

    php-fpm pool config files are located in folder /etc/php-fpm.d. php-fpm listens on socket at /run/php-fpm/www.sock

    php-fpm package comes with Apache config file, it get placed on /etc/httpd/conf.d/php.conf. Restart apache to get php-fpm activated.

    systemctl restart httpd
    

    Now create a file

    vi /var/www/html/1.php
    

    with content


    You should be able to access phpinfo page on URL

    http://YOUR-SERVER-IP/1.php
    

    php.ini file located in /etc/php.ini, you need to restart php-fpm service if you edit this file.

    Install MySQL

    We will install MariaDB, it is an open source drop in replacement for MySQL, created by creator of MySQL. To install MariaDB, run

    dnf install mariadb-server
    

    Enable MariaDB to start on boot

    systemctl enable mariadb
    

    Start MariaDB

    systemctl start mariadb
    

    CentOS 8 come with MariaDB 10.3. By default there is no root PW set, So you can connect to MySQL with command "mysql".

    CentOS 8 MariaDB

    To create a database, use

    create database DB_NAME_HERE;
    

    To create a user, run

    grant all on DB_NAME_HERE.* to 'USER_NAME'@'localhost' identified by 'PASSWORD_HERE';
    

    Now you have Apache, PHP, MySQL ready to use. Upload your web application to /var/www/html folder using SFTP.

    See CentOS 8

  • Creating CentOS 8 Virtual Machine with Vagrant

    Creating CentOS 8 Virtual Machine with Vagrant

    Create a directory for Vagrant project

    mkdir -p ~/vagrant/centos8
    cd ~/vagrant/centos8
    vagrant init generic/centos8
    

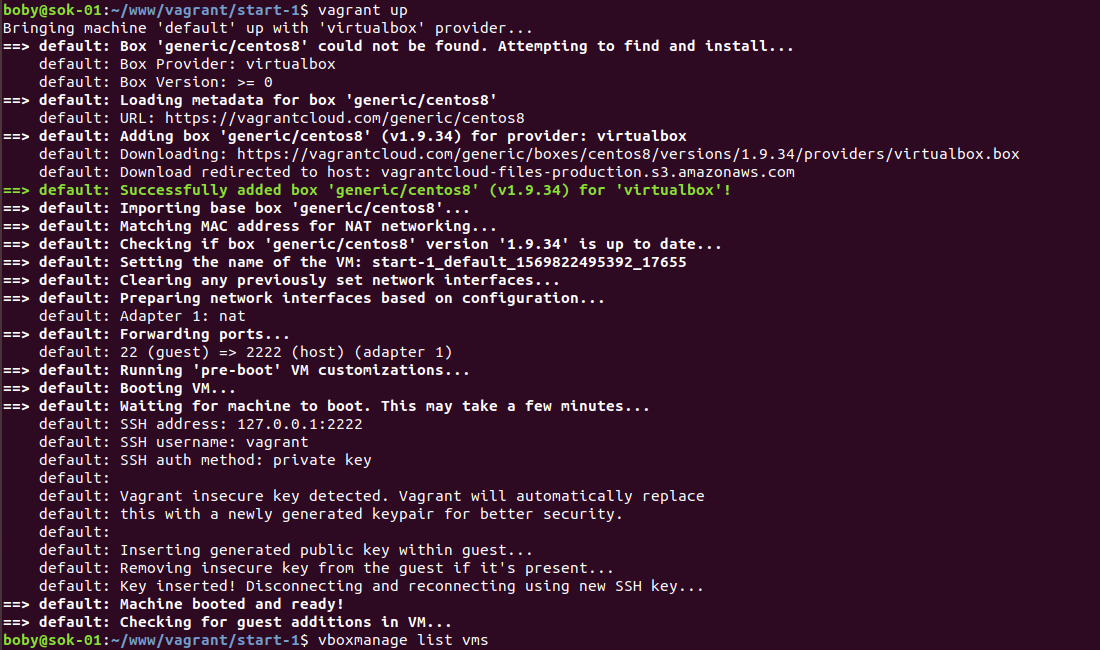
    This will create a file with name “Vagrantfile” on current folder. To start the CentOS 8 VM, run

    vagrant up
    

    CentOS 8  vagrant

    To SSH into CentOS 8 virtual machine

    vagrant ssh
    

    To stop a VM, run

    vagrant halt
    

    See Vagrant

  • CentOS 8 disable Activate the web console message

    When login to CentOS 8 using SSH, you get a message asking you to enable web console.

    Activate the web console with: systemctl enable --now cockpit.socket
    

    centos 8 cockpit

    You can uninstall cockpit with command

    yum remove cockpit*
    

    If you just need to disable the message, delete the file

    rm -f /etc/motd.d/cockpit
    

    This is actually a symlink to file /run/cockpit/motd

    See CentOS 8

  • dnf – Package manager for CentOS/RHEL 8

    dnf is package manager for RHEL/CentOS 8. This is improved version of yum.

    To search for a package, use

    dnf search PACKAGE_NAME
    

    To install a package, use

    dnf install PACKAGE_NAME
    
  • Install CentOS 8 from Net boot ISO

    Install CentOS 8 from Net boot ISO

    CentOS 8 provide 2 type of ISO. One that ends with boot.iso, this is 534 MB. This only include essential files to get you started with installation. This installation method require internet connection as files needed to be downloaded from internet. Other ISO file is full install media, that is 6.6 GB in size. To install from boot.iso, download it from

    http://isoredirect.centos.org/centos/8/isos/x86_64/

    This page will list morrors near to you.

    CentOS download mirror

    Click on any of the morror from link, on next page, you will see ISO files. Download CentOS-8-x86_64-xxxx-boot.iso

    CentOS 8 download ISO

    Write this ISO file into a USB drive or DVD, then boot your computer with it. You will see following screen.

    CentOS 8 install

    Select first or second option. 2nd option test install media for any errors. If you use USB drive, you can just select option 1 as there is less chance of media corruption compared to DVD drives.

    centos 8 language

    Select language, click continue.

    CentOS 8 installation

    On this screen, you need to make several choices.

    Installation Destination

    Select the hard disk where you need CentOS 8 installed.

    CentOS 8 disk

    If you have an empty disk, all you need to do is click “Done”.

    If your disk have existing partitions, you may need to delete it before insalling CentOS 8. If you have any data on this hard disk, always take a backup before you installing new OS.

    Network & Host Name

    You need to configure your network. Most of the time all you need to do is click on ON/OFF toggle on right side of the network interface.

    CentOS 8 Network

    If you have DHCP on your network, you will see IP address assigned to your computer. If not, you need to manually configure networking. It is important as you will need internet to do CentOS 8 install using boot ISO file. Click Done to go back to previous screen.

    Installation Source

    On this page, you need to enter a CentOS mirror. You can use following URL

    http://mirror.centos.org/centos/8/BaseOS/x86_64/os/
    

    CentOS 8 installation source

    It is better to use a CentOS mirror near to you. This will make file downloads faster. In my case, i used

    http://centos.mirrors.estointernet.in/8.0.1905/BaseOS/x86_64/os/
    

    There is option to select mirror near you on this screen. But for some reason, this option did not work for me.

    Software Slection

    On this screen, you need to select software to install.

    CentOS 8 software selection

    You can select if you need to install GUI or just minimal CentOS install. I selected minimal install as everything else can be installed later as needed.

    Click “Done”, will take you to previous screen. Now you will see “Begin Installation” button enabled. Click on it to continue installation.

    On next screen, you get option to set password. Set password for user root. You can also create a new user if required.

    Installation take 15 to 30 minutes depending on your download speed. Once installation completed, you will be asked to reboot.

    CentOS 8 use Kernel 4.18

    [root@192 ~]# hostnamectl 
       Static hostname: localhost.localdomain
    Transient hostname: 192.168.1.5
             Icon name: computer-vm
               Chassis: vm
            Machine ID: 7ad955dffb89464a96918974be28795b
               Boot ID: 77cd4c012cbe4b6f9c33ab7dae5ecc33
        Virtualization: oracle
      Operating System: CentOS Linux 8 (Core)
           CPE OS Name: cpe:/o:centos:centos:8
                Kernel: Linux 4.18.0-80.7.1.el8_0.x86_64
          Architecture: x86-64
    [root@192 ~]# 
    

    You can use both yum and dnf for installing software.