Category: CentOS

  • Install CentOS 8 from Net boot ISO

    Install CentOS 8 from Net boot ISO

    CentOS 8 provide 2 type of ISO. One that ends with boot.iso, this is 534 MB. This only include essential files to get you started with installation. This installation method require internet connection as files needed to be downloaded from internet. Other ISO file is full install media, that is 6.6 GB in size. To install from boot.iso, download it from

    http://isoredirect.centos.org/centos/8/isos/x86_64/

    This page will list morrors near to you.
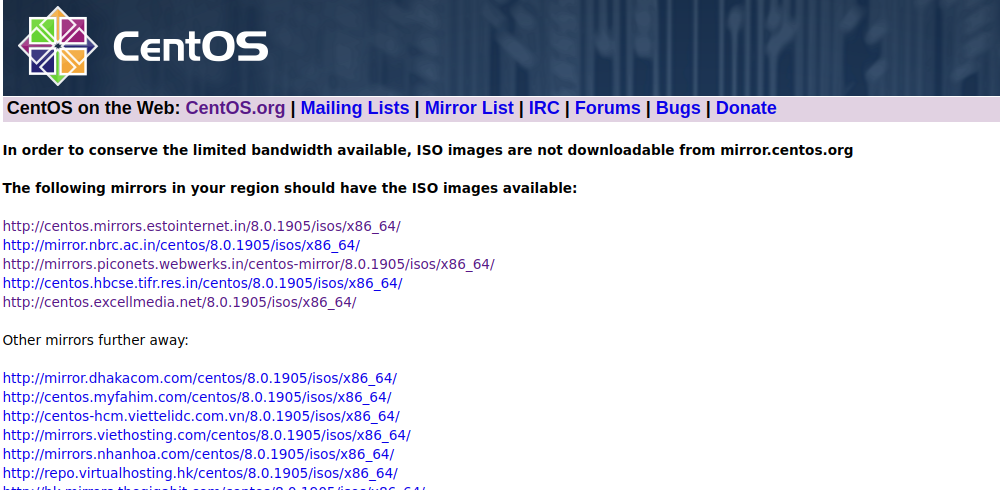
    CentOS download mirror

    Click on any of the morror from link, on next page, you will see ISO files. Download CentOS-8-x86_64-xxxx-boot.iso
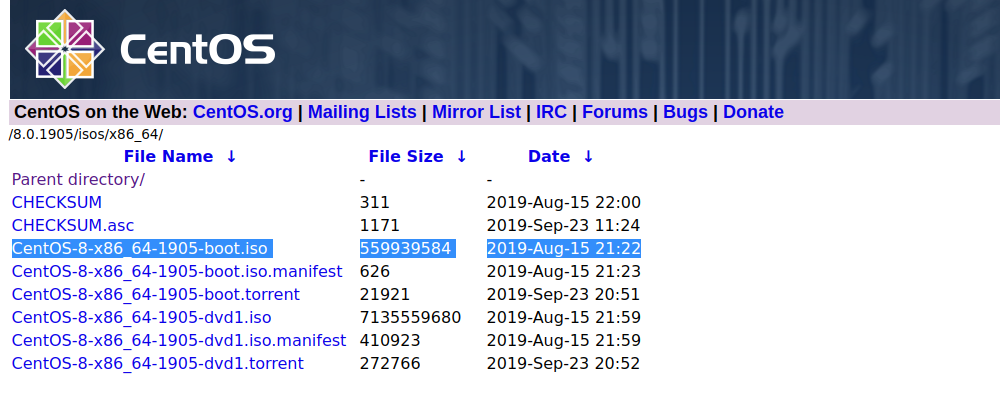
    CentOS 8 download ISO

    Write this ISO file into a USB drive or DVD, then boot your computer with it. You will see following screen.
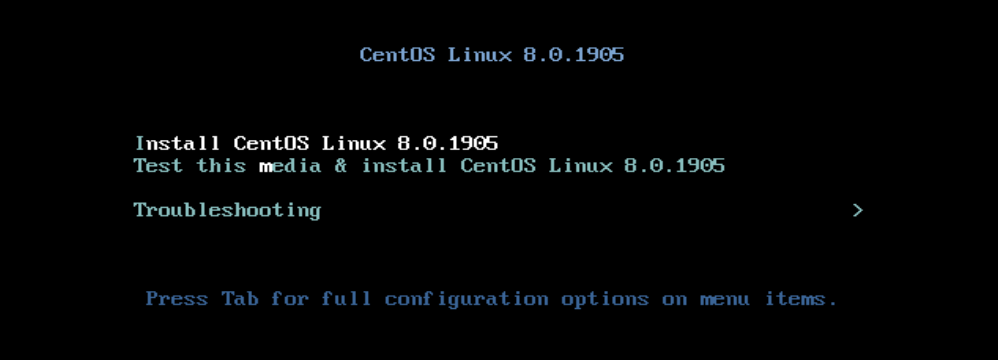
    CentOS 8 install

    Select first or second option. 2nd option test install media for any errors. If you use USB drive, you can just select option 1 as there is less chance of media corruption compared to DVD drives.
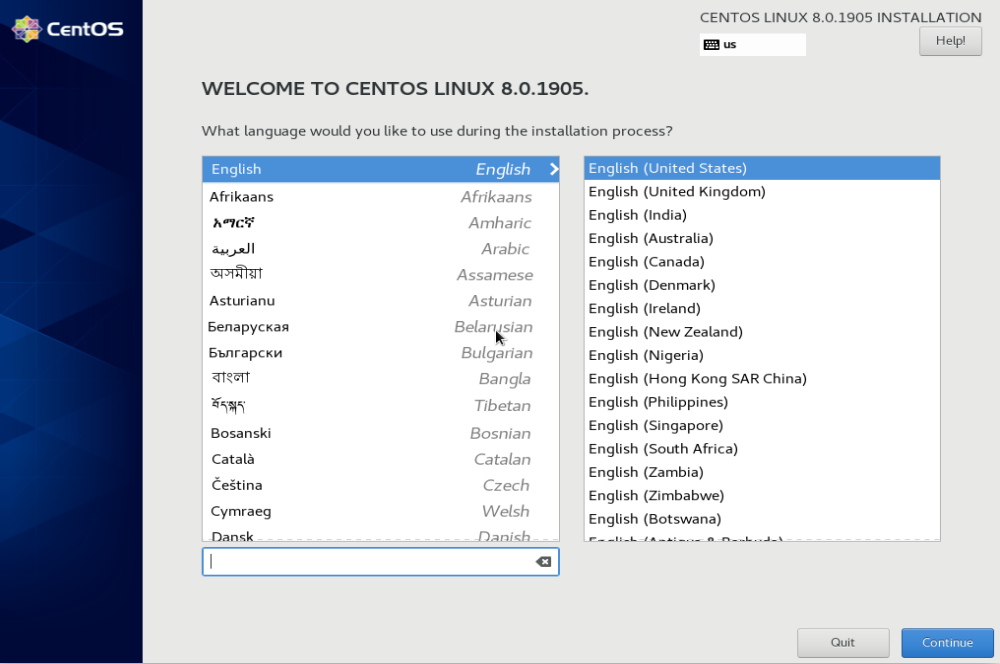
    centos 8 language

    Select language, click continue.

    CentOS 8 installation

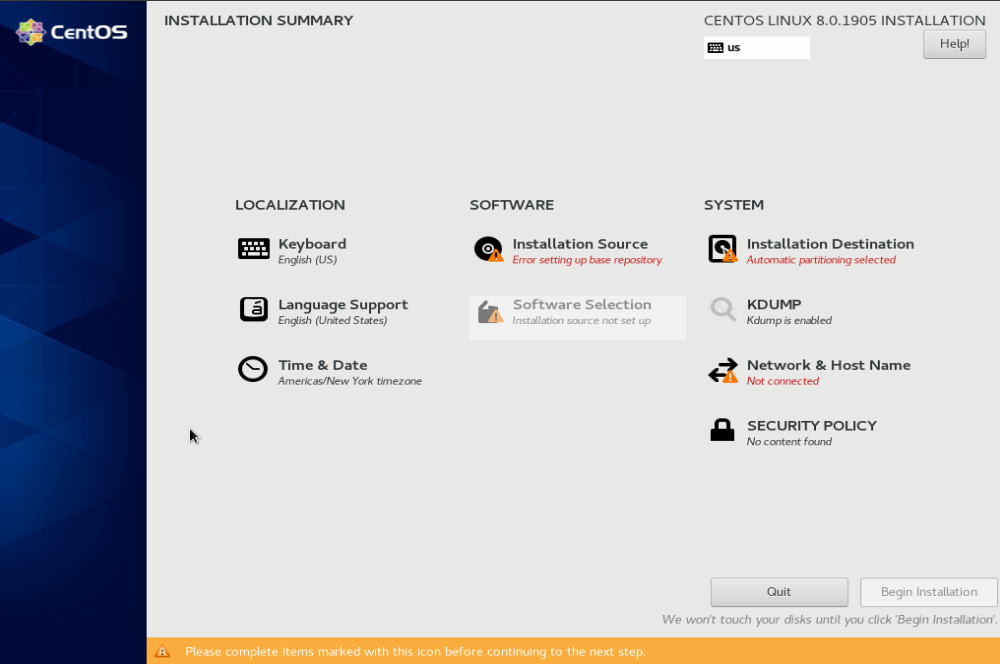
    On this screen, you need to make several choices.

    Installation Destination

    Select the hard disk where you need CentOS 8 installed.
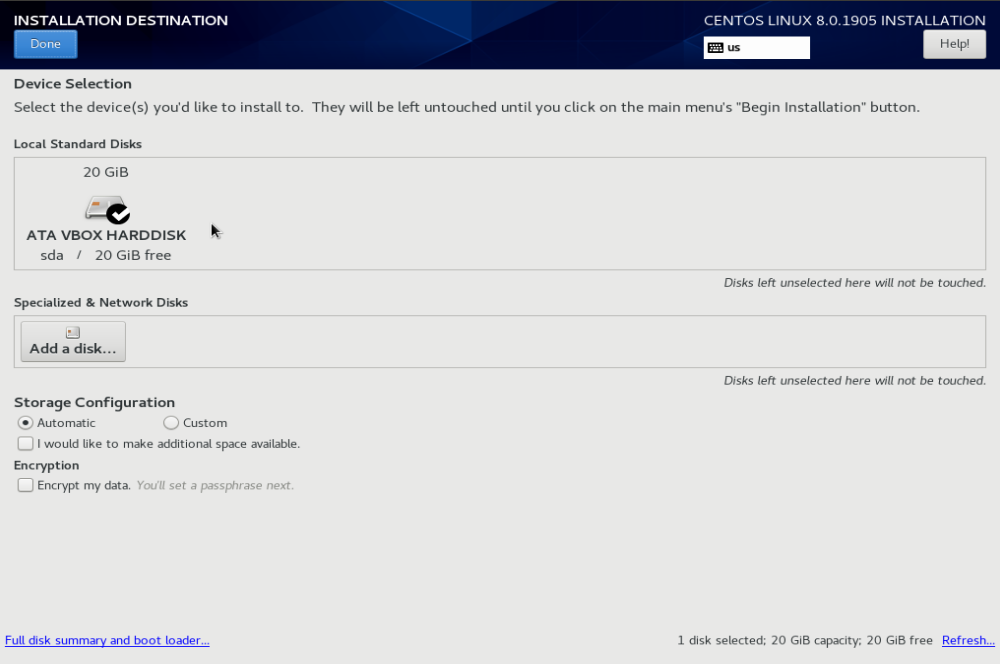
    CentOS 8 disk

    If you have an empty disk, all you need to do is click “Done”.

    If your disk have existing partitions, you may need to delete it before insalling CentOS 8. If you have any data on this hard disk, always take a backup before you installing new OS.

    Network & Host Name

    You need to configure your network. Most of the time all you need to do is click on ON/OFF toggle on right side of the network interface.
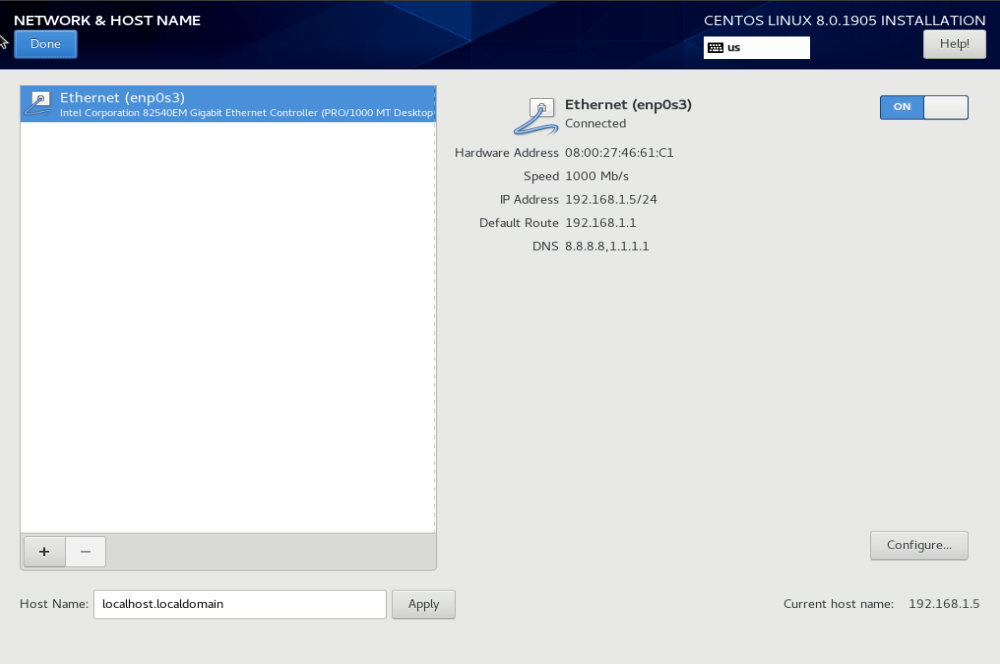
    CentOS 8 Network

    If you have DHCP on your network, you will see IP address assigned to your computer. If not, you need to manually configure networking. It is important as you will need internet to do CentOS 8 install using boot ISO file. Click Done to go back to previous screen.

    Installation Source

    On this page, you need to enter a CentOS mirror. You can use following URL

    http://mirror.centos.org/centos/8/BaseOS/x86_64/os/
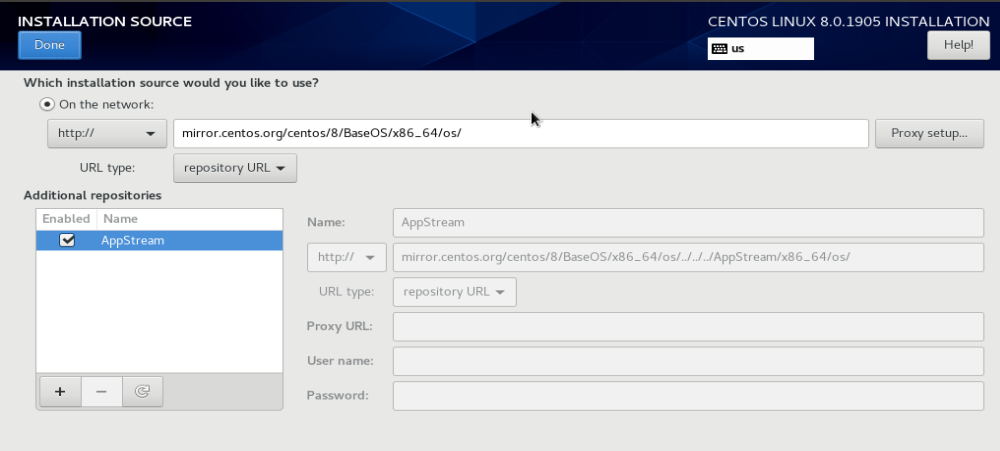
    

    CentOS 8 installation source

    It is better to use a CentOS mirror near to you. This will make file downloads faster. In my case, i used

    http://centos.mirrors.estointernet.in/8.0.1905/BaseOS/x86_64/os/
    

    There is option to select mirror near you on this screen. But for some reason, this option did not work for me.

    Software Slection

    On this screen, you need to select software to install.
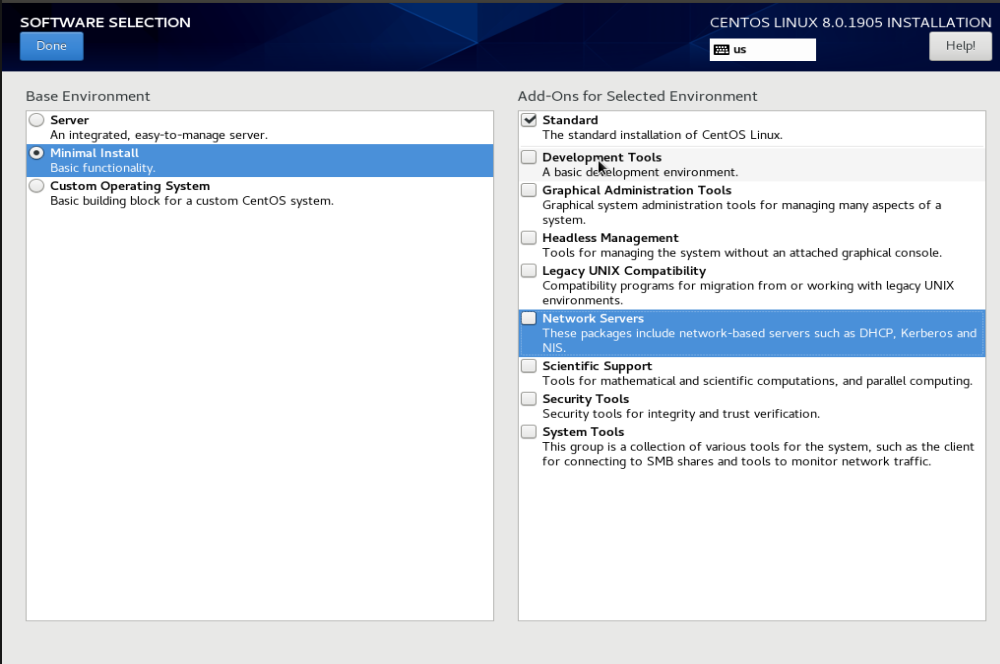
    CentOS 8 software selection

    You can select if you need to install GUI or just minimal CentOS install. I selected minimal install as everything else can be installed later as needed.

    Click “Done”, will take you to previous screen. Now you will see “Begin Installation” button enabled. Click on it to continue installation.

    On next screen, you get option to set password. Set password for user root. You can also create a new user if required.

    Installation take 15 to 30 minutes depending on your download speed. Once installation completed, you will be asked to reboot.

    CentOS 8 use Kernel 4.18

    [root@192 ~]# hostnamectl 
       Static hostname: localhost.localdomain
    Transient hostname: 192.168.1.5
             Icon name: computer-vm
               Chassis: vm
            Machine ID: 7ad955dffb89464a96918974be28795b
               Boot ID: 77cd4c012cbe4b6f9c33ab7dae5ecc33
        Virtualization: oracle
      Operating System: CentOS Linux 8 (Core)
           CPE OS Name: cpe:/o:centos:centos:8
                Kernel: Linux 4.18.0-80.7.1.el8_0.x86_64
          Architecture: x86-64
    [root@192 ~]# 
    

    You can use both yum and dnf for installing software.

  • CentOS 8

    CentOS 8 is a short-lived Linux distribution based on Red Hat Enterprise Linux (RHEL). Due to a change in policy, CentOS 8 had an early end of life on December 31, 2021.

    If you are using CentOS 8, you can easily migrate to other RHEL based distributions like Alma Linux, RockyLinux or Oracle Linux.

    CentOS will now provide CentOS 8 Stream, which is a rolling release Linux distribution. CentOS 8 Stream will position itself in the middle of Fedora and RHEL. It won’t be a copy of RHEL, instead, it will be used as a testing ground for RHEL. Newer versions of the software get released on CentOS 8 Stream, once it becomes stable, it will be included in RHEL.

  • Run Apache from command line

    To start Apache from command line with out using a systemd service file or init script, run

    /usr/sbin/httpd -DFOREGROUND
    

    To stop Apache, press CTRL+C.

    You can keep it running by running it inside screen or tmux.

    See Apache

  • Download RPM package from yum repository

    To download RPM file from yum repo, you need to install yum-utils package.

    yum install -y yum-utils
    

    Now you can use command

    yumdownloader --resolve --destdir=/path/ PACKAGE_NAME
    

    Example

    yumdownloader --resolve --destdir=/root/yum/ nginx
    

    This will download and store all rpm files in /var/yum folder. –resolve will resolve dependency and download them. This will be helpful if you need to install a package on a system with no direct internet connection.

    See yum

  • Setup Tor Hidden Service on CentOS 7

    Tor is provided by EPEL repository on CentOS 7. Install EPEL repo with command

    yum install epel-release
    

    Install tor

    yum install tor
    

    Edit tor config file

    vi /etc/tor/torrc
    

    Uncomment or add following lines

    HiddenServiceDir /var/lib/tor/hidden_service/
    HiddenServicePort 80 127.0.0.1:80
    

    Restart tor with command

    systemctl restart tor
    

    Now your tor hidden service is ready to use. You need to run your web application on 127.0.0.1:80

    To see URL of your tor hidden service, run

    cat /var/lib/tor/hidden_service/hostname
    

    Make sure to make a backup of folder “/var/lib/tor/hidden_service/” as it comtains keys for this .onion domain. If you lost it, you will lose your domain name. So it is very important you keep the files safe.

    To stop/start tor, run

    systemctl stop tor
    systemctl start tor
    

    See tor

  • yum-config-manager

    yum-config-manager allows you to manage yum repositories.

    To add a repo, run

    yum-config-manager --add-repo https://download.docker.com/linux/centos/docker-ce.repo
    

    Disable a repository

    yum-config-manager --disable rpmfusion-free-updates
    

    See yum

  • CentOS add IP Address

    To add IP address on a Linux server, first find name of your network interface. This can be done with command

    ip link
    

    In most case, it can be enp3s0 or eth0, if you have more than one network card, this may be differnt, in such case, you need to identify which network interface you need to configure the the IP address .

    Now create file

    vi /etc/sysconfig/network-scripts/ifcfg-enp3s0:1
    

    Here i used enp3s0 as network inferface name, replace it with whatever network interface name you use.

    Add following content

    DEVICE="enp3s0:1"
    IPADDR=IP_ADDR_HERE
    NETMASK=255.255.255.255
    

    IP_ADDR_HERE = replace with the IP address you need to add.

    enp3s0 = replace with actual network interface name.

    Restart network service with command

    systemctl restart network
    

    If you need to add another IP, create file with name

    INTERFACE_NAME:2
    

    for example “enp3s0:2”, you need to use same alias name in DEVICE entry (first line) in the file.

    Adding IP Range in CentOS 6

  • Install vnstat on CentOS 7

    To install vnstat on CentOS 7, run

    yum install vnstat -y
    

    Now create database for your network interface card

    vnstat --create -i NETWORK_INTERFACE_NAME
    

    Restart vnstat deamon

    systemctl restart vnstat
    

    See vnstat

  • Install Transmission on CentOS

    Install Transmission on CentOS

    transmission is a torrent client. This come with a web GUI, that make it easy to installed on a remote server with no X-Windows. To install transmission on CentOS server, run

    yum install -y transmission-daemon transmission-cli
    

    Allow Web Access

    To access transmission web GUI, you need to white list your IP address. To do this, first stop tranmission

    service transmission-daemon stop
    

    Edit file

    vi /var/lib/transmission/.config/transmission/settings.json
    

    Find

        "rpc-whitelist": "127.0.0.1",
    

    Replace with

        "rpc-whitelist": "127.0.0.1,YOUR_IP_ADDR_HERE",
    

    YOUR_IP_ADDR_HERE – replace with your actual IP address.

    Start transmission

    service transmission-daemon start
    

    You will be able to access web GUI at

    http://YOUR_SERVER_IP:9091
    

    Downloaded files are stored in folder

    /var/lib/transmission/Downloads
    
  • Install MongoDB 4.0 on CentOS 7

    To install MongoDB 4.0 (for other versions, see release note) on CentOS 7, create file

    vi /etc/yum.repos.d/mongodb-org-4.0.repo
    

    Add content

    [mongodb-org-4.0]
    name=MongoDB Repository
    baseurl=https://repo.mongodb.org/yum/redhat/$releasever/mongodb-org/4.0/x86_64/
    gpgcheck=1
    enabled=1
    gpgkey=https://www.mongodb.org/static/pgp/server-4.0.asc
    

    Install MongoDB with

    yum install -y mongodb-org
    

    Enable MongoDB start on boot

    systemctl enable mongod
    

    Start Mongo DB with

    systemctl start mongod
    

    To see mongoDB version, run

    [root@ns3084948 ~]# mongo --version
    MongoDB shell version v4.0.10
    git version: c389e7f69f637f7a1ac3cc9fae843b635f20b766
    OpenSSL version: OpenSSL 1.0.1e-fips 11 Feb 2013
    allocator: tcmalloc
    modules: none
    build environment:
        distmod: rhel70
        distarch: x86_64
        target_arch: x86_64
    [root@ns3084948 ~]#
    

    To see if mongoDB running

    [root@ns3084948 ~]# netstat -lntp | grep mongo
    tcp        0      0 127.0.0.1:27017         0.0.0.0:*               LISTEN      10349/mongod        
    [root@ns3084948 ~]# 
    

    Or use

    [root@ns3084948 ~]# systemctl status mongod
    ● mongod.service - MongoDB Database Server
       Loaded: loaded (/usr/lib/systemd/system/mongod.service; enabled; vendor preset: disabled)
       Active: active (running) since Tue 2019-06-04 06:08:01 BST; 18min ago
         Docs: https://docs.mongodb.org/manual
      Process: 10347 ExecStart=/usr/bin/mongod $OPTIONS (code=exited, status=0/SUCCESS)
      Process: 10344 ExecStartPre=/usr/bin/chmod 0755 /var/run/mongodb (code=exited, status=0/SUCCESS)
      Process: 10341 ExecStartPre=/usr/bin/chown mongod:mongod /var/run/mongodb (code=exited, status=0/SUCCESS)
      Process: 10338 ExecStartPre=/usr/bin/mkdir -p /var/run/mongodb (code=exited, status=0/SUCCESS)
     Main PID: 10349 (mongod)
       Memory: 46.7M
       CGroup: /system.slice/mongod.service
               └─10349 /usr/bin/mongod -f /etc/mongod.conf
    
    Jun 04 06:07:57 ns3084948.ip-145-239-4.eu systemd[1]: Starting MongoDB Database Server...
    Jun 04 06:07:58 ns3084948.ip-145-239-4.eu mongod[10347]: 2019-06-04T06:07:58.013+0100 I CONTROL  [main] WARNING: Cannot detect if NUMA interleaving is enabled. Failed to probe "/sys/devices...ssion denied
    Jun 04 06:07:58 ns3084948.ip-145-239-4.eu mongod[10347]: about to fork child process, waiting until server is ready for connections.
    Jun 04 06:07:58 ns3084948.ip-145-239-4.eu mongod[10347]: forked process: 10349
    Jun 04 06:08:01 ns3084948.ip-145-239-4.eu mongod[10347]: child process started successfully, parent exiting
    Jun 04 06:08:01 ns3084948.ip-145-239-4.eu systemd[1]: Started MongoDB Database Server.
    Hint: Some lines were ellipsized, use -l to show in full.
    [root@ns3084948 ~]# 
    
  • List all files in an rpm package

    To list all files in an rpm package run

    rpm -ql PACKAGE_NAME
    
  • Install vsftpd on CentOS

    To install vsftpd FTP server in CentOS, run

    yum install -y vsftpd
    

    Enable vsftpd to start on boot

    systemctl enable vsftpd
    

    Edit configuration file

    vi /etc/vsftpd/vsftpd.conf
    

    You need to update/add following configuration options

    chroot_local_user=YES
    allow_writeable_chroot=YES
    local_umask=002
    file_open_mode=0755
    force_dot_files=YES
    

    Restart vsftpd

    systemctl restart vsftpd
    

    Allow System Accounts to login

    local_enable=YES
    write_enable=YES 
    

    Find

    anonymous_enable=YES
    

    Replace With

    anonymous_enable=NO
    

    Find

    #chroot_local_user=YES
    

    Replace with

    chroot_local_user=YES
    

    Add

    allow_writeable_chroot=YES
    local_umask=002
    file_open_mode=0755
    

    See vsftpd