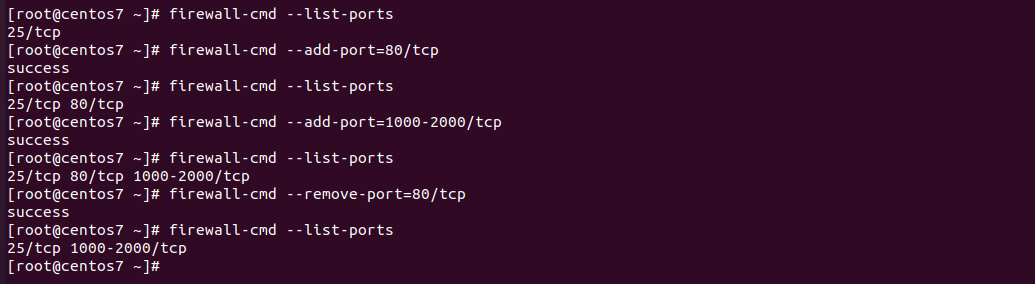
To list all open ports in firealld, run
firewall-cmd --list-ports
You may need to also use
[root@oc1 ~]# firewall-cmd --list-services http https ssh [root@oc1 ~]#
Example
See firewalld
To list all open ports in firealld, run
firewall-cmd --list-ports
You may need to also use
[root@oc1 ~]# firewall-cmd --list-services http https ssh [root@oc1 ~]#
Example
See firewalld
Xfce is a lightweight linux desktop environment. You can install Xfce on a remote server or virtual machine, connect to it using VNC to use it as a desktop.
To install Xfce, enable EPEL repo
yum install -y epel-release
Install Xfce
yum groupinstall Xfce
You can see other groups available with command “yum grouplist”.
Insall vnc server
yum install -y tigervnc-server
We need to create a normal linux user to use with Xfce. Using it as root is not recommended.
To create user, run
useradd -m --shell /bin/bash serverok
Replace “serverok” with whatever username you want to use.
Change to the user we created before
su - serverok
To create initial vnc config files and set password, run
vncserver -fg
We used -fg option to keep vncserver in forground. vcnserver will ask you to set password, this will be used to connect to VNC server.
When i run “vncserver -fg” on CentOS, it exited with error. If it keep running, press CTRL+C to stop vnc server.
If you run with out -fg option, you can stop vnc server with command
vncserver -kill :1
Edit file
vi /home/serverok/.vnc/xstartup
Replace contents of this file with following
#!/bin/sh unset SESSION_MANAGER unset DBUS_SESSION_BUS_ADDRESS /etc/X11/xinit/xinitrc /bin/startxfce4
Now you can start vncserver manually with command
vncserver -fg
You will be able to connect to VNC server with YOUR_SERVER_IP:1
Following need to be done as user root.
Edit file
vi /usr/lib/systemd/system/vncserver@.service
Find
ExecStart=/usr/bin/vncserver_wrapper%i
Replaced with
ExecStart=/usr/bin/vncserver_wrapper serverok %i
reload systemctl
systemctl daemon-reload
Enable vncserver to start on boot
systemctl enable vncserver@:1.service
Start vncserver
systemctl start vncserver@:1.service
You need to open VNC port in firewall. vnc ports start at 5900, for :1, it will be 5901.
[root@centos7 ~]# netstat -lntp | grep vnc tcp 0 0 0.0.0.0:5901 0.0.0.0:* LISTEN 1951/Xvnc tcp 0 0 0.0.0.0:6001 0.0.0.0:* LISTEN 1951/Xvnc tcp6 0 0 :::5901 :::* LISTEN 1951/Xvnc tcp6 0 0 :::6001 :::* LISTEN 1951/Xvnc [root@centos7 ~]#
If you are using firewalld, you can open port 5901 with
firewall-cmd --zone=public --add-port=5901/tcp firewall-cmd --zone=public --add-port=5901/tcp --permanent
firewall-cmd command is run 2 times as first command only make changes in current session. second command with –permanent option make changes permanent, but that only happens after you reload firewalld or reboot server. Running command 2 times make the changes permanent and apply changes to current session.
See VNC, Remote Desktop
To list rules use command
firewall-cmd --list-all --zone=public
To list all open ports
firewall-cmd --list-ports
Example
[root@centos7 zones]# firewall-cmd --zone=public --add-rich-rule='rule family="ipv4" source address="10.1.1.2/32" port protocol="tcp" port="1-65535" accept' success [root@centos7 zones]# firewall-cmd --list-all --zone=public public (active) target: default icmp-block-inversion: no interfaces: eth0 eth1 sources: services: dhcpv6-client ssh ports: 25/tcp 9090/tcp protocols: masquerade: no forward-ports: source-ports: icmp-blocks: rich rules: rule family="ipv4" source address="10.1.1.2/32" port port="1-65535" protocol="tcp" accept [root@centos7 zones]# firewall-cmd --zone=public --remove-rich-rule='rule family="ipv4" source address="10.1.1.2/32" port protocol="tcp" port="1-65535" accept' success [root@centos7 zones]# firewall-cmd --list-all --zone=public public (active) target: default icmp-block-inversion: no interfaces: eth0 eth1 sources: services: dhcpv6-client ssh ports: 25/tcp 9090/tcp protocols: masquerade: no forward-ports: source-ports: icmp-blocks: rich rules: [root@centos7 zones]#
See firewall-cmd
Monit allow you to monitor process. It can restart failed process or alert when server is overloaded.
On CentOS server, you need to enable EPEL repo to install monit.
yum install epel-release -y
Install monit with
yum install monit -y
Enable monit to auto start on boot
systemctl enable monit
Start monit service
systemctl start monit
On CentOS, monit configuration file located at
vi /etc/monitrc
See monit
ls command is used to list files in linux. It is same as dir on windows.
List all files in long format (l), a is to show hidden files
ls -la
Show only file names
ls -b
Show only file names. One file per line
ls -1
On Ubuntu 20.04/22.04 settings won’t open. This may be caused by some software install/update.
I tried to run
gnome-control-center
From the terminal, I get the error
boby@sok-01:~$ gnome-control-center
Command 'gnome-control-center' not found, but can be installed with:
sudo apt install gnome-control-center
boby@sok-01:~$
To fix the error, I installed gnome-control-center package as the error suggests.
sudo apt install gnome-control-center
See Ubuntu
After running a scan, maldet will give you command to see result like
maldet --report SCAN_ID
If you need this email sent to your email, use command
maldet --report SCAN_ID EMAIL_ADDR
Example
See maldet
To enable preview for files in nextcloud, you need to install “Preview Generator” from next cloud app store
https://apps.nextcloud.com/apps/previewgenerator
To install login to nextcloud as admin. From right drop down menu, click + Apps link.
Once on Apps page, you can use the search button on right side to search for “Preview Generator” and install it.
You need to install some additional software, on ubuntu/debian install it with
sudo apt install libreoffice ffmpeg imagemagick ghostscript
Now edit config/config.php file of your nextcloud installation, add following code
'enable_previews' => true, 'preview_libreoffice_path' => '/usr/bin/libreoffice', 'enabledPreviewProviders' => array ( 0 => 'OC\\Preview\\TXT', 1 => 'OC\\Preview\\MarkDown', 2 => 'OC\\Preview\\OpenDocument', 3 => 'OC\\Preview\\PDF', 4 => 'OC\\Preview\\MSOffice2003', 5 => 'OC\\Preview\\MSOfficeDoc', 6 => 'OC\\Preview\\PDF', 7 => 'OC\\Preview\\Image', 8 => 'OC\\Preview\\Photoshop', 9 => 'OC\\Preview\\TIFF', 10 => 'OC\\Preview\\SVG', 11 => 'OC\\Preview\\Font', 12 => 'OC\\Preview\\MP3', 13 => 'OC\\Preview\\Movie', 14 => 'OC\\Preview\\MKV', 15 => 'OC\\Preview\\MP4', 16 => 'OC\\Preview\\AVI', ),
Let’s generate thumbnail for existing files, for this, I enabled shell access for www-data so preview files have proper file ownership (not owned by root).
chsh --shell /bin/bash www-data
Now change to www-data user
su - www-data
Now run
/usr/bin/php /var/www/nextcloud/occ preview:generate-all -vvv
set a cronjob as user www-data
crontab -e -u www-data
*/5 * * * * /usr/bin/php /var/www/nextcloud/occ preview:pre-generate > /dev/null 2>&1
See Nextcloud
To enable SEO url in next cloud, first make sure your web server have mod_rewrite module enabled.
Edit config.php file
vi config/config.php
add following
'overwrite.cli.url' => 'https://yourdomain.com/', 'htaccess.RewriteBase' => '/',
overwrite.cli.url may already there, in that case, don’t add it again.
Now run
sudo -u www-data php /var/www/nextcloud/occ maintenance:update:htaccess
See NextCloud
Whem install csf firewall on Ubuntu 20.04, i get following error
root@ok:~# csf *Error* The path to iptables is either not set or incorrect for IPTABLES [/usr/sbin/ip6tables] in /etc/csf/csf.conf at /usr/local/csf/lib/ConfigServer/URLGet.pm line 26. Compilation failed in require at /usr/sbin/csf line 21. BEGIN failed--compilation aborted at /usr/sbin/csf line 21. root@ok:~#
This is because path for iptables is changed in Ubuntu 20.04. To fix the error edit csf.conf
vi /etc/csf/csf.conf
Find
IPTABLES = "/sbin/iptables" IPTABLES_SAVE = "/sbin/iptables-save" IPTABLES_RESTORE = "/sbin/iptables-restore" IP6TABLES = "/sbin/ip6tables" IP6TABLES_SAVE = "/sbin/ip6tables-save" IP6TABLES_RESTORE = "/sbin/ip6tables-restore"
Replace with
IPTABLES = "/usr/sbin/iptables" IPTABLES_SAVE = "/usr/sbin/iptables-save" IPTABLES_RESTORE = "/usr/sbin/iptables-restore" IP6TABLES = "/usr/sbin/ip6tables" IP6TABLES_SAVE = "/usr/sbin/ip6tables-save" IP6TABLES_RESTORE = "/usr/sbin/ip6tables-restore"
Now restart csf with csf -r, it will work.
csf -r systemctl restart lfd
See csf