To lock a Linux User account, run
usermod -L USER_NAME_HERE
You can verify the account is locked with command
passwd --status USER_NAME_HERE
Example

See usermod
To lock a Linux User account, run
usermod -L USER_NAME_HERE
You can verify the account is locked with command
passwd --status USER_NAME_HERE
Example
See usermod
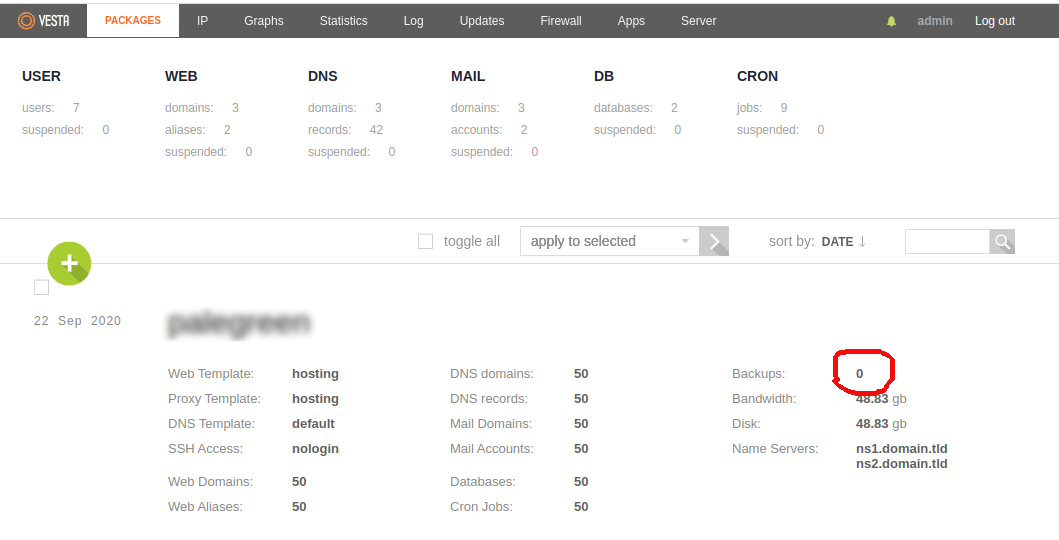
In VestaCP, each packages have option to specify how many backups it can take. First you need to click on packages, then change number of backups allowed for each package.
If backups allowed is more than 0, set it to 0.
Users are created with these Packages. For all existing users, you need to manually edit file
/usr/local/vesta/data/users/USERNAME_HERE/user.conf
change value for backup to 0.
If you have many users, instead o editing one by one, you can use following bash script.
#!/bin/bash

FILES=$(find /usr/local/vesta/data/users/ -name "user.conf")

for USER_FILE in $FILES
do
    echo "Processing ${USER_FILE}"
    sed -i "s/^BACKUPS=.*$/BACKUPS='0'/g" $USER_FILE
    sed -i "s/^U_BACKUPS=.*$/U_BACKUPS='0'/g" $USER_FILE
done
See VestaCP
If your server support both IPv4 and IPv6 and you need to force download a file using IPv4, you can use
wget -4 URL_HERE
To force IPv6 connection, use
wget -6 URL_HERE
Example
[root@li2136-233 ~]# wget -4 https://rpms.remirepo.net/enterprise/remi-release-7.rpm
--2020-09-22 04:45:30--  https://rpms.remirepo.net/enterprise/remi-release-7.rpm
Resolving rpms.remirepo.net (rpms.remirepo.net)... 195.154.241.117
Connecting to rpms.remirepo.net (rpms.remirepo.net)|195.154.241.117|:443... connected.
HTTP request sent, awaiting response... 200 OK
Length: 20732 (20K) [application/x-rpm]
Saving to: ‘remi-release-7.rpm’

100%[==================================================================================================================================================================>] 20,732      74.2KB/s   in 0.3s

2020-09-22 04:45:32 (74.2 KB/s) - ‘remi-release-7.rpm’ saved [20732/20732]

[root@li2136-233 ~]#
from wget help, here are the options

See wget
To update interwrox license, run
/usr/local/interworx/cron/license.pex --sync
Configuration file for interwrox at
/usr/local/interworx/iworx.ini
Interworx login url
https://SERVER-HOSTNAME:2443/nodeworx/index
Webmail
https://SERVER-HOSTNAME:2443/webmail/
To find version of OpenSuse, run
server3:~ # cat /etc/*release
NAME="openSUSE Leap"
VERSION="15.1"
ID="opensuse-leap"
ID_LIKE="suse opensuse"
VERSION_ID="15.1"
PRETTY_NAME="openSUSE Leap 15.1"
ANSI_COLOR="0;32"
CPE_NAME="cpe:/o:opensuse:leap:15.1"
BUG_REPORT_URL="https://bugs.opensuse.org"
HOME_URL="https://www.opensuse.org/"
server3:~ #
To install a program, run
zypper insall PROGRAM_NAME
Example
zypper install nginx
lvs command is used to display logical volumes. You can also use command lvdisplay
root@server70:~# lvs
  LV            VG  Attr       LSize   Pool Origin Data%  Meta%  Move Log Cpy%Sync Convert
  data          pve -wi-ao----  93.65g
  vm-100-disk-1 pve -wi-ao---- 500.00g
  vm-101-disk-1 pve -wi-ao----  50.00g
  vm-102-disk-1 pve -wi-ao---- 100.00g
  vm-104-disk-1 pve -wi-ao---- 800.00g
  vm-105-disk-1 pve -wi-ao----  32.00g
  vm-105-disk-2 pve -wi-ao----   6.00g
  vm-106-disk-1 pve -wi-ao----  50.00g
  vm-108-disk-1 pve -wi-ao----  32.00g
root@server70:~#
To get detailed list, use lvdisplay command
root@server70:~# lvdisplay
  --- Logical volume ---
  LV Path                /dev/pve/data
  LV Name                data
  VG Name                pve
  LV UUID                l7KQll-xHh4-NeJZ-A0q2-H30v-tj3U-DoOM8s
  LV Write Access        read/write
  LV Creation host, time rescue.ovh.net, 2015-12-17 19:45:51 +0000
  LV Status              available
  # open                 1
  LV Size                93.65 GiB
  Current LE             23975
  Segments               1
  Allocation             inherit
  Read ahead sectors     auto
  - currently set to     256
  Block device           253:0

  --- Logical volume ---
  LV Path                /dev/pve/vm-100-disk-1
  LV Name                vm-100-disk-1
  VG Name                pve
  LV UUID                DyrKed-bfZT-pyjO-DU6C-h7Nc-Qfy5-SYbbJe
  LV Write Access        read/write
  LV Creation host, time server70, 2015-12-21 05:57:53 +0000
  LV Status              available
  # open                 1
  LV Size                500.00 GiB
  Current LE             128000
  Segments               1
  Allocation             inherit
  Read ahead sectors     auto
  - currently set to     256
  Block device           253:1

  --- Logical volume ---
  LV Path                /dev/pve/vm-105-disk-1
  LV Name                vm-105-disk-1
  VG Name                pve
  LV UUID                bBHa7g-VBvY-nZfB-lAcw-0eL7-MBOz-QTGKKV
  LV Write Access        read/write
  LV Creation host, time server70, 2016-01-11 06:15:37 +0000
  LV Status              available
  # open                 1
  LV Size                32.00 GiB
  Current LE             8192
  Segments               1
  Allocation             inherit
  Read ahead sectors     auto
  - currently set to     256
  Block device           253:2

  --- Logical volume ---
  LV Path                /dev/pve/vm-105-disk-2
  LV Name                vm-105-disk-2
  VG Name                pve
  LV UUID                zHJvYJ-UjWi-u6dK-ez0u-5kcA-6pJH-PIqmgg
  LV Write Access        read/write
  LV Creation host, time server70, 2016-02-26 08:09:56 +0000
  LV Status              available
  # open                 1
  LV Size                6.00 GiB
  Current LE             1536
  Segments               1
  Allocation             inherit
  Read ahead sectors     auto
  - currently set to     256
  Block device           253:3

  --- Logical volume ---
  LV Path                /dev/pve/vm-106-disk-1
  LV Name                vm-106-disk-1
  VG Name                pve
  LV UUID                p7CBJM-tI3v-zH3G-BhhD-Xabx-UY0R-wOpm6n
  LV Write Access        read/write
  LV Creation host, time server70, 2016-03-27 17:10:46 +0000
  LV Status              available
  # open                 1
  LV Size                50.00 GiB
  Current LE             12800
  Segments               1
  Allocation             inherit
  Read ahead sectors     auto
  - currently set to     256
  Block device           253:4

  --- Logical volume ---
  LV Path                /dev/pve/vm-101-disk-1
  LV Name                vm-101-disk-1
  VG Name                pve
  LV UUID                2aUOze-mNh0-rXnn-qc1J-xpvy-ubhO-SgvEi8
  LV Write Access        read/write
  LV Creation host, time server70, 2016-04-15 04:08:34 +0000
  LV Status              available
  # open                 1
  LV Size                50.00 GiB
  Current LE             12800
  Segments               1
  Allocation             inherit
  Read ahead sectors     auto
  - currently set to     256
  Block device           253:5

  --- Logical volume ---
  LV Path                /dev/pve/vm-108-disk-1
  LV Name                vm-108-disk-1
  VG Name                pve
  LV UUID                RqTmNC-0IL6-N67Q-nh0a-MmS7-9G00-S3KqZy
  LV Write Access        read/write
  LV Creation host, time server70, 2016-12-09 20:46:32 +0000
  LV Status              available
  # open                 1
  LV Size                32.00 GiB
  Current LE             8192
  Segments               1
  Allocation             inherit
  Read ahead sectors     auto
  - currently set to     256
  Block device           253:6

  --- Logical volume ---
  LV Path                /dev/pve/vm-102-disk-1
  LV Name                vm-102-disk-1
  VG Name                pve
  LV UUID                11FKBs-gSYi-owds-4wLU-kT7z-xwcm-lZnamc
  LV Write Access        read/write
  LV Creation host, time server70, 2018-04-28 09:11:33 +0000
  LV Status              available
  # open                 1
  LV Size                100.00 GiB
  Current LE             25600
  Segments               1
  Allocation             inherit
  Read ahead sectors     auto
  - currently set to     256
  Block device           253:7

  --- Logical volume ---
  LV Path                /dev/pve/vm-104-disk-1
  LV Name                vm-104-disk-1
  VG Name                pve
  LV UUID                WrdrmV-jj6z-Nb23-Pdlz-lLYn-wUVZ-hlF5XU
  LV Write Access        read/write
  LV Creation host, time server70, 2018-04-29 16:31:28 +0000
  LV Status              available
  # open                 1
  LV Size                800.00 GiB
  Current LE             204800
  Segments               2
  Allocation             inherit
  Read ahead sectors     auto
  - currently set to     256
  Block device           253:8

root@server70:~#
See lvm
dmesg command on linux shows boot message.
dmesgTo see with human readable time, use
dmesg -TTo check any disk related errors
dmesg -T | grep -i -E "nvme|ext4|xfs|I/O"To install bitninja on Debian/Ubuntu, run
sudo su -c "echo deb http://apt.bitninja.io/debian/ bitninja non-free >> /etc/apt/sources.list.d/bitninja.list"
sudo su -c "wget -O- http://apt.bitninja.io/7F8B47DC.gpg | apt-key add -"
sudo apt-get update
sudo apt-get install bitninja
sudo bitninja-config --set license_key=YOUR_LICENSE_KEY_HERE
sudo /etc/init.d/bitninja start
To scan malware, run
bitninjacli --module=MalwareScanner --scan=/var/www
On Ubuntu, some times notifications steal focus from current application. This annoying when you are working on terminal. This is due to start focus feature of gnome when your mouse is over the notification area.
boby@sok-01:~$ gsettings get org.gnome.desktop.wm.preferences focus-new-windows
'smart'
boby@sok-01:~$
We need to change the value of focus-new-windows from smart to strict. This can be done with command
gsettings set org.gnome.desktop.wm.preferences focus-new-windows 'strict'
yum install PKG_NAME
yum remove
Example for installing php and GD
yum install php php-gd
When you need to update all install software, run
yum update
List all available software
yum list available
yum list available "software-name"
List all installed software
yum list installed
See yum

On Debian and Ubuntu servers, you can download a package using apt download command.
apt download PKG_NAME
Package will get downloaded to current working directory. Better do this to /tmp to avoid permission errors.
If you want to download package and dependencies, then use
apt-get install --download-only PKG_NAME
This will download the package and all dependency, store it in folder /var/cache/apt/archives.
If you need to remove downloaded packages, run
apt clean
Seeapt-get