To enable a service on boot, run
systemctl enable SERVICE_NAME

To disable a service from starting on boot, run
systemctl disable SERVICE_NAME
See systemctl
To enable a service on boot, run
systemctl enable SERVICE_NAME
To disable a service from starting on boot, run
systemctl disable SERVICE_NAME
See systemctl
Create init file.
touch /etc/rc.d/init.d/prometheus
chmod 755 /etc/rc.d/init.d/prometheus
vi /etc/rc.d/init.d/prometheus
Add following
#!/bin/bash
#
# /etc/rc.d/init.d/prometheus
#
# Prometheus monitoring server
#
#  chkconfig: 2345 20 80 Read
#  description: Prometheus monitoring server
#  processname: prometheus

# Source function library.
. /etc/rc.d/init.d/functions

PROGNAME=prometheus
PROG=/usr/hostonnet/prometheus/$PROGNAME
USER=prometheus
LOGFILE=/var/log/prometheus.log
DATADIR=/usr/hostonnet/prometheus/data
LOCKFILE=/var/run/$PROGNAME.pid
CONFIG_FILE=/usr/hostonnet/prometheus/prometheus.yml
ALERT_MGR_URL=localhost:9093

start() {
    echo -n "Starting $PROGNAME: "
    cd /usr/hostonnet/prometheus/
    #daemon --user $USER --pidfile="$LOCKFILE" "$PROG -config.file $CONFIG_FILE -storage.local.path $DATADIR -alertmanager.url $ALERT_MGR_URL &>$LOGFILE &"
    daemon --user $USER --pidfile="$LOCKFILE" "$PROG -config.file $CONFIG_FILE -storage.local.path $DATADIR &>$LOGFILE &"
    echo $(pidofproc $PROGNAME) >$LOCKFILE
    echo
}

stop() {
    echo -n "Shutting down $PROGNAME: "
    killproc $PROGNAME
    rm -f $LOCKFILE
    echo
}


case "$1" in
    start)
    start
    ;;
    stop)
    stop
    ;;
    status)
    status $PROGNAME
    ;;
    restart)
    stop
    start
    ;;
    reload)
    echo "Sending SIGHUP to $PROGNAME"
    kill -SIGHUP $(pidofproc $PROGNAME)
    ;;
    *)
        echo "Usage: service prometheus {start|stop|status|reload|restart}"
        exit 1
    ;;
esac
groupadd -r prometheus
useradd -r -g prometheus -s /sbin/nologin -d /usr/hostonnet/prometheus/ -c "prometheus Daemons" prometheus
chown -R prometheus:prometheus /usr/hostonnet/prometheus/
chown prometheus:prometheus /var/log/prometheus.log
chkconfig --add prometheus
chkconfig prometheus on
Verify it is enabled
[root@backup ~]# chkconfig --list | grep prome
prometheus     	0:off	1:off	2:on	3:on	4:on	5:on	6:off
[root@backup ~]#
“3:on” will start prometheus on run level 3, that is normal boot.
Start Prometheus
[root@backup ~]# service prometheus start
Starting prometheus:                                       [  OK  ]
[root@backup ~]#
For non cpanel server, install perl modules
yum install -y perl perl-libwww-perl perl-Time-HiRes unzip bind-utilsOn Ubuntu
apt-get install libwww-perl unzipOnce we have requirements installed, install csf with
cd /usr/local/src
rm -fv csf.zip
wget https://github.com/serverok/csf-firewall/archive/refs/heads/main.zip -O csf.zip
unzip csf.zip
cd csf-firewall-main
sh install.sh
/bin/sed -i "s/RESTRICT_SYSLOG\s*=.*$/RESTRICT_SYSLOG = \"3\"/g" /etc/csf/csf.conf
/bin/sed -i "s/SYSLOG_CHECK\s*=.*$/SYSLOG_CHECK = \"3600\"/g" /etc/csf/csf.conf
/bin/sed -i "s/IGNORE_ALLOW\s*=.*/IGNORE_ALLOW = \"1\"/g" /etc/csf/csf.conf
/bin/sed -i "s/TESTING = \"1\"/TESTING = \"0\"/g" /etc/csf/csf.conf
/bin/sed -i "s/PT_USERMEM\s*=.*/PT_USERMEM = \"1024\"/g" /etc/csf/csf.conf
/bin/sed -i "s/LF_NETBLOCK_ALERT\s*=.*/LF_NETBLOCK_ALERT = \"0\"/g" /etc/csf/csf.conf
/bin/sed -i "s/LF_PERMBLOCK_ALERT\s*=.*/LF_PERMBLOCK_ALERT = \"0\"/g" /etc/csf/csf.conf
/bin/sed -i "s/PS_EMAIL_ALERT\s*=.*/PS_EMAIL_ALERT = \"0\"/g" /etc/csf/csf.conf
/bin/sed -i "s/LF_EMAIL_ALERT\s*=.*/LF_EMAIL_ALERT = \"0\"/g" /etc/csf/csf.confSee csf
To search for available packages, run
apt-cache search PKG_NAME
Example
boby@sok-01:~$ apt-cache search wget
devscripts - scripts to make the life of a Debian Package maintainer easier
wget - retrieves files from the web
abcde - A Better CD Encoder
apt-mirror - APT sources mirroring tool
axel - light command line download accelerator
filetea - Web-based file sharing system
getdata - management of external databases
libcupt4-2-downloadmethod-wget - flexible package manager -- wget download method
libwget0 - Download library for files and recursive websites
ow-shell - shell utilities to talk to an 1-Wire owserver
puf - Parallel URL fetcher
pwget - downloader utility which resembles wget (implemented in Perl)
python-wget - pure Python download utility for Python 2
python3-wget - pure Python download utility for Python 3
snarf - command-line URL grabber
tcllib - Standard Tcl Library
texlive-latex-extra - TeX Live: LaTeX additional packages
wget2 - file and recursive website downloader
wget2-dev - development file for libwget2
wput - tiny wget-like ftp-client for uploading files
boby@sok-01:~$
Here is some example of using curl to login to site, use cookie to do further requests.
curl -k --cookie-jar ./cookies_hotfile --data "returnto=%2F&user=USERNAME_HERE&pass=PASSWORD_HERE" http://site.com/login.php
curl -L -O --cookie ./cookies_hotfile http://site.com/dl/5222/4444/file.zip.html
See curl
chown command is ued to change ownership of a file or folder
In this example ownership of folder public_html to username and group specified.
chown -R username:group public_html
-R used for recursively change ownership, that is all files and folders inside the folder also get the new ownership.
See Linux Commands
yum install at
Enable atd
[root@server12 ~]# service atd status
atd is stopped
[root@server12 ~]# chkconfig --list | grep atd
atd            	0:off	1:off	2:off	3:on	4:on	5:on	6:off
[root@server12 ~]# service atd start
Starting atd:                                              [  OK  ]
[root@server12 ~]#
Setting Job
[root@server12 ~]# echo "/sbin/shutdown -h now"  |  at  21:15  16.02.2017
job 1 at 2017-02-16 21:15
[root@server12 ~]# atq
1	2017-02-16 21:15 a root
[root@server12 ~]#
Deleting at job
[root@server12 ~]# atq
1	2017-02-16 21:15 a root
[root@server12 ~]# man atq
[root@server12 ~]# atrm 1
[root@server12 ~]# atq
[root@server12 ~]#
See linux commands
To test if pop3 mailbox work using telnet, use
telnet MAIL_SERVER_IP 110
user YOUR_EMAIL_ADDRESS
pass YOUR_EMAIL_PASSWORD
Once logged in, you can use commands like
STAT
LIST
RETR
DELE
RSET
TOP
QUIT
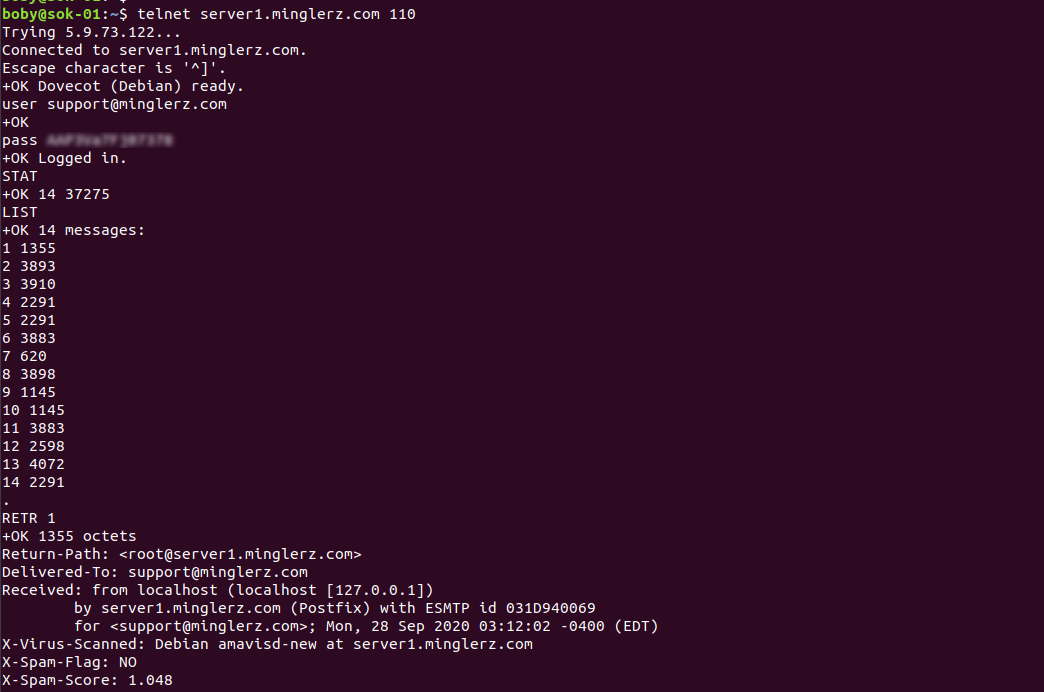
See telnet
To auto upgrade software packages in Ubuntu/Debian, install
apt install -y unattended-upgrades
Edit
vi /etc/apt/apt.conf.d/50unattended-upgrades
In this file, you can configure various settings.
See apt
PowerDNS is an OpenSource DNS server.
Update apt repo
apt-get update && apt-get upgrade -y
On Ubuntu, systemd-resolved listen to port 53. This is a local DNS resolver, we need to stop this service before we can install PowerDNS.
systemctl disable systemd-resolved
systemctl stop systemd-resolved
rm -f /etc/resolv.conf
echo "nameserver 1.1.1.1" > /etc/resolv.conf
echo "nameserver 8.8.8.8" >> /etc/resolv.conf
To install PowerDNS with MySQL backend, run
apt install pdns-server pdns-backend-mysql
Since we are using MySQL backend to store DNS zones, we need to install MySQL database.
apt install mariadb-server
Login to MySQL, create a database and user.
mysql
CREATE DATABASE powerdns;
GRANT ALL ON powerdns.* TO 'powerdns'@'localhost' IDENTIFIED BY 'YOUR_MYSQL_PW_HERE';
Restore database scheme provided by powerdns
mysql powerdns < /usr/share/pdns-backend-mysql/schema/schema.mysql.sql
You can see this scheme in PowerDNS documentation.
Configure PowerDNS to use MySQL backend
vi /etc/powerdns/pdns.d/mysql.conf
Add following content
# MySQL Configuration
# Launch gmysql backend
launch+=gmysql
# gmysql parameters
gmysql-host=localhost
gmysql-port=3306
gmysql-dbname=powerdns
gmysql-user=powerdns
gmysql-password=YOUR_MYSQL_PW_HERE
gmysql-dnssec=yes
# gmysql-socket=
Restart PowerDNS
systemctl restart pdns
If PowerDNS started properly, you will see it listening to port 53. You can verify with command netstat -lntp

In above picture, you will see PowerDNS listen to port 53 and 8081. Port 8081 is API port, you won't see it unless you enabled it.
To verify PowerDNS is running, you can use command
root@vultr:~# dig @127.0.0.1

; <<>> DiG 9.16.1-Ubuntu <<>> @127.0.0.1
; (1 server found)
;; global options: +cmd
;; Got answer:
;; ->>HEADER<<- opcode: QUERY, status: REFUSED, id: 63898
;; flags: qr rd; QUERY: 1, ANSWER: 0, AUTHORITY: 0, ADDITIONAL: 1
;; WARNING: recursion requested but not available

;; OPT PSEUDOSECTION:
; EDNS: version: 0, flags:; udp: 1232
;; QUESTION SECTION:
;.				IN	NS

;; Query time: 0 msec
;; SERVER: 127.0.0.1#53(127.0.0.1)
;; WHEN: Mon Oct 12 06:53:40 UTC 2020
;; MSG SIZE  rcvd: 28

root@vultr:~#
Back to PowerDNS
To find all open ports on a computer, run
nmap -P0 -vv -sS -ff -r -n -p 1-65535 IP_ADDR_HERE
-sS = SYN scan
if you only need to scan most common ports, use
nmap IP_ADDR_HERE
Example
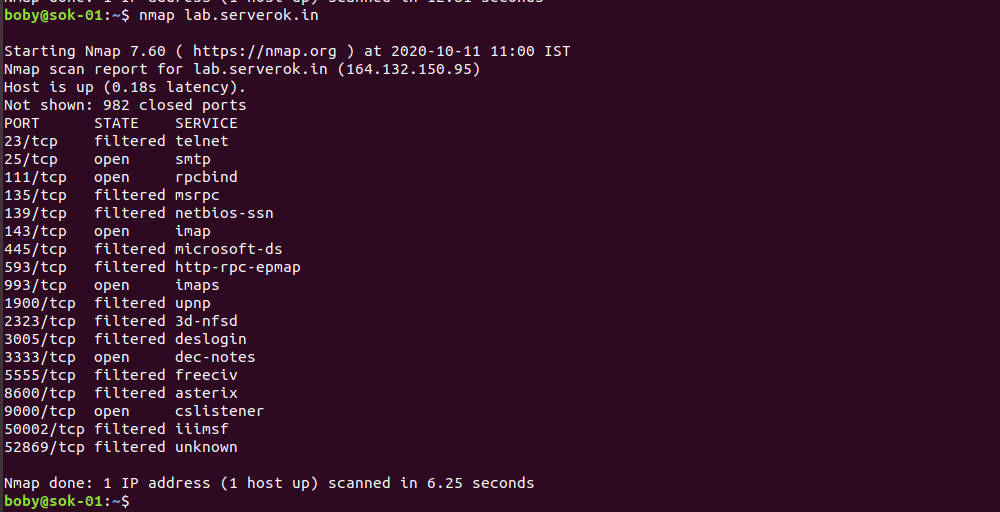
To see open ports on your local computer, run
nmap localhost
| nmap -p 22 IP_ADDR | Scan a single port |
| nmap -p 1-100 IP_ADDR | Scan range of ports |
| nmap -p- IP_ADDR | Scan all 65535 ports |
| nmap -F IP_ADDR | Scan most popular 100 ports (fast scan) |
See nmap