Category: Linux

  • Creating Software RAID 5

    Creating Software RAID 5

    RAID 5 Requires 3 or more physical disks. It provides the redundancy of RAID 1 combined with the speed and size benefits of RAID 0. RAID 5 uses striping, like RAID 0, but also stores parity blocks distributed across each member disk. In the event of a failed disk, these parity blocks are used to reconstruct the data on a replacement disk. RAID 5 can withstand the loss of one member disk.

    I have a server with 4 * 4 TB Disks. Here is parted -l result on the server.
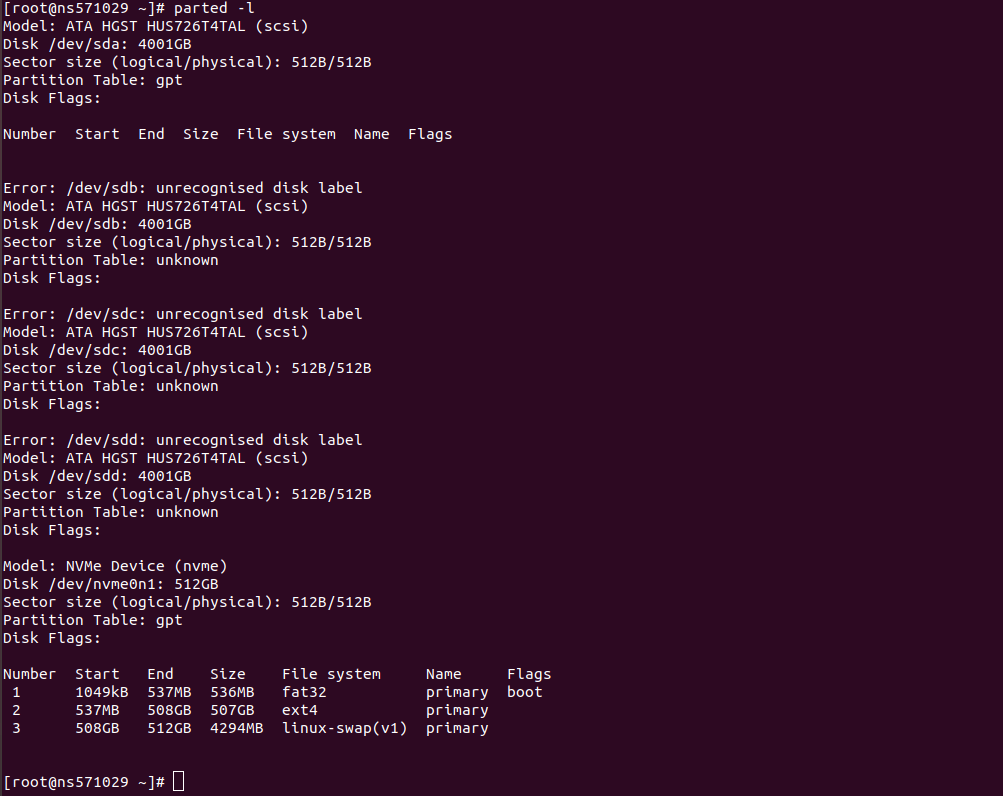
    On this server /dev/sda, /dev/sdb, /dev/sdc and /dev/sdd are 4 TB disks and are not in use. Lets format these disk to be used as RAID 5.

    Following commands need to be executed for each of the disks.

    parted -a optimal /dev/sda
    mklabel gpt
    mkpart primary ext4 0% 100%
    set 1 raid on
    align-check optimal 1
    print
    quit
    

    This will partition the disks, set file system as raid.
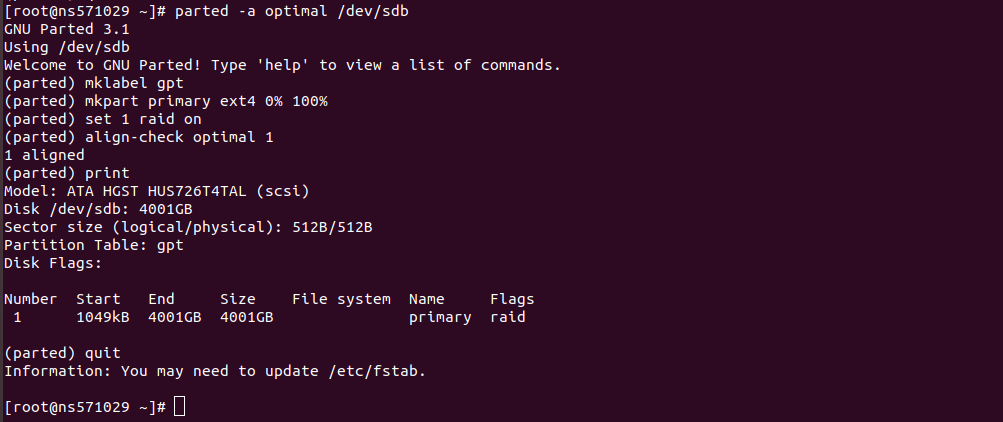
    Repeat the steps for /dev/sdb, /dev/sdc and /dev/sdd.
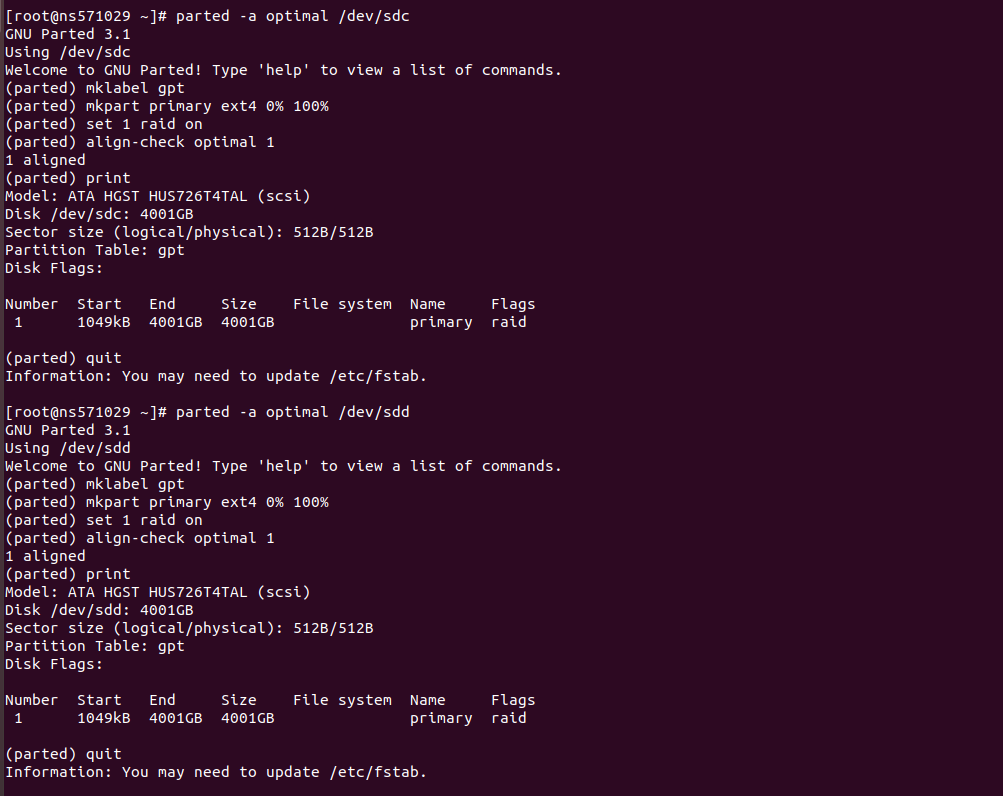
    Now you have all disks formatted, ready to be used in raid array.
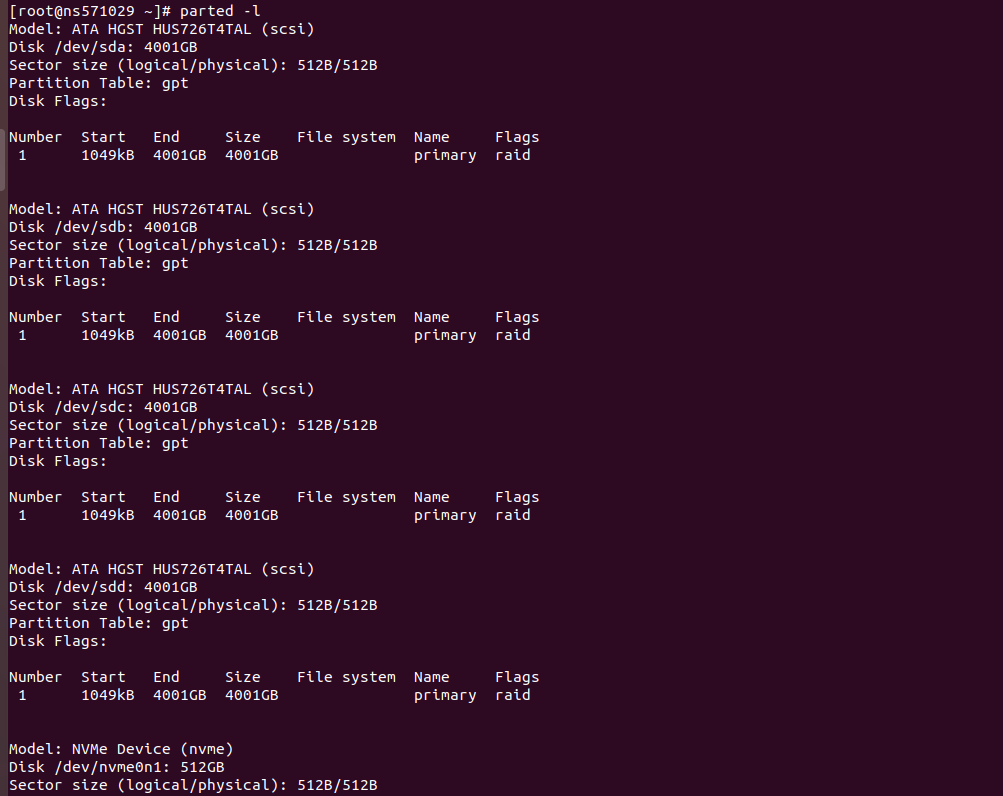
    Create RAID 5 array with command

    mdadm --create --verbose --level=5 --chunk=64 --raid-devices=4 --layout=left-symmetric /dev/md0 /dev/sda1 /dev/sdb1 /dev/sdc1 /dev/sdd1
    

    Once raid created, you can see status with command

    cat /proc/mdstat
    

    Before we can use raid array, we need to create a file system on the raid with command

    mkfs.ext4 /dev/md0
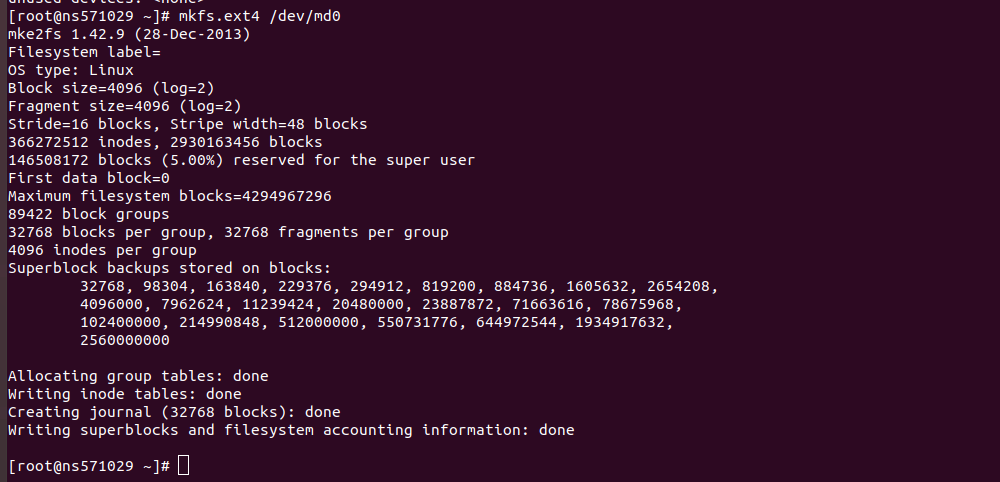
    

    formatting raid 5 array

    Create mdadm.conf file with following command

    mkdir /etc/mdadm/
    cat /etc/mdadm/mdadm.conf
    mdadm --detail --scan >> /etc/mdadm/mdadm.conf
    cat /etc/mdadm/mdadm.conf
    

    Mount Raid 5 Array

    I want to mount the new raid 5 array as /home. For this i edited /etc/fstab, added

    /dev/md0        /home           ext4    errors=remount-ro 0       1
    

    After rebooting, i have 11 TB RAID 5 drive mounted as /home

  • Autostart icecast using systemd

    To autostart icecast using systemd, create a unit file

    vi /etc/systemd/system/icecast.service
    

    Add following content

    [Unit]
    Description=Icecast Network Audio Streaming Server
    After=network.target
    
    [Service]
    Type=simple
    ExecStart=/usr/local/bin/icecast -c /etc/icecast/icecast.xml
    ExecReload=/bin/kill -HUP $MAINPID
    User=icecast
    Group=icecast
    WorkingDirectory=/home/icecast/
    
    [Install]
    WantedBy=multi-user.target

    Enable icecast to start on boot with

    systemctl enable icecast

    To start/stop/restart icecast, use

    systemctl start icecast
    systemctl stop icecast
    systemctl restart icecast
  • configure: error: must have Ogg Vorbis v1.0 or above installed

    when installing icecast from the source on the CentOS 7 server, I get error

    checking for libogg... not found
    checking for libvorbis... configure: error: must have Ogg Vorbis v1.0 or above installed

    To fix the error, install libvorbis-devel

    yum install -y libvorbis-devel

    See Errors

  • How to install icecast KH on CentOS 7 Server

    Download latest source code for IceCast KH server from

    https://github.com/karlheyes/icecast-kh/releases

    At the time of writing this post, latest version is 2.4.0-kh15

    cd /usr/local/src
    wget https://github.com/karlheyes/icecast-kh/archive/icecast-2.4.0-kh15.tar.gz
    tar -zxf icecast-2.4.0-kh15.tar.gz
    cd icecast-kh-icecast-2.4.0-kh15
    ./configure
    make CFLAGS="-D_XOPEN_SOURCE=600"
    make install
    

    If you get error related to “XSLT configuration could not be found”, see configure: error: XSLT configuration could not be found

    You need a non root user to run icecast, create a user

    useradd -m -s /bin/bash icecast
    

    Copy the sample conif file

    mkdir /etc/icecast
    cp /usr/local/src/icecast-kh-icecast-2.4.0-kh13/examples/icecast_minimal.xml /etc/icecast/
    chown -R icecast:icecast /etc/icecast/
    cp -R /usr/local/src/icecast-kh-icecast-2.4.0-kh13/admin/ /home/icecast/admin/
    cp -R /usr/local/src/icecast-kh-icecast-2.4.0-kh13/web/ /home/icecast/web/
    chown -R icecast:icecast /home/icecast/admin/
    chown -R icecast:icecast /home/icecast/web/
    

    Switch to user icecast

    su - icecast
    

    Create folders for logs

    mkdir /home/icecast/logs
    

    To start icecast, run

    icecast -c /etc/icecast/icecast.xml
    

    Edit icecast.xml, set the password and ports as required.

    To autostart icecast on server boot, check Autostart icecast using systemd.

    See icecast

  • Install PHP 5.6 on CentOS 7

    To install PHP 5.6 on CentOS 7, enable EPEL repo and remi repo

    yum install epel-release -y
    rpm -ivh https://rpms.remirepo.net/enterprise/remi-release-7.rpm
    

    Install yum-utils and enable remi-php56 repo

    yum install yum-utils
    yum-config-manager --enable remi-php56
    

    Install PHP 5.6 with

    yum install -y php php-bcmath php-cli php-common php-devel php-gd \
        php-imap php-intl php-json php-ldap php-lz4 php-mbstring php-mysqlnd \
        php-soap php-intl php-opcache php-xml php-pdo
    
  • configure: error: XSLT configuration could not be found

    When installing a software from source i get error

    configure: error: XSLT configuration could not be found
    

    To fix the error install run

    CentOS/RHEL

    yum install -y libxslt-devel
    

    See Errors

  • How to increase /tmp partition size

    On a Linux server /tmp partition was only 1 GB, it get full at times.

    Server had following in its /etc/fstab file

    [root@imeicheck-2020 ~]# cat /etc/fstab 
    UUID=c0f46bb1-c0bc-4199-95d6-551d03c12a0a /                       xfs     defaults        1 1
    /var/.tempdisk /tmp ext4 loop,rw,noexec,nosuid,nodev,nofail 0 0
    /tmp /var/tmp none bind 0 0
    [root@imeicheck-2020 ~]#
    

    Currenly file /var/.tempdisk is mounted as /tmp.

    So i created a new file with 4 GB size

    dd if=/dev/zero of=/var/sok_tmp bs=1M count=4096
    

    Format it as ext4 file system

    mkfs -t ext4 /var/sok_tmp
    

    Before i swith /tmp to newly created disk, i need to copy content of current /tmp to it. For this i mount the new disk as /tmp2

    mkdir /tmp2
    mount -o loop /var/sok_tmp /tmp2
    rsync -avzP /tmp/ /tmp2/
    

    Now you have all files of /tmp in /tmp2, edit /etc/fstab

    vi /etc/fstab
    

    Find entry for current /tmp partition

    /var/.tempdisk /tmp ext4 loop,rw,noexec,nosuid,nodev,nofail 0 0
    

    Replace it with new file you created

    /var/sok_tmp /tmp ext4 loop,rw,noexec,nosuid,nodev,nofail 0 0
    

    Reboot the server. You will have 4 GB /tmp partition now.

  • apt The method driver /usr/lib/apt/methods/https could not be found

    When running apt update on a Debian server, i get error

    root@shop:~# apt-get update
    E: The method driver /usr/lib/apt/methods/https could not be found.
    N: Is the package apt-transport-https installed?
    root@shop:~# 
    

    apt https error

    To fix the error, run

    apt-get install apt-transport-https ca-certificates
    

    See apt

  • uname

    List Kernel Full details

    boby@hon-pc-01:~ $ uname -a
    Linux hon-pc-01 4.4.0-53-generic #74-Ubuntu SMP Fri Dec 2 15:59:10 UTC 2016 x86_64 x86_64 x86_64 GNU/Linux
    boby@hon-pc-01:~ $ 
    

    List Architecture

    boby@hon-pc-01:~ $ uname -m
    x86_64
    boby@hon-pc-01:~ $ 
    

    Show Kernel Version

    boby@hon-pc-01:~ $ uname -r
    4.4.0-53-generic
    boby@hon-pc-01:~ $ 
    

    See Linux Commands

  • Lock User Account in Linux

    To lock a Linux User account, run

    usermod -L USER_NAME_HERE
    

    You can verify the account is locked with command

    passwd --status USER_NAME_HERE
    

    Example

    Lock Linux User Account usermod

    See usermod

  • VestaCP disable Backups

    VestaCP disable Backups

    In VestaCP, each packages have option to specify how many backups it can take. First you need to click on packages, then change number of backups allowed for each package.

    VestaCP disable backup

    If backups allowed is more than 0, set it to 0.

    Users are created with these Packages. For all existing users, you need to manually edit file

    /usr/local/vesta/data/users/USERNAME_HERE/user.conf
    

    change value for backup to 0.

    If you have many users, instead o editing one by one, you can use following bash script.

    #!/bin/bash
    
    FILES=$(find /usr/local/vesta/data/users/ -name "user.conf")
    
    for USER_FILE in $FILES
    do
        echo "Processing ${USER_FILE}"
        sed -i "s/^BACKUPS=.*$/BACKUPS='0'/g" $USER_FILE
        sed -i "s/^U_BACKUPS=.*$/U_BACKUPS='0'/g" $USER_FILE
    done
    

    See VestaCP