Category: Linux

  • How to uninstall Imunify360 on Cpanel Server

    How to uninstall Imunify360 on Cpanel Server

    To uninstall Imunify360, login to WHM, go to terminal and run following commands. You can also run these commands in SSH after login as user root.

    rm -f i360deploy.sh
    wget https://repo.imunify360.cloudlinux.com/defence360/i360deploy.sh
    bash i360deploy.sh --uninstall
    

    If you use CloudLinux, you may need to run following 2 commands also.

    /usr/sbin/cagefsctl  --force-update
    /usr/sbin/cagefsctl  --remount-all
    

    Back to Imunify360

  • Pterodactyl File Manager increase 250 file limit

    Pterodactyl File Manager increase 250 file limit

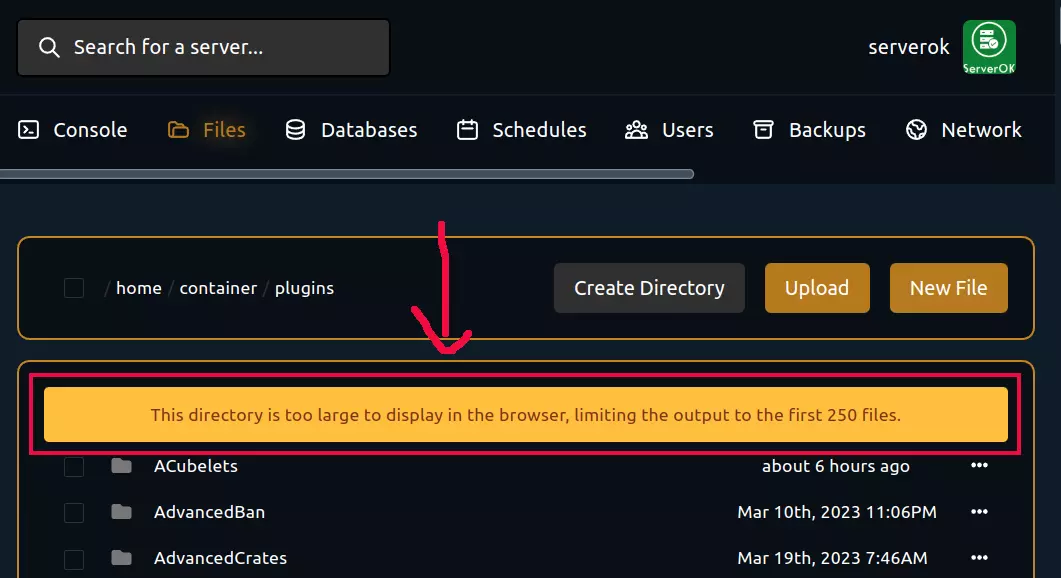
    Pterodactyl is an open-source game control panel. When you view game server files, the file manager only lists 250 files per directory.

    pterodactyl file manager 250 files limit

    This is done to improve page loading performance, but if you have many files, you may want to disable the 250 file limit. To do this, edit file

    cd /var/www/pterodactyl
    vi resources/scripts/components/server/files/FileManagerContainer.tsx

    Find

    <div>{files.length &gt; 250 &amp;&amp; (
    <div>
    <p>This directory is too large to display in the browser, limiting the output to the first 250 files.</p>
    </div>
    )} {sortFiles(files.slice(0, 250)).map((file) =&gt; ( ))}</div>
     

    Replace with

    <div>{sortFiles(files).map((file) =&gt; ( ))}</div>
     

    Another way is just to change the number 250 to a higher number.

    Now rebuild the files

    yarn build:production

    Create Laravel template cache

    php artisan view:clear

    Change permissions for files. This command depends on the web server and OS you use. On RHEL-based OS with Nginx web server, I used

    chown -R nginx:nginx /var/www/pterodactyl/

    Back to pterodactyl

  • AtoM PDF thumbnail not working

    AtoM PDF thumbnail not working

    After migrating AtoM to a new server, PDF thumbnails stopped generating when uploading PDF files.

    You can regenerate thumbnail for a resource with the command

    php symfony digitalobject:regen-derivatives --slug="slug-here"
    

    https://www.accesstomemory.org/en/docs/2.7/admin-manual/maintenance/cli-tools/#regenerating-derivatives

    When I run, I get error

    $ php symfony digitalobject:regen-derivatives --slug="dd-2"
                                                                                 
      Continuing will regenerate the derivatives for ALL digital objects (and    
      descendants of, if an information object)                                  
      "dd-2"                                                                     
      This will PERMANENTLY DELETE existing derivatives you chose to regenerate  
                                                                                 
      Continue? (y/N)                                                            
                                                                                 
    y
    >> digital object Regenerating derivatives for img108.pdf... (51.75s)
    sh: convert: command not found
    >> digital object Please update the search index manually to reflect any changes
    >> digital object Done!
    $ 
    

    The error “convert: command not found” is due to ImageMagick not installed on the server, fixed by installing ImageMagick with the command

    yum install -y ImageMagick
    

    Next, I get the error

    which: no pdfinfo in (/usr/local/bin:/bin:/usr/bin:/usr/local/sbin:/usr/sbin)
    

    Fixed by installing poppler-utils

    yum install -y poppler-utils
    

    PDF thumbnail got regenerated after installing the packages ImageMagick and poppler-utils.

    $ php symfony digitalobject:regen-derivatives --slug="dd-2"
                                                                                 
      Continuing will regenerate the derivatives for ALL digital objects (and    
      descendants of, if an information object)                                  
      "dd-2"                                                                     
      This will PERMANENTLY DELETE existing derivatives you chose to regenerate  
                                                                                 
      Continue? (y/N)                                                            
                                                                                 
    y
    >> digital object Regenerating derivatives for img108.pdf... (2.07s)
    >> digital object Please update the search index manually to reflect any changes
    >> digital object Done!
    $ 
    
  • How to reset CyberPanel admin password

    How to reset CyberPanel admin password

    If you have lost the admin password for your CyberPanel, you can reset the password using SSH. Login to the CyberPanel server using SSH user root, then run the command

    adminPass NEW_PASSWORD_HERE

    Example

    [root@sok ~]# adminPass vmmKeNSnLo8k5thC
    Admin password successfully changed!
    [root@sok ~]# 

    After the password reset, you can log in at

    https://server-ip-here:8090
    User = admin
    Password = the one you set above.

    Back to CyberPanel

  • How to install yt-dlp

    How to install yt-dlp

    yt-dlp is a fork of youtube-dl, it can be used to download videos from youtube and many other similar websites. yt-dlp is more actively developed.

    https://github.com/yt-dlp/yt-dlp

    To install yt-dlp on Ubuntu, run

    pip install yt-dlp

    To download a video, you can use the command

    yt-dlp https://www.youtube.com/watch?v=VIDEO_ID

    To see all available formats

    yt-dlp -F https://youtu.be/ykeW7Jw1K6E

    To download audio only

    yt-dlp -f 140 https://youtu.be/ykeW7Jw1K6E

    See youtube-dl

  • DirectAdmin

    DirectAdmin

    DirectAdmin is a powerful and user-friendly control panel that allows you to manage your web hosting environment easily. Whether you are a beginner or an experienced user, DirectAdmin provides an easy-to-use interface to help you manage your web server.

    To install DirectAdmin, run

    bash <(curl -fsSL https://download.directadmin.com/setup.sh) 'YOUR_LICENSE_KEY_HERE'

    After installation, you will get the admin username and password. You can log in to the DirectAdmin control panel at

    https://SERVER_IP:2222

    MySQL credentials are stored in the directory

    /usr/local/directadmin/conf/my.cnf
    /usr/local/directadmin/conf/mysql.conf

    DirectAdmin License

    /usr/local/directadmin/scripts/getLicense.sh 'YOUR_LICENSE_KEY_HERE'
    da license

    Update DIrectAdmin

    /usr/local/directadmin/scripts/getDA.sh auto stable

    Restart DIrectAdmin

    systemctl restart directadmin

    DirectAdmin CustomBuild versions.txt is getting old

    Back to Hosting Control Panels

  • How to add secondary IP address using nmcli

    How to add secondary IP address using nmcli

    On an AlmaLinux 9 server, I wanted to add secondary IPs to a server. First, I checked the network interface device name used in the server with the command

    ip a
    

    The current public IP address was assigned to the network interface with the name enp13s0. To see how it is configured, I run

    cd /etc
    grep -irl enp13s0
    

    That showed the server am using Network Manager to configure the IP address

    [root@node4 etc]# grep -irl enp13s0
    NetworkManager/system-connections/enp13s0.nmconnection
    [root@node4 etc]# 
    

    You can add additional IP adding using nmcli command.

    nmcli con mod DEVICE_NAME +ipv4.addresses "IP_ADDR/24"
    

    Example

    nmcli con mod enp13s0 +ipv4.addresses "67.222.158.35/24"
    nmcli con mod enp13s0 +ipv4.addresses "67.222.158.36/24"
    nmcli con mod enp13s0 +ipv4.addresses "67.222.158.37/24"
    nmcli con mod enp13s0 +ipv4.addresses "67.222.158.38/24"
    nmcli con mod enp13s0 +ipv4.addresses "67.222.158.39/24"
    nmcli con mod enp13s0 +ipv4.addresses "67.222.158.40/24"
    nmcli con mod enp13s0 +ipv4.addresses "67.222.158.41/24"
    

    To make the IPs online, run

    nmcli con up enp13s0
    

    Now ip a command lists all secondary IP addresses

    [root@node4 etc]# ip a show enp13s0
    2: enp13s0:  mtu 1500 qdisc fq_codel state UP group default qlen 1000
        link/ether 74:56:3c:31:38:0a brd ff:ff:ff:ff:ff:ff
        inet 67.222.158.34/24 brd 67.222.158.255 scope global noprefixroute enp13s0
           valid_lft forever preferred_lft forever
        inet 67.222.158.35/24 brd 67.222.158.255 scope global secondary noprefixroute enp13s0
           valid_lft forever preferred_lft forever
        inet 67.222.158.36/24 brd 67.222.158.255 scope global secondary noprefixroute enp13s0
           valid_lft forever preferred_lft forever
        inet 67.222.158.37/24 brd 67.222.158.255 scope global secondary noprefixroute enp13s0
           valid_lft forever preferred_lft forever
        inet 67.222.158.38/24 brd 67.222.158.255 scope global secondary noprefixroute enp13s0
           valid_lft forever preferred_lft forever
        inet 67.222.158.39/24 brd 67.222.158.255 scope global secondary noprefixroute enp13s0
           valid_lft forever preferred_lft forever
        inet 67.222.158.40/24 brd 67.222.158.255 scope global secondary noprefixroute enp13s0
           valid_lft forever preferred_lft forever
        inet 67.222.158.41/24 brd 67.222.158.255 scope global secondary noprefixroute enp13s0
           valid_lft forever preferred_lft forever
        inet6 fe80::7656:3cff:fe31:380a/64 scope link noprefixroute 
           valid_lft forever preferred_lft forever
    [root@node4 etc]# 
    

    To list all network interface devices using nmcli, run

    [root@node4 etc]# nmcli connection show
    NAME          UUID                                  TYPE      DEVICE       
    enp13s0       4ca2de2f-1f4d-38e2-84fc-4d17aafc2514  ethernet  enp13s0      
    docker0       521f050e-7870-43b3-a6ca-618d45116b03  bridge    docker0      
    [root@node4 etc]# 
    

    Back to IP

  • Mount NFS Drive

    Mount NFS Drive

    NFS (Network File System) is a protocol that allows a computer to access files over a network as if they were stored on its local hard drive. It was developed by Sun Microsystems in the 1980s and has become a popular file sharing protocol for Linux operating systems.

    On RHEL-based distro

    yum install nfs-utils -y
    

    To mount NFS drive, use

    mount -t nfs 10.160.0.5:/shared-data /var/www/html
    

    In the above command 10.160.0.5:/shared-data is the NFS drive, replace it with your NFS drive.

    Back to mount

  • SELinux allow non default SSH port

    SELinux allow non default SSH port

    By default, SELinux only allows running SSH service on default port 22. For security, it is better to change the SSH port to a non-standard port. On Systems running SELinux, sshd service will fail to start if you change the SSH port.

    To allow a custom SSH port, run

    semanage port -a -t ssh_port_t -p tcp SSH_PORT_HERE
    

    For example, to alow sshd service run on port 3333, use

    semanage port -a -t ssh_port_t -p tcp 3333
    

    Back to SELinux

  • How to configure IPv6 on OVH AlmaLinux 8 server

    How to configure IPv6 on OVH AlmaLinux 8 server

    First, find the network interface used by the server with ip a command.

    [root@15-204-47-122 ~]# ip a
    1: lo:  mtu 65536 qdisc noqueue state UNKNOWN group default qlen 1000
        link/loopback 00:00:00:00:00:00 brd 00:00:00:00:00:00
        inet 127.0.0.1/8 scope host lo
           valid_lft forever preferred_lft forever
        inet6 ::1/128 scope host 
           valid_lft forever preferred_lft forever
    2: eno1:  mtu 1500 qdisc mq state UP group default qlen 1000
        link/ether a8:a1:59:c0:de:80 brd ff:ff:ff:ff:ff:ff
        altname enp3s0f0
        inet 15.204.47.122/24 brd 15.204.47.255 scope global eno1
           valid_lft forever preferred_lft forever
        inet6 fe80::aaa1:59ff:fec0:de80/64 scope link 
           valid_lft forever preferred_lft forever
    3: enp3s0f1:  mtu 1500 qdisc noop state DOWN group default qlen 1000
        link/ether a8:a1:59:c0:de:81 brd ff:ff:ff:ff:ff:ff
    4: enp0s20f0u8u3c2:  mtu 1500 qdisc noop state DOWN group default qlen 1000
        link/ether 5a:58:d0:03:8e:b3 brd ff:ff:ff:ff:ff:ff
    [root@15-204-47-122 ~]# 
    

    The interface eno1 has the public IPv4 address of the server associated, so it is the public interface used by the server.

    Find the IPv6 IP address and gateway, This you can find in the OVH Manager server details page.

    OVH Server manager network details IPv6

    Edit ifcfg file for the network interface

    vi /etc/sysconfig/network-scripts/ifcfg-eno1 
    

    At the end of the configuration, add

    IPV6INIT=yes
    IPV6_AUTOCONF=no
    IPV6_FAILURE_FATAL=no
    IPV6ADDR=2604:2dc0:200:1f7a::/64
    

    2604:2dc0:200:1f7a::/64 – is the IPv6 IP address found in OVH Manager.

    Here is the full configuration

    BOOTPROTO=static
    DEVICE=eno1
    HWADDR=a8:a1:59:c0:de:80
    IPADDR=15.204.47.122
    NETMASK=255.255.255.0
    GATEWAY=15.204.47.254
    ONBOOT=yes
    TYPE=Ethernet
    USERCTL=no
    IPV6INIT=yes
    IPV6_AUTOCONF=no
    IPV6_FAILURE_FATAL=no
    IPV6ADDR=2604:2dc0:200:1f7a::/64
    

    Create route file

    vi /etc/sysconfig/network-scripts/route6-eno1 
    

    Add

    2604:2dc0:0200:1fff:00ff:00ff:00ff:00ff dev eno1
    default via 2604:2dc0:0200:1fff:00ff:00ff:00ff:00ff
    

    Here ‘2604:2dc0:0200:1fff:00ff:00ff:00ff:00ff” is gateway address you get from OVH Manager server network page. eno1 is your public network interface name.

    After reboot, the IPv6 network will work on the server.

    Back to IP

  • OVH CentOS 7 server grub rescue prompt

    OVH CentOS 7 server grub rescue prompt

    On an OVH Cpanel server running CentOS 7, the server won’t boot. When accessing the server console using IPMI, I found the following error.

    OVH IPMI server console

    I booted the server into rescue mode, checked the disk partitions with the command parted -l

    Disk /dev/nvme0n1: 450GB
    Sector size (logical/physical): 512B/512B
    Partition Table: gpt
    Disk Flags: 
    
    Number  Start   End     Size    File system     Name     Flags
     1      1049kB  537MB   536MB   fat32           primary  boot, esp
     2      537MB   1073MB  536MB   ext4            primary  raid
     3      1073MB  53.5GB  52.4GB  ext4            primary  raid
     4      53.5GB  450GB   396GB   ext4            primary  raid
     5      450GB   450GB   536MB   linux-swap(v1)  primary
    
    
    Disk /dev/nvme1n1: 450GB
    Sector size (logical/physical): 512B/512B
    Partition Table: gpt
    Disk Flags: 
    
    Number  Start   End     Size    File system     Name     Flags
     1      1049kB  537MB   536MB   fat32           primary  boot, esp
     2      537MB   1073MB  536MB   ext4            primary  raid
     3      1073MB  53.5GB  52.4GB  ext4            primary  raid
     4      53.5GB  450GB   396GB   ext4            primary  raid
     5      450GB   450GB   536MB   linux-swap(v1)  primary
    

    The server had 2 NVMe disks configured as RAID 1 mirrors. The first partition with fat32 filesystem is used for boot.

    To fix the problem, I chrooted to the server file system with the following command (this may be changed based on your server’s partition scheme).

    mount /dev/md3 /mnt
    mount /dev/md2 /mnt/boot/
    mount /dev/md4 /mnt/home
    mount --bind /dev /mnt/dev
    mount --bind /sys /mnt/sys
    mount --bind /proc /mnt/proc
    mount --bind /dev/pts /mnt/dev/pts/
    chroot /mnt
    

    Reinstalled the kernel with

    yum reinstall kernel
    

    Then reinstalled grub loader. This server used UEFI, so used following commands

    mkdir /nvme0n1p1
    mkdir /nvme1n1p1
    mount /dev/nvme0n1p1 /nvme0n1p1
    mount /dev/nvme1n1p1 /nvme1n1p1
    grub2-install --target=x86_64-efi --efi-directory=/nvme0n1p1 --bootloader-id=GRUB
    grub2-install --target=x86_64-efi --efi-directory=/nvme1n1p1 --bootloader-id=GRUB
    

    grub boot loaded is installed on both disks, so server will be able to boot when either one of the disk is selected as boot device.

    Back to grub

  • How to install docker on AlmaLinux 8

    How to install docker on AlmaLinux 8

    To install docker on AlmaLinux, run the following commands

    Install yum-utils

    dnf install -y yum-utils

    Add docker repository

    yum-config-manager --add-repo https://download.docker.com/linux/centos/docker-ce.repo

    Install Docker CE with

    dnf install docker-ce

    Enable docker

    systemctl enable docker

    Start Docker

    systemctl start docker

    To verify if docker is working properly, run

    docker run hello-world
    

    Example

    [root@cloud ~]# docker run hello-world
    Unable to find image 'hello-world:latest' locally
    latest: Pulling from library/hello-world
    2db29710123e: Pull complete 
    Digest: sha256:94ebc7edf3401f299cd3376a1669bc0a49aef92d6d2669005f9bc5ef028dc333
    Status: Downloaded newer image for hello-world:latest
    
    Hello from Docker!
    This message shows that your installation appears to be working correctly.
    
    To generate this message, Docker took the following steps:
     1. The Docker client contacted the Docker daemon.
     2. The Docker daemon pulled the "hello-world" image from the Docker Hub.
        (amd64)
     3. The Docker daemon created a new container from that image which runs the
        executable that produces the output you are currently reading.
     4. The Docker daemon streamed that output to the Docker client, which sent it
        to your terminal.
    
    To try something more ambitious, you can run an Ubuntu container with:
     $ docker run -it ubuntu bash
    
    Share images, automate workflows, and more with a free Docker ID:
     https://hub.docker.com/
    
    For more examples and ideas, visit:
     https://docs.docker.com/get-started/
    
    [root@cloud ~]# 

    See docker