Category: Linux

  • How to reset CentOS 7 root password using console

    How to reset CentOS 7 root password using console

    If you have lost the root password of your CentOS 7 system and have access to the console directly or using KVM, you can reset the password following the instructions below.

    1) Reboot the server, you will see the grub menu.

    CentOS 7 grub menu

    2) Press “e” to edit. You will see the edit screen as shown below.

    centos 7 grub edit

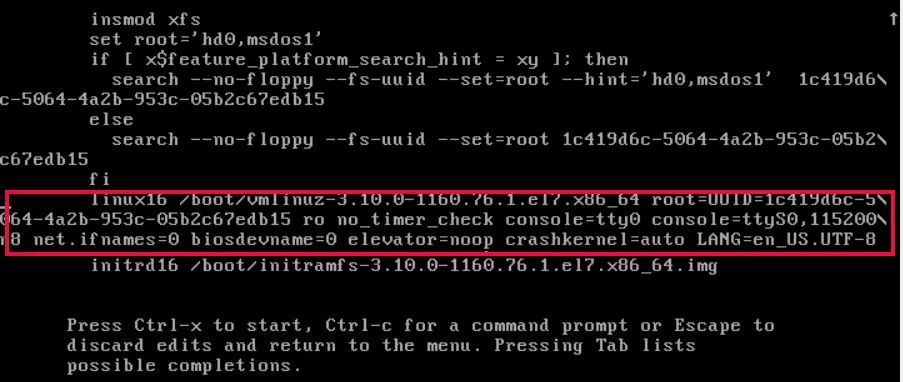
    3) Find the line starting with linux16

    linux16 /boot/vmlinuz-3.10.0-1160.76.1.el7.x86_64 root=UUID=1c419d6c-5064-4a2b-953c-05b2c67edb15 ro no_timer_check console=tty0 console=ttyS0,115200n8 net.ifnames=0 biosdevname=0 elevator=noop crashkernel=auto LANG=en_US.UTF-8
    

    In the fine, find

    ro
    

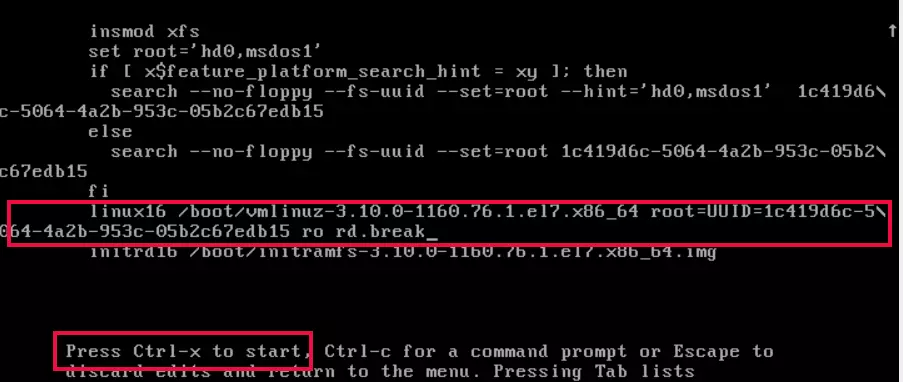
    Delete everything after that and replace with “rd.break”, so the line looks like the following

    linux16 /boot/vmlinuz-3.10.0-1160.76.1.el7.x86_64 root=UUID=1c419d6c-5064-4a2b-953c-05b2c67edb15 ro rd.break
    

    CentOS 7 enable emergency mode

    4) Boot the system to the emergency mode by pressing CTRL + X, you will get a prompt like the following

    CentOS 7 Emergency Mode Command line

    5) Mount /sysroot in read-write mode. and chroot to the file system

    mount -o remount,rw /sysroot
    chroot /sysroot
    

    6) Reset the root password with passwd command

    passwd
    

    7) SELinux won’t allow modifying system files like /etc/shadow, to allow the change, create a file

    touch /.autorelabel
    

    7) Now reboot the system by typing the “exit” command two times

    exit
    exit
    

    After rebooting, you will be able to log in to the system with the new root password.

    Back to CentOS 7

  • How to change home directory of a linux user

    How to change home directory of a linux user

    You can modify a user’s home directory using usermod command in Linux.

    The syntax for the usermod command is

    sudo usermod -d PATH_TO_HOME_DIR USER_NAME
    

    Example

    I have a user “sok_user1” with home directory /home/sok_user1

    root@ok:~# cat /etc/passwd | grep sok_user1
    sok_user1:x:1004:1005::/home/sok_user1:/bin/bash
    root@ok:~#
    

    To change the users home directory to /var/www/, we can use the command

    usermod -d /var/www sok_user1
    

    Example

    root@ok:~# usermod -d /var/www sok_user1
    root@ok:~# cat /etc/passwd | grep sok_user1
    sok_user1:x:1004:1005::/var/www:/bin/bash
    root@ok:~# 
    

    Back to Linux User

  • How to Auto Restart ElasticSearh service on failure

    How to Auto Restart ElasticSearh service on failure

    If ElasticSearh service crash on your server, you can auto restart it by modifying systemd service file.

    systemctl edit elasticsearch
    

    This will open an editor. In the file editor, paste the following text.

    [Service]
    Restart=always
    

    Save and exit the editor. Restart elasticsearch service

    systemctl restart elasticsearch
    

    To verify ElasticSearch auto restart on failure, you can kill the process. To find the process ID, you can use the command “systemctl status elasticsearch”, it will show the current status and PID of ElasticSearch. After killing the process, check the status of ElasticSearch, you will see it auto-starting.

    Monitor using cronjob

    If you are not using systemd, you can use a cronjob to monitor ElasticSearch and restart in case of failure.

    Create a file

    mkdir /usr/serverok/
    vi /usr/serverok/elasticsearch.sh
    

    In the file, paste the following code

    #!/bin/bash
    # Author: ServerOK
    # Web: https://serverok.in
    # Auto restart ElasticSearch on failure.
    
    CMD_RESULT="$(netstat -lntp | grep java | grep 9200)"
    TIME_STAMP="$(date "+%Y-%m-%d %H:%M:%S")"
    
    if [[ ! $CMD_RESULT == *"LISTEN"* ]];
    then
        service elasticsearch restart
        echo -e "${TIME_STAMP} restarted\n"
    fi
    

    This script will check if port 9200 is open (elasticsearch default port). If you use a non-standard port, replace the port 9200 in the script with your elasticsearch port.

    Make the script executable

    chmod 755 /usr/serverok/elasticsearch.sh
    

    Create a cronjob

    crontab -e
    

    Add

    */5 * * * * /usr/serverok/elasticsearch.sh >> /var/log/sok-elasticsearch.log
    

    You can also use monit to auto restart Elastic Search. How to Auto restart ElasticSearch with monit

    Check ElasticSearch Process is running

    In the above method, we check if ElasticSearch listening on a port. Instead, you can check if the process is running or not. Use the following script to check if ElasticSearch process is running, if it crashed, then restart the service.

    #!/bin/bash
    # Author: ServerOK
    # Web: https://serverok.in
    # Auto restart ElasticSearch on crash.
    
    TIME_STAMP="$(date "+%Y-%m-%d %H:%M:%S")"
    CMD_RESULT="$(ps -ef | grep -v grep | grep elastic)"
    
    if [[ -z $CMD_RESULT ]];
    then
        systemctl restart elasticsearch
        echo -e "${TIME_STAMP} restarted\n"
    fi
    

    NOTE: when you use this method, make sure you don’t name the script with name elastic as the script itself shows when you check if elasticsearch is running. So name this script with some generic name, example monitor-es.sh

    Check ElasticSearch status with systemctl

    #!/bin/bash
    
    CMD_RESULT="$(systemctl status elasticsearch.service | grep 'Active' | egrep 'running|dead|failed' | awk '{print $2}' | sed 's/[()]//g')"
    TIME_STAMP="$(date "+%Y-%m-%d %H:%M:%S")"
    
    if [[ ! $CMD_RESULT == "running" ]];
    then
        systemctl restart elasticsearch
        echo -e "${TIME_STAMP} restarted\n"
    #    echo 'elasticsearch restarted' | mail -s 'elasticsearch restarted' [email protected]
    fi
    

    Back to ElasticSearch

  • Auto start Next.js with supervisor

    Auto start Next.js with supervisor

    I want to start Next.js development server on my computer when it starts. Usually, this is done using pm2, I wanted to do it with supervisors.

    Install supervisor with command

    apt install -y supervisor
    

    Create file

    vi /etc/supervisor/conf.d/nextjs-todo.conf 
    

    My Next.js application is located in the directory /mnt/data/sites/learn/nextjs/todo, so I used the following configuration

    [program:nextjs-todo]
    priority=200
    directory=/mnt/data/sites/learn/nextjs/todo
    command=npm run dev
    user=boby
    autorestart=true
    autostart=true
    redirect_stderr=true
    

    In the file change “user=boby” to whatever username you want the application to run as.

    To start the application, run

    supervisorctl reload
    

    To see the application status, run

    boby@sok-01:~$ sudo supervisorctl status
    nextjs-todo                      RUNNING   pid 32604, uptime 0:07:49
    boby@sok-01:~$ 
    

    Back to supervisord

  • Cron Job fails with Error Message “(getpwnam() failed): No such file or directory”

    Cron Job fails with Error Message “(getpwnam() failed): No such file or directory”

    On a CentOS server, cronjob did not work. Checking the log file found the following error message in /var/log/cron

    Oct 24 18:35:01 CentOS-75-64-minimal crond[1546]: (/usr/local/bin/monitor-mysql) ERROR (getpwnam() failed)
    

    The error was because no user was specified in the cronjob. When you use cronjob in file /etc/crontab, you need to specify the username before the command in cronhjob.

    On the server, I had the following cronjob

    */5 * * * * /usr/local/bin/monitor-mysql > /var/log/mysql-monitor.log
    

    To fix the error, I added the user name before the command as below.

    */5 * * * * root /usr/local/bin/monitor-mysql > /var/log/mysql-monitor.log
    

    See cronjob

  • How to get list of User-Agent from access log

    How to get list of User-Agent from access log

    I wanted to block bots from accessing a website. For this, I need to generate a list of all browser User-Agent visiting the website, so I can see which ones can block. This work with most web servers like Apache, Nginx, IIS, etc.

    To get the list of all User-Agents, run

    awk -F\" '($2 ~ "^GET /"){print $6}' access_log | sort | uniq
    

    To get the List of all user agents with the number of visits, run

    awk -F\" '($2 ~ "^GET /"){print $6}' access_log | sort | uniq -c | sort -n
    

    If you want to show the most visited User-Agents first, use “sort -nr” for reverse sorting.

    awk -F\" '($2 ~ "^GET /"){print $6}' access_log | sort | uniq -c | sort -nr
    

    See Access Log

  • How to reset root password on Hetzner Dedicated Server

    How to reset root password on Hetzner Dedicated Server

    If you forget the root password of a Hetzner dedicated server, you need to boot the server into rescue mode, then mount the file system and chroot to the file system, then use the “passwd” command to reset the root password.

    Login to Hetzner

    https://robot.hetzner.com

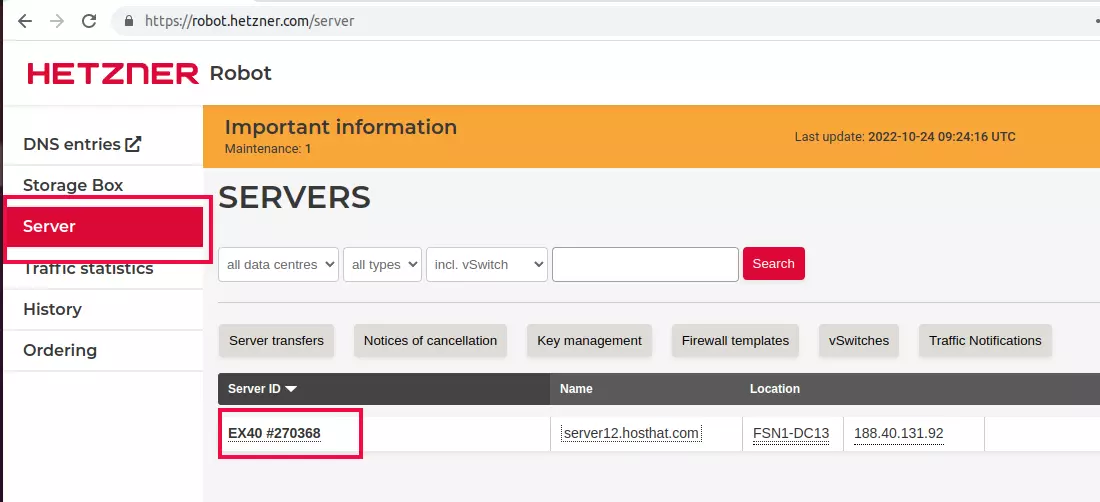
    Click on the “Server” link on the left menu.

    Hetzner dedicated server

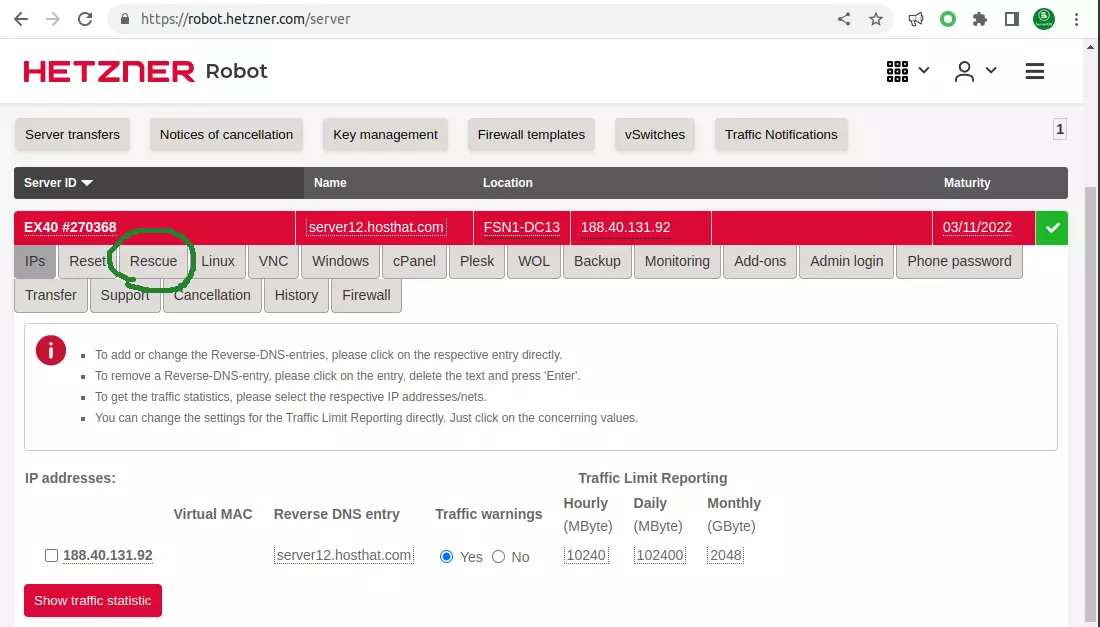
    Click on the server name to show more details about the server.

    Hetzner server rescue mode

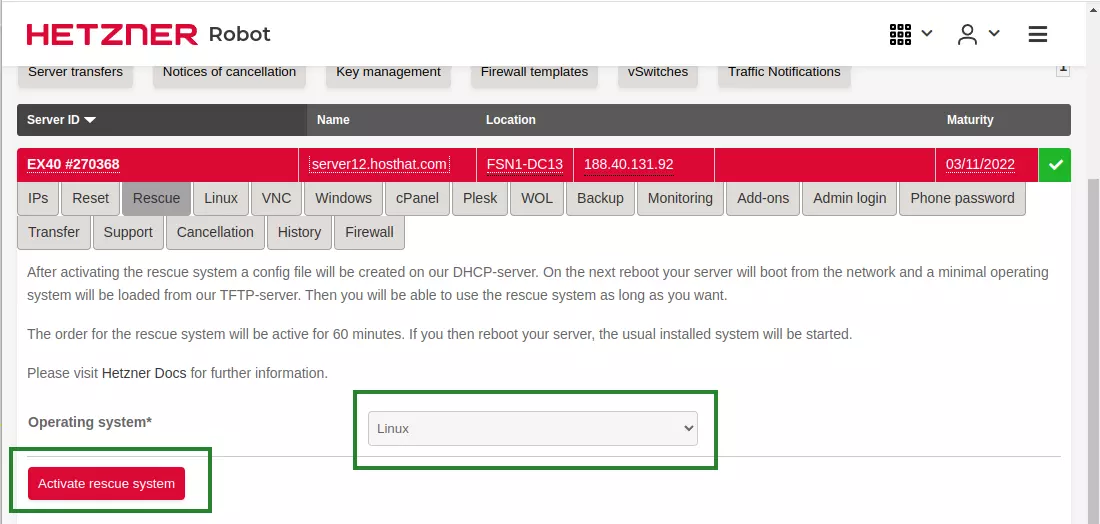
    Click on “Rescue”. On the next page, select “Linux” for Operating system. Then click on the “Activate rescue system” button.

    activate rescue mode on hetzner

    On next page, it will show root password for rescue mode. You need this password to login to rescue mode.

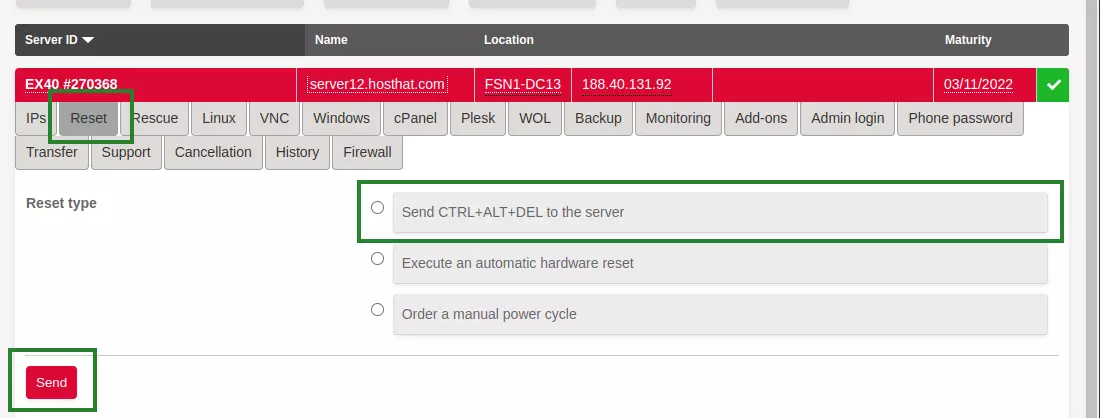
    To boot the server into rescue mode, you need to restart the server. For this click on “Reset” tab.

    restart hetzner server

    You have 3 options to reboot the server, select the first option, then click “Send”. If this did not work, you can try the other 2 options. 2nd option is automated power recycling. The third option is a manual restart by the data center technician.

    Once the server is rebooted into rescue, you can log in with SSH using your server IP, user name root, and password shown after you enable rescue mode.

    Chroot the file system

    After login into rescue mode, you need to find the drives used by your Linux installation, and mount it in /mnt/, this may depend on your partition scheme.

    Here are commands assuming /dev/sda2 is / partition and /dev/sda1 is /boot partition.

    NOTE: device name used in your server may be different, you have to find and mount the drives properly

    Mount device for / partition as /mnt

    mount /dev/sda2 /mnt
    

    Mount device for /boot as /mnt/boot

    mount /dev/sda1 /mnt/boot
    

    If you have other partitions, for example, /var and /usr have their own partition, you need to find appropriate partitions and mount them inside /mnt.

    mount --bind /dev /mnt/dev
    mount --bind /sys /mnt/sys
    mount --bind /proc /mnt/proc
    mount --bind /dev/pts /mnt/dev/pts/
    chroot /mnt
    

    Reset root password

    Once you chroot the file system, you can reset root password with the command

    passwd
    

    It will ask for a password and confirm the password.

    Now you can exit from chroot with the command

    exit
    

    Reboot the server back to normal mode with the command

    reboot
    
  • rsyslog Unsafe symlinks encountered in /var/log, refusing

    rsyslog Unsafe symlinks encountered in /var/log, refusing

    When updating packages on an Ubuntu server, I got the error “Unsafe symlinks encountered in /var/log, refusing.”.

    root@ip-172-31-45-33:/var# apt upgrade -y
    Reading package lists... Done
    Building dependency tree       
    Reading state information... Done
    Calculating upgrade... Done
    0 upgraded, 0 newly installed, 0 to remove and 0 not upgraded.
    1 not fully installed or removed.
    After this operation, 0 B of additional disk space will be used.
    Setting up rsyslog (8.32.0-1ubuntu4.2) ...
    The user `syslog' is already a member of `adm'.
    Unsafe symlinks encountered in /var/log, refusing.
    dpkg: error processing package rsyslog (--configure):
     installed rsyslog package post-installation script subprocess returned error exit status 1
    Errors were encountered while processing:
     rsyslog
    E: Sub-process /usr/bin/dpkg returned an error code (1)
    root@ip-172-31-45-33:/var#
    

    This is due to wrong file ownership for /var/log folder.

    I found the directory “/var” was owned by user www-data

    root@ip-172-31-45-33:/var# ls -l / | grep var
    drwxr-xr-x  15 www-data www-data  4096 Sep  1  2021 var
    root@ip-172-31-45-33:/var#
    

    To fix the error I changed ownership of /var directory to root user.

    chown root:root /var
    

    IMPORTANT: Do not use chown -R as the /var folder contains files owned by different users, if you change all file/folder ownership to root, it will mess up the system. For example /var/log/mysql need to be owned by user “mysql”, if you change it to the user “root”, MySQL will fail to start.

    You may also need to check ownership of folder /var/log and files inside. You can compare it with another Ubuntu server to make sure directory/file ownerships are correct.

    Back to apt

  • How to Split large CSV file into smaller files

    How to Split large CSV file into smaller files

    To split a large CSV file into smaller parts, you can use the split command

    tail -n +2 access_log.csv | split -l 50000 - --filter='sh -c "{ head -n1 access_log.csv; cat; } > $FILE"'
    

    The above command will split file access_log.csv into smaller parts, each part will have the header from the CSV file.

    split -l 50000 means we will have 50,000 lines per file. If you need a different number of lines per file, you can change the number.

    To rename all generated log files numerically, use the following command

    counter=0; for file in x*; do let "counter+=1"; echo "mv '$file' 'log-${counter}.log'" ; done | bash
    

    Back to split

  • CentOS Error checking for OpenSSL library … not found

    CentOS Error checking for OpenSSL library … not found

    When installing Nginx from source on a CentOS 7 server, I got the following error

    checking for OpenSSL library ... not found
    checking for OpenSSL library in /usr/local/ ... not found
    checking for OpenSSL library in /usr/pkg/ ... not found
    checking for OpenSSL library in /opt/local/ ... not found
    

    To fix the error, install openssl-devel package with the command

    yum install openssl-devel -y
    

    Back to Errors

  • Linux Disk Quota

    Linux Disk Quota

    To check disk quota for a Linux user, run

    quota -svu USERNAME_HERE
    

    Sample

    [root@shaft ~]# quota -svu informatiqc
    Disk quotas for user informatiqc (uid 1000): 
         Filesystem   space   quota   limit   grace   files   quota   limit   grace
           /dev/md3    382M      0K      0K            9116       0       0        
    [root@shaft ~]# 
    
  • How to find Operating System of a remote computer using nmap?

    How to find Operating System of a remote computer using nmap?

    Nmap is a network exploration and security auditing tool. It can be used to identify hosts and services on a network, as well as security issues. Nmap can be used to scan for vulnerable open ports on systems.

    To identify Operating System on a remote server or computer, you can use the command

    sudo nmap -O REMOTE_COMPUTER_IP
    

    Example

    boby@sok-01:~$ sudo nmap -O ok.serverok.in
    Starting Nmap 7.80 ( https://nmap.org ) at 2022-09-18 03:03 IST
    Nmap scan report for ok.serverok.in (51.38.246.115)
    Host is up (0.18s latency).
    rDNS record for 51.38.246.115: ok
    Not shown: 984 closed ports
    PORT      STATE    SERVICE
    23/tcp    filtered telnet
    25/tcp    filtered smtp
    80/tcp    open     http
    135/tcp   filtered msrpc
    139/tcp   filtered netbios-ssn
    443/tcp   open     https
    445/tcp   filtered microsoft-ds
    593/tcp   filtered http-rpc-epmap
    1900/tcp  filtered upnp
    2323/tcp  filtered 3d-nfsd
    3005/tcp  filtered deslogin
    3333/tcp  open     dec-notes
    5555/tcp  filtered freeciv
    10001/tcp open     scp-config
    50002/tcp filtered iiimsf
    52869/tcp filtered unknown
    Aggressive OS guesses: HP P2000 G3 NAS device (90%), Linux 2.6.32 (89%), Linux 2.6.32 - 3.1 (89%), Ubiquiti AirOS 5.5.9 (89%), Ubiquiti Pico Station WAP (AirOS 5.2.6) (88%), Linux 2.6.32 - 3.13 (88%), Linux 3.0 - 3.2 (88%), Infomir MAG-250 set-top box (88%), Linux 3.7 (88%), Netgear RAIDiator 4.2.21 (Linux 2.6.37) (88%)
    No exact OS matches for host (test conditions non-ideal).
    Network Distance: 18 hops
    
    OS detection performed. Please report any incorrect results at https://nmap.org/submit/ .
    Nmap done: 1 IP address (1 host up) scanned in 10.94 seconds
    boby@sok-01:~$ 
    

    See nmap