Category: Linux

  • Logging Modem logs to remote rsyslog server

    Logging Modem logs to remote rsyslog server

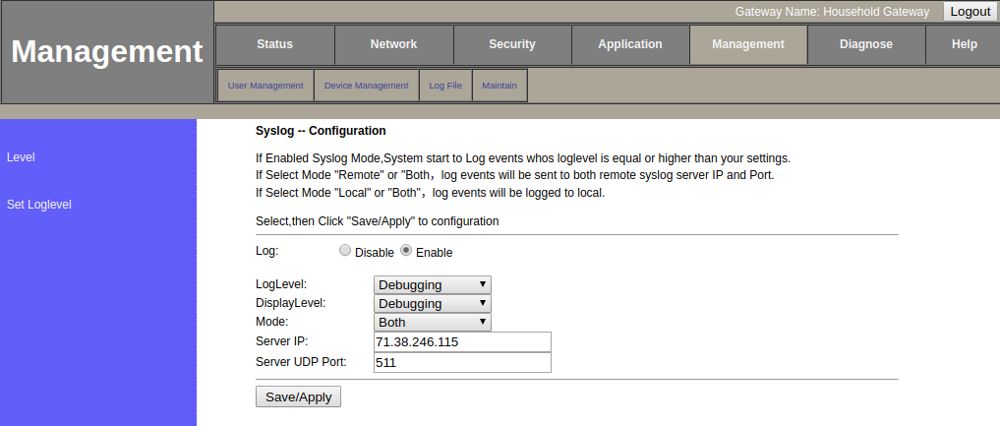
    My FTTH ONU have remote logging option, this allowes me to log to a remote server running rsyslog.

    On model, i set IP of my remote server and a UDP port. Default port was 514, i changed it to 511.

    Configuring Remote Server

    On the server, create file

    vi /etc/rsyslog.d/10-remote.conf
    

    Add

    $ModLoad imudp  
    $UDPServerRun 511
    :fromhost-ip, isequal, "103.35.199.82" /var/log/remote.log  
    & ~
    

    Here “103.35.199.82” is IP address for my router/modem.

    Now restart rsyslog

    systemctl restart rsyslog
    

    You will be able to see logs at /var/log/remote.log

    tail -f /var/log/remote.log
    
    root@ok:~# cat /etc/rsyslog.d/10-remote.conf 
    $ModLoad imudp  
    $UDPServerRun 511
    :fromhost-ip, isequal, "103.35.199.82" /var/log/remote.log  
    & ~
    root@ok:~# systemctl restart rsyslog
    root@ok:~# tail -f /var/log/remote.log
    May  3 09:38:59 103.35.199.82  syslog: Note: removing MFC: 0.0.0.0 -> 224.0.0.251, InpVIf: 1
    May  3 09:39:10 103.35.199.82  syslog: Debu: adding MFC: 0.0.0.0 -> 224.0.0.251, InpVIf: 1
    ^C
    root@ok:~# 
    
  • Install AnyDesk on Ubuntu using flatpak

    Install AnyDesk on Ubuntu using flatpak

    AnyDesk ubuntu flatpak

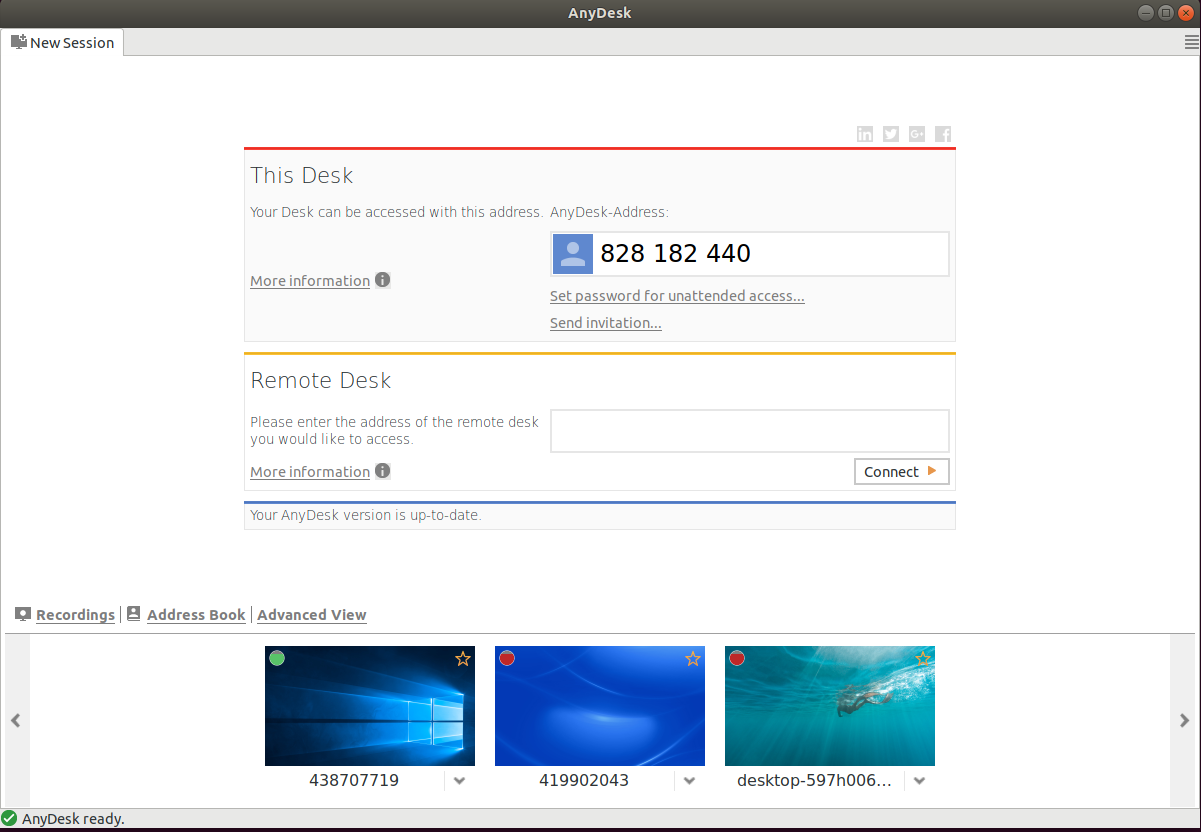
    AnyDesk is a remote desktop sharing application like TeamViewer and Google Remote Desktop. I normally use Google Chrome Remote desk as it is completely free. TeamViewer is popuplar alternative, but if they found out you are using it more often, they will limit your session to 5 minutes, some times even less to force you pay for paid version.

    AnyDesk available for Ubuntu in deb file. I don’t like installing .deb package as it run a background process on port 7070 or somthing like that. So i decided to go with flatpak version.

    First install flatpak with command

    sudo apt install flatpak
    

    Add remote

    flatpak remote-add --if-not-exists flathub https://flathub.org/repo/flathub.flatpakrepo
    

    Now you can install AnyDesk with command

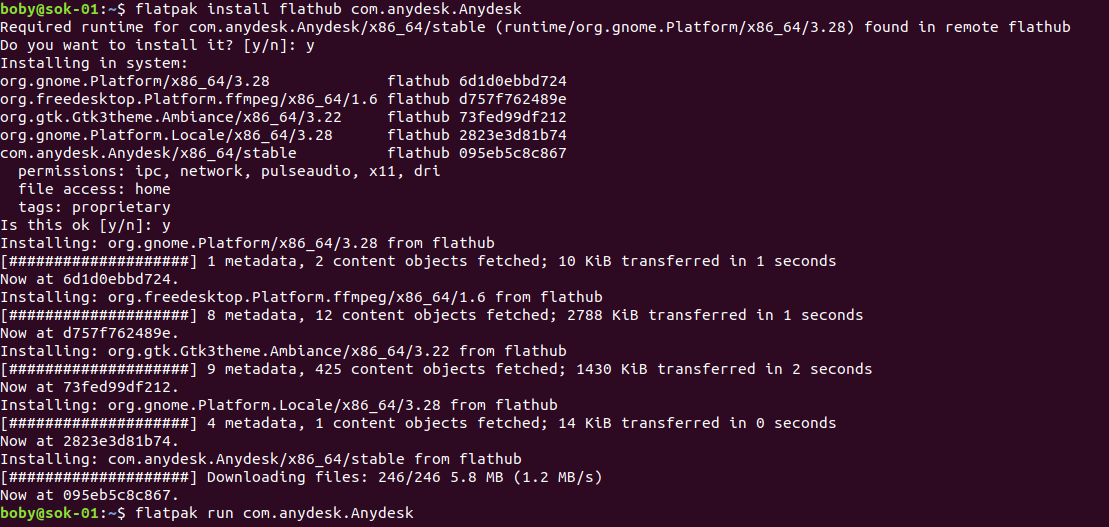
    flatpak install flathub com.anydesk.Anydesk
    

    flatpak install anydesk

    To run AnyDesk, run

    flatpak run com.anydesk.Anydesk
    
  • Adding Backup Disk on a Linux Server

    It is better to have a second hard disk on servers for backup. Here, we will partition a fresh disk, format and mount it as /backup.

    parted /dev/sdX print free
    parted /dev/sdX mktable gpt
    parted /dev/sdX mkpart primary ext4 0% 100%
    mkfs.ext4 /dev/sdX1

    Replace /dev/sdX with the actual device name of your backup disk.

    Now you need to find the UUID for this new drive with the command

    blkid

    Create a folder to mount the disk, in this case, we use /backup

    mkdir /backup

    Edit /etc/fstab

    vi /etc/fstab

    Add

    UUID=1c7b33ed-ea6d-4694-9925-edfd0e8a2837  /backup ext4 defaults 0 1

    Replace “1c7b33ed-ea6d-4694-9925-edfd0e8a2837” with the actual UUID for your new disk, that you found using blkid command.

    Now run

    mount -a

    This will mount all disks specified in /etc/fstab, verify /backup is mounted with the command

    df -h

    Partitioning New HDD

    Here we partition the device /dev/sdb and mount it as /backup.

    First, we check free space on the server with

    [root@sok ~]# parted /dev/sdb print free
    Error: /dev/sdb: unrecognised disk label
    Model: ATA WDC WD1003FBYX-0 (scsi)                                        
    Disk /dev/sdb: 1000GB
    Sector size (logical/physical): 512B/512B
    Partition Table: unknown
    Disk Flags: 
    [root@sok ~]#

    Lets make the partition table of type GPT

    [root@sok ~]# parted /dev/sdb mktable gpt
    Information: You may need to update /etc/fstab.
    
    [root@sok ~]#

    Now you will see we have 1000 GB free space.

    [root@sok ~]# parted /dev/sdb print free                                
    Model: ATA WDC WD1003FBYX-0 (scsi)
    Disk /dev/sdb: 1000GB
    Sector size (logical/physical): 512B/512B
    Partition Table: gpt
    Disk Flags: 
    
    Number  Start   End     Size    File system  Name  Flags
            17.4kB  1000GB  1000GB  Free Space
    
    [root@sok ~]#

    Let’s create a partition of type ext4 using 100% of the disk.

    [root@sok ~]# parted /dev/sdb mkpart primary ext4 0% 100%
    Information: You may need to update /etc/fstab.
    
    [root@sok ~]# parted /dev/sdb print free                
    Model: ATA WDC WD1003FBYX-0 (scsi)
    Disk /dev/sdb: 1000GB
    Sector size (logical/physical): 512B/512B
    Partition Table: gpt
    Disk Flags: 
    
    Number  Start   End     Size    File system  Name     Flags
            17.4kB  1049kB  1031kB  Free Space
     1      1049kB  1000GB  1000GB               primary
            1000GB  1000GB  729kB   Free Space
    
    [root@sok ~]#

    Formatting the Disk

    [root@sok ~]# mkfs.ext4 /dev/sdb1
    mke2fs 1.42.9 (28-Dec-2013)
    Filesystem label=
    OS type: Linux
    Block size=4096 (log=2)
    Fragment size=4096 (log=2)
    Stride=0 blocks, Stripe width=0 blocks
    61054976 inodes, 244190208 blocks
    12209510 blocks (5.00%) reserved for the super user
    First data block=0
    Maximum filesystem blocks=2392850432
    7453 block groups
    32768 blocks per group, 32768 fragments per group
    8192 inodes per group
    Superblock backups stored on blocks: 
    	32768, 98304, 163840, 229376, 294912, 819200, 884736, 1605632, 2654208, 
    	4096000, 7962624, 11239424, 20480000, 23887872, 71663616, 78675968, 
    	102400000, 214990848
    
    Allocating group tables: done                            
    Writing inode tables: done                            
    Creating journal (32768 blocks): done
    Writing superblocks and filesystem accounting information: done     
    
    [root@sok ~]# 

    Mounting Disk

    First, find the UUID of the disk with command blkid

    [root@thor ~]# blkid
    /dev/sda2: UUID="aba6f962-366b-455a-959a-b9d04a9bfa34" TYPE="ext4" 
    /dev/sda1: UUID="3432e015-01e6-4f09-9991-ff73a90f340b" TYPE="swap" 
    /dev/sdb1: UUID="1c7b33ed-ea6d-4694-9925-edfd0e8a2837" TYPE="ext4" PARTLABEL="primary" PARTUUID="7c182896-e88f-44cf-b3fe-e369b88044a1" 
    /dev/loop0: UUID="63f812e0-51e0-4cf8-8ae4-da70d61ce272" TYPE="ext3" 
    /dev/sdd1: UUID="5cabe12d-a575-4374-af15-c8bb3abe8fe8" TYPE="ext4" PARTLABEL="primary" PARTUUID="0eca4648-25a4-4b89-a93b-bc3ad781caa0" 
    /dev/sdc1: UUID="01cc1cfd-888b-42e2-bb1c-e0461c6b989d" TYPE="ext4" PARTLABEL="primary" PARTUUID="74cd1045-fbfc-44a0-9a7d-e0965db53d06" 
    [root@thor ~]# 

    UUID for the disk /dev/sdb1 is

    UUID="1c7b33ed-ea6d-4694-9925-edfd0e8a2837"

    To mount this disk as /backup, first create a folder

    mkdir /backup

    Now edit /etc/fstab

    vi /etc/fstab

    Add the following line

    UUID=1c7b33ed-ea6d-4694-9925-edfd0e8a2837  /backup ext4 defaults 0 1
    

    Run

    mount -a

    This will mount all disks specified in /etc/fstab

    Verify your new drive is mounted with the command df -h

    [root@thor ~]# df -h | grep backup
    /dev/sdb1       917G   77M  871G   1% /backup
    [root@thor ~]# 
  • Debian 8 jessie repo error

    On a Debian 8 server, when running apt update, got following error

    W: Failed to fetch http://mirror.com/debian/dists/jessie/main/source/Sources  404  Not Found [IP: 185.194.238.133 80]
    W: Failed to fetch http://mirror.com/debian/dists/jessie/non-free/source/Sources  404  Not Found [IP: 185.194.238.133 80]
    W: Failed to fetch http://mirror.com/debian/dists/jessie/contrib/source/Sources  404  Not Found [IP: 185.194.238.133 80]
    W: Failed to fetch http://mirror.com/debian/dists/jessie/main/binary-amd64/Packages  404  Not Found [IP: 185.194.238.133 80]
    W: Failed to fetch http://mirror.com/debian/dists/jessie/non-free/binary-amd64/Packages  404  Not Found [IP: 185.194.238.133 80]
    W: Failed to fetch http://mirror.com/debian/dists/jessie/contrib/binary-amd64/Packages  404  Not Found [IP: 185.194.238.133 80]
    W: Failed to fetch http://mirror.com/debian/dists/jessie/main/binary-i386/Packages  404  Not Found [IP: 185.194.238.133 80]
    W: Failed to fetch http://mirror.com/debian/dists/jessie/non-free/binary-i386/Packages  404  Not Found [IP: 185.194.238.133 80]
    W: Failed to fetch http://mirror.com/debian/dists/jessie/contrib/binary-i386/Packages  404  Not Found [IP: 185.194.238.133 80]
    W: Failed to fetch http://mirror.com/debian/dists/jessie-updates/main/source/Sources  404  Not Found [IP: 185.194.238.133 80]
    W: Failed to fetch http://mirror.com/debian/dists/jessie-updates/contrib/source/Sources  404  Not Found [IP: 185.194.238.133 80]
    W: Failed to fetch http://mirror.com/debian/dists/jessie-updates/non-free/source/Sources  404  Not Found [IP: 185.194.238.133 80]
    W: Failed to fetch http://mirror.com/debian/dists/jessie-updates/main/binary-amd64/Packages  404  Not Found [IP: 185.194.238.133 80]
    W: Failed to fetch http://mirror.com/debian/dists/jessie-updates/contrib/binary-amd64/Packages  404  Not Found [IP: 185.194.238.133 80]
    W: Failed to fetch http://mirror.com/debian/dists/jessie-updates/non-free/binary-amd64/Packages  404  Not Found [IP: 185.194.238.133 80]
    W: Failed to fetch http://mirror.com/debian/dists/jessie-updates/main/binary-i386/Packages  404  Not Found [IP: 185.194.238.133 80]
    W: Failed to fetch http://mirror.com/debian/dists/jessie-updates/contrib/binary-i386/Packages  404  Not Found [IP: 185.194.238.133 80]
    W: Failed to fetch http://mirror.com/debian/dists/jessie-updates/non-free/binary-i386/Packages  404  Not Found [IP: 185.194.238.133 80]
    E: Some index files failed to download. They have been ignored, or old ones used instead.
    

    To fix it, run

    cp /etc/apt/sources.list /etc/apt/sources.list.backup
    vi /etc/apt/sources.list
    

    Add following content to the file

    deb http://cdn-fastly.deb.debian.org/debian/ jessie main
    deb-src http://cdn-fastly.deb.debian.org/debian/ jessie main
    deb http://security.debian.org/ jessie/updates main
    deb-src http://security.debian.org/ jessie/updates main
    deb http://archive.debian.org/debian jessie-backports main
    deb-src http://archive.debian.org/debian jessie-backports main
    

    Create

    vi /etc/apt/apt.conf
    

    Add

    Acquire::Check-Valid-Until "false";
    
  • Linux How to Disable a user account

    To disable or lock a linux user account, run

    passwd -l USERNAME_HERE
    

    Or

    usermod -L USERNAME_HERE
    

    To verify if a user is locked, run

    passwrd --status USERNAME_HERE
    

    If account is disabled/locked, it will show L.

  • Install LetsEncrypt SSL on Gitlab

    Install LetsEncrypt SSL on Gitlab

    To enable LetsEncrypt free SSL on Gitlab, edit file

    vi /etc/gitlab/gitlab.rb
    

    Modify following configrations

    letsencrypt['enable'] = true
    external_url "https://gitlab.example.com"
    letsencrypt['contact_emails'] = ['[email protected]']
    letsencrypt['auto_renew'] = true
    letsencrypt['auto_renew_hour'] = 1
    letsencrypt['auto_renew_minute'] = 30
    letsencrypt['auto_renew_day_of_month'] = "*/4"
    

    external_url should start with HTTPS.

    Run command

    gitlab-ctl reconfigure
    

    Now gitlab installation will work with HTTPS.

  • crontab

    crontab command is used to list/editc cronjobs.

    To list all cronjobs for current user, run

    crontab -l
    

    To edit cronjob for current user, run

    crontab -e
    

    To edit for a specific user, you can use

    crontab -e -u USERNAME_HERE
    

    To list cronobs for a specific user, you can use

    crontab -l -u USERNAME_HERE
    

    See cronjob

  • gitlab

    Install Gitlab on Debian/Ubuntu
    Install LetsEncrypt SSL on Gitlab
    Gitlab find version

    Restart gitlab

    gitlab-ctl restart
    

    Resconfigure gitlab, needed if you make any changes to /etc/gitlab/gitlab.rb

    gitlab-ctl reconfigure
    

    Backups stored in

    /var/opt/gitlab/backups/
    
  • Install Gitlab on Debian/Ubuntu

    Install requirements

    echo "postfix postfix/main_mailer_type string 'Internet Site'" | debconf-set-selections
    echo "postfix postfix/mailname string localhost" | debconf-set-selections
    curl -Ls https://packages.gitlab.com/gpg.key | apt-key add -
    apt-get update
    apt-get --force-yes -y upgrade
    apt-get clean
    

    Setup repo/dependency

    wget https://packages.gitlab.com/install/repositories/gitlab/gitlab-ce/script.deb.sh
    bash script.deb.sh
    

    Install gitlab

    apt-get install -y gitlab-ce
    
  • Install SpeedTest cli on Ubuntu

    speedtest.net is a popular web site for testing braodband speed.

    To install speedtest cli on Ubuntu, run

    apt install -y speedtest-cli
    

    This will be very helpful for testing speed of servers and remote systems using SSH.

    To test speed, run

    speedtest
    

    Example

    speedtest-cli

    To get list of available speedtest servers, run

    speedtest --list
    

    To test with a specific server, run

    speedtest --server SERVER_ID