Category: Linux

  • How to convert images to webp format in Ubuntu

    How to convert images to webp format in Ubuntu

    Webp is a new image format for the web. It can be used on websites for the fast and efficient loading of images. Webp is an open-source image format created by Google and quickly getting adopted by web developers.

    If you use Ubuntu or Debain, you can install webp from the official repository with the command

    sudo apt-get install webp
    

    To convert an image to webp format, open the terminal and run

    cwebp FILE.png -o FILE.webp
    

    If you want to specify the quality of the converted webp image, you can use -q option.

    cwebp -q 60 FILE.png -o FILE.webp
    

    Image viewer comes with Ubuntu won’t display webp images. To view webp images, you can open them in the GIMP image editor or drag and drop them in a web browser. Another way is to use the command-line tool that comes with webp package.

    vwebp FILE.webp
    
  • How to install MySQL 5.7 on CentOS 7 Server

    How to install MySQL 5.7 on CentOS 7 Server

    To install MySQL 5.7 on CentOS 7 server, install the repository

    rpm -ivh http://repo.mysql.com/mysql57-community-release-el7.rpm
    

    import MySQL GPG key with

    rpm --import https://repo.mysql.com/RPM-GPG-KEY-mysql-2022
    

    Install MySQL with the command

    yum install mysql-community-server.x86_64
    

    Enable MySQL to start on boot

    systemctl enable mysqld
    

    Start MySQL with

    systemctl start mysqld
    

    Find the initial MySQL password with the command

    grep 'password' /var/log/mysqld.log
    

    This initial password is expired, you should change this password before you can start using MySQL server.

    To set MySQL password and secure MySQL server, run the command

    mysql_secure_installation
    
  • Install CSF firewall on Ubuntu Server

    Install CSF firewall on Ubuntu Server

    First, install libwww-perl package needed for CSF firewall

    apt -y install libwww-perl
    

    Install CSF with

    cd /usr/local/src
    wget https://download.configserver.com/csf.tgz
    tar -xzf csf.tgz
    cd csf
    sh install.sh
    

    Change following settings in csf.conf file

    /bin/sed -i "s/RESTRICT_SYSLOG\s*=.*$/RESTRICT_SYSLOG = \"3\"/g" /etc/csf/csf.conf
    /bin/sed -i "s/SYSLOG_CHECK\s*=.*$/SYSLOG_CHECK = \"3600\"/g" /etc/csf/csf.conf
    /bin/sed -i "s/TESTING = \"1\"/TESTING = \"0\"/g" /etc/csf/csf.conf
    

    If you need GUI enabled, edit file

    vi /etc/csf/csf.conf
    

    Modify following settings

    UI = "1"
    UI_PORT = "8282"
    UI_USER = "username"
    UI_PASS = "password"
    UI_ALLOW = "0"
    
  • Configure VPS IP address in OneProvider Server

    Configure VPS IP address in OneProvider Server

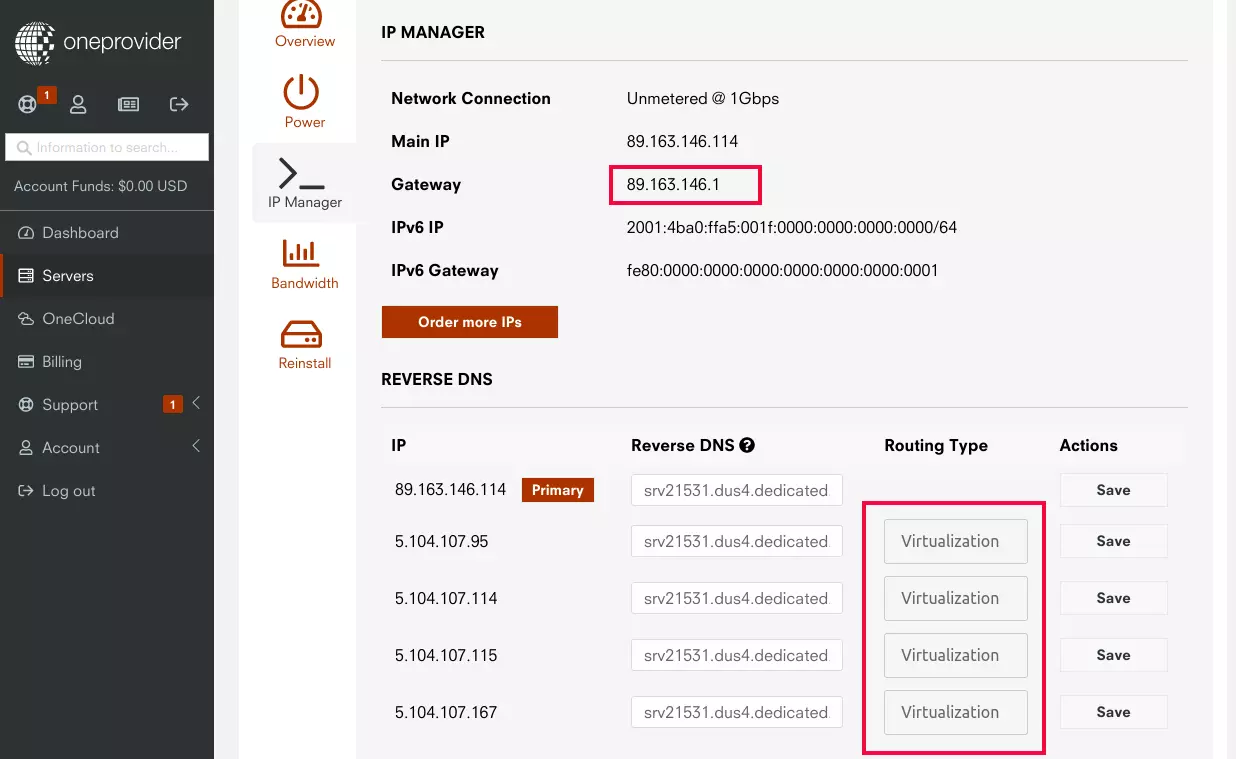
    If you are running virtualization software like Proxmox, KVM, or VMWare ESXi on the OneProvider server, you need to order an additional IP address. On one provider IP operates in 2 modes, you need to set IP to virtualization mode to configure the IP address inside a VPS.

    Go to Server Details > Manage > IP Manager

    Default settings for IP address is “Host Route”, change it to “Virtualization” under Routing Type.

    oneprovider ip manager

    On this page, you can also get the Gateway IP address. All virtual machines should use the same Gateway IP as main server.

    For a virtual machine, I used following netplan config

    root@vm3:~# cat /etc/netplan/00-installer-config.yaml 
    # This is the network config written by 'subiquity'
    network:
      ethernets:
        enp1s0:
          dhcp4: false
          addresses:
          - 5.104.107.115/32
          nameservers:
           addresses:
           - 1.1.1.1
           - 8.8.8.8
          routes:
          - on-link: true
            to: 0.0.0.0/0
            via: 89.163.146.1
      version: 2
    root@vm3:~# 
    

    Here 5.104.107.115 is the IP address of the Virtual Machine. 89.163.146.1 is the gateway.

    After editing file /etc/netplan/00-installer-config.yaml, you can apply the changes with command

    netplan apply
    
  • Linux groups

    Linux groups

    To see lists all groups that a user is in, run

    groups USER_HERE
    

    Example

    boby@sok-01:~$ groups boby
    boby : boby adm cdrom sudo dip plugdev lpadmin lxd sambashare libvirt docker
    boby@sok-01:~$ 
    

    To add a user to a group, run

    adduser USER_NAME GROUP_NAME
    

    Example

    root@vagrant:~# adduser boby sudo
    Adding user `boby' to group `sudo' ...
    Adding user boby to group sudo
    Done.
    root@vagrant:~# 
    

    To remove a user from a group

    deluser USER_HERE GROUP_HERE
    

    Example

    root@vagrant:~# deluser boby sudo
    Removing user `boby' from group `sudo' ...
    Done.
    root@vagrant:~# 
    
  • Drupal 7 Enable/Disable Maintenance Mode

    Drupal 7 Enable/Disable Maintenance Mode

    To disable maintenance mode in drupal 7.x run the command

    drush vset maintenance_mode 0
    

    Example

    $ drush vset maintenance_mode 0
    maintenance_mode was set to 0.   [success]
    $
    

    To Enable Maintenance mode, run

    drush vset maintenance_mode 1
    
  • puttygen: error loading x.ppk: PuTTY key format too new

    puttygen: error loading x.ppk: PuTTY key format too new

    Putty saves ssh key in file with .ppk extension. To use the key on Linux systems, you need to convert it to openssh format. When converting ppk file to openssh format, i got error “PuTTY key format too new”.

    boby@sok:~$ puttygen key.ppk -O private-openssh -o 2.pem
    puttygen: error loading `key.ppk': PuTTY key format too new
    boby@sok:~$
    

    This error is because the puttygen command is older version. Ubuntu 20.04 comes with older version of puttygen command provided by putty-tools.

    The solution is to remove putty-tools package, then install latest version of puttygen from source code.

    Remove putty-tools with

    sudo apt remove putty-tools
    

    Download and install latest puttygen from

    https://www.chiark.greenend.org.uk/~sgtatham/putty/latest.html

    As of writing this, latest version of putty is version 0.76

    mkdir ~/src
    cd ~/src
    wget https://the.earth.li/~sgtatham/putty/latest/putty-0.76.tar.gz
    tar -xvf putty-0.76.tar.gz
    cd putty-0.76/
    ./configure
    make
    sudo cp puttygen /usr/bin/
    

    Once installed, you can check version with

    boby@sok:~/src/putty-0.76$ puttygen --version
    puttygen: Release 0.76
    Build platform: 64-bit Unix
    Compiler: gcc 9.3.0
    Source commit: 1fd7baa7344bb38d62a024e5dba3a720c67d05cf
    boby@sok:~/src/putty-0.76$ 
    

    You will be able to convert newer version of ppk files to openssh format now.

    See Convert PPK file to PEM

  • How to Migrate Linux Server with rsync

    How to Migrate Linux Server with rsync

    A few days ago I wanted to Migrate an Ubuntu VPS from one provider to another. I tried to take a snapshot and try to migrate, but it did not work. The VPS had few random services, so migrating services one by one was not easy. What I did was set up a new Ubuntu VPS with the same OS version, rsync files from source VPS to new VPS.

    Make sure you take a backup of your server before doing it. In case anything goes wrong, you should be able to restore from back or OS reload.

    Install rsync on source and destination servers.

    For Ubuntu/Debian

    apt install rsync

    For RHEL/CentOS/AlmaLinux

    yum install rsync

    On the source server, create a file

    vi /root/no_copy

    add the following content

    /boot/
    /etc/modules
    /etc/fstab
    /etc/mtab
    /etc/netplan/
    /etc/network/
    /etc/sysconfig/network-scripts/
    /lib/modules
    lost+found/
    /sys/
    /proc/
    /dev/
    /var/cache/
    /var/log/journal/
    /swapfile
    /swap.img
    /usr/tmpDSK
    /root/.ssh/
    /backup/
    /home/virtfs/

    These files won’t be copied to the new VPS. If you don’t have any other folders or files, that you don’t want to be copied to the new server, you can add to the list.

    Now run rsync on the source server to copy over files to the new server

    rsync -avzPHAX --exclude-from=/root/no_copy / root@NEW_SERVER_IP:/

    In the command above, replace NEW_SERVER_IP with the new server IP address.

    When we do rsync, all files get copied to the new server. After the first rsync run, you can run the rsync command any number of times, only changed files copied, and will finish much faster as less data need to be copied to the new server.

    After the first rsync is completed, we will stop all services on the source and destination servers like MySQL, Apache, Nginx, etc… so no data gets changed while we doing the rsync. Now do another rsync, reboot the destination server, see if everything works fine.

    See rsync

  • How To Install Apache Solr on Debian 10

    How To Install Apache Solr on Debian 10

    Apache Solr is a highly reliable and scalable open source search platform. Solr powers the search and navigation features of many of the world’s largest internet sites.

    https://solr.apache.org

    Solar is based on Java, so we need to install OpenJDK

    apt install -y openjdk-11-jdk-headless
    

    Edit .bashrc file

    vi ~/.bashrc
    

    Add

    export JAVA_HOME=/usr/lib/jvm/java-11-openjdk-amd64
    export PATH=$PATH:/usr/lib/jvm/java-11-openjdk-amd64/bin
    

    Log off and log in. Alternatively, you can run

    source ~/.bashrc
    

    Next download Apache Solr binary package and install

    cd /usr/local/src
    wget "https://www.apache.org/dyn/closer.lua/lucene/solr/8.11.1/solr-8.11.1.tgz?action=download"
    mv 'solr-8.11.1.tgz?action=download' solr-8.11.1.tgz
    tar xzf solr-8.11.1.tgz solr-8.11.1/bin/install_solr_service.sh --strip-components=2
    bash ./install_solr_service.sh solr-8.11.1.tgz
    

    To start Apache Solr on boot, run

    systemctl enable solr
    

    To start Solr, run

    systemctl start solr
    

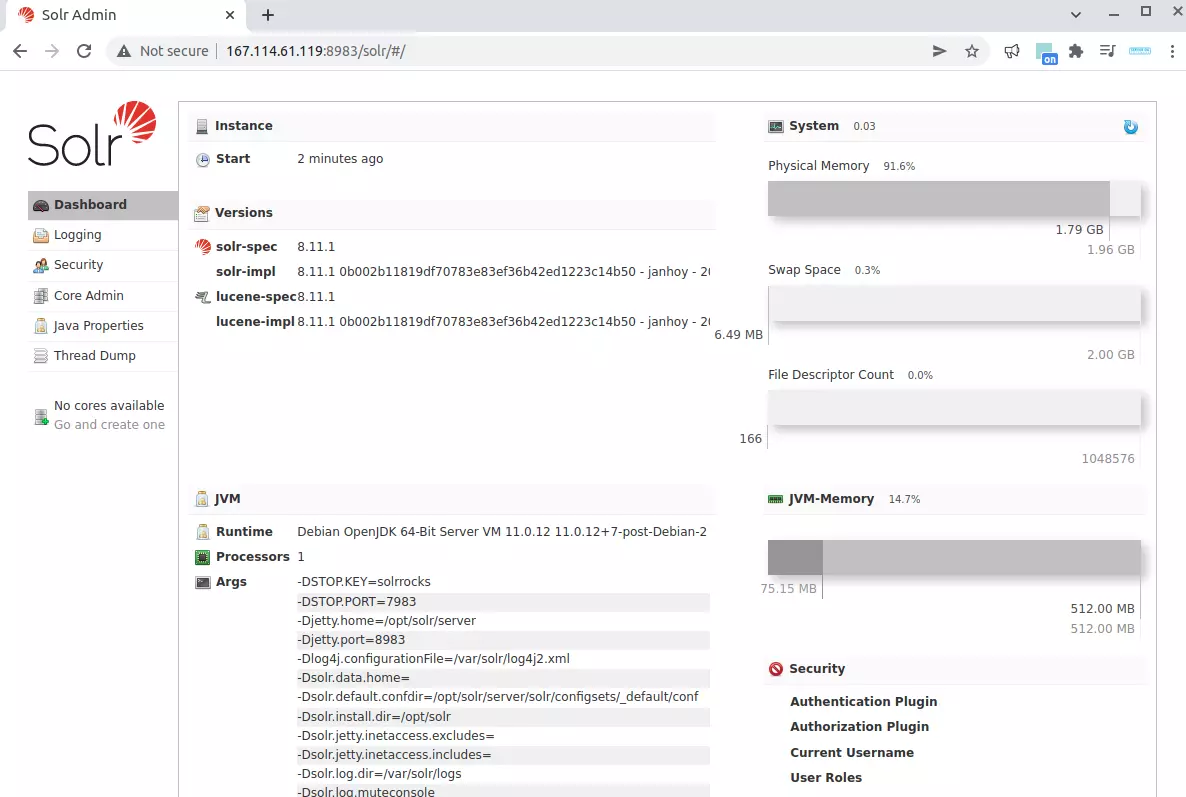
    After installation, you can access Solr admin area at

    http://your-server-ip:8983
    

    Apache  Solr

  • How to Install Supervisord on CentOS 7

    How to Install Supervisord on CentOS 7

    Supervisor is a program used to monitor and control programs. It can auto startup application on server boot time, and restart if the application fails.

    http://supervisord.org

    To install supervisors on CentOS 7, first, enable epel repository.

    yum install -y epel-release
    

    Once EPEL repository is enabled, you can install supervisors with the yum command

    yum install -y supervisor
    

    Enable supervisord to start on boot, run

    systemctl enable supervisord
    

    Start supervisord

    systemctl start supervisord
    

    To start a python application on boot time, I created file

    vi /etc/supervisord.d/telegram-bot.ini
    

    With the following content

    [program:telegram_bot]
    command=/root/bots/telegram_bot/bot.py
    directory=/root/bots/telegram_bot
    ;process_name=%(program_name)s ; process_name expr (default %(program_name)s)
    numprocs=1
    autostart=true
    autorestart=true
    stdout_logfile=/var/log/telegram-bot.log
    stdout_logfile_maxbytes=1MB
    stdout_logfile_backups=10
    stdout_capture_maxbytes=1MB
    stdout_events_enabled=false
    stderr_logfile=/var/log/telegram-bot-error.log
    stderr_logfile_maxbytes=1MB
    stderr_logfile_backups=10
    stderr_capture_maxbytes=1MB
    stderr_events_enabled=false
    

    Started application with

    supervisorctl reload
    

    See supervisord

  • dpkg dependency problems not removing

    dpkg dependency problems not removing

    When removing a package, I got the following error message

    root@82-165-118-245:/~# dpkg --remove psa-phpmyadmin
    dpkg: dependency problems prevent removal of psa-phpmyadmin:
     plesk-core depends on psa-phpmyadmin (>= 5.1.1); however:
      Package psa-phpmyadmin is to be removed.
    
    dpkg: error processing package psa-phpmyadmin (--remove):
     dependency problems - not removing
    Errors were encountered while processing:
     psa-phpmyadmin
    root@82-165-118-245:/~# 
    

    It is fixed by specifying –ignore-depends=plesk-core in apt command.

    Example

    root@82-165-118-245:/~# dpkg --remove --ignore-depends=plesk-core psa-phpmyadmin
    (Reading database ... 168316 files and directories currently installed.)
    Removing psa-phpmyadmin (5.1.1-v.ubuntu.18.04+p18.0.38.0+t210825.1032) ...
    root@82-165-118-245:/~# 
    
  • dpkg package pre-removal script returned error

    dpkg package pre-removal script returned error

    On a Plesk server, MySQL somehow went missing. When I tried to remove a package, I get error

    root@82-165-118-245:~# dpkg --remove plesk-config-troubleshooter
    (Reading database ... 168528 files and directories currently installed.)
    Removing plesk-config-troubleshooter (18.0-v.ubuntu.18.04+p18.0.39.2+t211117.1817) ...
    dpkg action: 
    
    ERROR while trying to detect MySQL service name
    
    Check the error reason (see log file: /var/log/plesk/install/plesk_18.0.39_installation.log), fix and try again
    dpkg action: 
    
    ERROR while trying to detect MySQL service name
    
    
    Package script failed
    
    ***** installing problem report *****
    ERROR while trying to detect MySQL service name
    Package script failed
    dpkg: error processing package plesk-config-troubleshooter (--remove):
     installed plesk-config-troubleshooter package pre-removal script subprocess returned error exit status 1
    Errors were encountered while processing:
     plesk-config-troubleshooter
    root@82-165-118-245:~#

    To fix this, I removed the prerm and postrm scripts. These scripts execute before and after a package is removed. It is not recommended to remove it, but if these scripts prevent you from uninstalling a package, you can remove them as the last option.

    mv /var/lib/dpkg/info/plesk-config-troubleshooter.prerm ~/
    mv /var/lib/dpkg/info/plesk-config-troubleshooter.postrm ~/

    Or you can just edit the file, put

    exit 0

    somewhere before the error happens.