Tag: linux

  • Change PHP version in Virtualmin Server

    Change PHP version in Virtualmin Server

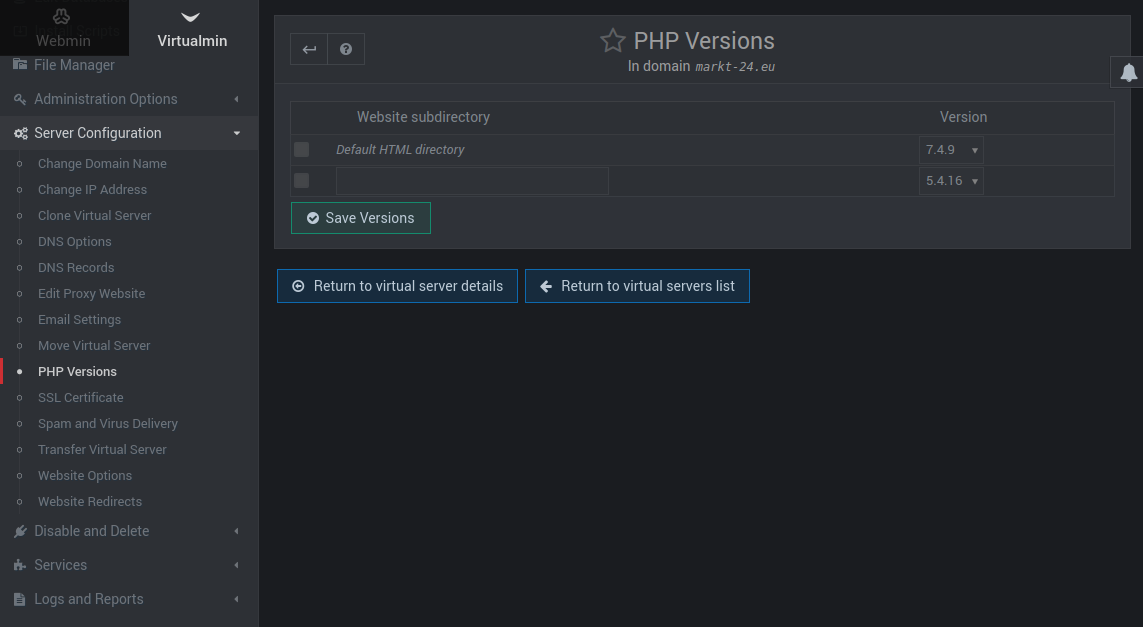
    To change PHP version for a web site hosted in Virtualmin, click on the Virtualmin tab. Select the domain from drop down that you need to change PHP version for.

    Virtualmin > YourDomain > Server Configuration > PHP Versions
    

    On this page, select PHP version from drop down.

    virtualmin server configuration

    See Virtualmin

  • fatal: open /etc/postfix/main.cf: Permission denied

    On a CentOS server, when sending mail from PHP scripts, mail failed to work. On checking postfix log file (/var/log/maillog), i see following error.

    Aug 11 01:41:53 forums postfix/sendmail[44463]: fatal: open /etc/postfix/main.cf: Permission denied
    

    To fix this, disable selinux

    setenforce 0
    

    To permanantly disable SELinux, run

    sed -i 's/SELINUX=enforcing/SELINUX=disabled/' /etc/selinux/config
    
  • Protecting files with noclobber

    To protect files on Linux by accidently overwritten by > operator, you can use

    set -o noclobber
    

    Now if you try to overwrite a file with >, you will get error

    root@ok:~# echo "Hello" > 1.txt
    -bash: 1.txt: cannot overwrite existing file
    root@ok:~# 
    

    If you really need to overwrite, use >! operator.

    echo "Hello" >! FILE_NAME
    

    Example

    root@ok:~# echo "Hello" > 1.txt
    -bash: 1.txt: cannot overwrite existing file
    root@ok:~# echo "Hello" >! 1.txt
    root@ok:~# 
    

    Instead of running the command “set -o noclobber” everytime, you can add it to .bashrc file.

  • Extract Audio from Video using ffmpeg

    To extract Audio from Video using ffmpeg, run

    ffmpeg -i VIDEO_FILE.mp4 audio.mp3
    
  • Email Alert When User Login Using SSH

    On web servers, you may need to get email alert when someone logs in to your server using SSH. To do this edit file

    vi ~/.bashrc

    Add

    echo "ALERT - Bash shell access by user \"`whoami`\" to server $HOSTNAME  on  `date` "  | mail -s  "Alert:  Shell access detected from user \"`whoami`\" from IP_Address: `who | cut -d"(" -f2 | cut -d")" -f1`" [email protected]

    In above, replace [email protected] with your actual email address. You need a mail server installed on your server for this to work.

    If you want to log to a file, add

    echo 'ALERT - Root Shell Access (' `hostname` ') on:' `date` `who` >> /var/log/user-logins

    See SSH

  • KVM VNC Allow Remote Access

    By default VNC Console on a KVM virtual Machine only listens to localhost. So you need to do SSH tunnel to access VNC console.

    To make VNC available on all interfaces on Host machine, you need to edit file

    vi  /etc/libvirt/qemu.conf
    

    You need to uncomment the line vnc_listen = “0.0.0.0”.

    # VNC is configured to listen on 127.0.0.1 by default.
    # To make it listen on all public interfaces, uncomment
    # this next option.
    #
    # NB, strong recommendation to enable TLS + x509 certificate
    # verification when allowing public access
    #
    vnc_listen = "0.0.0.0"
    

    Once this is done, you need to shutdown and start the virtual machine. Just reboot won’t work.

    root@PAR-199235:~# virsh vncdisplay kali-linux
    127.0.0.1:0
    
    root@PAR-199235:~# virsh shutdown kali-linux
    Domain kali-linux is being shutdown
    
    root@PAR-199235:~# virsh list --all
     Id   Name         State
    -----------------------------
     -    kali-linux   shut off
    
    root@PAR-199235:~# virsh start  kali-linux
    Domain kali-linux started
    
    root@PAR-199235:~# virsh vncdisplay kali-linux
    :0
    
    root@PAR-199235:~# 
    

    See Linux KVM

  • Bash Script to Monitor Disk Usage

    This script will check disk usage on / partition and email you if disk usage is above 80%

    We can use df / command to find current disk usage

    df /
    

    As you can see, the result have 2 lines. We don’t need first line. To ignore first line, we can use

    df / | grep -v 'Filesystem'
    

    From the result, we only need the Use% part. In this case 66%, to find this, you can use awk command, that split the line, then prient specified part. In our case, we need 5th part.

    df / | grep -v 'Filesystem' | awk '{print $5}'
    

    To use disk usage % in our script for calculation, we need it converted to number. That is remove %. This can be done with sed command

    df / | grep -v 'Filesystem' | awk '{print $5}' | sed 's/%//g'
    

    Now we have disk usage as a number. We can use it in our script.

    vi disk-usage-checker
    

    Add following content to it

    #!/bin/bash
    
    CURRENT_USAGE=$(df / | grep -v 'Filesystem' | awk '{print $5}' | sed 's/%//g')
    ALERT_ON=80
    
    if [ "$CURRENT_USAGE" -gt "$ALERT_ON" ] ; then
        mail -s 'Disk Usage Warning' YOUR_EMAIL_HERE << EOF
    Disk almost full on / partition. Current Useage: $CURRENT_USAGE%
    EOF
    fi
    

    In above script, replace YOUR_EMAIL_HERE with your email address.

    disk usage bash script

    You can run the script daily using cronjob. If disk usage ever go above 80%, you will get email alert.

    See bash
  • Install Linux KVM on CentOS 8

    To install Linux KVM hypervisor on CentOS 8, run

    dnf install qemu-kvm
    

    Install libvirtd

    dnf install libvirt-daemon libvirt-daemon-kvm libvirt-client
    

    Enable libvirtd to start on boot

    systemctl enable libvirtd
    

    Start libvirtd

    systemctl start libvirtd
    

    To see status, run

    systemctl status libvirtd
    

    Install virt-install

    dnf install virt-install
    

    Now you have Linux KVM installed. You can use virt-install or Virt Manager to create virtual machine.

    See Linux KVM Virtualization

  • Joining files with Cat on Linux

    I have a movie cut with hjspit.

    -rw-r--r-- 1 root root 110100480 Apr 17 10:42 MSFT_1.avi.001
    -rw-r--r-- 1 root root 110100480 Apr 17 10:45 MSFT_1.avi.002
    -rw-r--r-- 1 root root 110100480 Apr 17 10:45 MSFT_1.avi.003
    -rw-r--r-- 1 root root 110100480 Apr 17 10:47 MSFT_1.avi.004
    -rw-r--r-- 1 root root 110100480 Apr 17 10:47 MSFT_1.avi.005
    -rw-r--r-- 1 root root 110100480 Apr 17 10:49 MSFT_1.avi.006
    -rw-r--r-- 1 root root 110100480 Apr 17 10:49 MSFT_1.avi.007
    -rw-r--r-- 1 root root 110100480 Apr 17 10:51 MSFT_1.avi.008
    -rw-r--r-- 1 root root  62759034 Apr 17 10:51 MSFT_1.avi.009

    To join them on Linux, run

    cat MSFT_1.avi.00? > MSFT_1.avi

    Back to cat

  • Docker delete container after running

    When you run a docker image, it create a container and run it. After docker container stop, container stays, so you can use it again if required.

    Some times, you need to delete docker container after it is run. This is useful if your docker container is just a command line executable. In my case, docker container have ffmpeg in it, i don’t want container left over after i executed ffmpeg command.

    To auto delete container after execution, use –rm option.

    docker run --rm DOCKER_IMAGE
    

    Example

    docker run --rm --name ffmpeg jrottenberg/ffmpeg:3.2-ubuntu -format
    
  • apt force IPv4

    One of my internet provider only provide IPv4 connection. When i run apt install command, it failed with error as it try to connect using IPv6.

    boby@sok-01:~$ sudo apt install php7.3-curl
    Reading package lists... Done
    Building dependency tree       
    Reading state information... Done
    The following NEW packages will be installed:
      php7.3-curl
    0 upgraded, 1 newly installed, 0 to remove and 0 not upgraded.
    Need to get 29.6 kB of archives.
    After this operation, 123 kB of additional disk space will be used.
    Err:1 http://ppa.launchpad.net/ondrej/php/ubuntu bionic/main amd64 php7.3-curl amd64 7.3.13-1+ubuntu18.04.1+deb.sury.org+1
      Could not connect to ppa.launchpad.net:80 (2001:67c:1560:8008::15). - connect (101: Network is unreachable) Could not connect to ppa.launchpad.net:80 (91.189.95.83), connection timed out
    E: Failed to fetch http://ppa.launchpad.net/ondrej/php/ubuntu/pool/main/p/php7.3/php7.3-curl_7.3.13-1+ubuntu18.04.1+deb.sury.org+1_amd64.deb  Could not connect to ppa.launchpad.net:80 (2001:67c:1560:8008::15). - connect (101: Network is unreachable) Could not connect to ppa.launchpad.net:80 (91.189.95.83), connection timed out
    E: Unable to fetch some archives, maybe run apt-get update or try with --fix-missing?
    boby@sok-01:~$
    

    To force apt to use IPv4 only, edit

    sudo vi /etc/apt/apt.conf.d/99-force-ipv4
    

    Add

    Acquire::ForceIPv4 "true";
    

    If you want to force IPv6, add

    Acquire::ForceIPv6 "true";
    
  • CentOS 7 resolv.conf make changes permanent

    On rebooting the CentOS 7 server, changes made to resolv.conf is lost. This is because one of the network interface is configured to use DNS server.

    [root@server ~]# grep DNS /etc/sysconfig/network-scripts/ifcfg-*
    /etc/sysconfig/network-scripts/ifcfg-eno1:DNS1="127.0.0.1"
    [root@server ~]# 

    To fix, edit

    vi /etc/sysconfig/network-scripts/ifcfg-eno1

    Remove the line

    DNS1="127.0.0.1"

    Now NetworkManager will not modify /etc/resolv.conf file on boot.

    Or you can set valid DNS servers in network config file like

    [root@server ~]# cat /etc/sysconfig/network-scripts/ifcfg-eno1 | grep DNS
    DNS1="1.1.1.1"
    DNS2="8.8.8.8"
    [root@server ~]# 

    If your network configuration use DHCP, set set PEERDNS=no.

    BOOTPROTO=dhcp
    PEERDNS=no

    Another solution is to make file immutable with

    chattr +i /etc/resolv.conf

    Related Posts

    Domain Resolver