Tag: linux

  • Linux KVM Bridge network on Ubuntu

    On Ubuntu 18.04 server, first i get Ubuntu to use /etc/network/interface, by default Ubuntu 18.04 and newer use netplan.

    First install ifdown

    apt install ifupdown -y
    

    Install bridge utils and resolvconf.

    apt install bridge-utils resolvconf
    

    Now you can configure your network interface by editing file

    vi  /etc/network/interface
    

    Here is my network configuration on an OVH server.

    root@ns3048991:~# cat /etc/network/interfaces
    # interfaces(5) file used by ifup(8) and ifdown(8)
    # Include files from /etc/network/interfaces.d:
    source-directory /etc/network/interfaces.d
    
    auto eno3
    iface eno3 inet static
        address 149.202.199.137
        netmask 255.255.255.255
        broadcast 149.202.199.137
        gateway 149.202.199.254
        dns-nameservers 8.8.8.8 8.8.4.4
    root@ns3048991:~# 
    

    To convert this interface to bridge network, do the following

    1) Replace all occurance of “eno3” with “br0”

    2) Add following lines

        bridge_ports eno3
        bridge_stp off
        bridge_maxwait 5
    

    In above, replace “eno3” with name of your physical interface.

    Here is my final network configuration.

    root@ns3048991:~# cat /etc/network/interfaces
    # interfaces(5) file used by ifup(8) and ifdown(8)
    # Include files from /etc/network/interfaces.d:
    source-directory /etc/network/interfaces.d
    
    auto br0
    iface br0 inet static
        address 149.202.199.137
        netmask 255.255.255.255
        broadcast 149.202.199.137
        gateway 149.202.199.254
        bridge_ports eno3
        bridge_stp off
        bridge_maxwait 5
        dns-nameservers 8.8.8.8 8.8.4.4
    root@ns3048991:~# 
    

    See Linux KVM, Networking @ linux-kvm.org

  • Install  Xfce VNC remote desktop on Ubuntu

    Install Xfce VNC remote desktop on Ubuntu

    XFCE is a lightweight Desktop Environment for Linux. XFCE + vnc allows you to set up a remote desktop on a VPS or dedicated server located in a remote data center or cloud. You can connect to remote desktop using a VNC client and work like it is a local computer, similar to Windows Remote Desktop (RDP).

    To install XFCE run

    apt install -y xfce4 xfce4-goodies
    

    You will be asked to select Default Display Manager. You can select any of the options.

    Next install vncserver

    apt install tightvncserver autocutsel
    

    It is a bad idea to use root user for logging into the desktop. Create a normal user with sudo privileges to be used as desktop user.

    useradd -m -s /bin/bash USERNAME
    

    It will be good to make this user an admin, so the user can install software or update the system.

    usermod -aG sudo USERNAME
    

    Set a password for the user

    passwd USERNAME
    

    Now login as the user

    su - USERNAME_HERE
    

    Create a vnc password for this user.

    vncpasswd
    

    Create vnc startup file

    vi ~/.vnc/xstartup
    

    Add

    #!/bin/bash
    
    xrdb $HOME/.Xresources
    autocutsel -fork
    startxfce4 &
    

    Make it executable

    chmod 755 ~/.vnc/xstartup
    

    Auto start VNC Server

    To autostart vncserver on boot, you need to create a service file. You need to do the following as user root.

    vi /etc/systemd/system/[email protected]
    

    Add

    [Unit]
    Description=Start VNC server at startup
    After=syslog.target network.target
    
    [Service]
    Type=forking
    User=USERNAME
    Group=USERNAME
    WorkingDirectory=/home/USERNAME
    
    PIDFile=/home/USERNAME/.vnc/%H:%i.pid
    ExecStartPre=-/usr/bin/vncserver -kill :%i > /dev/null 2>&1
    ExecStart=/usr/bin/vncserver -depth 24 -geometry 1920x1080  :%i
    ExecStop=/usr/bin/vncserver -kill :%i
    
    [Install]
    WantedBy=multi-user.target
    

    In the above, replace USERNAME with the actual user name you created above.

    Enable the service with

    systemctl enable vncserver@1
    

    Start the VNC server

    systemctl start vncserver@1
    

    Now reboot the server. You should be able to connect to VNC server using SERVER_IP:1

    OPTIONAL: Using RDP instead of VNC

    If you want to use RDP (Windows Remote Desktop) to connect instead of VNC, install xrdp

    apt install -y xrdp
    

    Edit

    vi /etc/xrdp/xrdp.ini
    

    Set value of new_cursors to false.

    new_cursors=false
    

    Change to desktop user

    su - USERNAME
    

    Create file

    vi ~/.xsession
    

    Add following content

    xfce4-session
    export XDG_SESSION_DESKTOP=xubuntu
    export XDG_DATA_DIRS=/usr/share/xfce4:/usr/local/share:/usr/share:/var/lib/snapd/USERNAME:/usr/share
    export XDG_CONFIG_DIRS=/etc/xdg/xfce4:/etc/xdg:/etc/xdg
    

    Enable and restart XRDP

    systemctl enable xrdp
    systemctl restart xrdp
    

    See VNC Server

  • Install HandBrake on Ubuntu 18.04

    HandBreak is an OpenSource Video transcoder available from https://handbrake.fr. It can convert video to various format.

    Latest version of Handbreak available in Ubuntu PPA. To install, enable Handbreak PPA

    add-apt-repository ppa:stebbins/handbrake-releases
    

    Install handbreak with

    apt install handbrake-gtk handbrake-cli
    
  • Install Linux KVM on Ubuntu

    Install Linux KVM on Ubuntu

    Linux KVM is virtualisation software that allow you to create virtual machine under linux. To install on Ubuntu, run

    apt install -y qemu-kvm qemu-utils
    

    Install libvirtd, this allow you to easily create KVM virtual machines and allow remote connection from virt-manager GUI application.

    For Ubuntu 20.04

    apt install -y libvirt-daemon libvirt-daemon-system
    

    For Ubuntu 18.04

    apt install -y libvirt-bin
    

    Enable and start libvirt

    systemctl enable libvirtd
    systemctl start libvirtd
    systemctl is-active libvirtd
    systemctl status libvirtd
    

    At this stage, you should be able to connect to KVM server form your computer using virt-manager.

    You need to create a bridge network interface (“br0”), for this, follow instructions at Linux KVM Bridge network on Ubuntu.

    Downloading ISO

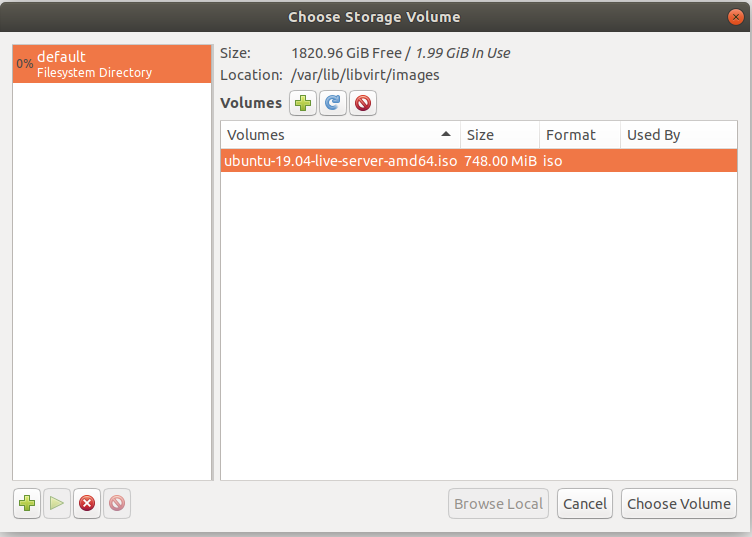
    Before you can setup any VM, you need to download ISO image for the OS. Here i downloaded ISO image for Ubuntu 19.04

    cd /var/lib/libvirt/images
    wget http://mirrors.piconets.webwerks.in/ubuntu-mirror/ubuntu-releases/19.04/ubuntu-19.04-live-server-amd64.iso
    

    Once downloaded, you should be able to select this ISO image in virt-manager when creating a VM.

    See Linux KVM

  • Disable IP Block Alerts in CSF Firewall

    To disable IP block alert in CSF firewall, run

    sed -i "s/LF_PERMBLOCK_ALERT\s*=.*$/LF_PERMBLOCK_ALERT = \"0\"/g" /etc/csf/csf.conf
    

    Restart lfd and csf

    systemctl restart lfd
    csf -r
    

    See csf firewall

  • Ignore a folder in maldet

    maldet is malware scanner for linux. On a shared hosting server, maldet detected one cusomer files as malware, on checking i found it is false positive. It is just a log file written by the application. To avoid getting further email from this application, i added this folder to maldet ignore_paths.

    To add a folder to ignore list, edit file

    vi /usr/local/maldetect/ignore_paths
    

    Add the folder you need to ignore to end of this file as a new line.

    Example

    root@server74 [~]# cat /usr/local/maldetect/ignore_paths
    /home/welgreenkerala/public_html/login/
    /usr/local/maldetect
    /usr/local/sbin/maldet
    /home/shopatke/public_html/application/logs/
    root@server74 [~]# 
    

    See maldet

  • Download RPM package from yum repository

    To download RPM file from yum repo, you need to install yum-utils package.

    yum install -y yum-utils
    

    Now you can use command

    yumdownloader --resolve --destdir=/path/ PACKAGE_NAME
    

    Example

    yumdownloader --resolve --destdir=/root/yum/ nginx
    

    This will download and store all rpm files in /var/yum folder. –resolve will resolve dependency and download them. This will be helpful if you need to install a package on a system with no direct internet connection.

    See yum

  • Enable Passive FTP in ISPConfig

    To enable Passive FTP in Debian/Ubuntu installation of ISPConfig, run

    echo "40110 40210" > /etc/pure-ftpd/conf/PassivePortRange
    

    Restart pure-ftpd

    service pure-ftpd-mysql restart
    

    Now open ports 40110-40210 in firewall.

    On CSF Firewall, edit

    vi /etc/csf/csf.conf
    

    Add

    40110:40210
    

    At ened of TCP_IN line.

    Example

    TCP_IN = "20,21,22,25,53,80,110,143,443,465,587,993,995,3333,8080,8090,19999,40110:40210"
    

    if you are using AWS, you need to run

    echo "YOUR_EXTERNAL_IP_ADDR" > /etc/pure-ftpd/conf/ForcePassiveIP
    service pure-ftpd-mysql restart
    

    See ispconfig

  • Install virt-manager on Ubuntu

    virt-manager is a GUI tool used to manage KVM virtial machines. To install virt-manager on Ubuntu, run

    apt install virt-manager
    
  • Clone VM on VMware ESXi using vmkfstools

    Clone VM on VMware ESXi using vmkfstools

    Free version of VMware ESXi don’t provide option to clone virtual machine. If you want to clone a VM, you need to purchase expensive vSphere license.

    There is a work around for this, you need to clone disk of an existing Virtual machine using vmkfstools.

    To make clone of a VM disk, SSH into your VMWare ESXi server as user root. Then create clone of disk with

    vmkfstools -i "source.vmdk" "destination.vmdk"
    

    For new VM, i created a directory. Path to datastore directory may be differnt on your server, you can find it using “df -h” command and checking the file system.

    mkdir /vmfs/volumes/disk2/ubuntu-clone/
    

    Shutdown the Virtual Machine you want to clone the disk from. Run

    [root@ns3048991:~] vmkfstools -i "/vmfs/volumes/disk2/Ubuntu/Ubuntu.vmdk" "/vmfs/volumes/disk2/ubuntu-clone/ubuntu-clone.vmdk"
    Destination disk format: VMFS zeroedthick
    Cloning disk '/vmfs/volumes/disk2/Ubuntu/Ubuntu.vmdk'...
    Clone: 100% done.
    [root@ns3048991:~] 
    

    In screenshot below, i first tried to clone with out creating destination folder. That resulted in error. After creating destination folder, vmkfstools command worked.

    vmkfstools

    Creating VM using cloned disk

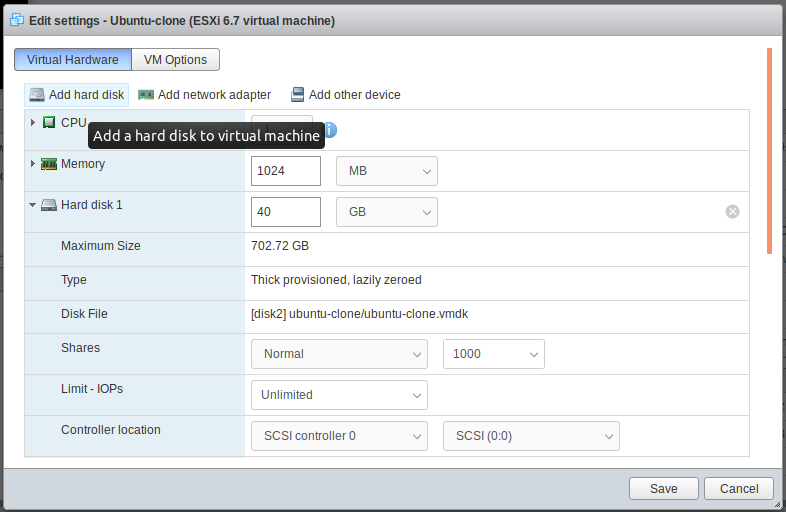
    Login to VMware ESXi web interface. Create a new VM. On the step where you select hardware, delete the existing Disk. Add a new disk, browse and select the newly created clone disk. In this case – “/vmfs/volumes/disk2/ubuntu-clone/ubuntu-clone.vmdk”

    VMWare ESXi

    Once the VM creation is finished, you will be able to start the new VM. You can create a VM, then use it as the template for creating new virtual machines.

    See VMWare

  • vmstat

    [root@server70 ~]# vmstat -S M 1 10
    procs -----------memory---------- ---swap-- -----io---- --system-- -----cpu-----
     r  b   swpd   free   buff  cache   si   so    bi    bo   in   cs us sy id wa st
     0  0     11    770   1009   3119    0    0    28    22   53   51  4  1 94  1  0
     3  0     11    727   1009   3120    0    0    52  2504 8387 2624 12  1 86  1  0
     0  0     11    755   1009   3120    0    0     4   157 4619 1841 12  1 86  1  0
     0  0     11    755   1009   3120    0    0   136     4 9405 1595  2  1 98  0  0
     0  0     11    755   1009   3120    0    0     0    33 4564  875  0  0 99  0  0
     1  0     11    761   1009   3120    0    0    60     0 3151 1157  2  1 97  0  0
     0  0     11    798   1009   3120    0    0    12   984 2937  898  0  0 99  0  0
     0  1     11    828   1009   3120    0    0     0   321 3108 1002  3  0 96  1  0
     0  0     11    813   1009   3120    0    0     4     0 6065 1512  6  1 93  0  0
     1  0     11    848   1009   3120    0    0     4   100 7311 1628  3  1 95  2  0
    [root@server70 ~]#
    

    vmstat 1

    * High values in “wa” column mean: IO problem
    * High values in “si”, “so” mean: excessive swapping

    Sustained high swap rates (si and so) are usually bad. The system will start spending all of its time swapping, and make no progress on any actual work. You will also see the number of runnable (r and b) processes increase. If the situation gets bad enough and free memory gets too low, the Out-of-memory (oom) logic will start killing random processes. At this point, either reducing the number of processes that normally run or adding additional RAM are about the only options.

    vmstat – Report virtual memory statistics

    vmstat [-a] [-n] [delay [ count]]
    vmstat [-f] [-s] [-m]
    vmstat [-S unit]
    vmstat [-d]
    vmstat [-p disk partition]
    vmstat [-V]
    

    vmstat reports information about processes, memory, paging, block IO, traps, and cpu activity.

    The first report produced gives averages since the last reboot. Additional reports give information on a sampling period of length delay. The process and memory reports are instantaneous in either case.

    FIELD DESCRIPTION FOR VM MODE

    
       Procs
           r: The number of processes waiting for run time.
           b: The number of processes in uninterruptible sleep.
    
       Memory
           swpd: the amount of virtual memory used.
           free: the amount of idle memory.
           buff: the amount of memory used as buffers.
           cache: the amount of memory used as cache.
           inact: the amount of inactive memory. (-a option)
           active: the amount of active memory. (-a option)
    
       Swap
           si: Amount of memory swapped in from disk (/s).
           so: Amount of memory swapped to disk (/s).
    
       IO
           bi: Blocks received from a block device (blocks/s).
           bo: Blocks sent to a block device (blocks/s).
    
       System
           in: The number of interrupts per second, including the clock.
           cs: The number of context switches per second.
    
       CPU
           These are percentages of total CPU time.
           us: Time spent running non-kernel code. (user time, including nice time)
           sy: Time spent running kernel code. (system time)
           id: Time spent idle. Prior to Linux 2.5.41, this includes IO-wait time.
           wa: Time spent waiting for IO. Prior to Linux 2.5.41, included in idle.
           st: Time stolen from a virtual machine. Prior to Linux 2.6.11, unknown.


    FIELD DESCRIPTION FOR DISK MODE

       Reads
           total: Total reads completed successfully
           merged: grouped reads (resulting in one I/O)
           sectors: Sectors read successfully
           ms: milliseconds spent reading
    
       Writes
           total: Total writes completed successfully
           merged: grouped writes (resulting in one I/O)
           sectors: Sectors written successfully
           ms: milliseconds spent writing
    
       IO
           cur: I/O in progress
           s: seconds spent for I/O


    FIELD DESCRIPTION FOR DISK PARTITION MODE

           reads: Total number of reads issued to this partition
           read sectors: Total read sectors for partition
           writes : Total number of writes issued to this partition
           requested writes: Total number of write requests made for partition
    

    FIELD DESCRIPTION FOR SLAB MODE

           cache: Cache name
           num: Number of currently active objects
           total: Total number of available objects
           size: Size of each object
           pages: Number of pages with at least one active object
           totpages: Total number of allocated pages
           pslab: Number of pages per slab
    

    Related commands

    * iostat
    * sar
    * mpstat
    * ps
    * top
    * free

    See Linux Commands

  • vgcreate

    To Create a volumegroup.

    vgcreate vg1 /dev/sdd1 /dev/sde1
    

    Example

    [root@server ~]# vgcreate vg-storage /dev/sdb
      Volume group "vg-storage" successfully created
    [root@server ~]# vgdisplay
      --- Volume group ---
      VG Name               vg-storage
      System ID             
      Format                lvm2
      Metadata Areas        1
      Metadata Sequence No  1
      VG Access             read/write
      VG Status             resizable
      MAX LV                0
      Cur LV                0
      Open LV               0
      Max PV                0
      Cur PV                1
      Act PV                1
      VG Size               9.09 TiB
      PE Size               4.00 MiB
      Total PE              2383357
      Alloc PE / Size       0 / 0   
      Free  PE / Size       2383357 / 9.09 TiB
      VG UUID               tAh3cq-EwoJ-6t94-SJtp-YoCC-XCst-4m8Ktp
       
    [root@server ~]# 
    

    See lvm