Tag: linux

  • lxc

    LXC is Linux Container, allows you to run lightweight virtual servers on your computer.

    It is better use LXD instead of LXC. LXD provides a much easier-to-use interface to LXC.

    To install lxc, run

    apt install -y lxc
    

    To create a VM, use

    lxc-create -t download -n first-vm
    

    To list VM, use the command lxc-ls

    root@UNUSED:~# lxc-ls
    first-vm 
    root@UNUSED:~# lxc-ls -f
    NAME     STATE   AUTOSTART GROUPS IPV4      IPV6 UNPRIVILEGED 
    first-vm RUNNING 0         -      10.0.3.26 -    false        
    root@UNUSED:~#
    

    To start a VM, run

    lxc-start VM_NAME
    

    To login to a VM, run

    lxc-attach VM_NAME
    

    lxc config files

    /etc/lxc/default.conf
    /etc/lxc/lxc-usernet
    /var/lib/lxc
    
  • Create lxc container with lxc-create

    lxc-create is used to create lxc container. To create a container, run

    lxc-create -t download -n CONTAINER_NAME_HERE
    

    This will list all available containers. You can select the OS you want to use.

    To specify OS, you can use the following examples

    lxc-create -t download -n mycontainer-1 -- -d ubuntu -r focal -a amd64
    lxc-create -t download -n mycontainer-2 -- -d debian -r buster -a amd64
    

    To list all containers, run

    lxc-ls -f
    

    To start a container, run

    lxc-start NAME
    

    To connect to a container, use the command

    lxc-attach NAME
    

    Example

    root@b24:~# lxc-attach boby2
    root@boby2:~# cat /etc/*issue
    Debian GNU/Linux 10 \n \l
    
    root@boby2:~# 
    

    To delete a container, run

    lxc-destroy NAME
    

    See lxc

  • install ShadowSocks client in Ubuntu 18.04

    install ShadowSocks client in Ubuntu 18.04

    ShadowSocks client is part of shadowsocks package. This include both client and server. If you are looking to install server, see Install ShadowSocks server on Debian 10

    To install ShadowSocks, run

    apt install -y shadowsocks
    

    ShadowSocks client is called sslocal, get installed in /usr/bin/sslocal.

    On Ubuntu, no start up script provided with this package, so you need to create one or manually run sslocal when required.

    Create a service file

    vi /lib/systemd/system/[email protected]
    

    Add following content

    [Unit]
    Description=Shadowsocks client mode service
    Documentation=man:sslocal(1)
    After=network-online.target
    
    [Service]
    Type=simple
    User=nobody
    Group=nogroup
    ExecStart=/usr/bin/sslocal -q -c /etc/shadowsocks/%i.json
    Restart=on-failure
    RestartSec=30
    
    [Install]
    WantedBy=multi-user.target
    

    Now we need to create a configuration file with your ShadowSocks server IP and password.

    mkdir /etc/shadowsocks/
    vi /etc/shadowsocks/local.json
    

    Add following content

    {
        "server":"YOUR_SERVER_IP",
        "server_port":8044,
        "local_address": "127.0.0.1",
        "local_port":8044,
        "password":"PASSWORD",
        "timeout":300,
        "method":"aes-256-cfb",
        "fast_open": false,
        "workers": 1,
        "prefer_ipv6": false
    }
    

    “server” = IP of the server where you installled ShadowSocks server.
    “server_port” = Port used by ShadowSocks server
    “password” = ShadowSocks server password.

    local_port can be anything you like.

    Enable shadowsocks service

    systemctl enable shadowsocks-local@local
    

    To start

    systemctl start shadowsocks-local@local
    

    To see status

    systemctl status shadowsocks-local@local
    

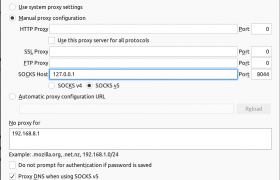
    Now you can configure your browser or other sock proxy supported application using 127.0.0.1:8044. Here is how to configure firefox
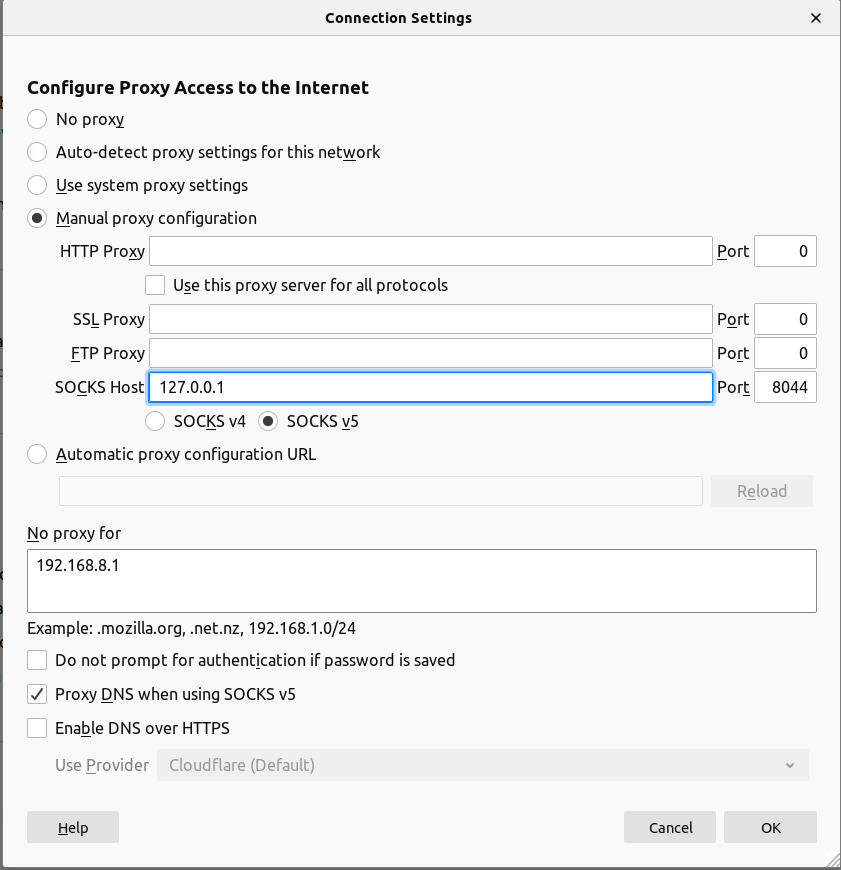
    shadowsocks firefox settings

  • Setting up MineCraft Server in Ubuntu

    To setup MineCraft server on Ubuntu, first you need to install Java.

    apt install openjdk-8-jre -y
    

    Create a user to run minecraft

    useradd -m --shell /bin/bash minecraft
    

    You can set a password if you want direct SSH login to this user or login as root, then “su – minecraft”.

    passwd minecraft
    

    Login as user minecraft with SSH or “su”.

    Download minecraft server .jar file from

    https://www.minecraft.net/en-us/download/server/

    At the time of writing, i downloaded

    wget https://launcher.mojang.com/v1/objects/3dc3d84a581f14691199cf6831b71ed1296a9fdf/server.jar
    

    Don’t use above link as it can get older, always go to minecraft site and get new link, so you get latest minecraft server jar file.

    You can start minecraft server with command

    java -Xmx1024M -Xms1024M -jar server.jar nogui
    

    First time when you run, it exit with some error related to EULA.

    You need to edit file

    vi eula.txt
    

    Set

    eula=true
    

    Now minecraft will run. You can create a run.sh file with following command for starting minecrat easily.

    vi ~/start.sh
    

    Paste following content

    #!/bin/bash
    
    java -Xmx1024M -Xms1024M -jar server.jar nogui
    

    To make the file executable, chmod it 755

    chmod 755 ~/start.sh
    

    When you start minecraft from terminal/ssh, it get closed when you disconnect. To keep minecraft server running after you disconnect, use tmux or screen.

  • Configure OVH Bridge Network from command line

    Configure OVH Bridge Network from command line

    If you have a Proxmox or VmWare ESXi server on OVH network, you need to configure network interface once virtual machine is created.

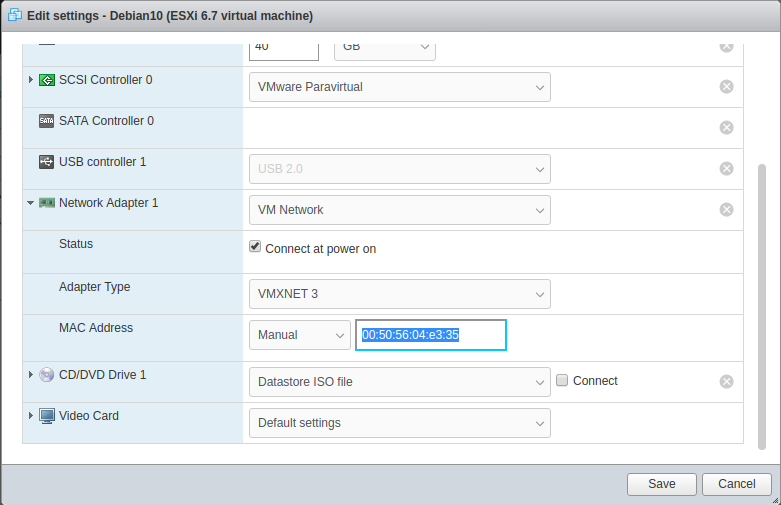
    First login to OVH, go to IP page. Find the IP address you need to assign to this new VM, create a Virtual MAC. OVH allow 2 type of MAC. If you are using Proxmox, use OVH Mac. For VMWare ESXi, use vmware vmac.

    Once you have Virual Mac. you need to configure it in your VM network interface settings. For Vmware ESXi

    Now login to Virtial Machine, run following commands

    ip link set NETWORK_INTERFACE_HERE up
    ip addr add FO_IP_HERE dev NETWORK_INTERFACE_HERE
    ip route add GW_IP_HERE dev NETWORK_INTERFACE_HERE
    ip route add default via GW_IP_HERE dev NETWORK_INTERFACE_HERE
    

    In above, replace

    NETWORK_INTERFACE_HERE = name of your network interface. This can be found with command “ip link”. Normally it is eth0 or ensXXX.

    FO_IP_HERE = this is the Failover IP you will be using for this Virtual Machine.

    GW_IP_HERE = This is gateway IP. For OVH network, it will be your servers MAIN IP address with last number replaced with 254.

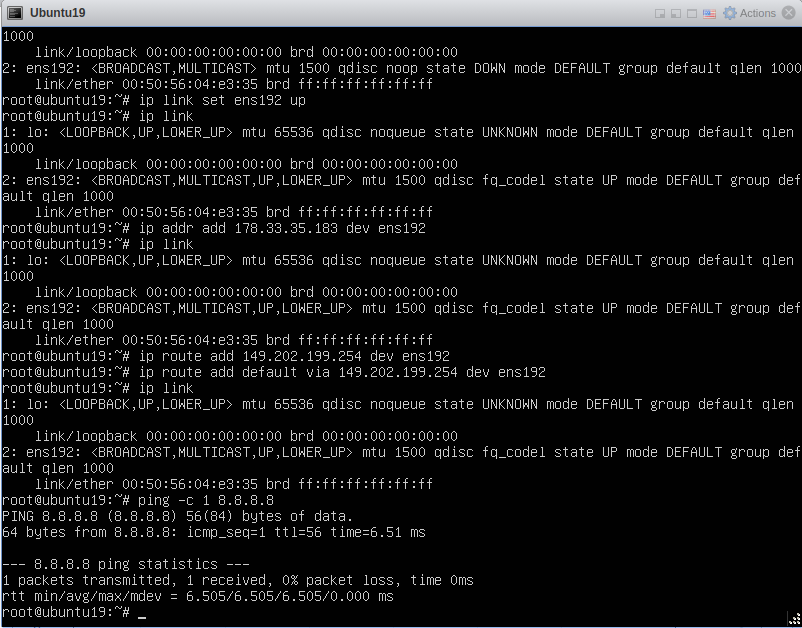
    Here is an actial example.

    ip link set ens192 up
    ip addr add 178.33.35.183 dev ens192
    ip route add 149.202.199.254 dev ens192
    ip route add default via 149.202.199.254 dev ens192
    

    This settings will be lost when you reboot OS. For configuring network interface permanantly, you can do

  • Install netdata on ArchLinux

    First update the packages with

    pacman -Syu
    

    Install netdata

    pacman -S netdata
    

    Enable and start netdata

    systemctl enable netdata
    systemctl start netdata
    
  • Ubuntu remove SSH welcome message

    Ubuntu remove SSH welcome message

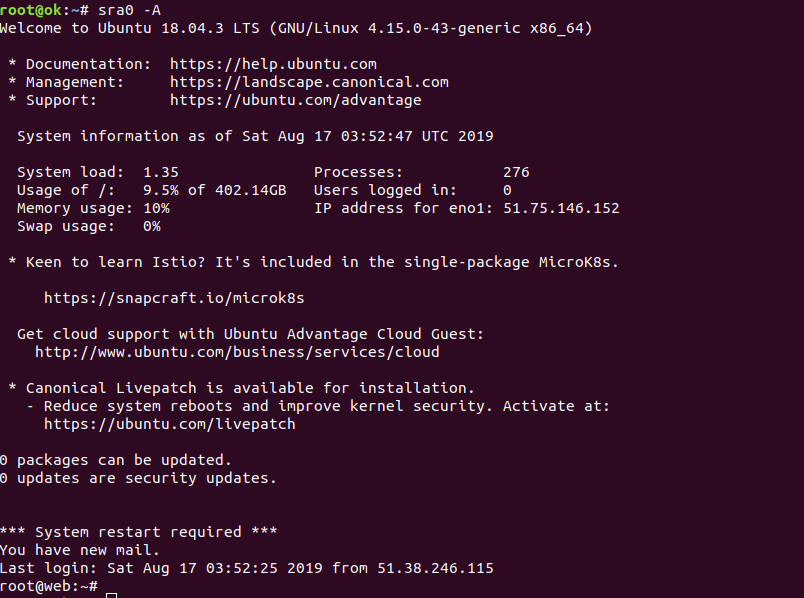
    When you login to an Ubuntu server using SSH, you get welcome message like

    Ubuntu welcome message

    On most Linux systems, this is generated by /etc/motd. On Ubuntu, MOTD (message of the day) generated dynamically with some scripts. I don’t want to see all the marketing message from Ubuntu everyday.

    To disable MOTD on Ubuntu, just delete the scripts from /etc/update-motd.d/

    rm -f /etc/update-motd.d/*
    

    If you want a differnt motd, you can put a shell script in this folder.

    Method 2

    Another way to disable motd is by disabling pam_motd.so module.

    Edit files

    /etc/pam.d/login
    /etc/pam.d/sshd
    

    Comment out the lines related to pam_motd.so

    session    optional     pam_motd.so  motd=/run/motd.dynamic
    session    optional     pam_motd.so noupdate
    
  • nmtui

    nmtui

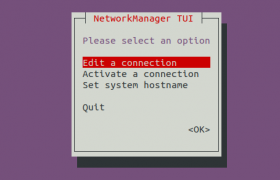
    nmtui allow you to configure network interface if you are using network manager.

    On Debian/Ubuntu, it is part of network-manager package

    apt install network-manager
    

  • Install Linux Kernel 5.0 on Ubuntu 18.04 LTS

    Ubuntu 18.04 was released with Linux kernel 4.15

    root@DUS-147022:~# hostnamectl
       Static hostname: DUS-147022.op-net.com
             Icon name: computer-desktop
               Chassis: desktop
            Machine ID: 1fcb383ac03e4299a3b994dca4c51a10
               Boot ID: 66d616e9b11145c38387d71f9c48a4bd
      Operating System: Ubuntu 18.04.3 LTS
                Kernel: Linux 4.15.0-58-generic
          Architecture: x86-64
    root@DUS-147022:~# 
    

    On 8 Aug 2019, Cannonical released Ubuntu 18.04.3 LTS with Linux Kernel 5.0.

    If you are using older Ubuntu 18.04 point release, you won’t get newer kernel when you do software upgrade.

    To get newer Linux kernal installed, you need to install Hardware enablement (HWE) stack, this provide newer kernel that provide support for latest hardware.

    To install Hardware enablement (HWE) stack, run

    apt install linux-generic-hwe-18.04
    

    if this is Desktop computer, you may need to run

    apt install linux-generic-hwe-18.04 xserver-xorg-hwe-18.04
    

    after installing, reboot

    reboot
    

    after reboot, you will see latest Linux Kernel.

    boby@sok-01:~$ hostnamectl
       Static hostname: sok-01
             Icon name: computer-desktop
               Chassis: desktop
            Machine ID: 70486772aac1410c9a8031851ab60a0d
               Boot ID: 6c946c08f95d4c6b883e6790ab83e728
      Operating System: Ubuntu 18.04.3 LTS
                Kernel: Linux 5.0.0-25-generic
          Architecture: x86-64
    boby@sok-01:~$ 
    
  • ping: unknown host localhost

    On a server, ping localhost did not work

    root@cloud1:~# ping localhost
    ping: unknown host localhost
    root@cloud1:~#
    

    /etc/hosts files was proper, had entry for localhost.

    root@cloud1:~# cat /etc/hosts | grep localhost
    127.0.0.1 localhost
    ::1 ip6-localhost ip6-loopback
    root@cloud1:~# 
    

    problem was due to /etc/nsswitch.conf file missing in the server. To fix create file

    vi /etc/nsswitch.conf
    

    Add

    # /etc/nsswitch.conf
    #
    # Example configuration of GNU Name Service Switch functionality.
    # If you have the `glibc-doc-reference' and `info' packages installed, try:
    # `info libc "Name Service Switch"' for information about this file.
    
    passwd:         compat systemd
    group:          compat systemd
    shadow:         compat
    gshadow:        files
    
    hosts:          files mdns4_minimal [NOTFOUND=return] dns myhostname
    networks:       files
    
    protocols:      db files
    services:       db files
    ethers:         db files
    rpc:            db files
    
    netgroup:       nis
    

    Set permission for the file

    chmod 644 /etc/nsswitch.conf
    
  • Zimbra Mail Server CentOS firewall settings

    On CentOS 7 server with firewalld running, used following command to open ports used by Zimbra Mail Server.

    firewall-cmd --zone=public --permanent --add-service=http
    firewall-cmd --zone=public --permanent --add-service=https
    firewall-cmd --zone=public --permanent --add-service=ssh
    firewall-cmd --zone=public --permanent --add-port=110/tcp
    firewall-cmd --zone=public --permanent --add-port=11211/tcp
    firewall-cmd --zone=public --permanent --add-port=143/tcp
    firewall-cmd --zone=public --permanent --add-port=25/tcp
    firewall-cmd --zone=public --permanent --add-port=443/tcp
    firewall-cmd --zone=public --permanent --add-port=465/tcp
    firewall-cmd --zone=public --permanent --add-port=5222/tcp
    firewall-cmd --zone=public --permanent --add-port=5269/tcp
    firewall-cmd --zone=public --permanent --add-port=587/tcp
    firewall-cmd --zone=public --permanent --add-port=7025/tcp
    firewall-cmd --zone=public --permanent --add-port=7071/tcp
    firewall-cmd --zone=public --permanent --add-port=7072/tcp
    firewall-cmd --zone=public --permanent --add-port=7073/tcp
    firewall-cmd --zone=public --permanent --add-port=7110/tcp
    firewall-cmd --zone=public --permanent --add-port=7143/tcp
    firewall-cmd --zone=public --permanent --add-port=7993/tcp
    firewall-cmd --zone=public --permanent --add-port=7995/tcp
    firewall-cmd --zone=public --permanent --add-port=8443/tcp
    firewall-cmd --zone=public --permanent --add-port=993/tcp
    firewall-cmd --zone=public --permanent --add-port=995/tcp
    firewall-cmd --reload
    

    See Zimbra, firewall-cmd

  • Zimbra redirect webmail http to https

    After Zimbra mail server installed, webmail work on url

    https://SERVER-HOSTNAME-HERE/

    If you access webmail with out HTTPS, it won’t work.

    To set HTTP to redirect to HTTPS, login to server as root, switch to user zimbra

    su - zimbra
    

    Run

    zmprov ms SERVER_HOSTNAME_HERE zimbraReverseProxyMailMode redirect
    

    Wait few minutes, HTTP link will redirect to HTTPS.

    [root@correo ~]# netstat -lntp | grep 80                                                                                                                                                                    
    tcp        0      0 0.0.0.0:8080            0.0.0.0:*               LISTEN      22891/java                                                                                                                  
    tcp6       0      0 :::7780                 :::*                    LISTEN      24005/httpd                                                                                                                 
    [root@correo ~]# su - zimbra                                                                                                                                                                                
    Last login: Thu Aug  8 21:33:52 CST 2019 on pts/0                                                                                                                                                           
    [zimbra@correo ~]$ zmprov ms correo.net.gt zimbraReverseProxyMailMode redirect                                                                                                                              
    [zimbra@correo ~]$
    

    You need to wait few minutes before it can start working on HTTPS port, no restart required.

    Now netstat shows nginx runs on port 80

    [root@correo ~]# netstat -lntp| grep 80
    tcp        0      0 0.0.0.0:80              0.0.0.0:*               LISTEN      90391/nginx: master 
    tcp        0      0 0.0.0.0:8080            0.0.0.0:*               LISTEN      22891/java          
    tcp6       0      0 :::7780                 :::*                    LISTEN      24005/httpd         
    [root@correo ~]# 
    

    See Zimbra