Category: Linux
-
Check rootkit with rkhunter
rkhunter is a software used to check your server for rootkits. The official site is
http://rkhunter.sourceforge.net/
On Ubuntu, install with
apt install rkhunter
Before you scan, update rkhunter with
rkhunter --update
To check your system for rootkit, run
rkhunter --check
-
Apache AH00144: couldn’t grab the accept mutex
On Ubuntu 18.04 server, apache crashed. On checking apache error log, found following
[Mon Aug 13 23:19:24.625927 2018] [mpm_prefork:emerg] [pid 2378] (43)Identifier removed: AH00144: couldn't grab the accept mutex [Mon Aug 13 23:19:24.626990 2018] [mpm_prefork:emerg] [pid 1227] (43)Identifier removed: AH00144: couldn't grab the accept mutex [Mon Aug 13 23:19:24.628515 2018] [mpm_prefork:emerg] [pid 1211] (43)Identifier removed: AH00144: couldn't grab the accept mutex [Mon Aug 13 23:19:24.628693 2018] [mpm_prefork:emerg] [pid 1309] (43)Identifier removed: AH00144: couldn't grab the accept mutex [Mon Aug 13 23:19:24.629122 2018] [mpm_prefork:emerg] [pid 2387] (43)Identifier removed: AH00144: couldn't grab the accept mutex [Mon Aug 13 23:19:24.629319 2018] [mpm_prefork:emerg] [pid 1603] (43)Identifier removed: AH00144: couldn't grab the accept mutex [Mon Aug 13 23:19:24.629483 2018] [mpm_prefork:emerg] [pid 1637] (43)Identifier removed: AH00144: couldn't grab the accept mutex [Mon Aug 13 23:19:24.629659 2018] [mpm_prefork:emerg] [pid 1566] (43)Identifier removed: AH00144: couldn't grab the accept mutex [Mon Aug 13 23:19:25.366503 2018] [core:alert] [pid 990] AH00050: Child 1211 returned a Fatal error... Apache is exiting! [Mon Aug 13 23:19:25.366568 2018] [:emerg] [pid 990] AH02818: MPM run failed, exiting
To fix the error, edit file
vi /etc/apache2/apache2.conf
Find
#Mutex file:${APACHE_LOCK_DIR} default
Replace with
Mutex posixsem
Restart Apache
service apache2 restart
See Apache
-
How to Block a Country in CSF firewall
To block all traffic from a country in CSF Firewall edit file /etc/csf/csf.conf
vi /etc/csf/csf.conf
Find the line
CC_DENY = ""
In this line, you can add 2 Letter country code. For example to block China and Russia, add
CC_DENY = "CN,RU"
Now you need to restart firewall with command
systemctl restart lfd csf -r
-
How to view login history on Linux Server
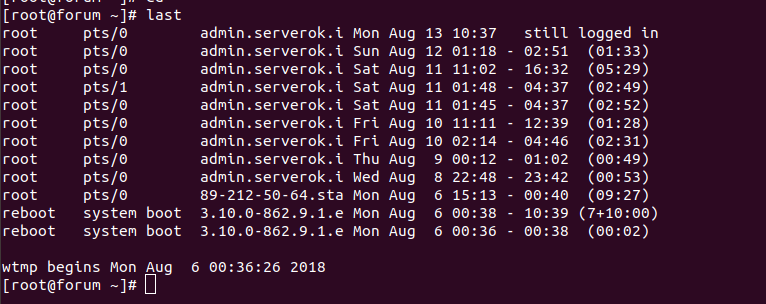
To see login history on a Linux system, you can use the “last” command.
last
On the screenshot above, it shows “admin.serverok.i” for some of the logins. This is because DNS resolve is enabled in SSH configuration, so IP get converted to hostname and it get truncated. To see the full hostname, run
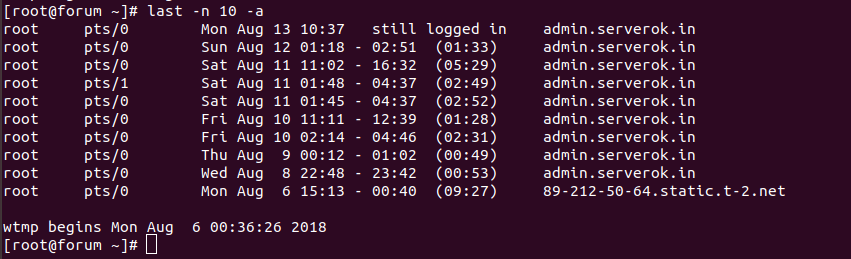
last -a
If you don’t want IP converted to hostname, run
last -ai
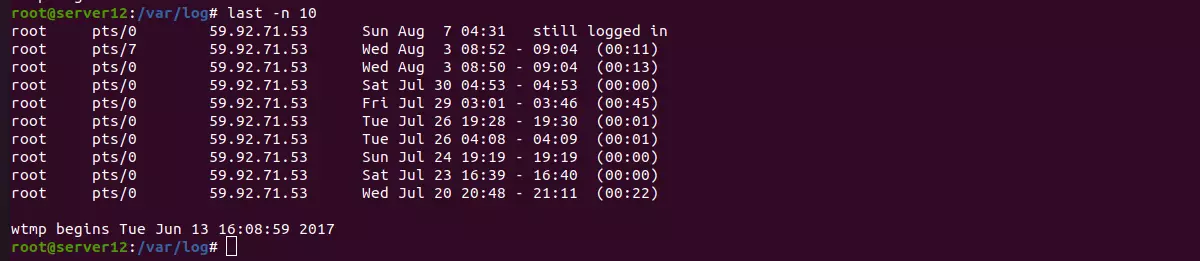
To list only the last 10 logins, run
last -n 10
To see full date/time, use
last -F
Login history is stored in the file
/var/log/wtmp
This file can grow and get rotated over time. If the file gets rotated, when you use the “last” command, it won’t report login history from older files.
root@server12:/var/log# ls -l | grep wtmp -rw-rw-r-- 1 root utmp 935K Aug 7 04:31 wtmp -rw-rw-r-- 1 root utmp 1.1M Jun 3 2017 wtmp-20170603 root@server12:/var/log#
To see login history from an older file, you need to specify the location of the file using -f argument.
last -f /var/log/wtmp-20170603
You can also use the command
utmpdump /var/log/wtmp-20170603
To view the last 10 logins with full hostname from the old login file wtmp-20170603, use
last -n 10 -a -f /var/log/wtmp-20170603
The file name may differ in your server, check the /var/log folder for actual file names.
-
mysqldump
mysqldump is a command used to backup MySQL databases.
To take backup, run
mysqldump --opt DB_NAME > DB_NAME.sql
To backup with triggers, routines, and events
mysqldump --opt --triggers --routines --events --single-transaction DB_NAME > DB_NAME.sql
--opt
combines many options. It is same as adding –add-drop-table, –add-locks, –create-options, –disable-keys, –extended-insert, –lock-tables, –quick, and –set-charset.--extended-insert
option will group together all INSERT operations for a table. This makes the backup file smaller and makes restoration faster. I restored a mysqldump bakcup, it take me 2 hours to restore. Same database backup with--extended-insert
option take only 10 minutes to restore. If you want a separate INSERT for each row, then usemysqldump --skip-extended-insert db1 > db1.sql mysqldump --complete-insert db1 > db1.sql
Backup All Databases
To backup all databases, run
mysqldump --opt --events --routines --triggers --all-databases | gzip -9 > "$(date +%F-%H%m%S)"-mysql-backup.sql.gz
To backup MySQL databases into separate files, run
mkdir /root/mysqlbackup/ for DB in $(mysql -Be "show databases" | grep -v 'row\|information_schema\|Database\|performance_schema') ; do mysqldump --opt --events --routines --triggers ${DB} > /root/mysqlbackup/${DB}.sql done
If you need to compress the sql file. use
mkdir /root/mysqlbackup/ for DB in $(mysql -Be "show databases" | grep -v 'row\|information_schema\|Database\|performance_schema') ; do mysqldump --skip-lock-tables --events --routines --triggers ${DB} | gzip -9 > /root/mysqlbackup/"$(date +%F-%H%m%S)"-${DB}.sql.gz done
Backup Database Structure only
mysqldump --no-data DB_NAME > DB_NAME.sql
Backup Only routines
mysqldump --routines --no-create-info --no-data --no-create-db --skip-opt DB_NAME > DB_NAME-routines.sql
Restore Backup
mysql --max_allowed_packet=1G --net_buffer_length=100000 < mysql-backup.sql
To disable sql mode, use
mysql -u serverok -p --max_allowed_packet=1024M --sql_mode="" serverok < db.sql
Related Posts
- How to Backup a Large MySQL Database Table by Table
- mysqldump errno: 24 Can’t open file when using LOCK TABLES
- MySQL Backup using mysqldump
- Extract Backup of one database from mysqldump all databases
- mysqldump packet bigger than max_allowed_packet
- Export MySQL Database table as an XML Document
- mysqldump Lost connection to MySQL server during query when dumping table
-
grep
To find a string inside files in a folder, use
grep -rnw ./ -e "STRING_TO_FIND"
Or
grep -irl "STRING_TO_FIND" ./
Or
grep -ir 'STRING_TO_FIND' ./ | cat
To search for multiple strings, use
netstat -lntp | grep -E "(dovecot|speed)"
-
Git
Monitor file changes in your Website
PHP Script to pull changes from GIT Repository
How to protect .git folder using htaccess
Git stdin is not a tty
Git Ignore file Permission (chmod)
Show git branch in terminal
Color git command line result
How to block .git directory in nginx
Find who added a file to git repoGit Hooks
Git Hosting
https://about.gitea.com
https://gitlab.comGitHub Actions
-
Monitor file changes in your Website
This script can be used to notify you when a file changed in your website. This is useful when you want to know when a file changed or your site is hacked and you to monitor your site for file changes so you know when hacker upload or modify a file.
First you need to add your web site to GIT.
This can be with
cd /var/www/html git init git add . git commit -a -m "inital commit"
Replace /var/www/html with actual DocumentRoot for your web site.
Every time you modify or add a file, you need to commit it to git you will get alerted. You can commit a new file to git with command
git add FILE_NAME git commit -a
Create a file
mkdir /usr/serverok/ vi /usr/serverok/check-files.php
Add following content
In the script, replace /var/www/html with actual document root of your web site. Change email and site name with your email and domain name.
Set following cronjob.
0 * * * * /usr/bin/php /usr/serverok/check-files.php
Cronjob will run every 1 hour and email you if any file change is detected. You can modify cronjob if you want to monitor more frequently, every 1 hour will be fine for most uses.
If you have a folder or file that you need to ignore, you can create a file with name ".gitignore" and add path to file/folder in it, git will ignore files/folders listed in it.
-
Restart rsync on failure
When copying a large site form a shared server using rsync, the rsync process on get killed, this may be done by some program on shared host or server admin manually killing the process.
Here is a bash script that will check if rsync exited normally or not, then retry the trasfter is rsync failure detected.
#!/bin/bash while [ 1 ] do rsync -avzP u89587395@home686010467.1and1-data.host:/kunden/homepages/18/d686010467/htdocs/jobformazione/ /home/jobformazione/ if [ "$?" = "0" ] ; then echo "rsync completed normally" exit else echo "Rsync failed. Retrying..." sleep 180 fi done
Save the file as 1.sh, then run it with
bash ./1.sh
You need to add servers SSH key in remote server so rsync work with out password.
-
iptv
https://xtream-codes.com/
https://www.infomir.eu/eng/solutions/ministra-tv-platform/
https://flussonic.com/flussonic-media-server
https://newiq.plXtream Codes
DocumentRoot = /home/xtreamcodes/iptv_xtream_codes/wwwdir/ (this is accessable using URL http://IP_ADDR:25461/)
Client Area can be accessed with
http://IP_ADDR:25461/client_area/
Ports used = 25461 (nginx), 25462 (nginx_rtmp), 25463 (nginx)
root@ds11154:~# netstat -antp | grep LIST | grep ngin tcp 0 0 0.0.0.0:31210 0.0.0.0:* LISTEN 2012/nginx_rtmp tcp 0 0 0.0.0.0:25461 0.0.0.0:* LISTEN 2015/nginx tcp 0 0 0.0.0.0:25462 0.0.0.0:* LISTEN 2012/nginx_rtmp tcp 0 0 0.0.0.0:25463 0.0.0.0:* LISTEN 2015/nginx root@ds11154:~#
Some useful commands/config
/home/xtreamcodes/iptv_xtream_codes/nginx/conf/nginx.conf /home/xtreamcodes/iptv_xtream_codes/start_services.sh /home/xtreamcodes/iptv_xtream_codes/nginx/sbin/nginx -s reload /home/xtreamcodes/iptv_xtream_codes/wwwdir/ /home/xtreamcodes/iptv_xtream_codes/php/etc
ffmpeg command used to streaming video
/home/xtreamcodes/iptv_xtream_codes/bin/ffmpeg -y -nostdin -hide_banner -loglevel warning -err_detect ignore_err -user-agent Xtream-Codes IPTV Panel Pro -nofix_dts -start_at_zero -copyts -vsync 0 -correct_ts_overflow 0 -avoid_negative_ts disabled -max_interleave_delta 0 -probesize 5000000 -analyzeduration 5000000 -progress http://127.0.0.1:9000/progress.php?stream_id=124 -i http://da1981.xyz:8080/tJvIus0CY5/XwRjNIiKZM/8583 -vcodec copy -scodec copy -acodec copy -individual_header_trailer 0 -f segment -segment_format mpegts -segment_time 10 -segment_list_size 6 -segment_format_options mpegts_flags=+initial_discontinuity:mpegts_copyts=1 -segment_list_type m3u8 -segment_list_flags +live+delete -segment_list /home/xtreamcodes/iptv_xtream_codes/streams/124_.m3u8 /home/xtreamcodes/iptv_xtream_codes/streams/124_%d.ts
-
How to extract RAR file in Linux
unar is a utility to extract rar archive files.
Using unrar
To extract a rar file, run
unrar x filename.rar
Install unare on Ubuntu/Debian
To install unrar on Ubuntu/Debian, run
apt install unrar -y
Install Unrar from source
Download unrar from
http://www.rarlab.com/download.htm
cd /usr/local/src wget https://www.rarlab.com/rar/rarlinux-x64-6.0.b1.tar.gz tar zxvf rarlinux-x64-6.0.b1.tar.gz cd rar cp rar unrar /usr/bin