Category: Linux

  • Configure Networking in Fedora 28 OVH Proxmox

    Configure Networking in Fedora 28 OVH Proxmox

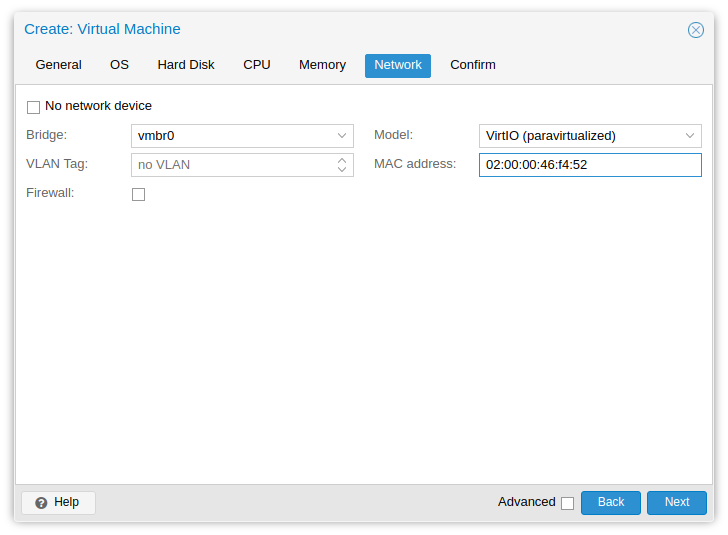
    OVH have special networking requirement. First you need to login OVH and create vMAC for your IP address. Now create VM in Proxmox, during VM creation, specify this vMAC address under Network > MAC.

    Proxmox create virtual machine

    Once your VM is installed, you don’t have network access. Login to the server using Proxmox Console.

    Run following commands

    ip addr add FAILOVER_IP dev ens18
    ip route add GATEWAY_IP dev ens18
    ip route add default via GATEWAY_IP dev ens18
    

    Replace following in above commands

    FAILOVER_IP = IP address of your Virtual Machine.

    GATEWAY_IP = This is gateway IP addres. This is IP address of your host machine (the server on which proxmox installed). Replace last digit with 254. For example, if your servers main IP is 123.123.123.142, then use 123.123.123.254 as gateway.

    Here is an example

    ip addr add 158.69.138.120 dev ens18
    ip route add 192.95.29.254 dev ens18
    ip route add default via 192.95.29.254 dev ens18
    

    At this point, you will be able to login to server using SSH. You may not able to ping outside, for this, you need to edit /etc/resolv.conf and add nameserver entry.

    vi /etc/resolv.conf
    

    Add

    nameserver 8.8.8.8
    

    To make it permanant, edit

    vi /etc/sysconfig/network-scripts/ifcfg-ens18
    

    Find

    BOOTPROTO=dhcp
    

    Replace with

    BOOTPROTO=static
    IPADDR=FAILOVER_IP
    GATEWAY=GATEWAY_IP
    HWADDR=MY:VI:RT:UA:LM:AC
    DNS1=1.1.1.1
    

    Example

    [root@ip120 ~]# cat  /etc/sysconfig/network-scripts/ifcfg-ens18
    TYPE=Ethernet
    PROXY_METHOD=none
    BROWSER_ONLY=no
    BOOTPROTO=static
    IPADDR=158.69.138.120
    GATEWAY=192.95.29.254
    HWADDR=02:00:00:46:f4:52
    DEFROUTE=yes
    IPV4_FAILURE_FATAL=no
    IPV6INIT=yes
    IPV6_AUTOCONF=yes
    IPV6_DEFROUTE=yes
    IPV6_FAILURE_FATAL=no
    IPV6_ADDR_GEN_MODE=stable-privacy
    NAME=ens18
    UUID=cf4c9d14-92ec-3475-94e2-797b405ac516
    ONBOOT=yes
    AUTOCONNECT_PRIORITY=-999
    DEVICE=ens18
    [root@ip120 ~]# 
    

    For routung, create

    vi /etc/sysconfig/network-scripts/ifcfg-ens18-route
    
    GATEWAY_IP - 255.255.255.255 ens18
    default GATEWAY_IP
    

    Example

    [root@ip120 ~]# cat /etc/sysconfig/network-scripts/ifcfg-ens18-route
    192.95.29.254 - 255.255.255.255 ens18
    default 192.95.29.254
    [root@ip120 ~]# 
    
  • Setup ZFS file system in Ubuntu

    ZFS file system allow you to take snapshot, this is great for backing up MySQL databases. Last day i setup 2 * 2 TB Hard disk on My PC as RAID 1 (mirror) using ZFS.

    First install ZFS with

    apt install zfsutils-linux
    

    I created same size partition on both hard disks. You can use full disk if you want, but i created partition, so i can use first 100 GB of each disk for installing Operating system.

    RAID 1

    RAID 1 mirror data between 2 disks. Even if one of the disk die, your data will be safe.

    To create RAID 1, run

    zpool create tank mirror /dev/sdx3 /dev/sdy3
    

    Here sdx3 and sdy3 is partition on my HDD. Replace it with your actual partition to be used with ZFS. Be carefull not to use wrong partition or you will lose data.

    If you are using full disk, then use

    zpool create tank mirror /dev/sdx /dev/sdy
    

    RAID 0

    RAID 0 is dangerous, only use if you don’t care about data or you have a backup. If one of the disk fails, you will lose all data.

    To setup RAID 0, use

    zpool create tank /dev/sdx3 /dev/sdy3
    

    Pool

    Once you create a ZFS pool with “zpool” command, it get auto mounted as “/pool-name”. In above cause, i used name “tank”.

    Here is what i have on my PC

    root@ok-pc-01:~# df -h | grep tank
    tank/data             1.6T  371G  1.3T  23% /mnt/data
    tank                  1.3T     0  1.3T   0% /tank
    root@ok-pc-01:~# 
    

    The 2nd entry is the ZFS pool tank.

    Datasets

    Datasets are like partitions. You can create multiple partitions inside your pool, they sare disk space. You can set disk quotas if needed, by default no quota per datasets are set.

    In above example /tank/data is a datasets i use.

    To create a data set, run

    zfs create -o mountpoint=/mnt/data tank/data
    

    Here “-o mountpoint” specify where you want to mount the new dataset.

    zpool status

    To see status for your ZFS file system, run

    root@ok-pc-01:~# zpool status
      pool: tank
     state: ONLINE
      scan: none requested
    config:
    
    	NAME        STATE     READ WRITE CKSUM
    	tank        ONLINE       0     0     0
    	  mirror-0  ONLINE       0     0     0
    	    sda3    ONLINE       0     0     0
    	    sdc3    ONLINE       0     0     0
    
    errors: No known data errors
    root@ok-pc-01:~# 
    

    See zfs

  • Add ISO Images to Proxmox

    Add ISO Images to Proxmox

    proxmox

    To add ISO images to proxmox server, login to server as user root, then go to folder “/var/lib/vz/template/iso”. You can download ISO for operating system you need to this folder.

    cd /var/lib/vz/template/iso
    

    For Debian 10

    wget https://cdimage.debian.org/debian-cd/current/amd64/iso-cd/debian-10.5.0-amd64-netinst.iso
    

    For Debian 9

    wget https://cdimage.debian.org/debian-cd/current/amd64/iso-cd/debian-9.4.0-amd64-netinst.iso
    

    For Fedora 28

    wget https://download.fedoraproject.org/pub/fedora/linux/releases/28/Server/x86_64/iso/Fedora-Server-dvd-x86_64-28-1.1.iso
    

    See proxmox

  • How to download Proxmox Container Templates (CT)

    How to download Proxmox Container Templates (CT)

    Proxmox allows you to create fully virtualized virtual machines and Linux Containers. Linux Containers are lightweight, and share kernel used by the host server.

    Before you can create CT, you need to download templates.

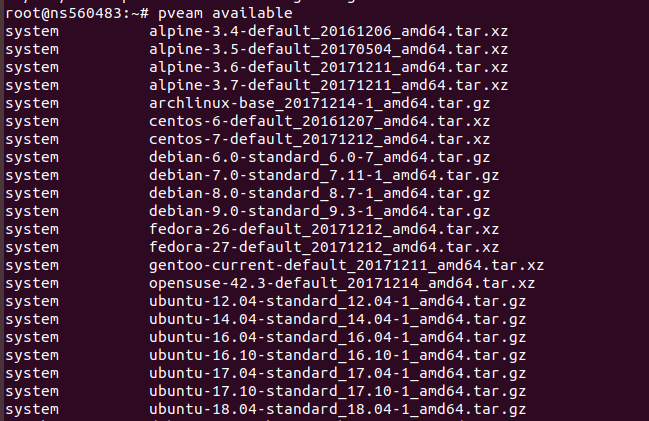
    To list all available CT images, run

    pveam available
    

    Proxmox CT Templates

    Download a template

    To download a proxmox CT template, run

    pveam download local ubuntu-18.04-standard_18.04-1_amd64.tar.gz
    

    This will download and save template to folder “/var/lib/vz/template/cache/”

    proxmox download template

    List available templates

    To get list of all templates available on your installation, run

    pveam list local
    

    proxmox pveam list local

    To update

    pveam update
    

    See Proxmox

  • Trying Out Archlinux

    Trying Out Archlinux

    Archlinux is a popular rolling distro. You always get latest software with Arch, there is no new version release like Ubuntu/RedHat etc.. You are always on latest version of ArchLinux by updating your system. So it is like install once and use for ever. Generally ArchLinux have very positive review from users. So i wanted to try it.

    Installing ArchLinux require some command line, if you are comfortable with any Linux, it will be an easy task. I had some problem with getting WiFi work once i have installed and booted to ArchLinux. I posted in ArchLinux forum, got solution quickly. I have to boot with USB again, chroot to ArchLinux installation, then install dhclient and iw packages required.

    For connecting to WiFi from command line, i made my Wifi connection OPEN (no password) as connecting to WiFI network with password from command line is little more involving. Since i have no one near my house to steal my WiFi, don’t have to worry about keeping it Open while i am installing Arch.

    ip link set wlxe8de270b3955 up
    systemctl start dhclient@wlxe8de270b3955
    iw dev wlxe8de270b3955 connect -w SSID
    

    Here wlxe8de270b3955 is my wifi interface name.

    Once i have internet on new Arch Install. I installed gnome with pacman

    pacman -S gnome gnome-extra
    

    When it asked for package selection, i selected all, this installed many unwanted stuff. I asked for some options, i selected default. Install need to download some 500 MB of files.

    After install, i created a user for me to login.

    useradd -m -s /bin/bash  MY_USER_NAME
    passwd MY_USER_NAME
    

    After reboot, i am able to login to GNOME. I don’t like the default theme. I installed some dark theme using pacman. I don’t like it much, but that is all i can find on a quick search. I may need to spend more time to find a theme i like.

    Next i need to install Visual Studio Code, that is the text editor i use. This is not available to install from pacman. Had to use AUR to install.

    https://aur.archlinux.org

    I searched for Microsoft Visual Code, found
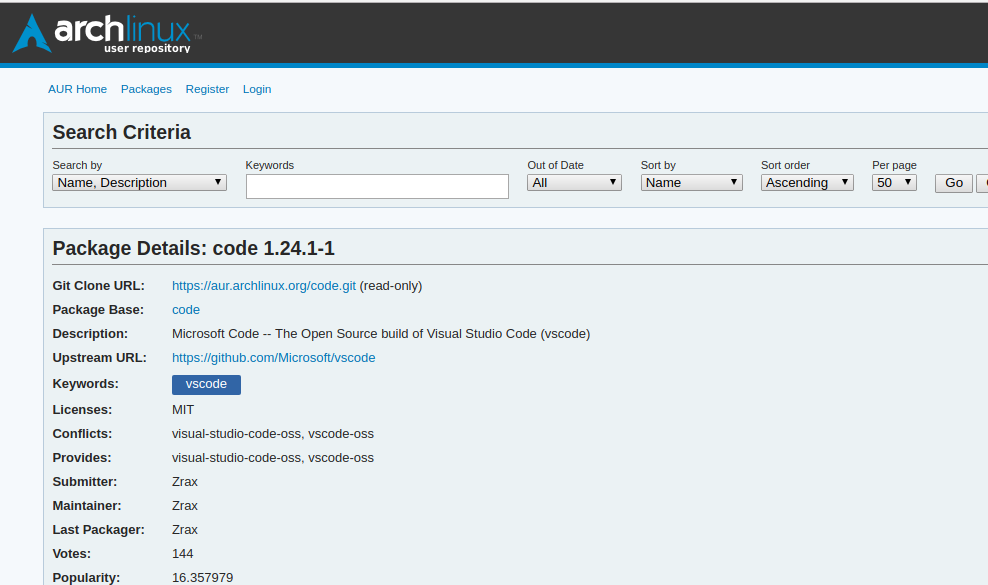
    ArchLinux AUR

    To install, i have to clone the repo on the page. I done

    mkdir ~/builds
    cd ~/builds
    sudo pacman -S git
    git clone https://aur.archlinux.org/code.git
    cd code
    makepkg -si
    

    This asked some questions to install dependency packages. I pressed yes. It installed many software like nodejs and many other related softwares. I don’t like it, but i allowed it to continue as i may able to use some of the sofware, many i will never use unless i am a Node.JS programmer. Next it started downloading Visual Code repo. This going to take some time as it need to pull all the commits. Then compile from source. Not something i will enjoy. So i decided to CTRL+C.

    ArchLinux is not for me

    For now i decided to stay with Ubuntu. I like color scheme better. Ubuntu was using Unity desktop, with Ubuntu 18.04, they switched to using GNOME destop. This made me want to try other distos using GNOME. I tried fedora, archlinux and Budgie Desktop. But for me Ubuntu feels much more polished and better looking. Maybe because i am using it for years now, so switching to another DE may take time. ArchLinux will stay on my 2nd HDD, so i can boot and play with it when i need to try something new.

    ArchLinux will give me latest software. This is good, but for normal use, you may not find any differnce. For example Arch have kernal version 4.17, Ubuntu have 4.15. But having new kernal is not going to make any differnce unless you have some shiny new hardware, that only work with newer kernal.

    Softwares are more stable and polished in Ubuntu LTS. ArchLinux, it is fresh, have new features. In rare cases, new software can have bugs and you may face problem and have to find a solution.

    Most software vendors provide package for Ubuntu and Redhat Linux. Since this provided in deb format, installing is quick, no compliation needed. For example, if i need to install Skype, Visual Studio Code or Sublime, i just go to provider web site, they provide download for Ubuntu, that you can install, you get latest software, they keep updated whenever new version is available.

    With AUR, i am not sure how upgrades are done. I think it is like FreeBSD ports, so you need to handle upgrades your own.

  • Enable Hot Corner in Ubuntu 18.04

    Enable Hot Corner in Ubuntu 18.04

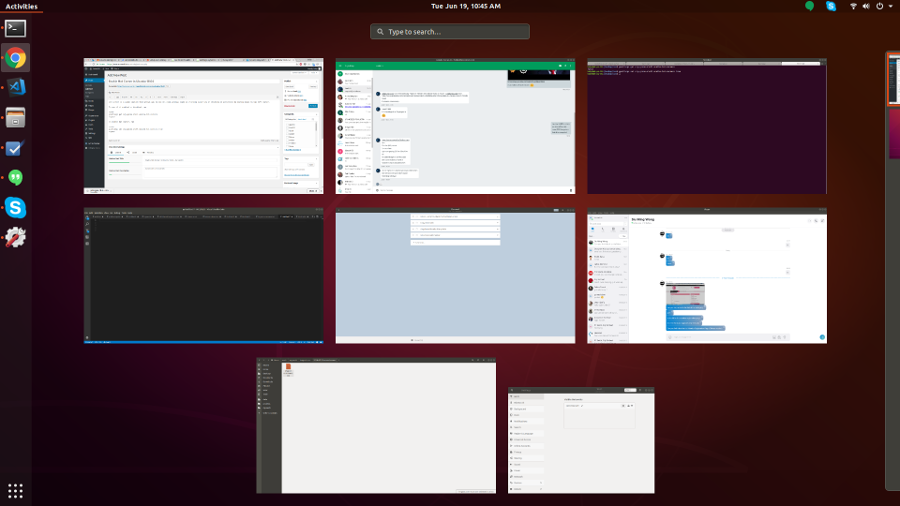
    Hot Corner is a Gnome Feature that allows you to see all open windows (same as clicking Super key or clicking on Activites) by moving mouse to top left corner.

    Ubuntu 18.04 hot corner

    To see if hot corner is enabled or disabled, run

    gsettings get org.gnome.shell enable-hot-corners
    

    To enable hot corner, run

    gsettings set org.gnome.shell enable-hot-corners true
    

    EDIT: After using enable hot corner for a day, i found my mouse reach this corner accidetly multiple times. Seeing activites page unexpectedly when you want someting else is confusing. For Ubuntu, it is better to keep it disabled.

    To disable, run

    gsettings set org.gnome.shell enable-hot-corners false
    

    See Ubuntu 18.04

  • sfdisk

    sfdisk is a program to copy partition information. This is for disks with MBR partition. Use sgdisk if you have GPT partition table.

    To save partition info, run

    sfdisk -d /dev/sda > part_table
    

    To restore

    sfdisk /dev/sda < part_table
    

    Copy Partition to Another Disk

    This is useful when you setting up raid or when you want to replace a disk in raid.

    sfdisk -d /dev/sda | sfdisk /dev/sdb
    

    Once copied, you may need to run

    sfdisk -R /dev/sdb
    

    So Linux kernal will read the new partition.

    See hdd

  • selectorctl

    selectorctl list all installed PHP (alt-php) versions in CloudLinux Server.

    [root@titan ~]# selectorctl -l
    4.4    4.4.9  /opt/alt/php44/usr/bin/php-cgi
    5.1    5.1.6  /opt/alt/php51/usr/bin/php-cgi
    5.2    5.2.17  /opt/alt/php52/usr/bin/php-cgi
    5.3    5.3.29  /opt/alt/php53/usr/bin/php-cgi
    5.4    5.4.45  /opt/alt/php54/usr/bin/php-cgi
    5.5    5.5.38  /opt/alt/php55/usr/bin/php-cgi
    5.6    5.6.36  /opt/alt/php56/usr/bin/php-cgi
    7.0    7.0.30  /opt/alt/php70/usr/bin/php-cgi
    7.1    7.1.18  /opt/alt/php71/usr/bin/php-cgi
    7.2    7.2.6  /opt/alt/php72/usr/bin/php-cgi
    [root@titan ~]#
    

    CloudLinux

  • yum

    Some useful yum commands when installation fails or stopped halfway

    yum-complete-transaction
    yum-complete-transaction --cleanup-only
    yum history redo last

    Red Hat Software Collections (RHSCL)

    yum install rh-php56
    scl enable rh-php56 bash

    Selectively enable yum repos

    yum update -v --disablerepo=* --enablerepo=cl*

    yum commands
    Maybe run: yum groups mark install
    yum reinstall a package
    yum repolist
    Yum disable a repository
    rpm
    yum-config-manager
    Download RPM package from yum repository
    yum list all available packages in a repo

    yum errors

  • Maybe run: yum groups mark install

    When installing CloudLinux alt-php group, i get error.

    [root@titan ~]# yum groupinstall alt-php
    Loaded plugins: fastestmirror, rhnplugin, universal-hooks
    This system is receiving updates from CLN.
    Loading mirror speeds from cached hostfile
    * EA4: 169.255.59.74
    * cpanel-addons-production-feed: 169.255.59.74
    * cloudlinux-x86_64-server-7: cl-mirror.fr.planethoster.net
    Maybe run: yum groups mark install (see man yum)
    No packages in any requested group available to install or update
    [root@titan ~]#
    

    This error is fixed by running

    yum groups mark remove alt-php
    yum groupinstall alt-php 
    

    See yum