Category: Linux

  • nslookup

    To find IP of a domain, use

    nslookup serverok.in
    

    To find MX record for a domain, use

    nslookup -q=mx serverok.in
    

    To see TXT records, run

    nslookup -q=txt serverok.in
    

    Asking Authritative Name Servers

    When you run nslookup, it checks with caching name servers, generally provided by your ISP. But these are not authoritative name servers for your domain name. These caching name servers cache any DNS result for several hours depending on TTL (Time To Live) value in a domain’s DNS zone. If you are debugging some DNS problems, you need to ask domains authoritative name servers, that you can find by taking whois of a domain name.

    Here is an example

    nslookup -q=a DOMAIN_NAME_HEARE AUTHORITATIVE_NAME_SERVER_HERE
    

    If you take whois of serverok.in, you will see the domain use name servers

    Name Server: elle.ns.cloudflare.com
    Name Server: carl.ns.cloudflare.com
    

    To find MX record of the domain, you can use

    nslookup -q=mx serverok.in
    

    But what you get is the cached result from a non-authoritative name server. To get an authoritative result, you need to use the following command

    nslookup -q=mx serverok.in elle.ns.cloudflare.com
    

    Here elle.ns.cloudflare.com is one of the name servers used by serverok.in, that you find from whois. You can use any of the name servers with the nslookup command.

    What it does is, ask the name server elle.ns.cloudflare.com (authoritative name server) what is the MX record for the domain serverok.in

    Install nslookup on ArchLinux
    Find Reverse-DNS/PTR using dig, nslookup, host
    How to verify rDNS (reverse DNS)/PTR Record

  • Start a program after reboot using cronjob

    To start a program using cronjob, create a cronjob like

    @reboot /root/start.sh
    

    On system boot, the command “/root/start.sh” will be executed.

  • Install memcached on CentOS 7

    To install memcached on CentOS 7, run

    yum -y install memcached

    Set memcached to start on boot

    systemctl enable memcached

    Start memcached with

    systemctl start memcached

    Installing PHP Module

    You need remi repository installed, which provide a memcached module for all versions of php they support.

    For PHP 5.6, run

    yum install php-memcache

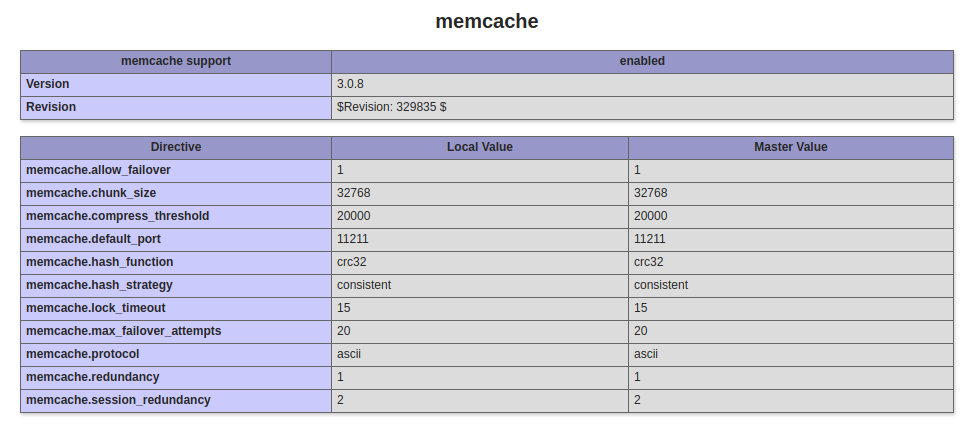
    Now phpinfo() will show

    centos 7 php memcache

    See memcached

  • Ubuntu 18.04 Remove Trash Icon from Desktop

    Ubuntu 18.04 Remove Trash Icon from Desktop

    First find the Trash related settings with gsettings command.

    boby@ok-pc-01:~$ gsettings  list-recursively | grep -i trash
    org.gnome.gedit.plugins.filebrowser.nautilus confirm-trash true
    org.gnome.desktop.privacy remove-old-trash-files false
    org.gnome.eog.ui disable-trash-confirmation false
    org.gnome.nautilus.preferences confirm-trash true
    org.gnome.nautilus.preferences show-move-to-trash-shortcut-changed-dialog true
    org.gnome.DejaDup exclude-list ['$TRASH', '$DOWNLOAD']
    org.gnome.nautilus.desktop trash-icon-name 'Trash'
    org.gnome.nautilus.desktop trash-icon-visible true
    boby@ok-pc-01:~$ 
    

    To disable the Trash Icon on desktop, run

    gsettings set org.gnome.nautilus.desktop trash-icon-visible false
    

    Method 2

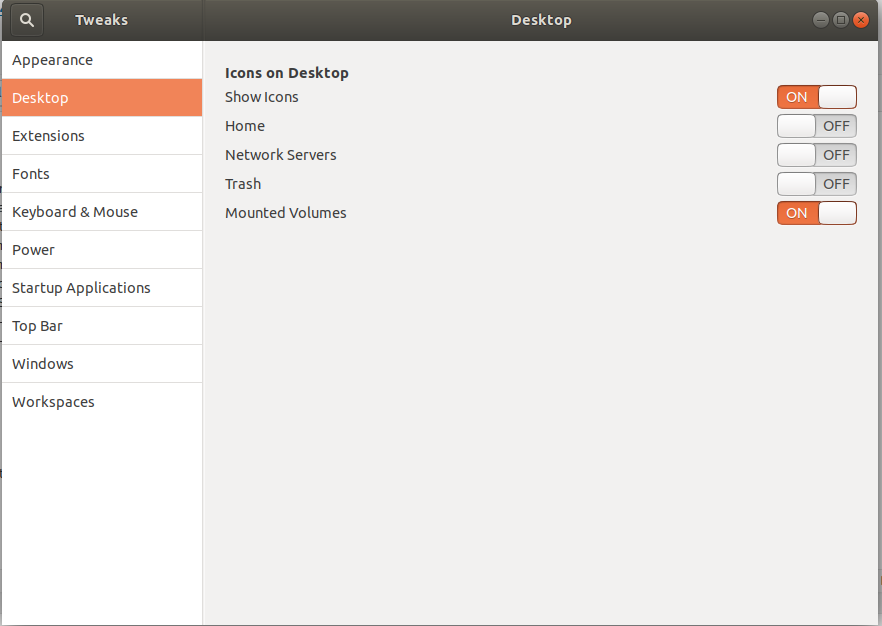
    If you have gnome tweaks tool installed, go to Desktop, you have option to disable Trash Icon.

    Ubuntu 18.04 remove trash

    See Ubuntu 18.04

  • grub

    CentOS 7 Grub 2
    grubby
    OVH CentOS 7 server grub rescue prompt

    RHEL Based – AlmaLinux, CentOS, RockeyLinux, Oracle Linux

    Regenerate grub config

    grub2-mkconfig -o /boot/grub2/grub.cfg
    grub2-mkconfig -o /boot/efi/EFI/centos/grub.cfg
    grub2-mkconfig -o /boot/efi/EFI/almalinux/grub.cfg
    

    grub config on RHEL

    /etc/default/grub
    

    To install Grub, run

    /sbin/grub2-install /dev/sda
    

    To see all available kernels

    awk -F\' '$1=="menuentry " {print i++ " =  "$2}' /etc/grub2.cfg
    

    If all kernels not showing, edit

    vi /etc/default/grub
    

    Add

    GRUB_DISABLE_SUBMENU=true
    GRUB_DEFAULT=saved
    

    Rebuild grub

    grub2-mkconfig -o /etc/grub2.cfg
    

    To set default Kernel

    grub2-set-default 0
    

    To see the current Kernel

    grub2-editenv list
    

    Reinstall kernel and set it to default

    yum reinstall kernel
    grub2-set-default 0
    grubby --set-default 0
    

    Ubuntu

    sudo update-grub
    /usr/sbin/grub-mkconfig -o /boot/grub/grub.cfg
    
  • Haproxy Site With SSL

    To handle SSL/HTTPS traffic on haproxy, use following config in your /etc/haproxy/haproxy.cfg file.

    frontend https-frontend-new
    	bind :::443 ssl crt domain.pem
    
    	acl https ssl_fc
    	http-request set-header X-Forwarded-Proto http  if !https
    	http-request set-header X-Forwarded-Proto https if https
    
    	option forwardfor
    
    	acl secured_cookie res.hdr(Set-Cookie),lower -m sub secure
    	http-response replace-header Set-Cookie (.*) \1;\ secure if https !secured_cookie
    	
    	default_backend https-backend-new
    
    backend https-backend-new
    	balance static-rr
    	option httpchk
    	cookie SRV insert indirect nocache maxidle 30m maxlife 8h
    	server web1 BACKEND_SERVER_IP:443 check ssl verify none
    

    domain.pem

    SSL certificate of your domain in PEM format. This is done by using combining your SSL cert, private key and ca bundle.

    cat yourdomain.crt yourdomain.key yourdomain.ca-bundle > yourdomain.pem
    

    If you have more sites with SSL, you can specify SSl certs like

    bind :::443 ssl crt domain.pem crt domain-2.pem crt domain-3.pem
    

    BACKEND_SERVER_IP

    This is IP of your back end server.

    Restart Haproxy with

    systemctl restart haproxy
    
  • How to check if systemctl service is enabled

    To check if a systemctl service is enabled, run

    systemctl is-enabled SERVICE_NAME

    Example

    [root@mail ~]# systemctl is-enabled memcached
    disabled
    [root@mail ~]#

    You can enable the service, so it run at boot with command

    [root@mail ~]# systemctl enable memcached
    Created symlink from /etc/systemd/system/multi-user.target.wants/memcached.service to /usr/lib/systemd/system/memcached.service.
    [root@mail ~]# 

    To check if a service is enabled to start on boot, run

    systemctl list-unit-files | grep SERVICE_NAME_HERE

    Example

    [root@ok ~]# systemctl list-unit-files | grep httpd
    httpd.service                                 enabled 
    [root@ok ~]# 
  • Auto Start pm2 on boot

    To auto start pm2 on boot, run

    pm2 startup
    

    This will generate auto start script for your system.

    Once you started all applications, you can save it with

    pm2 save
    

    To uninstall, run

    pm2 unstartup systemd
    

    Running Application as Normal User

    First login as the user, then start the application using pm2.

    pm2 start app.js
    

    Now save it.

    pm2 save
    

    Generate command for auto startup

    pm2 startup
    

    It will show a command. That you need to run as user root. If you have sudo privilage, you can run it with sudo as same user.

    This will create a service with name pm2-USERNAME.

    After reboot, you will be able to check status with command

    systemctl status pm2-USERNAME
    

    See pm2

  • sqlite

    .database

    Show location of the database file.


    sqlite> .database
    main: /root/config.db
    sqlite>

    .tables

    List tables in a database


    sqlite> .tables
    tree
    sqlite>

    select

    To see data from table, use select statement like you do in MySQL.


    select * from TABLE_NAME;

    .schema

    To see how a table is created, use

    .schema TABLE_NAME

    This is equivalent to “show create table TABLE_NAME;” command in MySQL.

  • lftp Fatal error: Certificate verification: Not trusted

    When i connect to an FTP server, i get following error

    root@hestia-lnx:~# lftp -u sokftp 54.37.215.1
    Password: 
    lftp [email protected]:~> dir                   
    ls: Fatal error: Certificate verification: Not trusted
    lftp [email protected]:~> ls -la
    ls: ls -la: Fatal error: Certificate verification: Not trusted
    lftp [email protected]:~>
    

    To fix this, run

    set ssl:verify-certificate no
    

    You can add this to /etc/lftp.conf to make this permanant

    vi  /etc/lftp.conf
    

    Add

    set ssl:verify-certificate no
    

    See lftp

  • SSH Remember Passphrase

    When i connect to remote server using SSH using private key, it ask for passphrase every time.

    root@admin:~# ssh [email protected]
    Enter passphrase for key '/root/.ssh/id_rsa': 
    
    root@admin:~# 
    

    I want it only ask once, then remember it.

    To do this, you need to run

    eval `ssh-agent -s`
    ssh-add
    

    When you run “ssh-add” command, it ask for your passphrase. Now you will be able to use your SSH Key with out getting promoted for passphrase.

    See ssh

  • Ubuntu Slow Boot

    Ubuntu Slow Boot

    Last day my PC become very slow to boot.

    boby@ok-pc-01:~$ systemd-analyze 
    Startup finished in 15.777s (kernel) + 3min 1.400s (userspace) = 3min 17.178s
    graphical.target reached after 1min 47.169s in userspace
    boby@ok-pc-01:~$ 
    

    It take 3 minutes and 17 seconds to boot up.

    This happend after i did some changes to my 2nd hard disk and added ZFS partition. First thing i thought it was ZFS that make my PC slow.

    systemd-analyze blame did not show any useful info.

    systemd-analyze blame
    

    systemd analyze blame

    To find the problem, i edited the file

    sudo  vi /etc/defaults/grub
    

    Find the line

    GRUB_CMDLINE_LINUX_DEFAULT="quiet splash"
    

    Replace it with

    GRUB_CMDLINE_LINUX_DEFAULT=""
    

    Now rebuild grub.cfg with

    update-grub2
    

    Rebooted the PC. Now instead of showing Ubuntu splash screen, you get lot of text, that shows what actually your PC is doing.

    Ubuntu Grub Disable Splash

    From the boot message i found system waiting 1 minutes 30 seconds for mounting one of the disk partition. This is because i re-partitioned my 2nd hard disk and forget to remove the disk from /etc/fstab.

    I removed the non existant disk entry from /etc/fstab and rebooted PC. Now it boot much faster.

    systemd analyze

    See Ubuntu