Category: Linux

  • Install ioncube on CentOS Plesk Server

    Install ioncube on CentOS Plesk Server

    To install ioncube on Plesk server, run

    yum install plesk-php56-ioncube-loader plesk-php70-ioncube-loader plesk-php71-ioncube-loader plesk-php72-ioncube-loader
    

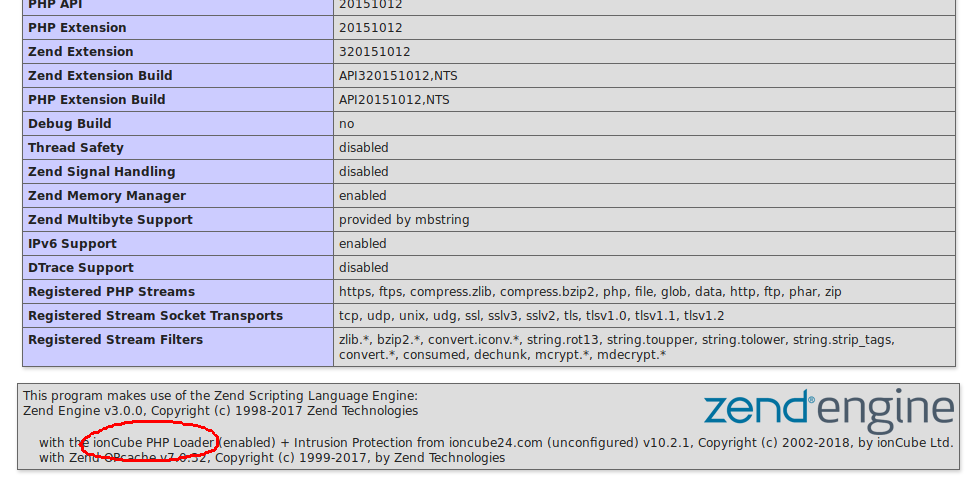
    To verify ioncube installed, create a PHP file with following content


    Upload it to server and access the file via web browser. You will see phpinfo. This will show ioncube if installed properly.

  • Install OpenLiteSpeed on Ubuntu/Debian

    Install OpenLiteSpeed on Ubuntu/Debian

    OpenLiteSpeed ia an Open Source version of LiteSpeed Web Server.

    To install OpenLiteSpeed, add repository by running

    wget -O - http://rpms.litespeedtech.com/debian/enable_lst_debain_repo.sh | bash
    

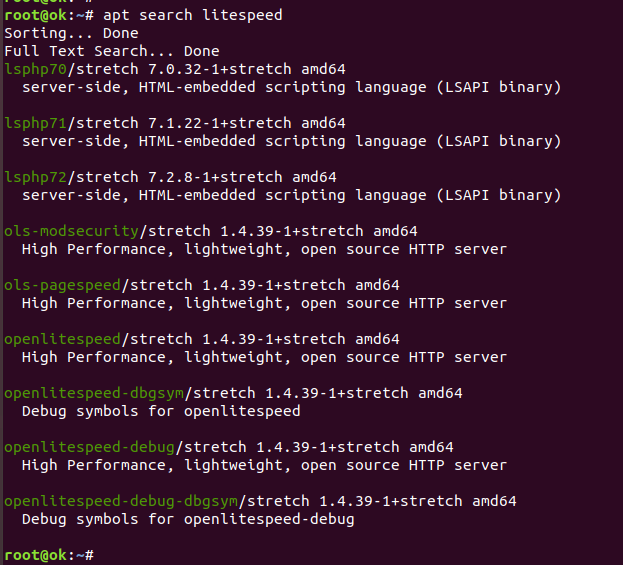
    Now you have openlitespeed packages available on your server. Here is packages available on a Debian 9 server.

    OpenLiteSpeed Web Server

    To install OpenLiteSpeed, run

    apt install -y openlitespeed
    

    OpenLiteSpeed will be installed in folder

    /usr/local/lsws
    

    You can start/stop OpenLiteSpeed using command

    root@ok:~# /usr/local/lsws/bin/lswsctrl
    $Usage: /usr/local/lsws/bin/lswsctrl {start|stop|restart|reload|condrestrt|try-restart|status|help}
    
    start       - start web server
    stop        - stop web server
    restart     - gracefully restart web server with zero down time
    reload      - same as restart
    condrestart - gracefully restart web server if server is running
    try-restart - same as condrestart
    status      - show service status
    help        - this screen
    
    root@ok:~#
    

    Once installed, you will be able to login to WebAdmin at

    https://YOUR_SERVER_IP_ADDR:7080
    User = admin
    Pass = 123456
    

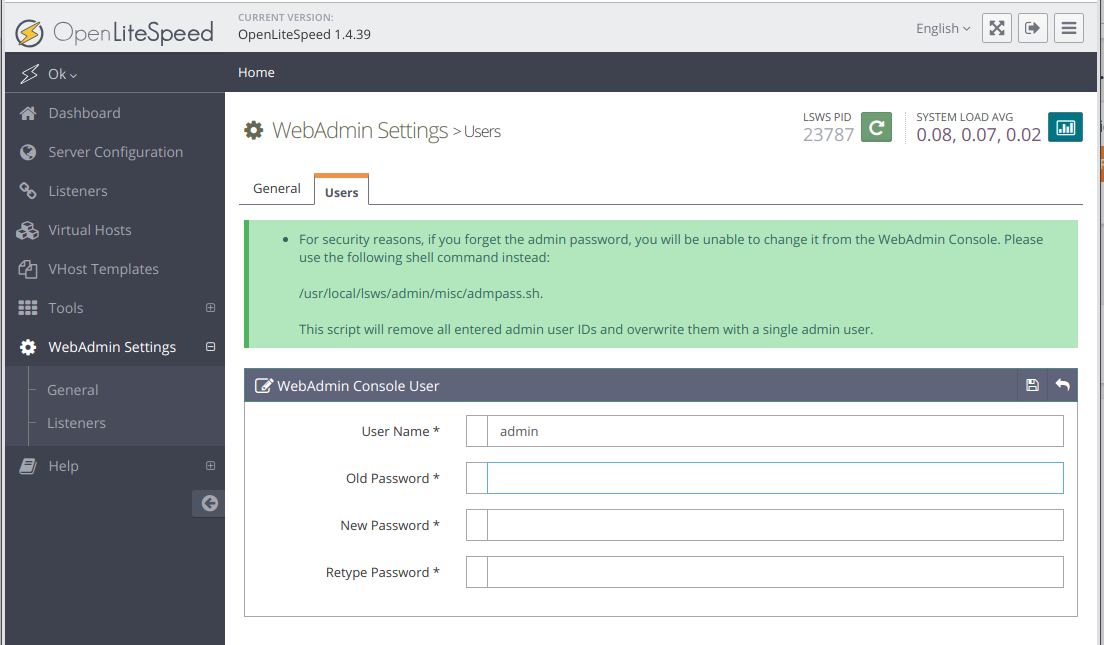
    You can change default admin passord by going to

    Admin > WebAdmin Settings > General > Users

    Click on edit icon right side of user “admin”.

    OpenLiteSpeed Change Admin Password

    You can also change OpenLiteSpeed Admin password by running following command as user root

    /usr/local/lsws/admin/misc/admpass.sh
    
  • Install CyberPanel on CentOS 7

    Install CyberPanel on CentOS 7

    CyberPanel is a hosting control panel. CyberPanel uses OpenLiteSpeed, an open-source version of LiteSpeed Web server.

    CyberPanel with OpenLitespeed is Free to use.

    To install CyberPanel, run

    yum install -y wget
    wget https://cyberpanel.net/install.sh
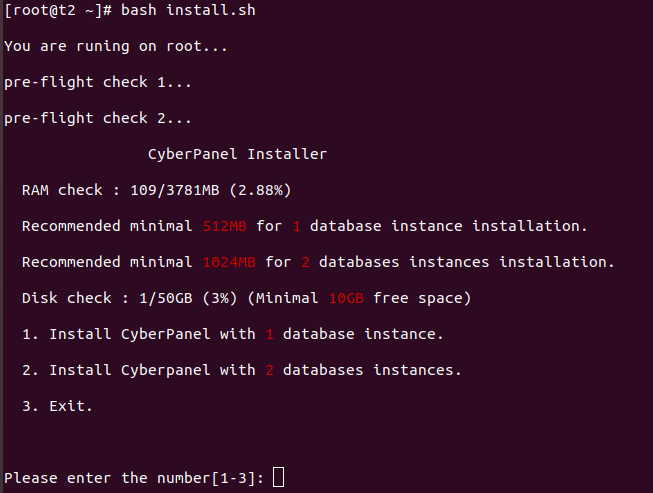
    bash install.sh

    It asks you the number of MySQL instances. I selected option 1

    LiteSpeed CyberPanel install

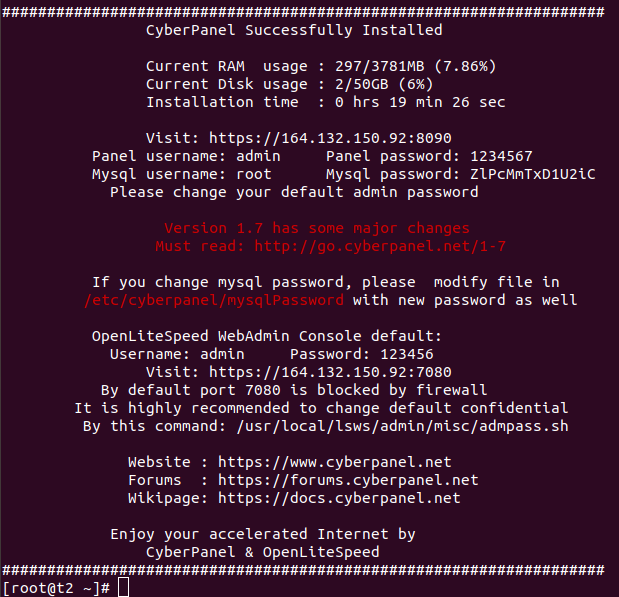
    On next screen, it ask you to select MariaDB version. MariaDB is a MySQL drop in replacement, it work exactly like MySQL. Once install completed, installer displays login user name and password.

    You wil be able to login to CyberPanel at

    https://SERVER_IP:8090
    Panel username: admin
    Panel password: 1234567

    See LiteSpeed

  • Find all devices in your LAN using nmap

    Find all devices in your LAN using nmap

    Find all live hosts on your network
    Find all open ports using nmap
    How to find Operating System of a remote computer using nmap?

    Find all devices connected to your LAN network.

    nmap -sn 192.168.1.0/24
    

    Replace 192.168.1.0/24 with whatever subnet you use.

    nmap

    nmap -p 80 IP_ADDR Scan specific port
    nmap -p 100-1000 IP_ADDR Scan range of ports
    nmap -F IP_ADDR Scan most used 100 ports
    nmap -p- IP_ADDR Scan all ports

    Disable TLSv1 in Nginx

  • CyberPanel

    Reset Password

    To list websites, run

    cyberpanel listWebsitesPretty

    Backup a website

    cyberpanel createBackup --domainName your-domain.com

    Backup will be stoed in folder /home/domain.tld/backup

    To restore a backup, run

    cd /home/domain.tld/backup
    cyberpanel restoreBackup --fileName backup-domain.tld-12.18.2024_20-25-21.tar.gz

    MySQL root password

    cat /etc/cyberpanel/mysqlPassword

    Urls

    CyberPanel: https://hostname:8090
    Webmail: 
    https://hostname:8090/rainloop/
    https://hostname:8090/snappymail/

    See Hosting Control Panel

  • How to Change User Password in CyberPanel

    How to Change User Password in CyberPanel

    Login to CyberPanel at

    https://YOUR_SERVER_IP_ADDR:8090

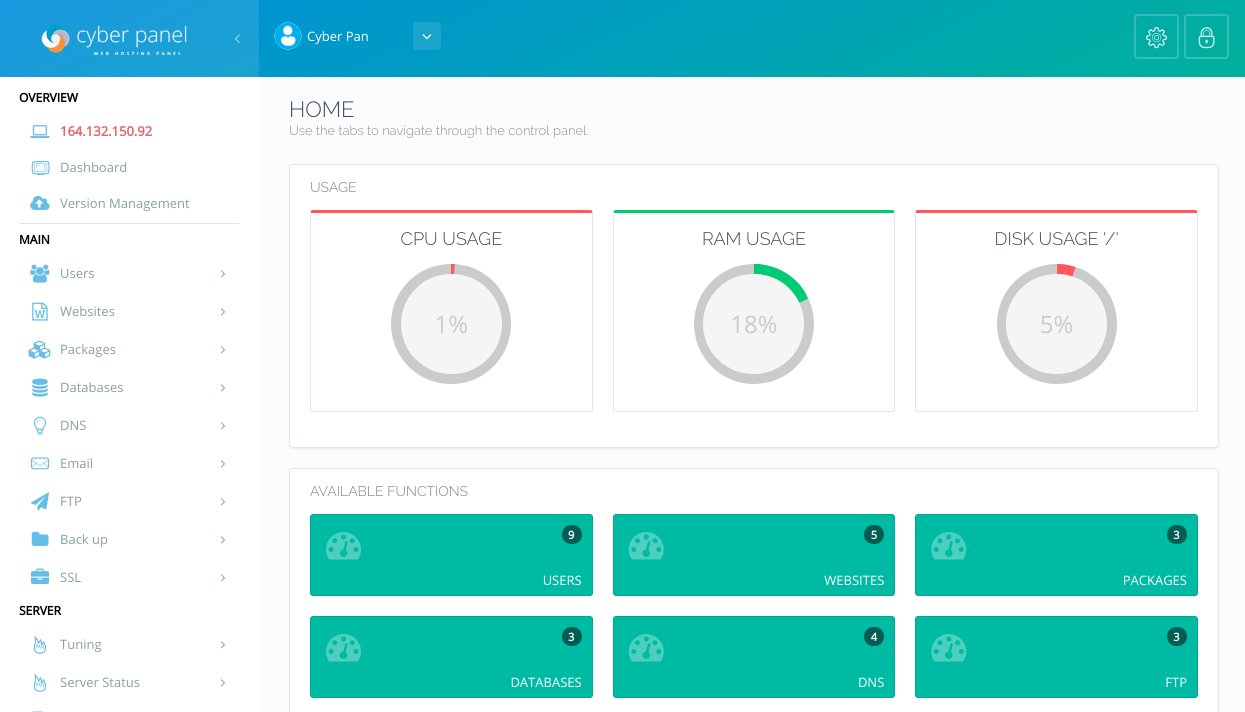
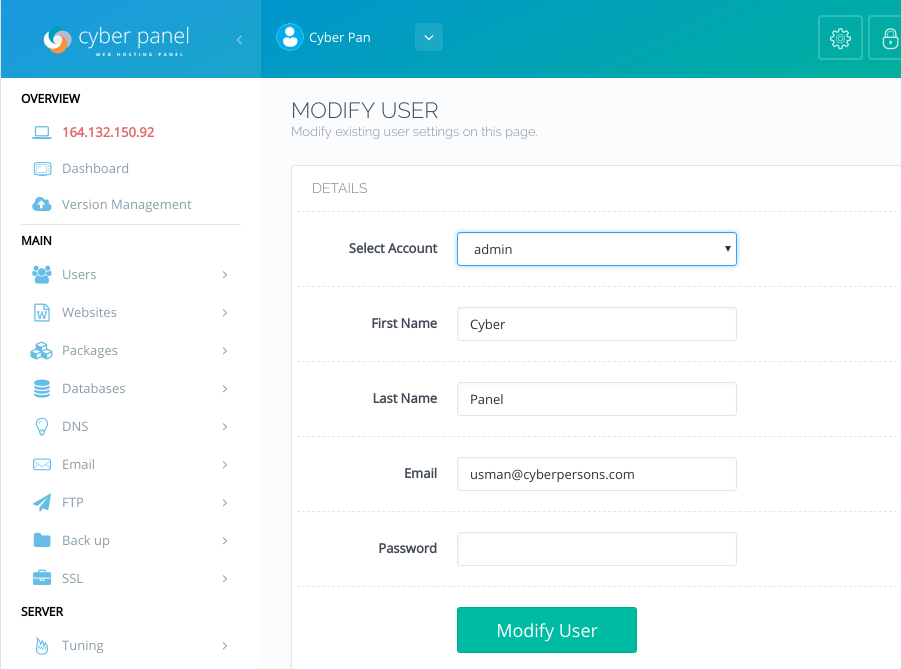
    Once logged in you will see

    Click on the drop-down icon. Click on the “Edit Profile” Link.

    The next page will have a drop-down box, where you can select the user you need to change password for.

    You can enter your new password on this page and click “Modify User” button to update user password.

    See CyberPanel

  • Secure Memcached on CentOS/RHEL 7

    Secure Memcached on CentOS/RHEL 7

    By default memcached on CentOS 7 is set to run on all IP address on the server. This allow attackers to abuse the service.

    To set memcached to only listen to localhost (127.0.0.1), edit file

    vi /etc/sysconfig/memcached
    

    Find

    OPTIONS=""
    

    Replace with

    OPTIONS="-l 127.0.0.1"
    

    See memcached

  • Install Node.js on Ubuntu/Debian

    To install Node.js on Ubuntu, first set up repository as per your version requirements.

    For NodeJs v21.x

    curl -sL https://deb.nodesource.com/setup_21.x | bash -

    For NodeJs v20.x

    curl -sL https://deb.nodesource.com/setup_20.x | bash -

    For NodeJs v18.x

    curl -sL https://deb.nodesource.com/setup_18.x | bash -

    For NodeJs v17.x

    curl -sL https://deb.nodesource.com/setup_17.x | bash -

    For NodeJs v16.x

    curl -sL https://deb.nodesource.com/setup_16.x | bash -

    For NodeJs v15.x

    curl -sL https://deb.nodesource.com/setup_15.x | bash -

    For NodeJs v14.x

    curl -sL https://deb.nodesource.com/setup_14.x | bash -

    For NodeJs v12.x

    curl -sL https://deb.nodesource.com/setup_12.x | bash -

    For NodeJs v11.x

    curl -sL https://deb.nodesource.com/setup_11.x | bash -

    Node.js v10.x

    curl -sL https://deb.nodesource.com/setup_10.x | bash -

    Node.js v9.x

    curl -sL https://deb.nodesource.com/setup_9.x | bash -

    Node.js v8.x

    curl -sL https://deb.nodesource.com/setup_8.x | bash -

    Node.js v6.x

    curl -sL https://deb.nodesource.com/setup_6.x | bash -

    Now install node.js with

    apt-get install -y nodejs

    Install build-essential package

    apt install -y build-essential

    See Node.Js

  • RPM Package Manager

    On RHEL, CentOS, Fedora, etc use RPM for package management. To find the package that provides a binary file, run

    rpm -qf /usr/sbin/sendmail

    To see the change log for an rpm package, run

    rpm -q --changelog PKG_NAME

    Example

    rpm -q --changelog bind | grep CVE

    To find which RPM package owns a file

    root@server2 [~]# rpm -qf /lib64/libkeyutils-1.2.so
    keyutils-libs-1.2-1.el5
    root@server2 [~]#

    To see scripts used by a package

    rpm -q --scripts httpd

    See yum

  • Block an IP using iptables

    To block an IP using iptables, use

    iptables -A INPUT -s IPADDR -j DROP
    

    Replace IPADDR with IP address you need to block.

    To block an IP range

    iptables -A INPUT -s IP_IN_CIDR_FORMAT -j DROP
    

    Example, bock IP range 159.138.0.0/16

    iptables -A INPUT -s 159.138.0.0/16 -j DROP
    

    Unblock an IP address

    To unblock an IP address, first find the rule number, you can do it with the command

    iptables --list  INPUT -n --line-number | grep IP_ADDR_HERE
    

    Once you find the number of rule to be removed, you can run

    iptables --delete INPUT RULE_NUMBER_HERE
    

    Example

    iptables delete a rule

    See iptables

  • Encrypt a file using gpg

    To encrypt a file using gpg command, run

    gpg -o myfile.tar.gpg --symmetric myfile.tar
    

    Now it will ask for a password. Once you enter password 2 times, file will be encrypted.

    Decrypt

    To decrypt a file, run

    gpg myfile.tar.gpg
    

    It will ask for the password, once you enter password, get file decrypted.

    Example

    gpg decrypt

    This encryption process will also compress the file.

    -rw-r--r--   1 root root 1559767040 Oct  1 08:35 home-boby.tar
    -rw-r--r--   1 root root  666947870 Oct  1 08:24 home-boby.tar.gpg
    

    In above example, 1.5 GB tar file get compressed into 600 MB file when encrypted with gpg

  • AMD Ryzen 3 2200G on Ubuntu 18.04

    AMD Ryzen 3 2200G on Ubuntu 18.04

    New PC i have purchased have AMD Ryzen 3 2200G CPU. This come with Vega 8 iGPU.

    If you boot Ubuntu 18.04 on this PC, it fail to boot with some graphics errors. To boot, you need to select advanced option, then recovery, once you get in the menu with differnt options, select continue. This will boot PC with out hardware acceleration.

    You can also set “nomodeset” in /etc/default/grub

    Find

    GRUB_CMDLINE_LINUX_DEFAULT=""
    

    Replace with

    GRUB_CMDLINE_LINUX_DEFAULT="nomodeset"
    

    Now run

    update-grub
    

    But doing this disable hardware acceleration. Proper way is to install AMD drivers. You can use open source or AMD propritery, i dedided to go with AMD propritery drivers.

    Install Latest Kernel

    Support for Vega 8 iGPU only available in latest kernel. So you need to install latest kernel from ubuntu mainline.

    Go to

    http://kernel.ubuntu.com/~kernel-ppa/mainline/?C=N;O=D

    Find the latest kernel, it will be listed on top of the page. At the time of writing this post, it is “v4.19-rc5”

    Click on this folder. You need to download 3 files with name generic for amd64 and install it.

    wget http://kernel.ubuntu.com/~kernel-ppa/mainline/v4.19-rc5/linux-headers-4.19.0-041900rc5-generic_4.19.0-041900rc5.201809231830_amd64.deb
    wget http://kernel.ubuntu.com/~kernel-ppa/mainline/v4.19-rc5/linux-image-unsigned-4.19.0-041900rc5-generic_4.19.0-041900rc5.201809231830_amd64.deb
    wget http://kernel.ubuntu.com/~kernel-ppa/mainline/v4.19-rc5/linux-modules-4.19.0-041900rc5-generic_4.19.0-041900rc5.201809231830_amd64.deb
    

    Install it with

    sudo dpkg -i *.deb
    

    Install AMDGPU PRO driver

    I don’t really know how to find latest driver from AMD site. It only lists Windows deivers. I had to use google to find link to latest AMD driver.

    With some googling, i found a driver released on August 17th , 2018

    https://www.amd.com/en/support/kb/release-notes/rn-prorad-lin-18-30

    On this page, you have download links for differnt linux distributions, for Ubuntu, i run

    wget https://www2.ati.com/drivers/linux/ubuntu/18.04/amdgpu-pro-18.30-641594.tar.xz
    tar xvf amdgpu-pro-18.30-641594.tar.xz
    cd amdgpu-pro-18.30-641594
    ./amdgpu-pro-install
    

    amdgpu-pro-install is actually a symlink to amdgpu-install, but you should run “amdgpu-pro-install” to install the driver as it will run amdgpu-install with –pro switch.

    Now reboot your PC, your iGPU will work.

    Before installing new kernel, glxinfo reported following

    boby@ok-pc-01:~$ glxinfo | grep -i opengl
    OpenGL vendor string: VMware, Inc.
    OpenGL renderer string: llvmpipe (LLVM 6.0, 128 bits)
    OpenGL core profile version string: 3.3 (Core Profile) Mesa 18.1.0-rc4
    OpenGL core profile shading language version string: 3.30
    OpenGL core profile context flags: (none)
    OpenGL core profile profile mask: core profile
    OpenGL core profile extensions:
    OpenGL version string: 3.1 Mesa 18.1.0-rc4
    OpenGL shading language version string: 1.40
    OpenGL context flags: (none)
    OpenGL extensions:
    OpenGL ES profile version string: OpenGL ES 3.0 Mesa 18.1.0-rc4
    OpenGL ES profile shading language version string: OpenGL ES GLSL ES 3.00
    OpenGL ES profile extensions:
    boby@ok-pc-01:~$ 
    

    After install new kernel and AMDGPU Pro driver, i have

    boby@ok-pc-01:~$ glxinfo | grep -i opengl
    OpenGL vendor string: Advanced Micro Devices, Inc.
    OpenGL renderer string: AMD Radeon Graphics
    OpenGL core profile version string: 4.6.13536 Core Profile Context
    OpenGL core profile shading language version string: 4.50
    OpenGL core profile context flags: (none)
    OpenGL core profile profile mask: core profile
    OpenGL core profile extensions:
    OpenGL version string: 4.5.13536 Compatibility Profile Context
    OpenGL shading language version string: 4.50
    OpenGL context flags: (none)
    OpenGL profile mask: compatibility profile
    OpenGL extensions:
    OpenGL ES profile version string: 4.5.13536 Compatibility Profile Context
    OpenGL ES profile shading language version string: 4.50
    OpenGL ES profile extensions:
    boby@ok-pc-01:~$ 
    

    With latest mainline kernal (no AMDGPU PRO)

    boby@ok-pc-01:~$ glxinfo | grep -i opengl
    OpenGL vendor string: X.Org
    OpenGL renderer string: AMD RAVEN (DRM 3.27.0 / 4.19.0-041900rc6-generic, LLVM 6.0.0)
    OpenGL core profile version string: 4.5 (Core Profile) Mesa 18.0.5
    OpenGL core profile shading language version string: 4.50
    OpenGL core profile context flags: (none)
    OpenGL core profile profile mask: core profile
    OpenGL core profile extensions:
    OpenGL version string: 3.0 Mesa 18.0.5
    OpenGL shading language version string: 1.30
    OpenGL context flags: (none)
    OpenGL extensions:
    OpenGL ES profile version string: OpenGL ES 3.1 Mesa 18.0.5
    OpenGL ES profile shading language version string: OpenGL ES GLSL ES 3.10
    OpenGL ES profile extensions:
    boby@ok-pc-01:~$ 
    

    If you don’t install newer kernel, amdgpu-pro-install install will FAIL, i get some segmentation fault.