Tag: Ubuntu

  • How to Disable apt Ubuntu Pro Advertisement

    How to Disable apt Ubuntu Pro Advertisement

    On running “apt upgrade” command on Ubuntu 20.04 and newer, Ubuntu shows an advertisement about Ubuntu Pro subscription.

    apt Ubuntu Pro advertisement

    To disable the Ubuntu Pro advertisement that appears when updating apt, run

    sudo mv /etc/apt/apt.conf.d/20apt-esm-hook.conf /etc/apt/apt.conf.d/20apt-esm-hook.conf.bak
    sudo touch /etc/apt/apt.conf.d/20apt-esm-hook.conf

    After running these commands, running “apt upgrade”, you won’t get the Ubuntu Pro advertisement.

    apt ubuntu pro advertisements disabled

    Back to Ubuntu

  • How to Install MySQL 5.7 on Ubuntu 22.04

    How to Install MySQL 5.7 on Ubuntu 22.04

    MySQL 5.7 is not supported on Ubuntu 22.04, but you can download MySQL 5.7 for Ubuntu 18.04 and install it on Ubuntu 20.04 or Ubuntu 22.04

    First, install libtinfo5, this is available for download from https://launchpad.net/ubuntu/bionic/amd64/libtinfo5/6.1-1ubuntu1.18.04

    cd ~/
    wget http://launchpadlibrarian.net/371711898/libtinfo5_6.1-1ubuntu1.18.04_amd64.deb
    dpkg -i libtinfo5_6.1-1ubuntu1.18.04_amd64.deb

    The files are moved from the Offical MySQL site

    https://dev.mysql.com/downloads/mysql/5.7.html

    So we will download it from a mirror site. If the mirror is down, you can search with the .deb file name to find another mirror.

    mkdir ~/mysql57
    cd ~/mysql57
    wget https://mirror.csclub.uwaterloo.ca/mysql/Downloads/MySQL-5.7/libmysqlclient-dev_5.7.38-1ubuntu18.04_amd64.deb
    wget https://mirror.csclub.uwaterloo.ca/mysql/Downloads/MySQL-5.7/libmysqlclient20_5.7.38-1ubuntu18.04_amd64.deb
    wget https://mirror.csclub.uwaterloo.ca/mysql/Downloads/MySQL-5.7/libmysqld-dev_5.7.38-1ubuntu18.04_amd64.deb
    wget https://mirror.csclub.uwaterloo.ca/mysql/Downloads/MySQL-5.7/mysql-client_5.7.38-1ubuntu18.04_amd64.deb
    wget https://mirror.csclub.uwaterloo.ca/mysql/Downloads/MySQL-5.7/mysql-common_5.7.38-1ubuntu18.04_amd64.deb
    wget https://mirror.csclub.uwaterloo.ca/mysql/Downloads/MySQL-5.7/mysql-community-client_5.7.38-1ubuntu18.04_amd64.deb
    wget https://mirror.csclub.uwaterloo.ca/mysql/Downloads/MySQL-5.7/mysql-community-server_5.7.38-1ubuntu18.04_amd64.deb
    wget https://mirror.csclub.uwaterloo.ca/mysql/Downloads/MySQL-5.7/mysql-community-source_5.7.38-1ubuntu18.04_amd64.deb
    wget https://mirror.csclub.uwaterloo.ca/mysql/Downloads/MySQL-5.7/mysql-community-test_5.7.38-1ubuntu18.04_amd64.deb
    wget https://mirror.csclub.uwaterloo.ca/mysql/Downloads/MySQL-5.7/mysql-server_5.7.38-1ubuntu18.04_amd64.deb
    wget https://mirror.csclub.uwaterloo.ca/mysql/Downloads/MySQL-5.7/mysql-testsuite_5.7.38-1ubuntu18.04_amd64.deb
    dpkg -i *.deb
    apt install -f

    To start MySQL on boot, run

    systemctl enable mysql

    To start MySQL, run

    systemctl start mysql

    Back to MySQL Installation

  • rsyslog Unsafe symlinks encountered in /var/log, refusing

    rsyslog Unsafe symlinks encountered in /var/log, refusing

    When updating packages on an Ubuntu server, I got the error “Unsafe symlinks encountered in /var/log, refusing.”.

    root@ip-172-31-45-33:/var# apt upgrade -y
    Reading package lists... Done
    Building dependency tree       
    Reading state information... Done
    Calculating upgrade... Done
    0 upgraded, 0 newly installed, 0 to remove and 0 not upgraded.
    1 not fully installed or removed.
    After this operation, 0 B of additional disk space will be used.
    Setting up rsyslog (8.32.0-1ubuntu4.2) ...
    The user `syslog' is already a member of `adm'.
    Unsafe symlinks encountered in /var/log, refusing.
    dpkg: error processing package rsyslog (--configure):
     installed rsyslog package post-installation script subprocess returned error exit status 1
    Errors were encountered while processing:
     rsyslog
    E: Sub-process /usr/bin/dpkg returned an error code (1)
    root@ip-172-31-45-33:/var#
    

    This is due to wrong file ownership for /var/log folder.

    I found the directory “/var” was owned by user www-data

    root@ip-172-31-45-33:/var# ls -l / | grep var
    drwxr-xr-x  15 www-data www-data  4096 Sep  1  2021 var
    root@ip-172-31-45-33:/var#
    

    To fix the error I changed ownership of /var directory to root user.

    chown root:root /var
    

    IMPORTANT: Do not use chown -R as the /var folder contains files owned by different users, if you change all file/folder ownership to root, it will mess up the system. For example /var/log/mysql need to be owned by user “mysql”, if you change it to the user “root”, MySQL will fail to start.

    You may also need to check ownership of folder /var/log and files inside. You can compare it with another Ubuntu server to make sure directory/file ownerships are correct.

    Back to apt

  • Install CSF firewall on Ubuntu Server

    Install CSF firewall on Ubuntu Server

    First, install libwww-perl package needed for CSF firewall

    apt -y install libwww-perl
    

    Install CSF with

    cd /usr/local/src
    wget https://download.configserver.com/csf.tgz
    tar -xzf csf.tgz
    cd csf
    sh install.sh
    

    Change following settings in csf.conf file

    /bin/sed -i "s/RESTRICT_SYSLOG\s*=.*$/RESTRICT_SYSLOG = \"3\"/g" /etc/csf/csf.conf
    /bin/sed -i "s/SYSLOG_CHECK\s*=.*$/SYSLOG_CHECK = \"3600\"/g" /etc/csf/csf.conf
    /bin/sed -i "s/TESTING = \"1\"/TESTING = \"0\"/g" /etc/csf/csf.conf
    

    If you need GUI enabled, edit file

    vi /etc/csf/csf.conf
    

    Modify following settings

    UI = "1"
    UI_PORT = "8282"
    UI_USER = "username"
    UI_PASS = "password"
    UI_ALLOW = "0"
    
  • How to Migrate Linux Server with rsync

    How to Migrate Linux Server with rsync

    A few days ago I wanted to Migrate an Ubuntu VPS from one provider to another. I tried to take a snapshot and try to migrate, but it did not work. The VPS had few random services, so migrating services one by one was not easy. What I did was set up a new Ubuntu VPS with the same OS version, rsync files from source VPS to new VPS.

    Make sure you take a backup of your server before doing it. In case anything goes wrong, you should be able to restore from back or OS reload.

    Install rsync on source and destination servers.

    For Ubuntu/Debian

    apt install rsync

    For RHEL/CentOS/AlmaLinux

    yum install rsync

    On the source server, create a file

    vi /root/no_copy

    add the following content

    /boot/
    /etc/modules
    /etc/fstab
    /etc/mtab
    /etc/netplan/
    /etc/network/
    /etc/sysconfig/network-scripts/
    /lib/modules
    lost+found/
    /sys/
    /proc/
    /dev/
    /var/cache/
    /var/log/journal/
    /swapfile
    /swap.img
    /usr/tmpDSK
    /root/.ssh/
    /backup/
    /home/virtfs/

    These files won’t be copied to the new VPS. If you don’t have any other folders or files, that you don’t want to be copied to the new server, you can add to the list.

    Now run rsync on the source server to copy over files to the new server

    rsync -avzPHAX --exclude-from=/root/no_copy / root@NEW_SERVER_IP:/

    In the command above, replace NEW_SERVER_IP with the new server IP address.

    When we do rsync, all files get copied to the new server. After the first rsync run, you can run the rsync command any number of times, only changed files copied, and will finish much faster as less data need to be copied to the new server.

    After the first rsync is completed, we will stop all services on the source and destination servers like MySQL, Apache, Nginx, etc… so no data gets changed while we doing the rsync. Now do another rsync, reboot the destination server, see if everything works fine.

    See rsync

  • How to verify installed packages on Ubuntu/Debian

    How to verify installed packages on Ubuntu/Debian

    To verify the integrity of installed packages, you can use debsums utility. First of all install debsums with command

    apt install -y debsums
    

    To verify packages, run

    debsums -s
    

    To verify a package

    debsums PKG_NAME
    

    If you find any packages with missing files, you can reinstall them with the command

    apt reinstall PKG_NAME
    
  • Convert image to WebP format in Ubuntu

    Convert image to WebP format in Ubuntu

    WebP is an image format for web by Google. The size of webp images are much smaller compared with other image formats, so better to use webp images on websites for faster site load speed.

    To install webp on Ubuntu/Debian, run

    sudo apt install webp
    

    To convert an image to webp format, run

    cwebp image.png -o image.webp
    

    With the above command, image.png file gets converted to image.webp

    You can specify quality with -q option

    -q  ............. quality factor (0:small..100:big), default=75
    

    To view a webp image, run

    vwebp image.webp
    
  • How to disable GUI in Ubuntu

    How to disable GUI in Ubuntu

    If you have installed Ubuntu with GUI and don’t want GUI, you can disable GUI from starting on boot with command

    systemctl set-default multi-user
    

    If you need to GUI auto-start on boot, run

    systemctl set-default graphical.target
    
  • bash: locale-gen: command not found

    bash: locale-gen: command not found

    When I run locale-gen command, i get the following error

    root@netmon1:~# locale-gen en_US.UTF-8
    bash: locale-gen: command not found
    root@netmon1:~# 
    

    To see which package provide the locale-gen command, run

    boby@sok-01:~$ dpkg -S /usr/sbin/locale-gen
    locales: /usr/sbin/locale-gen
    boby@sok-01:~$ 
    

    The command locale-gen is provided by package locales. To fix the error install package “locales” with the command

    apt install -y locales
    

    See locale-gen

  • Ant Media Server Ubuntu firewall configuration

    Ant Media Server Ubuntu firewall configuration

    To enable firewal for Ant Media Server on Ubnuntu server, use following rules

    ufw allow ssh
    ufw allow http
    ufw allow https
    ufw allow 1935/tcp
    ufw allow 5080/tcp
    ufw allow 5443/tcp
    ufw allow 5000:65000/udp
    enable ufw
    

    After enabling, you will have following status

    root@server:~# ufw status
    Status: active
    
    To                         Action      From
    --                         ------      ----
    22/tcp                     ALLOW       Anywhere                  
    80/tcp                     ALLOW       Anywhere                  
    443/tcp                    ALLOW       Anywhere                  
    1935/tcp                   ALLOW       Anywhere                  
    5080/tcp                   ALLOW       Anywhere                  
    5443/tcp                   ALLOW       Anywhere                  
    5000:65000/udp             ALLOW       Anywhere                  
    22/tcp (v6)                ALLOW       Anywhere (v6)             
    80/tcp (v6)                ALLOW       Anywhere (v6)             
    443/tcp (v6)               ALLOW       Anywhere (v6)             
    1935/tcp (v6)              ALLOW       Anywhere (v6)             
    5080/tcp (v6)              ALLOW       Anywhere (v6)             
    5443/tcp (v6)              ALLOW       Anywhere (v6)             
    5000:65000/udp (v6)        ALLOW       Anywhere (v6)             
    
    root@server:~# 
    

    Port forwarding

    You can forward port 80 and 443 to Ant Media Server, so you don’t have to use ports.

    You can use following iptables commands

    sudo iptables -t nat -A PREROUTING -p tcp --dport 80 -j REDIRECT --to-port 5080
    sudo iptables -t nat -A PREROUTING -p tcp --dport 443 -j REDIRECT --to-port 5443
    

    To make it permanent, edit

    vi /etc/ufw/before.rules
    

    In the beginning of the file, find

    *filter
    

    Add above

    *nat
    :PREROUTING ACCEPT [0:0]
    -A PREROUTING -p tcp --dport 80 -j REDIRECT --to-port 5080
    -A PREROUTING -p tcp --dport 443 -j REDIRECT --to-port 5443
    COMMIT
    

    Restart ufw firewall

    ufw disable
    ufw enable
    

    See Ant Media Server

  • Reinstall Kernel in Ubuntu/Debian

    Reinstall Kernel in Ubuntu/Debian

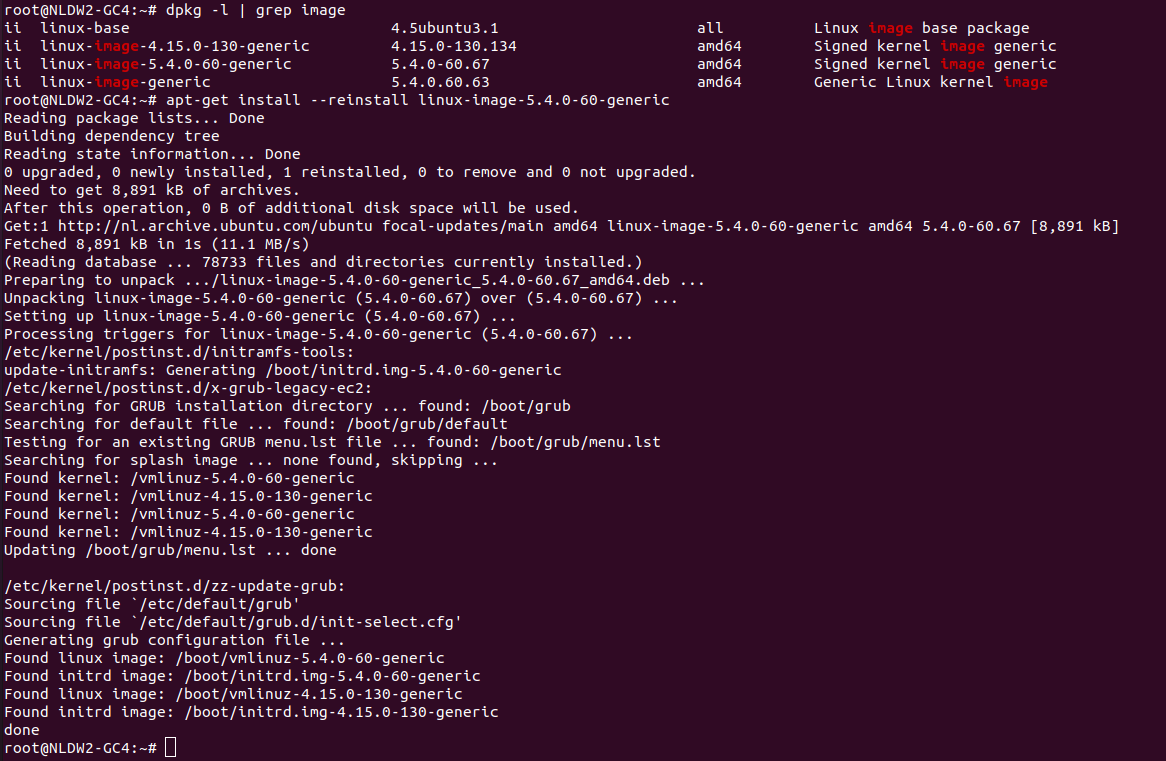
    To reinstall Kernel in Ubunru, you need to find the version of kernal installed, for this run

    dpkg -l | grep linux-image
    

    Or you can use command, find the kernel version you need to install

    apt-cache search linux-image
    

    Once you have the name of linux-image package you need to install, you can run

    apt-get install --reinstall PKG_NAME_HERE
    

    Example

    reinstall ubuntu kernel

    See apt, Ubuntu, Debian

  • install Shotcut Video Editor in ubuntu

    Shotcut is an free open source video editor for Ubuntu. You can find more info at

    https://shotcut.org

    Latest version of Shotcut video editor can be installed on Ubuntu using command

    sudo snap install shotcut --classic
    

    shotcut is also available to be installed from apt, but this is slightly older version than snap. To install from apt, use command

    sudo apt install shotcut
    

    See Ubuntu